说明
【跟月影学可视化】学习笔记。
什么是镜面反射?
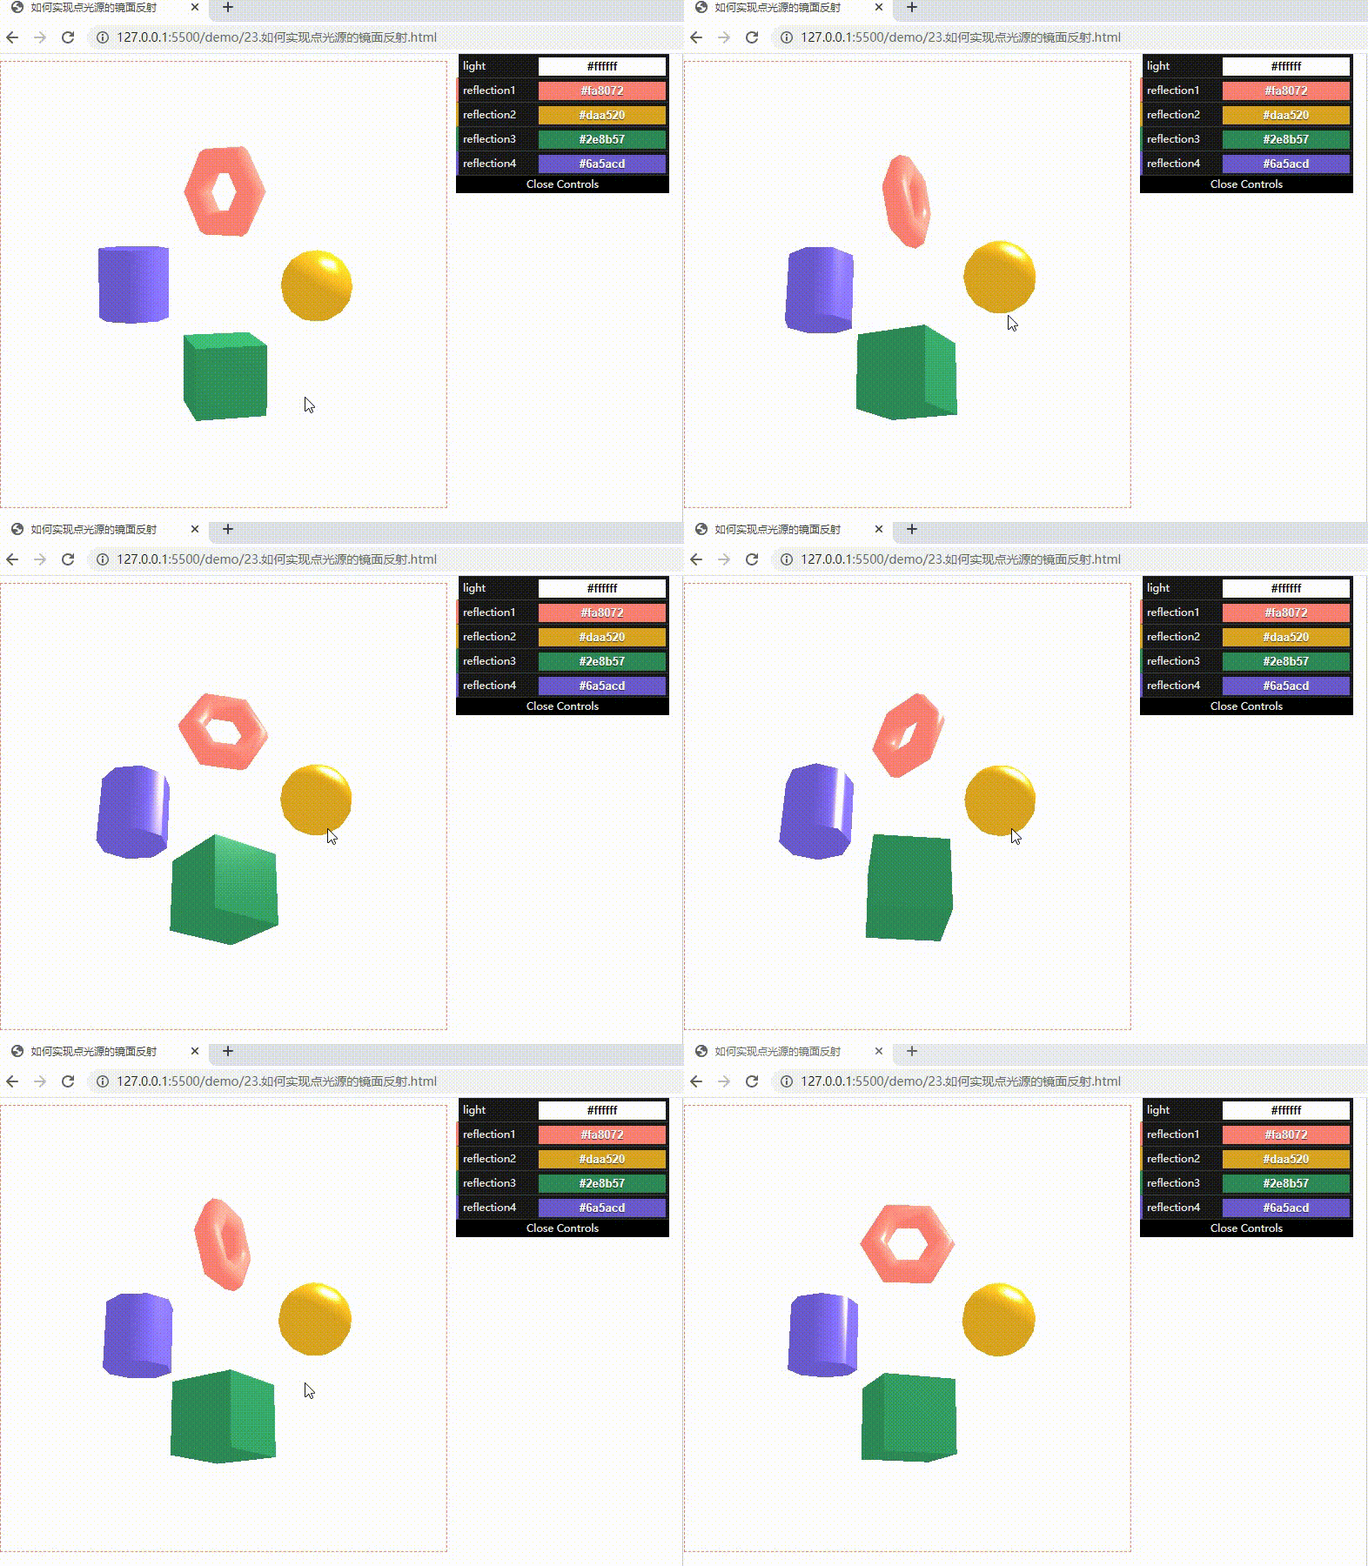
如果若干平行光照射在表面光滑的物体上,反射出来的光依然平行,这种反射就是镜面反射。越光滑的材质,它的镜面反射效果也就越强,并且物体表面会有闪耀的光斑,也叫镜面高光。
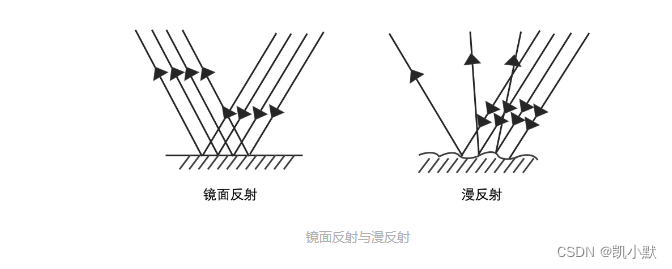
镜面反射的性质:入射光与法线的夹角等于反射光与法线的夹角。
如何实现有向光的镜面反射?
实现镜面反射效果的步骤:
- 求出反射光线的方向向量
- 根据相机位置计算视线与反射光线夹角的余弦
- 使用系数和指数函数设置镜面反射强度
- 将漫反射和镜面反射结合起来,让距离光源近的物体上形成光斑
下面以点光源为例来实现光斑:
<!DOCTYPE html>
<html lang="en">
    <head>
        <meta charset="UTF-8" />
        <meta http-equiv="X-UA-Compatible" content="IE=edge" />
        <meta name="viewport" content="width=device-width, initial-scale=1.0" />
        <title>如何实现点光源的镜面反射</title>
        <style>
            canvas {
                border: 1px dashed #fa8072;
            }
        </style>
    </head>
    <body>
        <canvas width="512" height="512"></canvas>
        <script type="module">
            import { Renderer, Camera, Transform, Sphere, Box, Cylinder, Torus, Orbit, Program, Mesh, Color } from './common/lib/ogl/index.mjs';
            // JavaScript Controller Library
            import * as dat from './common/lib/dat.gui.js';
            console.log(dat)

            const canvas = document.querySelector('canvas');
            const renderer = new Renderer({
                canvas,
                width: 512,
                height: 512,
            });

            const gl = renderer.gl;
            gl.clearColor(1, 1, 1, 1);
            const camera = new Camera(gl, {fov: 35});
            camera.position.set(0, 0, 10);
            camera.lookAt([0, 0, 0]);

            const scene = new Transform();

            // 在顶点着色器中,将物体变换后的坐标传给片元着色器
            const vertex = `
                precision highp float;

                attribute vec3 position;
                attribute vec3 normal;
                uniform mat4 modelViewMatrix;
                uniform mat4 viewMatrix;
                uniform mat4 projectionMatrix;
                uniform mat3 normalMatrix;
                uniform vec3 cameraPosition;

                varying vec3 vNormal;
                varying vec3 vPos;
                varying vec3 vCameraPos;

                void main() {
                    vec4 pos = modelViewMatrix * vec4(position, 1.0);
                    vPos = pos.xyz;
                    // 求光源与点坐标的方向向量
                    vCameraPos = (viewMatrix * vec4(cameraPosition, 1.0)).xyz;
                    vNormal = normalize(normalMatrix * normal);
                    gl_Position = projectionMatrix * pos;
                }
            `;

            // 传入环境光 ambientLight 和材质反射率 materialReflection
            // 片元着色器中计算光线方向与法向量夹角的余弦
            const fragment = `
                precision highp float;

                uniform vec3 ambientLight;
                uniform vec3 materialReflection;
                uniform vec3 pointLightColor;
                uniform vec3 pointLightPosition;
                uniform mat4 viewMatrix;
                uniform vec3 pointLightDecayFactor;

                varying vec3 vNormal;
                varying vec3 vPos;
                varying vec3 vCameraPos;

                void main() {
                    // 光线到点坐标的方向
                    vec3 dir = (viewMatrix * vec4(pointLightPosition, 1.0)).xyz - vPos;

                    // 光线到点坐标的距离,用来计算衰减
                    float dis = length(dir);

                    // 归一化
                    dir = normalize(dir);

                    // 与法线夹角余弦
                    float cos = max(dot(normalize(dir), vNormal), 0.0);

                    // 反射光线:使用 GLSL 的内置函数 reflect,这个函数能够返回一个向量相对于某个法向量的反射向量
                    vec3 reflectionLight = reflect(-dir, vNormal);
                    vec3 eyeDirection = vCameraPos - vPos;
                    eyeDirection = normalize(eyeDirection);

                    // 与视线夹角余弦
                    float eyeCos = max(dot(eyeDirection, reflectionLight), 0.0);

                    // 镜面反射:指数取 20.0,系数取 3.0。
                    // 指数越大,镜面越聚焦,高光的光斑范围就越小。
                    // 系数能改变反射亮度,系数越大,反射的亮度就越高。
                    float specular = 3.0 *  pow(eyeCos, 20.0);

                    // 计算衰减
                    float decay = min(1.0, 1.0 /
                        (pointLightDecayFactor.x * pow(dis, 2.0) + pointLightDecayFactor.y * dis + pointLightDecayFactor.z));

                    // 计算漫反射
                    vec3 diffuse = decay * cos * pointLightColor;

                    // 合成颜色
                    gl_FragColor.rgb = specular + (ambientLight + diffuse) * materialReflection;
                    gl_FragColor.a = 1.0;
                }
            `;

            // 创建四个不同的几何体,初始化它们的环境光 ambientLight 以及材质反射率 materialReflection
            const sphereGeometry = new Sphere(gl);
            const cubeGeometry = new Box(gl);
            const cylinderGeometry = new Cylinder(gl);
            const torusGeometry = new Torus(gl);

            // 添加一个水平向右的白色平行光
            const ambientLight = { value: [1, 1, 1] };

            const directional = {
                pointLightPosition: { value: [3, 3, 0] },
                pointLightColor: { value: [0.5, 0.5, 0.5] },
                pointLightDecayFactor: { value: [0, 0, 1] },
            };

            const program1 = new Program(gl, {
                vertex,
                fragment,
                uniforms: {
                    ambientLight,
                    materialReflection: {value: [250/255, 128/255, 114/255]},
                    ...directional
                },
            });
            const program2 = new Program(gl, {
                vertex,
                fragment,
                uniforms: {
                    ambientLight,
                    materialReflection: {value: [218/255, 165/255, 32/255]},
                    ...directional
                },
            });
            const program3 = new Program(gl, {
                vertex,
                fragment,
                uniforms: {
                    ambientLight,
                    materialReflection: {value: [46/255, 139/255, 87/255]},
                    ...directional
                },
            });
            const program4 = new Program(gl, {
                vertex,
                fragment,
                uniforms: {
                    ambientLight,
                    materialReflection: {value: [106/255, 90/255, 205/255]},
                    ...directional
                },
            });

            const torus = new Mesh(gl, {geometry: torusGeometry, program: program1});
            torus.position.set(0, 1.3, 0);
            torus.setParent(scene);

            const sphere = new Mesh(gl, {geometry: sphereGeometry, program: program2});
            sphere.position.set(1.3, 0, 0);
            sphere.setParent(scene);

            const cube = new Mesh(gl, {geometry: cubeGeometry, program: program3});
            cube.position.set(0, -1.3, 0);
            cube.setParent(scene);

            const cylinder = new Mesh(gl, {geometry: cylinderGeometry, program: program4});
            cylinder.position.set(-1.3, 0, 0);
            cylinder.setParent(scene);

            const controls = new Orbit(camera);

            // 添加动画
            requestAnimationFrame(update);
            function update() {
                requestAnimationFrame(update);
                controls.update();

                torus.rotation.y -= 0.02;
                sphere.rotation.y -= 0.03;
                cube.rotation.y -= 0.04;
                cylinder.rotation.y -= 0.02;

                renderer.render({scene, camera});
            }

            // 添加控制
            const gui = new dat.GUI();
            const palette = {
                light: '#FFFFFF',
                reflection1: '#fa8072', // salmon rgb(250, 128, 114) [250/255, 128/255, 114/255, 1]
                reflection2: '#daa520', // goldenrod rgb(218, 165, 32) [218/255, 165/255, 32/255, 1]
                reflection3: '#2e8b57', // seagreen rgb(46, 139, 87) [46/255, 139/255, 87/255, 1]
                reflection4: '#6a5acd', // slateblue rgb(106, 90, 205) [106/255, 90/255, 205/255, 1]
            };
            gui.addColor(palette, 'light').onChange((val) => {
                const color = new Color(val);
                program1.uniforms.ambientLight.value = color;
                program2.uniforms.ambientLight.value = color;
                program3.uniforms.ambientLight.value = color;
                program4.uniforms.ambientLight.value = color;
            });
            gui.addColor(palette, 'reflection1').onChange((val) => {
                program1.uniforms.materialReflection.value = new Color(val);
            });
            gui.addColor(palette, 'reflection2').onChange((val) => {
                program2.uniforms.materialReflection.value = new Color(val);
            });
            gui.addColor(palette, 'reflection3').onChange((val) => {
                program3.uniforms.materialReflection.value = new Color(val);
            });
            gui.addColor(palette, 'reflection4').onChange((val) => {
                program4.uniforms.materialReflection.value = new Color(val);
            });
        </script>
    </body>
</html>
什么是 Phong 反射模型?
冯氏反射模型是由美国犹他大学(University of Utah)的 Bui Tuong Phong 于1975年在他的博士论文中提出的,都用其名字命名。
Phong 光照模型是真实图形学中提出的第一个有影响的光照明模型,该模型只考虑物体对直接光照的反射作用,认为环境光是常量,没有考虑物体之间相互的反射光,物体间的反射光只用环境光表示。Phong光照模型属于简单光照模型。
Phong 模型认为物体表面反射光线由三部分组成:
- 环境光(Ambient):场景中的其他间接光照
- 漫反射(Diffuse):散射部分(大但不光亮)
- 高光反射(Specular):镜面反射部分(小而亮)

在上图中,光线是白色的,环境光和漫反射部分是蓝色的,高光部分是白色的。
高光部分反射的光区域比较小,但强度很大;漫反射部分的强度根据物体表面方向的不同而不同;而环境光部分是跟方向无关的。
Phong 反射模型的完整公式如下:

光源部分:
lights:所有光源的集合,对于每盏光,可分为高光和漫反射两部分- i s i_s is:光源高光部分的强度(可以理解为就是RGB)
- i d i_d id:光源漫反射部分的强度(可以理解为就是RGB)
- i a i_a ia:环境光部分的强度(可以理解为就是RGB)
场景中材质的参数:
- k s k_s ks:对入射光的高光反射常数(镜面反射系数)
- k d k_d kd:对入射光的漫反射常数
- k a k_a ka:对环境光的反射常数
α:是和物体材质有关的常量,决定了镜面高光的范围。光泽度α越大,则亮点越小。
几个向量(全部归一化):
- L m ^ \hat{L_m} Lm^:物体表面某点指向光源m的位置的向量
- N ^ \hat{N} N^:物体表面某点的法线
- R m ^ \hat{R_m} Rm^:光源在物体表面某点发生镜面反射的方向
- V ^ \hat{V} V^:物体表面某点指向摄像机位置的向量
如何实现完整的 Phong 反射模型?
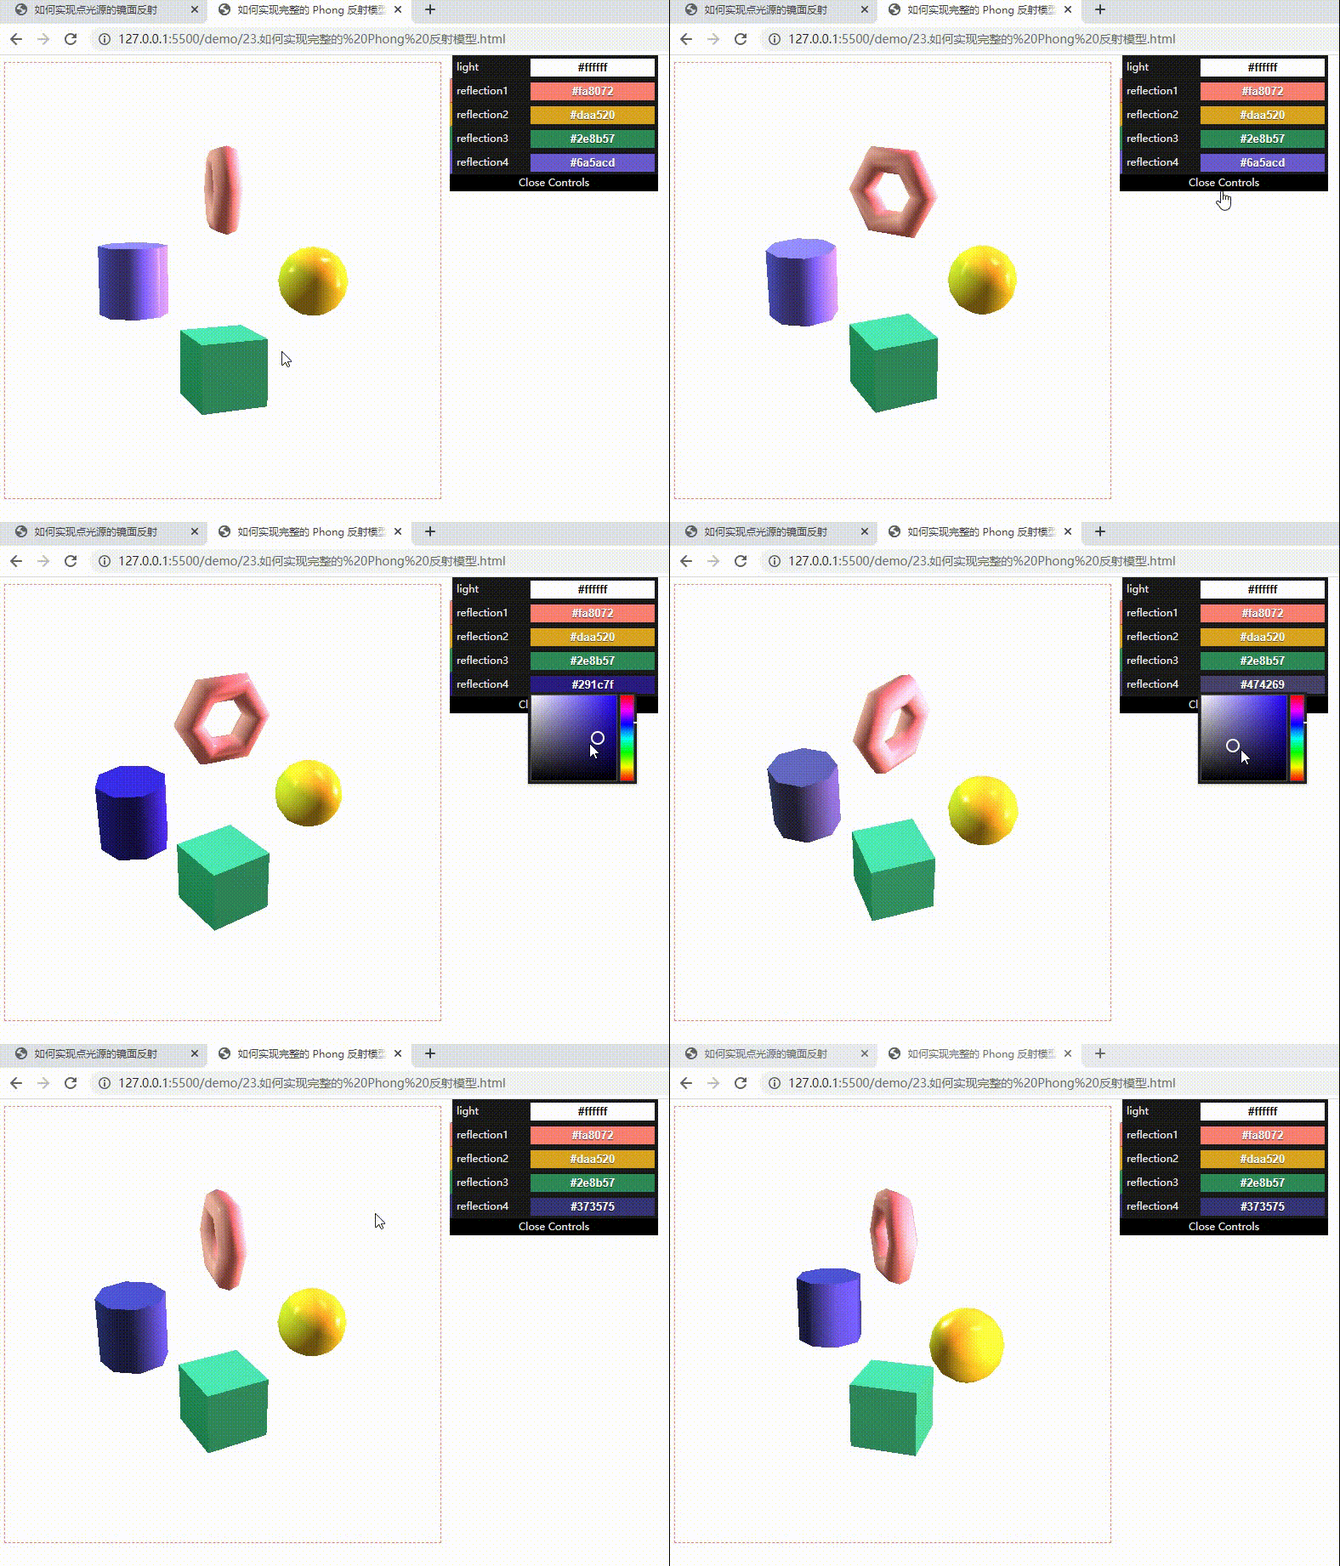
Phong 反射模型的实现整个过程分为三步:定义光源模型、定义几何体材质和实现着色器。
1、定义光源模型
| 属性(作用) /光源 | 点光源 | 平行光 | 聚光灯 |
|---|---|---|---|
direction 方向 (定义光照方向) | 无 | 有 | 有 |
position 位置 (定义光源位置) | 有 | 无 | 有 |
color 颜色 (定义光的颜色) | 有 | 有 | 有 |
decay 衰减 (光强度随着距离而减小) | 有 | 无 | 有 |
angle 角度 (光传播的角度范围) | 无 | 无 | 有 |
实现定义一个 Phong 类:用于添加和删除光源,并把光源的属性通过 uniforms 访问器属性转换成对应的 uniform 变量。
class Phong {
  constructor(ambientLight = [0.5, 0.5, 0.5]) {
    this.ambientLight = ambientLight;
    this.directionalLights = new Set();
    this.pointLights = new Set();
    this.spotLights = new Set();
  }

  addLight(light) {
    const {position, direction, color, decay, angle} = light;
    if(!position && !direction) throw new TypeError('invalid light');
    light.color = color || [1, 1, 1];
    if(!position) this.directionalLights.add(light);
    else {
      light.decay = decay || [0, 0, 1];
      if(!angle) {
        this.pointLights.add(light);
      } else {
        this.spotLights.add(light);
      }
    }
  }

  removeLight(light) {
    if(this.directionalLights.has(light)) this.directionalLights.delete(light);
    else if(this.pointLights.has(light)) this.pointLights.delete(light);
    else if(this.spotLights.has(light)) this.spotLights.delete(light);
  }

  get uniforms() {
    const MAX_LIGHT_COUNT = 16; // 最多每种光源设置16个
    this._lightData = this._lightData || {};
    const lightData = this._lightData;

    lightData.directionalLightDirection = lightData.directionalLightDirection || {value: new Float32Array(MAX_LIGHT_COUNT * 3)};
    lightData.directionalLightColor = lightData.directionalLightColor || {value: new Float32Array(MAX_LIGHT_COUNT * 3)};

    lightData.pointLightPosition = lightData.pointLightPosition || {value: new Float32Array(MAX_LIGHT_COUNT * 3)};
    lightData.pointLightColor = lightData.pointLightColor || {value: new Float32Array(MAX_LIGHT_COUNT * 3)};
    lightData.pointLightDecay = lightData.pointLightDecay || {value: new Float32Array(MAX_LIGHT_COUNT * 3)};

    lightData.spotLightDirection = lightData.spotLightDirection || {value: new Float32Array(MAX_LIGHT_COUNT * 3)};
    lightData.spotLightPosition = lightData.spotLightPosition || {value: new Float32Array(MAX_LIGHT_COUNT * 3)};
    lightData.spotLightColor = lightData.spotLightColor || {value: new Float32Array(MAX_LIGHT_COUNT * 3)};
    lightData.spotLightDecay = lightData.spotLightDecay || {value: new Float32Array(MAX_LIGHT_COUNT * 3)};
    lightData.spotLightAngle = lightData.spotLightAngle || {value: new Float32Array(MAX_LIGHT_COUNT)};

    [...this.directionalLights].forEach((light, idx) => {
      lightData.directionalLightDirection.value.set(light.direction, idx * 3);
      lightData.directionalLightColor.value.set(light.color, idx * 3);
    });

    [...this.pointLights].forEach((light, idx) => {
      lightData.pointLightPosition.value.set(light.position, idx * 3);
      lightData.pointLightColor.value.set(light.color, idx * 3);
      lightData.pointLightDecay.value.set(light.decay, idx * 3);
    });

    [...this.spotLights].forEach((light, idx) => {
      lightData.spotLightPosition.value.set(light.position, idx * 3);
      lightData.spotLightColor.value.set(light.color, idx * 3);
      lightData.spotLightDecay.value.set(light.decay, idx * 3);
      lightData.spotLightDirection.value.set(light.direction, idx * 3);
      lightData.spotLightAngle.value[idx] = light.angle;
    });

    return {
      ambientLight: {value: this.ambientLight},
      ...lightData,
    };
  }
}
2、定义几何体材质
实现一个 Matrial 类,来定义物体的材质。通过 uniforms 访问器属性,获得它的 uniform 数据结构形式。
class Material {
  constructor(reflection, specularFactor = 0, shininess = 50) {
    this.reflection = reflection;
    this.specularFactor = specularFactor;
    this.shininess = shininess;
  }

  get uniforms() {
    return {
      materialReflection: {value: this.reflection},
      specularFactor: {value: this.specularFactor},
      shininess: {value: this.shininess},
    };
  }
}
3、实现着色器
下面看一下支持 phong 反射模型的片元着色器是怎么处理的。
首先声明了 vec3 和 float 数组,数组的大小为 16。
#define MAX_LIGHT_COUNT 16
uniform mat4 viewMatrix;

uniform vec3 ambientLight;
uniform vec3 directionalLightDirection[MAX_LIGHT_COUNT];
uniform vec3 directionalLightColor[MAX_LIGHT_COUNT];
uniform vec3 pointLightColor[MAX_LIGHT_COUNT];
uniform vec3 pointLightPosition[MAX_LIGHT_COUNT];
uniform vec3 pointLightDecay[MAX_LIGHT_COUNT];
uniform vec3 spotLightColor[MAX_LIGHT_COUNT];
uniform vec3 spotLightDirection[MAX_LIGHT_COUNT];
uniform vec3 spotLightPosition[MAX_LIGHT_COUNT];
uniform vec3 spotLightDecay[MAX_LIGHT_COUNT];
uniform float spotLightAngle[MAX_LIGHT_COUNT];

uniform vec3 materialReflection;
uniform float shininess;
uniform float specularFactor;

varying vec3 vNormal;
varying vec3 vPos;
varying vec3 vCameraPos;
然后实现计算 phong 反射模型的主体逻辑,循环处理每个光源,再计算入射光方向,然后计算漫反射以及镜面反射,最终将结果返回。
float getSpecular(vec3 dir, vec3 normal, vec3 eye) {
  vec3 reflectionLight = reflect(-dir, normal);
  float eyeCos = max(dot(eye, reflectionLight), 0.0);
  return specularFactor *  pow(eyeCos, shininess);
}

vec4 phongReflection(vec3 pos, vec3 normal, vec3 eye) {
  float specular = 0.0;
  vec3 diffuse = vec3(0);

  // 处理平行光
  for(int i = 0; i < MAX_LIGHT_COUNT; i++) {
    vec3 dir = directionalLightDirection[i];
    if(dir.x == 0.0 && dir.y == 0.0 && dir.z == 0.0) continue;
    vec4 d = viewMatrix * vec4(dir, 0.0);
    dir = normalize(-d.xyz);
    float cos = max(dot(dir, normal), 0.0);
    diffuse += cos * directionalLightColor[i];
    specular += getSpecular(dir, normal, eye);
  }

  // 处理点光源
  for(int i = 0; i < MAX_LIGHT_COUNT; i++) {
    vec3 decay = pointLightDecay[i];
    if(decay.x == 0.0 && decay.y == 0.0 && decay.z == 0.0) continue;
    vec3 dir = (viewMatrix * vec4(pointLightPosition[i], 1.0)).xyz - pos;
    float dis = length(dir);
    dir = normalize(dir);
    float cos = max(dot(dir, normal), 0.0);
    float d = min(1.0, 1.0 / (decay.x * pow(dis, 2.0) + decay.y * dis + decay.z));
    diffuse += d * cos * pointLightColor[i];
    specular += getSpecular(dir, normal, eye);
  }

  // 处理聚光灯
  for(int i = 0; i < MAX_LIGHT_COUNT; i++) {
    vec3 decay = spotLightDecay[i];
    if(decay.x == 0.0 && decay.y == 0.0 && decay.z == 0.0) continue;

    vec3 dir = (viewMatrix * vec4(spotLightPosition[i], 1.0)).xyz - pos;
    float dis = length(dir);
    dir = normalize(dir);

    // 聚光灯的朝向
    vec3 spotDir = (viewMatrix * vec4(spotLightDirection[i], 0.0)).xyz;
    // 通过余弦值判断夹角范围
    float ang = cos(spotLightAngle[i]);
    float r = step(ang, dot(dir, normalize(-spotDir)));

    float cos = max(dot(dir, normal), 0.0);
    float d = min(1.0, 1.0 / (decay.x * pow(dis, 2.0) + decay.y * dis + decay.z));
    diffuse += r * d * cos * spotLightColor[i];
    specular += r * getSpecular(dir, normal, eye);
  }

  return vec4(diffuse, specular);
}
最后,在 main 函数中,调用 phongReflection 函数来合成颜色。
void main() {
  vec3 eyeDirection = normalize(vCameraPos - vPos);
  vec4 phong = phongReflection(vPos, vNormal, eyeDirection);

  // 合成颜色
  gl_FragColor.rgb = phong.w + (phong.xyz + ambientLight) * materialReflection;
  gl_FragColor.a = 1.0;
}
下面实战尝试一下:
<!DOCTYPE html>
<html lang="en">
<head>
<meta charset="UTF-8" />
<meta http-equiv="X-UA-Compatible" content="IE=edge" />
<meta name="viewport" content="width=device-width, initial-scale=1.0" />
<title>如何实现完整的 Phong 反射模型</title>
<style>
canvas {
border: 1px dashed #fa8072;
}
</style>
</head>
<body>
<canvas width="512" height="512"></canvas>
<script type="module">
import { Renderer, Camera, Transform, Sphere, Box, Cylinder, Torus, Orbit, Program, Mesh, Color } from './common/lib/ogl/index.mjs';
// JavaScript Controller Library
import * as dat from './common/lib/dat.gui.js';
console.log(dat)
// 用于添加和删除光源
class Phong {
constructor(ambientLight = [0.5, 0.5, 0.5]) {
this.ambientLight = ambientLight;
this.directionalLights = new Set();
this.pointLights = new Set();
this.spotLights = new Set();
}
addLight(light) {
const {position, direction, color, decay, angle} = light;
if(!position && !direction) throw new TypeError('invalid light');
light.color = color || [1, 1, 1];
if(!position) this.directionalLights.add(light);
else {
light.decay = decay || [0, 0, 1];
if(!angle) {
this.pointLights.add(light);
} else {
this.spotLights.add(light);
}
}
}
removeLight(light) {
if(this.directionalLights.has(light)) this.directionalLights.delete(light);
else if(this.pointLights.has(light)) this.pointLights.delete(light);
else if(this.spotLights.has(light)) this.spotLights.delete(light);
}
get uniforms() {
const MAX_LIGHT_COUNT = 16; // 最多每种光源设置16个
this._lightData = this._lightData || {};
const lightData = this._lightData;
lightData.directionalLightDirection = lightData.directionalLightDirection || {value: new Float32Array(MAX_LIGHT_COUNT * 3)};
lightData.directionalLightColor = lightData.directionalLightColor || {value: new Float32Array(MAX_LIGHT_COUNT * 3)};
lightData.pointLightPosition = lightData.pointLightPosition || {value: new Float32Array(MAX_LIGHT_COUNT * 3)};
lightData.pointLightColor = lightData.pointLightColor || {value: new Float32Array(MAX_LIGHT_COUNT * 3)};
lightData.pointLightDecay = lightData.pointLightDecay || {value: new Float32Array(MAX_LIGHT_COUNT * 3)};
lightData.spotLightDirection = lightData.spotLightDirection || {value: new Float32Array(MAX_LIGHT_COUNT * 3)};
lightData.spotLightPosition = lightData.spotLightPosition || {value: new Float32Array(MAX_LIGHT_COUNT * 3)};
lightData.spotLightColor = lightData.spotLightColor || {value: new Float32Array(MAX_LIGHT_COUNT * 3)};
lightData.spotLightDecay = lightData.spotLightDecay || {value: new Float32Array(MAX_LIGHT_COUNT * 3)};
lightData.spotLightAngle = lightData.spotLightAngle || {value: new Float32Array(MAX_LIGHT_COUNT)};
[...this.directionalLights].forEach((light, idx) => {
lightData.directionalLightDirection.value.set(light.direction, idx * 3);
lightData.directionalLightColor.value.set(light.color, idx * 3);
});
[...this.pointLights].forEach((light, idx) => {
lightData.pointLightPosition.value.set(light.position, idx * 3);
lightData.pointLightColor.value.set(light.color, idx * 3);
lightData.pointLightDecay.value.set(light.decay, idx * 3);
});
[...this.spotLights].forEach((light, idx) => {
lightData.spotLightPosition.value.set(light.position, idx * 3);
lightData.spotLightColor.value.set(light.color, idx * 3);
lightData.spotLightDecay.value.set(light.decay, idx * 3);
lightData.spotLightDirection.value.set(light.direction, idx * 3);
lightData.spotLightAngle.value[idx] = light.angle;
});
return {
ambientLight: {value: this.ambientLight},
...lightData,
};
}
}
// 用于定义物体的材质
class Material {
constructor(reflection, specularFactor = 0, shininess = 50) {
this.reflection = reflection;
this.specularFactor = specularFactor;
this.shininess = shininess;
}
get uniforms() {
return {
materialReflection: {value: this.reflection},
specularFactor: {value: this.specularFactor},
shininess: {value: this.shininess},
};
}
}
const canvas = document.querySelector('canvas');
const renderer = new Renderer({
canvas,
width: 512,
height: 512,
});
const gl = renderer.gl;
gl.clearColor(1, 1, 1, 1);
const camera = new Camera(gl, {fov: 35});
camera.position.set(0, 0, 10);
camera.lookAt([0, 0, 0]);
const scene = new Transform();
// 在顶点着色器中,将物体变换后的坐标传给片元着色器
const vertex = `
precision highp float;
attribute vec3 position;
attribute vec3 normal;
uniform mat4 modelViewMatrix;
uniform mat4 viewMatrix;
uniform mat4 projectionMatrix;
uniform mat3 normalMatrix;
uniform vec3 cameraPosition;
varying vec3 vNormal;
varying vec3 vPos;
varying vec3 vCameraPos;
void main() {
vec4 pos = modelViewMatrix * vec4(position, 1.0);
vPos = pos.xyz;
// 求光源与点坐标的方向向量
vCameraPos = (viewMatrix * vec4(cameraPosition, 1.0)).xyz;
vNormal = normalize(normalMatrix * normal);
gl_Position = projectionMatrix * pos;
}
`;
// 传入环境光 ambientLight 和材质反射率 materialReflection
// 片元着色器中计算光线方向与法向量夹角的余弦
const fragment = `
precision highp float;
#define MAX_LIGHT_COUNT 16
uniform mat4 viewMatrix;
uniform vec3 ambientLight;
uniform vec3 directionalLightDirection[MAX_LIGHT_COUNT];
uniform vec3 directionalLightColor[MAX_LIGHT_COUNT];
uniform vec3 pointLightColor[MAX_LIGHT_COUNT];
uniform vec3 pointLightPosition[MAX_LIGHT_COUNT];
uniform vec3 pointLightDecay[MAX_LIGHT_COUNT];
uniform vec3 spotLightColor[MAX_LIGHT_COUNT];
uniform vec3 spotLightDirection[MAX_LIGHT_COUNT];
uniform vec3 spotLightPosition[MAX_LIGHT_COUNT];
uniform vec3 spotLightDecay[MAX_LIGHT_COUNT];
uniform float spotLightAngle[MAX_LIGHT_COUNT];
uniform vec3 materialReflection;
uniform float shininess;
uniform float specularFactor;
varying vec3 vNormal;
varying vec3 vPos;
varying vec3 vCameraPos;
float getSpecular(vec3 dir, vec3 normal, vec3 eye) {
vec3 reflectionLight = reflect(-dir, normal);
float eyeCos = max(dot(eye, reflectionLight), 0.0);
return specularFactor * pow(eyeCos, shininess);
}
vec4 phongReflection(vec3 pos, vec3 normal, vec3 eye) {
float specular = 0.0;
vec3 diffuse = vec3(0);
// 处理平行光
for(int i = 0; i < MAX_LIGHT_COUNT; i++) {
vec3 dir = directionalLightDirection[i];
if(dir.x == 0.0 && dir.y == 0.0 && dir.z == 0.0) continue;
vec4 d = viewMatrix * vec4(dir, 0.0);
dir = normalize(-d.xyz);
float cos = max(dot(dir, normal), 0.0);
diffuse += cos * directionalLightColor[i];
specular += getSpecular(dir, normal, eye);
}
// 处理点光源
for(int i = 0; i < MAX_LIGHT_COUNT; i++) {
vec3 decay = pointLightDecay[i];
if(decay.x == 0.0 && decay.y == 0.0 && decay.z == 0.0) continue;
vec3 dir = (viewMatrix * vec4(pointLightPosition[i], 1.0)).xyz - pos;
float dis = length(dir);
dir = normalize(dir);
float cos = max(dot(dir, normal), 0.0);
float d = min(1.0, 1.0 / (decay.x * pow(dis, 2.0) + decay.y * dis + decay.z));
diffuse += d * cos * pointLightColor[i];
specular += getSpecular(dir, normal, eye);
}
// 处理聚光灯
for(int i = 0; i < MAX_LIGHT_COUNT; i++) {
vec3 decay = spotLightDecay[i];
if(decay.x == 0.0 && decay.y == 0.0 && decay.z == 0.0) continue;
vec3 dir = (viewMatrix * vec4(spotLightPosition[i], 1.0)).xyz - pos;
float dis = length(dir);
dir = normalize(dir);
// 聚光灯的朝向
vec3 spotDir = (viewMatrix * vec4(spotLightDirection[i], 0.0)).xyz;
// 通过余弦值判断夹角范围
float ang = cos(spotLightAngle[i]);
float r = step(ang, dot(dir, normalize(-spotDir)));
float cos = max(dot(dir, normal), 0.0);
float d = min(1.0, 1.0 / (decay.x * pow(dis, 2.0) + decay.y * dis + decay.z));
diffuse += r * d * cos * spotLightColor[i];
specular += r * getSpecular(dir, normal, eye);
}
return vec4(diffuse, specular);
}
void main() {
vec3 eyeDirection = normalize(vCameraPos - vPos);
vec4 phong = phongReflection(vPos, vNormal, eyeDirection);
// 合成颜色
gl_FragColor.rgb = phong.w + (phong.xyz + ambientLight) * materialReflection;
gl_FragColor.a = 1.0;
}
`;
// 创建四个不同的几何体,初始化它们的环境光 ambientLight 以及材质反射率 materialReflection
const sphereGeometry = new Sphere(gl);
const cubeGeometry = new Box(gl);
const cylinderGeometry = new Cylinder(gl);
const torusGeometry = new Torus(gl);
const phong = new Phong();
// 添加一个平行光
phong.addLight({
direction: [-1, 0, 0],
});
// 添加两个点光源
phong.addLight({
position: [-3, 3, 0],
color: [0.5, 1, 1],
});
phong.addLight({
position: [3, 3, 0],
color: [1, 0.5, 1],
});
// 创建 4 个 matrial 对象,分别对应要显示的四个几何体的材质。
const matrial1 = new Material(new Color('#fa8072'), 2.0);
const matrial2 = new Material(new Color('#daa520'), 2.0);
const matrial3 = new Material(new Color('#2e8b57'), 2.0);
const matrial4 = new Material(new Color('#6a5acd'), 2.0);
const program1 = new Program(gl, {
vertex,
fragment,
uniforms: {
...matrial1.uniforms,
...phong.uniforms,
},
});
const program2 = new Program(gl, {
vertex,
fragment,
uniforms: {
...matrial2.uniforms,
...phong.uniforms,
},
});
const program3 = new Program(gl, {
vertex,
fragment,
uniforms: {
...matrial3.uniforms,
...phong.uniforms,
},
});
const program4 = new Program(gl, {
vertex,
fragment,
uniforms: {
...matrial4.uniforms,
...phong.uniforms,
},
});
const torus = new Mesh(gl, {geometry: torusGeometry, program: program1});
torus.position.set(0, 1.3, 0);
torus.setParent(scene);
const sphere = new Mesh(gl, {geometry: sphereGeometry, program: program2});
sphere.position.set(1.3, 0, 0);
sphere.setParent(scene);
const cube = new Mesh(gl, {geometry: cubeGeometry, program: program3});
cube.position.set(0, -1.3, 0);
cube.setParent(scene);
const cylinder = new Mesh(gl, {geometry: cylinderGeometry, program: program4});
cylinder.position.set(-1.3, 0, 0);
cylinder.setParent(scene);
const controls = new Orbit(camera);
// 添加动画
requestAnimationFrame(update);
function update() {
requestAnimationFrame(update);
controls.update();
torus.rotation.y -= 0.02;
sphere.rotation.y -= 0.03;
cube.rotation.y -= 0.04;
cylinder.rotation.y -= 0.02;
renderer.render({scene, camera});
}
// 添加控制
const gui = new dat.GUI();
const palette = {
light: '#FFFFFF',
reflection1: '#fa8072', // salmon rgb(250, 128, 114) [250/255, 128/255, 114/255, 1]
reflection2: '#daa520', // goldenrod rgb(218, 165, 32) [218/255, 165/255, 32/255, 1]
reflection3: '#2e8b57', // seagreen rgb(46, 139, 87) [46/255, 139/255, 87/255, 1]
reflection4: '#6a5acd', // slateblue rgb(106, 90, 205) [106/255, 90/255, 205/255, 1]
};
gui.addColor(palette, 'light').onChange((val) => {
const color = new Color(val);
program1.uniforms.ambientLight.value = color;
program2.uniforms.ambientLight.value = color;
program3.uniforms.ambientLight.value = color;
program4.uniforms.ambientLight.value = color;
});
gui.addColor(palette, 'reflection1').onChange((val) => {
program1.uniforms.materialReflection.value = new Color(val);
});
gui.addColor(palette, 'reflection2').onChange((val) => {
program2.uniforms.materialReflection.value = new Color(val);
});
gui.addColor(palette, 'reflection3').onChange((val) => {
program3.uniforms.materialReflection.value = new Color(val);
});
gui.addColor(palette, 'reflection4').onChange((val) => {
program4.uniforms.materialReflection.value = new Color(val);
});
</script>
</body>
</html>
效果如下:
Phong 反射模型的局限性
Phong 反射模型没有考虑物体反射光对其他物体的影响,也没有考虑物体对光线遮挡产生的阴影。
参考资料
- Phong光照模型
- 百科:Phong光照模型
- 百科:补色渲染







![[附源码]Python计算机毕业设计SSM基于数据挖掘的毕业生离校信息系统(程序+LW)](https://img-blog.csdnimg.cn/943f15acc0774605920744688d73c9c0.png)
