目录
官方解释
例子
使用场景1
使用场景2
场景3
官方解释
首先看一下官方文档上该注解的解释:
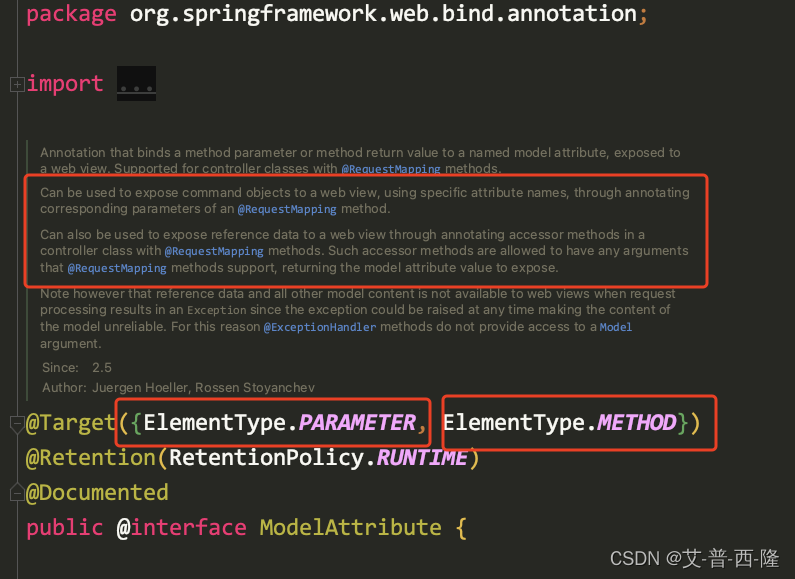
可以看到ModelAttribute可以用在参数上,也可以用在方法上:
- Can be used to expose command objects to a web view, using specific attribute names, through annotating corresponding parameters of an @RequestMapping method.
- Can also be used to expose reference data to a web view through annotating accessor methods in a controller class with @RequestMapping methods. Such accessor methods are allowed to have any arguments that @RequestMapping methods support, returning the model attribute value to expose.
大致的意思是说,结合@RequestMapping,使用特定的属性名,可以将对象暴露给web view;或者也可以在controller类中将该注解加到方法上,暴露相关的数据。
说的太抽象了,结合具体场景更好理解,请继续往下看⬇️。
例子
我写了一个controller类,里面有几个接口,为了安全,我希望每次调用这些接口的时候都要验证用户的登录状态,如果验证通过,才能正常使用接口:
package com.useless.matrix.test.controller;

import com.useless.matrix.common.exception.ApiException;
import com.useless.matrix.data.dto.AccountDetailDto;
import com.useless.matrix.data.mbg.model.Account;
import com.useless.matrix.test.service.AccountService;
import io.swagger.annotations.ApiOperation;
import org.springframework.beans.factory.annotation.Autowired;
import org.springframework.web.bind.annotation.GetMapping;
import org.springframework.web.bind.annotation.RequestParam;
import org.springframework.web.bind.annotation.RestController;
import io.swagger.annotations.Api;

import java.util.List;

@RestController
@Api(tags = "TestController", description = "测试controller")
public class TestController {
    @Autowired
    AccountService accountService;

    @ApiOperation("测试抛异常")
    @GetMapping(value = "/testThrowExcep")
    //@ResponseBody
    public void throwExp() {
        throw new ApiException("api error");
    }

    @ApiOperation("测试-获取账户详细信息")
    @GetMapping(value = "/userInfo")
    public List<AccountDetailDto> userInfo(@RequestParam("id") String userId) {
        return accountService.getAccountDetail(userId);
    }

    @ApiOperation("测试-获取所有账户信息")
    @GetMapping(value = "/allAccount")
    public List<Account> allAccount() {
        return accountService.getAllAccount();
    }
}
最简单的方式,在每个方法中都加入验证token的代码:

虽然能满足需求,但是每个方法都包含重复的代码,且都增加了入参,那么简化下,将登录验证封装成一个方法:
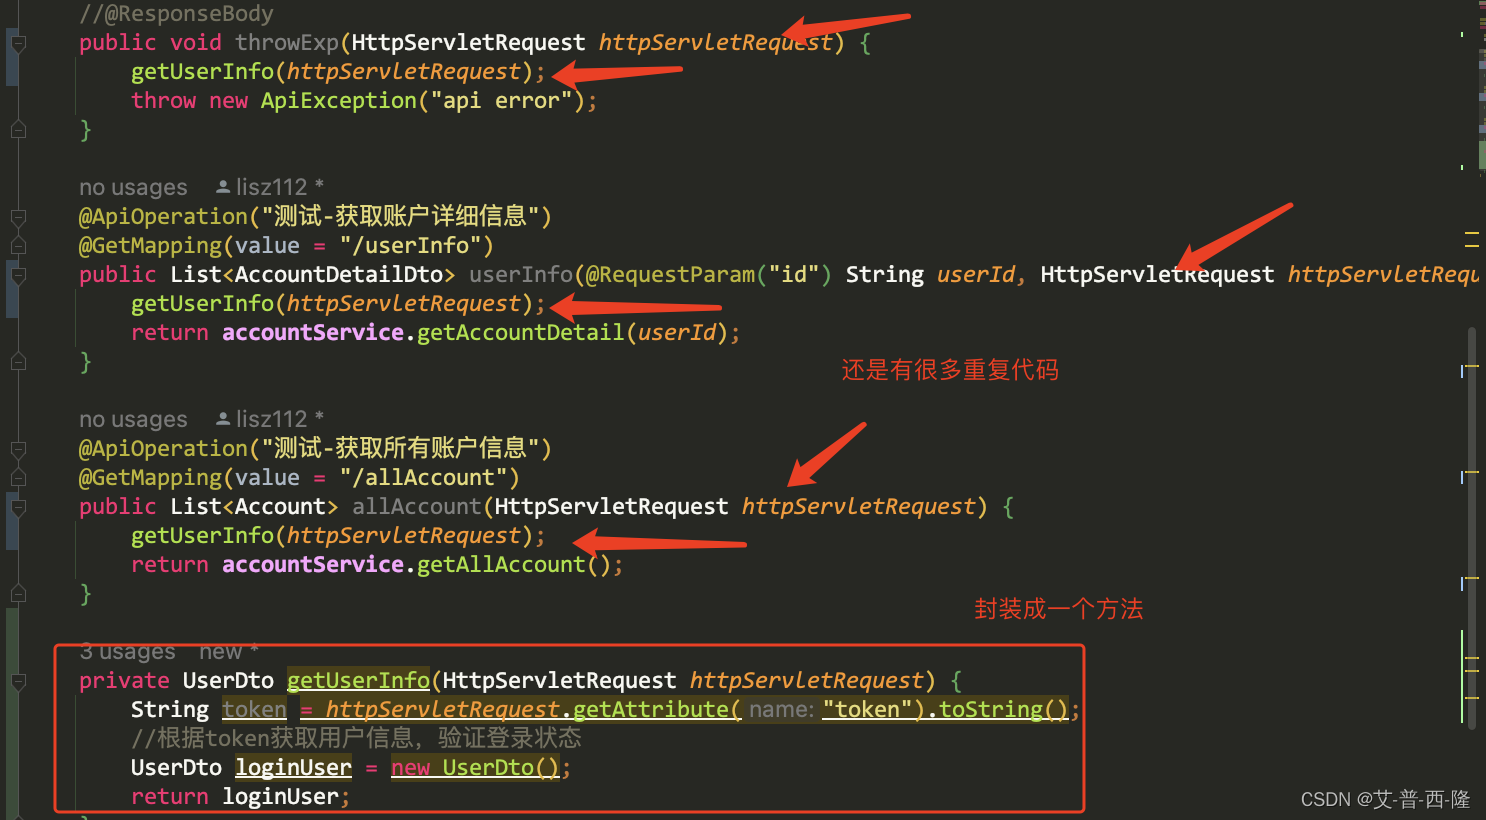
将验证登录状态的代码封装在一个getUserInfo方法中,哪里需要就拿来用。这是个不错的办法,也比较灵活,但是对于当下的场景,controller类下的每一个方法还是要重复写代码,且如果新增了接口,接口里还要写重复代码,比较麻烦。还能再优化下吗?当然可以!下面有请主角ModelAttribute出场!
使用场景1
我们写一个基本类,其中包含了一个验证登录状态的接口getUserInfo,接口上有@ModelAttribute注解⬇️
import org.springframework.web.bind.annotation.ModelAttribute;

import javax.servlet.http.HttpServletRequest;

public class BaseController {

    @ModelAttribute
    public void getUserInfo(HttpServletRequest httpServletRequest) {
        System.out.println("从httpRequest中获取token,验证登录状态");
    }
}
原来的controller继承基本类⬇️
import com.useless.matrix.common.exception.ApiException;
import com.useless.matrix.data.dto.AccountDetailDto;
import com.useless.matrix.data.mbg.model.Account;
import com.useless.matrix.test.service.AccountService;
import io.swagger.annotations.Api;
import io.swagger.annotations.ApiOperation;
import org.springframework.beans.factory.annotation.Autowired;
import org.springframework.web.bind.annotation.GetMapping;
import org.springframework.web.bind.annotation.RequestParam;
import org.springframework.web.bind.annotation.RestController;

import java.util.List;

@RestController
@Api(tags = "TestController", description = "测试controller")
public class TestController extends BaseController {
    @Autowired
    AccountService accountService;

    @ApiOperation("测试抛异常")
    @GetMapping(value = "/testThrowExcep")
    //@ResponseBody
    public void throwExp() {
        throw new ApiException("api error");
    }

    @ApiOperation("测试-获取账户详细信息")
    @GetMapping(value = "/userInfo")
    public List<AccountDetailDto> userInfo(@RequestParam("id") String userId) {
        return accountService.getAccountDetail(userId);
    }

    @ApiOperation("测试-获取所有账户信息")
    @GetMapping(value = "/allAccount")
    public List<Account> allAccount() {
        System.out.println("我才是真正的方法");
        return null;
        //return accountService.getAllAccount();
    }

}
尝试调用其中的一个接口/allAccount:

观察log日志或者打断点,会发现程序会先去调getUserInfo接口,再去调真正的接口:

这样一来,所有写在该controller下的方法都会先去调getUserInfo验证登录状态,这就是官方文档中说的:
Can also be used to expose reference data to a web view through annotating accessor methods in a controller class with @RequestMapping methods. Such accessor methods are allowed to have any arguments that @RequestMapping methods support, returning the model attribute value to expose.
这样写的好处是我们不需要在每个方法中都放入登录校验的代码,写在controller类下面的每个方法调用之前都会去调用getUserInfo方法验证登录状态,即便再写新的接口,也无需特殊处理。并且其他需要验证登录状态的controller也可以继承该基本类。
使用场景2
到这儿还没完,如果我不仅想验证登录状态,还想使用返回的userInfo该怎么办?ModelAttribute也可以支持,请继续往下看⬇️。
首先定义一个简单的用户信息类:
import lombok.Data;

@Data
public class UserDto {
    String userId;
    String userName;
    String phone;
}
改造下getUserInfo方法,现在它会返回一个伪造的UserDto用户信息,注意ModelAttribute上加了name属性:
import com.useless.matrix.data.dto.UserDto;
import org.springframework.web.bind.annotation.ModelAttribute;

import javax.servlet.http.HttpServletRequest;

public class BaseController {

    @ModelAttribute(name = "userInfo")
    public UserDto getUserInfo(HttpServletRequest httpServletRequest) {
        System.out.println("从httpRequest中获取token,验证登录状态");
        UserDto userDto = new UserDto();
        userDto.setUserName("Tom");
        userDto.setUserId("1");
        userDto.setPhone("123");
        return userDto;
    }
}
改造下实际调用的方法,入参中加入了一个userInfo,且同样使用了ModelAttribute注解。注意modelAttribute中的name需要和getUserInfo的name保持一致。
@ApiOperation("测试-获取所有账户信息")
    @GetMapping(value = "/allAccount")
    public List<Account> allAccount(@ModelAttribute("userInfo") UserDto userInfo) {
        System.out.println("我才是真正的方法");
        System.out.println(userInfo.getUserId() + " " + userInfo.getUserName() + " " + userInfo.getPhone());
        return null;
        //return accountService.getAllAccount();
    }
再次调用接口,可以看到正常获取到了用户信息:
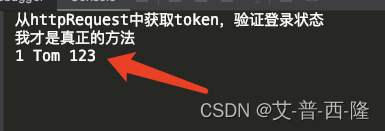
这也就是官方文档中说的:
Can be used to expose command objects to a web view, using specific attribute names, through annotating corresponding parameters of an @RequestMapping method.
场景3
再进一步,我不仅想要获取用户信息,还想知道用户所在的组织id,也就是说我想获得多个参数怎么办?
继续改造getUserInfo方法,去除了@ModelAttribute的name属性,增加了一个ModelMap参数,现在我们可以使用addAttribute方法往里面放多个参数:
@ModelAttribute
    public void getUserInfo(ModelMap modelMap, HttpServletRequest httpServletRequest) {
        System.out.println("从httpRequest中获取token,验证登录状态");
        UserDto userDto = new UserDto();
        userDto.setUserName("Tom");
        userDto.setUserId("1");
        userDto.setPhone("123");
        modelMap.addAttribute("userInfo", userDto);
        modelMap.addAttribute("orgId", 110);
    }
真实方法现在可以获取到多个参数了:
@ApiOperation("测试-获取所有账户信息")
    @GetMapping(value = "/allAccount")
    public List<Account> allAccount(@ModelAttribute("userInfo") UserDto userInfo,
                                    @ModelAttribute("orgId") Integer orgId) {
        System.out.println("我才是真正的方法");
        System.out.println(userInfo.getUserId() + " " + userInfo.getUserName() + " " + userInfo.getPhone());
        System.out.println("orgId: " + orgId);
        return null;
        //return accountService.getAllAccount();
    }
使用postman调用后可以看到日志:

好的,以上就是ModelAttribute的使用方法。
ps:特别注意的是,如果使用了swagger,则需要在入参上加入@ApiIgnore注解忽略参数,不然swagger上会显示该参数(@ApiParam( hidden = true)不支持复杂类型,所以还是用@ApiIgnore比较稳妥)。
