项目背景
大数据专业综合项目实践,数据集采用阿里天池的公开数据集,下载链接: 消费者商品交易调研清单
这个数据集是一个样本集,共有5000多条记录,每条记录代表一个消费者的商品交易调研信息。以下是对每个字段的描述:
消费者姓名:消费者的姓名。
年龄:消费者的年龄。
性别:消费者的性别。
月薪:消费者的月薪状况。
消费偏好:消费者在购买商品时的偏好类型,如性价比、功能性、时尚潮流、环保可持续等。
消费领域:消费者购买的商品领域,如家居用品、汽车配件、珠宝首饰、美妆护肤等。
购物平台:消费者常用的购物平台,如天猫、苏宁易购、淘宝、拼多多等。
支付方式:消费者在购物时使用的支付方式,如微信支付、货到付款、支付宝、信用卡等。
单次购买商品数量:消费者每次购买商品的数量。
优惠券获取情况:消费者在购物过程中是否获取到优惠券,如折扣优惠、免费赠品等。
购物动机:消费者购物的动机,如品牌忠诚、日常使用、礼物赠送、商品推荐等。
通过对数据集的分析及可视化,可以了解消费者的购物偏好、消费习惯和购物动机,从而为企业制定营销策略和产品定位提供参考。
一、项目环境说明
Linux Ubuntu 16.04
jdk-7u75-linux-x64
eclipse-java-juno-SR2-linux-gtk-x86_64
Flume 1.5.0 -cdh5.4.5
Sqoop 1.4.5-cdh5.4.5
Hive-common-1.1.0-cdh5.4.5
Spark 1.6.0      Scala 2.10.5    kafka 0.8.2
Mysql Ver 14.14 Distrib 5.7.24 for Linux(x86_64)
二、Mapreduce数据清洗
1、下载数据集,并移动到目录
打开终端,创建目录,新建文件
mkdir /data/shiyan1
gedit /data/shiyan1/shujuji
将下载内容去掉标题行并写入到shujuji文件中(或者后续在mapreduce程序中进行此步骤也行,但这里是先去掉第一行内容)
2、将数据集上传到hadoop集群当中
hadoop fs -mkdir /shiyan1/origindata/
hadoop fs -put /data/shiyan1/shujuji  /shiyan1/origindata/*
3、编写mapreduce简单做数据清洗(删除几个无关紧要的列)
先创建一个清洗后文件保留的目录
hadoop fs -mkdir /shiyan1/cleandata/
在eclipse中新建一个项目,再新建一个目录folder,命名为lib,导入项目所需jar包。具体操作:选中所有jar包(按住Shift快捷键),右键点击Add to Build Path。(项目jar包在我的博客主页资源里,需要自取)
新建一个类名为Clean,写入下述代码
package my.clean;

import java.io.IOException;

import org.apache.hadoop.fs.Path;
import org.apache.hadoop.io.Text;
import org.apache.hadoop.mapreduce.Job;
import org.apache.hadoop.mapreduce.Mapper;
import org.apache.hadoop.mapreduce.lib.input.FileInputFormat;
import org.apache.hadoop.mapreduce.lib.output.FileOutputFormat;

public class Clean {

	public static class doMapper extends Mapper<Object, Text, Text, Text> {
		@Override
		protected void map(Object key, Text value, Context context)
				throws IOException, InterruptedException {

			String[] arr = value.toString().split(",");
			StringBuilder one = new StringBuilder();
			one.append(arr[1]);
			one.append("\t");
			one.append(arr[2]);
			one.append("\t");
			one.append(arr[3]);
			one.append("\t");
			one.append(arr[4]);
			one.append("\t");
			one.append(arr[5]);
			one.append("\t");
			one.append(arr[9]);
			one.append("\t");
			one.append(arr[10]);
			context.write(new Text(one.toString()), new Text(""));
		}
	}

	public static void main(String[] args) throws IOException,
			ClassNotFoundException, InterruptedException {
		Job job = Job.getInstance();
		job.setJobName("Clean");
		job.setJarByClass(Clean.class);

		job.setMapperClass(doMapper.class);
		// job.setReducerClass(doReducer.class);
		job.setOutputKeyClass(Text.class);
		job.setOutputValueClass(Text.class);
		Path in = new Path("hdfs://localhost:9000//shiyan1/origindata");
		Path out = new Path("hdfs://localhost:9000//shiyan1/cleandata");
		FileInputFormat.addInputPath(job, in);
		FileOutputFormat.setOutputPath(job, out);
		System.exit(job.waitForCompletion(true) ? 0 : 1);
	}

}
4、运行程序,查验结果
右键项目,点击run on hadoop(注意要先开启hadoop)
打开终端,输入命令,查看结果,再将清洗后的数据下载到本地
hadoop fs -cat /shiyan1/cleandata/part-r-00000 >> /data/shiyan1/cleandata

三、Hive离线分析数据
1、执行hive,进入交互式命令行,创建数据库和表(默认内部表,默认路径为/user/hive/warehouse/)
create database behavior;
use behavior;
create table xiaofei (age int,sex string,salary int,consumelike string,consumearea string, coupon string,shoppeupose string) row format delimited fields terminated by '\t' ;
2、从本地再装入数据
load data local inpath '/data/shiyan1/cleandata' into table xiaofei;
在hive中,执行查询操作,验证数据是否导入成功。若没有数据,看看是否漏掉哪条命令
select * from xiaofei limit 10;
3、编写查询sql,进行数据分析
需求1:
统计消费者商品购物调研单中,中老年人较大(35岁做划分)与年轻人购物人数与比例:
select age,count(*) as num from(
select case when age>=35 then 1 when age<35 then 0 end as age from xiaofei
) t
group by age
(发现比例大致为为1:2)

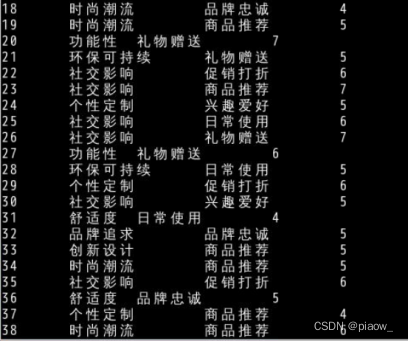
需求2:统计不同年龄的消费偏好和消费动机,挖掘出现最多的次数,发现不同年龄的人群消费追求是什么
select age,consumelike,shoppurpose,nums from (
select * ,row_number()over(partition by age order by nums desc) as rank from (
select age,consumelike,shoppurpose,nums from (
select age,consumelike,shoppurpose ,count(*) as nums from xiaofei
group by age,consumelike,shoppurpose
) t
where nums>=2
) p
) m
where rank = 1
(统计结果发现,有些年龄段消费追求较集中,而有些年龄段消费追求比较广泛,消费追求差别也较大)
需求3:统计不同性别,对购物时用优惠券的关注情况(各取前三位)
select sex ,coupon from (
select *, row_number()over(partition by sex order by num desc) as rank from (
select sex,coupon,count(*) as num from xiaofei
group by sex,coupon
) as t
) as p
where rank <=3
(统计结果:不管男性还是女性,免费赠品对他们的诱惑还是很大的,除此之外,女性购物喜欢用优惠券,而男性则是有购买欲望就买了,对优惠券的使用力度不是很大)

4、将查询结果重新写入hive的新表,用于后面sqoop导出使用
这里新建了三个表,用于保存上面查询的结果
create table agecount(age int,num int) row format delimited fields terminated by '\t' ;
create table agelike(age int,consumelike string,consumearea string,num int) row format delimited fields terminated by '\t' ;
create table sexcoupon(sex string,counpon string) row format delimited fields terminated by '\t' ;
再在查询语句前添加insert into table ,以第一个需求为例,后面类推
insert into table agecount select age,count(*) as num from(
select case when age>=35 then 1 when age<35 then 0 end as age from xiaofei
) t
group by age
四、Sqoop将数据从hive导出到mysql
1、安装好mysql环境,并确保服务已经开启,开启命令
sudo service mysql start
2、进入mysql数据库,创建相应库、表
这里输入你的用户名和密码
mysql -u root -p
创建库,并在库下创建表
CREATE DATABASE IF NOT EXISTS  behavior DEFAULT CHARSET utf8 COLLATE utf8_general_ci;
use behavior;
create table agecount (age int ,num int);
create table agecount (age int ,consumelike varchar(200),consumearea varchar(200),num int);
create table sexcoupon(sex varchar(20),shoppurpose varchar(200));
3、sqoop将数据导入
sqoop export --connect jdbc:mysql://localhost:3306/behavior?characterEncoding=UTF-8 --username root --password strongs --table agecount --export-dir /user/hive/warehouse/behavior.db/agecount/000000_0 --input-fields-terminated-by '\t'

sqoop export --connect jdbc:mysql://localhost:3306/behavior?characterEncoding=UTF-8 --username root --password strongs --table agelike --export-dir /user/hive/warehouse/behavior.db/agelike/000000_0 --input-fields-terminated-by '\t'

sqoop export --connect jdbc:mysql://localhost:3306/behavior?characterEncoding=UTF-8 --username root --password strongs --table sexcoupon --export-dir /user/hive/warehouse/behavior.db/sexcoupon/000000_0 --input-fields-terminated-by '\t'
4、执行命令,查看Mysql表里是否有数据了
select * from sexcoupon;
五、SparkStreaming实时分析
这里做个小说明:由于项目本身应该用爬虫程序爬取网站的实时数据,然后分析一些评论密集时间、评论内容等等。但是由于数据集是直接下载的,不好再做实时爬虫,找到相似的可用数据再做筛选比较麻烦,脱离了项目的重心,于是这里编写个shell脚本,模拟生成实时数据。
1、建立项目文件
mkdir /data/shiyan1/realtime/datasource
mkdir /data/shiyan1/realtime/datarandom
mkdir /data/shiyan1/realtime/shellrealtime
2、编写shell脚本程序
首先进入到编辑模式,如果你发现不识别gedit命令,可以尝试使用vim或者vi
gedit /data/shiyan1/realtime/shellrealtime/time.sh
写入下述内容
#!/bin/bash
file_count=1
while true;do
	for i in {1..5} ; do
		if read -r line; then
			echo "$line" >> /data/shiyan1/realtime/datarandom/file_${file_count}.txt
		else
			break 2
		fi
	done
	((file_count++))
	sleep 10
done < /data/shiyan1/realtime/datasource/source
3、开启flume服务,查看是否能检测新文件生成
下面配置flume的conf文件,测试flume是否可以正常工作
gedit spooldir_mem_logger.conf
将以下Flume的配置信息添加到文件里,然后保存退出。使其实现功能为监控/data/shiyan1/realtime/datarandom目录,并将读取到的文件输出到console界面。
agent1.sources=src
agent1.channels=ch
agent1.sinks=des

agent1.sources.src.type = spooldir
agent1.sources.src.restart = true
agent1.sources.src.spoolDir =/data/shiyan1/realtime/datarandom

agent1.channels.ch.type=memory

agent1.sinks.des.type = logger

agent1.sources.src.channels=ch
agent1.sinks.des.channel=ch
配置好spooldir_mem_logger.conf文件后,切换到Flume安装目录下并启动Flume。(说明下:这里/data/edu6/是我配置flume的conf文件的目录)
cd /apps/flume

flume-ng agent -c /data/edu6/ -f /data/edu6/spooldir_mem_logger.conf -n agent1
-Dflume.root.logger=DEBUG,console
运行上面写好的time.sh脚本程序,发现目录下文件有如下变化。

若检测成功,可以发现文件结尾加了.COMPLETED后缀
接着请删除/data/shiyan1/realtime/datarandom目录下的所有文件,防止影响flume内容监测。
4、开启kafka服务,并检测生产者消费者连通性
前置步骤:开启hadoop服务,zookeeper服务,接着进入kafka安装目录,启动Kafka-server端。
cd /apps/kafka
bin/kafka-server-start.sh config/server.properties
1.开启Kafka服务后窗口进入阻塞状态,需另开启一个端口模拟器进行操作。
创建topic,命名为flumesendkafka。
bin/kafka-topics.sh \
--create \
--zookeeper localhost:2181 \
--replication-factor 1 \
--topic flumesendkafka \
--partitions 1
查看当前kafka中,都有哪些topic
/apps/kafka/bin/kafka-topics.sh --list --zookeeper localhost:2181
2.调用/apps/kafka/bin目录下kafka-console-producer.sh,来生产一些消息,producer也就是生产者
cd /apps/kafka
bin/kafka-console-producer.sh --broker-list localhost:9092 --topic flumesendkafka
这里的localhost为Kafka的IP,9092为broker节点的端口。用户可以在console界面上,输入信息,交给producer进行处理,并发给consumer。
3.再另外开启一个窗口,调用bin目录下kafka-console-consumer.sh,启动consumer,consumer作为消费者,用来消费数据。
cd /apps/kafka
bin/kafka-console-consumer.sh --zookeeper localhost:2181 --topic flumesendkafka
 --from-beginning
kafka-console-consumer.sh依然需要加一些参数,比如ZooKeeper的IP及端口、主题名称、读取数据位置等。
4.测试
在执行kafka-console-producer.sh命令的界面中,随便输入几行文字,按回车。可以看到在consumer端,会将同样的内容,输出出来
5、编写Sparkstreaming程序
新建Scala Project,(如需项目所用jar包,请去我的博客资源里自行下载)
统计每一段时间,共有多少条新数据,做一个实时计算
package my.streaming

import kafka.serializer.StringDecoder
import org.apache.spark.SparkConf
import org.apache.spark.streaming.StreamingContext
import org.apache.spark.streaming.kafka.KafkaUtils
import org.apache.spark.streaming.Seconds
import org.apache.spark.streaming.dstream.InputDStream

import java.sql.DriverManager
import java.sql.ResultSet
import java.sql.Connection
import java.sql.PreparedStatement
import java.text.SimpleDateFormat
import java.util.Date

object JianKong {

  def main(args: Array[String]) {

    val sparkConf = new SparkConf().setAppName("jiankong").setMaster("local[2]")
    val ssc = new StreamingContext(sparkConf, Seconds(4))
    ssc.checkpoint("checkpoint")
    val topics = Set("flumesendkafka")
    val brokers = "localhost:9092"
    val zkQuorum = "localhost:2181"

    val kafkaParams = Map[String, String](
      "metadata.broker.list" -> brokers,
      "serializer.class" -> "kafka.serializer.StringEncoder")

    val lines = KafkaUtils.createDirectStream[String, String, StringDecoder, StringDecoder](ssc, kafkaParams, topics).map(_._2)

    lines.foreach(line => {
      var strs = line.collect()
      println(strs.size)

      var finalNum = 0

      for (str: String <- strs) {
        /**Use Fastjson to parse jsonString!*/
        println("finalNum : " + finalNum + "#"+ str)
        if (!str.equals("")) {
            finalNum = finalNum + 5
         }
       }
      println("finalNum: " + finalNum)

      var now: Date = new Date()
      val dateFormat: SimpleDateFormat = new SimpleDateFormat("yyyy-MM-dd HH:mm:ss")
      var creationtime = dateFormat.format(now)

      val db_host = "localhost"
      val db_name = "realtimebase"
      val db_user = "root"
      val db_passwd = "strongs"
      val db_connection_str = "jdbc:mysql://" + db_host + ":3306/" + db_name + "?user=" + db_user + "&password=" + db_passwd
      var conn: Connection = null
      var ps: PreparedStatement = null
      val sql = "insert into jiankong (creationtime, num) values (?, ?)"
      try {
        conn = DriverManager.getConnection(db_connection_str)
        ps = conn.prepareStatement(sql)
        ps.setString(1, creationtime)
        ps.setInt(2, finalNum)
        ps.executeUpdate()
      } catch {
        case e: Exception => println("MySQL Exception")
      } finally {
        if (ps != null) {
          ps.close()
        }
        if (conn != null) {
          conn.close()
        }
      }

    })

    ssc.start()
    ssc.awaitTermination()
    ssc.stop()
  }

}
6、开启Mysql服务、建表
sudo service mysql start
mysql -u root -p
CREATE DATABASE IF NOT EXISTS realtimebase DEFAULT CHARSET utf8 \
COLLATE utf8_general_ci;
use  realtimebase
create table jiankong (creationtime datetime,num int);
这样,通过sparkstreaming处理过的程序,就会将结果写入到Mysql数据库中,最后查看每一段时间共有多少条评论被记录
7、按顺序启动实时处理程序
1.启动kafka-server
cd /apps/kafka
bin/kafka-server-start.sh config/server.properties
2.启动spark streaming的JianKong.scala程序
3.另外开启一个终端模拟器,启动flume
cd /apps/flume
flume-ng agent -c /data/edu6/ -f /data/edu6/spooldir_mem_logger.conf -n agent1
-Dflume.root.logger=DEBUG,console
4.启动模拟爬虫程序
/data/shiyan1/realtime/shellrealtime/time.sh
5.查看MySQL,发现里面有相应统计数据
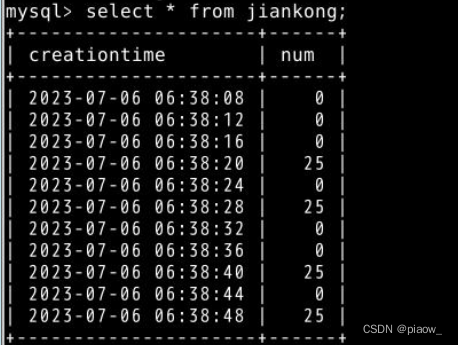
发现Mysql表中有相应内容,实时处理结束。

