来看看如何实现最最基本的TagGroupView,该视图作为ViewGroup的作用是实现其中的子视图的自动换行,保证子视图能够按照在xml中传入的顺序来相对合理地显示到界面上。
注意:其实在Android技术已经非常完善的当下,其实我们已经不怎么需要自定义ViewGroup了,因为像ConstraintsLayout这样的布局视图基本已经能解决我们**99.95%**的日常开发需求了。重复造轮子永远时开发过程中的最大忌讳,而且开源框架是经历过历史和时间的检验的,不能断言说他不会出问题,但是可以说它在绝大多数场景下不会出现问题。
先来理一理整体的思路:
-
工欲善其事必先利其器,我们先实现一个随机宽度,高度和颜色的视图。
-
实现TagGroupView:
- onMeasure中调用measureSpecWithMargin来对子视图的尺寸进行测量,存储测量结果
- onMeasure的最后setMeasuredDimension来存储ViewGroup的测量结果
- onLayout根据onMeasure中存储的测量结果,调用各个子视图的layout方法设置子视图的测绘范围
-
在XML文件中将若干个我们定义的子视图放置到TagGroupView中,确认实现效果
好了,基本的思路已经说完了,我们来看看每一步具体怎么实现。
步骤一:定义随机视图
定义一个能每次生成不同宽度,高度,颜色的文本视图,这一块没有什么好说的,唯一有一小点需要注意的就是随机数的生成:
- 种子一定要用随机的方式获取,现在的CPU性能都非常高,所以不能用当前系统毫秒时间来作为种子,这样一来所有文本视图就都一样了。
- 最好不断调用**nextInt()**方法来生成随机数,这样就能让实际实现的效果更加随机,也更容易发现我们开发过程中出现的问题。
class RandomTextView(context: Context, attributeSet: AttributeSet) :
    AppCompatTextView(context, attributeSet) {
    private val random by lazy { Random(System.nanoTime()) }
    private val color by lazy { Color.rgb(nextInt(), nextInt(), nextInt()) }
    private val randomWidth by lazy { nextInt() }
    private val randomHeight by lazy { nextInt() }
    private val rect by lazy { Rect() }

    init {
        text = nextInt().toString()
        textAlignment = TEXT_ALIGNMENT_CENTER
        gravity = Gravity.CENTER
        setPadding(10.dip, 10.dip, 10.dip, 10.dip)
        setBackgroundColor(color)
    }

    private fun nextInt() = random.nextInt() % 50 + 100

    override fun onMeasure(widthMeasureSpec: Int, heightMeasureSpec: Int) {
        super.onMeasure(widthMeasureSpec, heightMeasureSpec)
        paint.getTextBounds(text.toString(), 0, text.length, rect)
        setMeasuredDimension(
            randomWidth + rect.width() + paddingLeft * 2,
            randomHeight + rect.height() + paddingTop * 2
        )
    }
}
步骤二:自定义GroupView
-
onMeasure中调用measureSpecWithMargin来对子视图的尺寸进行测量,存储测量结果
-
onMeasure的最后setMeasuredDimension来存储ViewGroup的测量结果
-
onLayout根据onMeasure中存储的测量结果,调用各个子视图的layout方法设置子视图的测绘范围
import android.content.Context
import android.util.AttributeSet
import android.view.ViewGroup
import kotlin.math.max

class TagGroupView(context: Context, attributeSet: AttributeSet) :
    ViewGroup(context, attributeSet) {
    //我们为每个视图定义一个[ChildViewParam]类来存储该视图的位置信息,包括其宽度,高度,起始的X,Y坐标
    private val childViewLayouts by lazy {
        0.until(childCount).map { ChildViewParam(0, 0, 0, 0) }
    }

    override fun onMeasure(widthMeasureSpec: Int, heightMeasureSpec: Int) {
        super.onMeasure(widthMeasureSpec, heightMeasureSpec)
        //已经使用的宽度
        var widthUsed = 0
        //已经使用的高度
        var heightUsed = 0
        //当前遍历行最大高度
        var maxHeightOfLine = 0
        //目前遍历的所有行的最大宽度
        var maxWidthOfLine = 0
        0.until(childCount).map { getChildAt(it) }.forEachIndexed { index, it ->
            it.layoutParams = it.layoutParams.toMarginLayoutParams
            val childViewParam = childViewLayouts[index]

            //因为我们这里仅仅是Demo,所以采用这种丑陋的抽离方式,实际上我认为应该有更好的方式,但是那个方式虽然实现看起来非常简单,但是理解成本会比较高
            //测量子视图布局方法,判断当前行放入子视图是否符合我们的规则,另外,Demo中忽略子视图设置的Margin,因为如果考虑Margin,代码会显得比较复杂
            fun doMeasureChild(): Boolean {
                //测量子视图的尺寸
                measureChildWithMargins(
                    it,
                    widthMeasureSpec,
                    widthUsed,
                    heightMeasureSpec,
                    heightUsed
                )
                //如果当前行的尺寸容许足够放入当前遍历到的子视图,刷新各个状态值,并返回true
                if (it.measuredWidth + widthUsed <= MeasureSpec.getSize(widthMeasureSpec)) {
                    childViewParam.x = widthUsed
                    childViewParam.y = heightUsed
                    childViewParam.width = it.measuredWidth
                    childViewParam.height = it.measuredHeight
                    widthUsed += it.measuredWidth
                    maxWidthOfLine = max(maxWidthOfLine, widthUsed)
                    maxHeightOfLine = max(maxHeightOfLine, it.measuredHeight)
                    return true
                }
                //否则返回false
                return false
            }
            //如果当前行空间足够,继续遍历下一个子视图
            if (doMeasureChild()) return@forEachIndexed
            //当前行空间不够,换行,重置状态值,重新尝试放入子视图
            widthUsed = 0
            heightUsed += maxHeightOfLine
            maxHeightOfLine = 0
            doMeasureChild()
        }
        //设置当前ViewGroup的测量结果
        setMeasuredDimension(maxWidthOfLine, heightUsed + maxHeightOfLine)
    }

    /**
     * 根据[onMeasure]测量子视图的结果,为每个子视图分配布局位置
     */
    override fun onLayout(changed: Boolean, l: Int, t: Int, r: Int, b: Int) {
        0.until(childCount).map { getChildAt(it) }.forEachIndexed { index, it ->
            val param = childViewLayouts[index]
            it.layout(param.x, param.y, param.x + param.width, param.y + param.height)
        }
    }

    private val LayoutParams.toMarginLayoutParams: MarginLayoutParams
        get() = MarginLayoutParams(this)
}

/**
 * 存储视图的起始X,Y值,宽度和高度
 */
data class ChildViewParam(var width: Int, var height: Int, var x: Int, var y: Int) {
    override fun hashCode(): Int {
        return x * x + y * y;
    }

    override fun equals(other: Any?): Boolean {
        if (other == null) return false;
        if (other is ChildViewParam)
            return x == (other as ChildViewParam).x
                    && y == (other as ChildViewParam).y;
        return false;
    }
}
步骤三:XML文件中验证对应的实现效果
<?xml version="1.0" encoding="utf-8"?>
<com.mm.android.mobilecommon.TagGroupView xmlns:android="http://schemas.android.com/apk/res/android"
    android:id="@+id/root_view"
    android:layout_width="match_parent"
    android:layout_height="match_parent">

    <com.mm.android.mobilecommon.RandomTextView
        android:layout_width="wrap_content"
        android:layout_height="wrap_content"
        android:layout_margin="5dp" />
<!--    篇幅原因,省略若干个相同定义的RandomTextView-->
</com.mm.android.mobilecommon.TagGroupView>
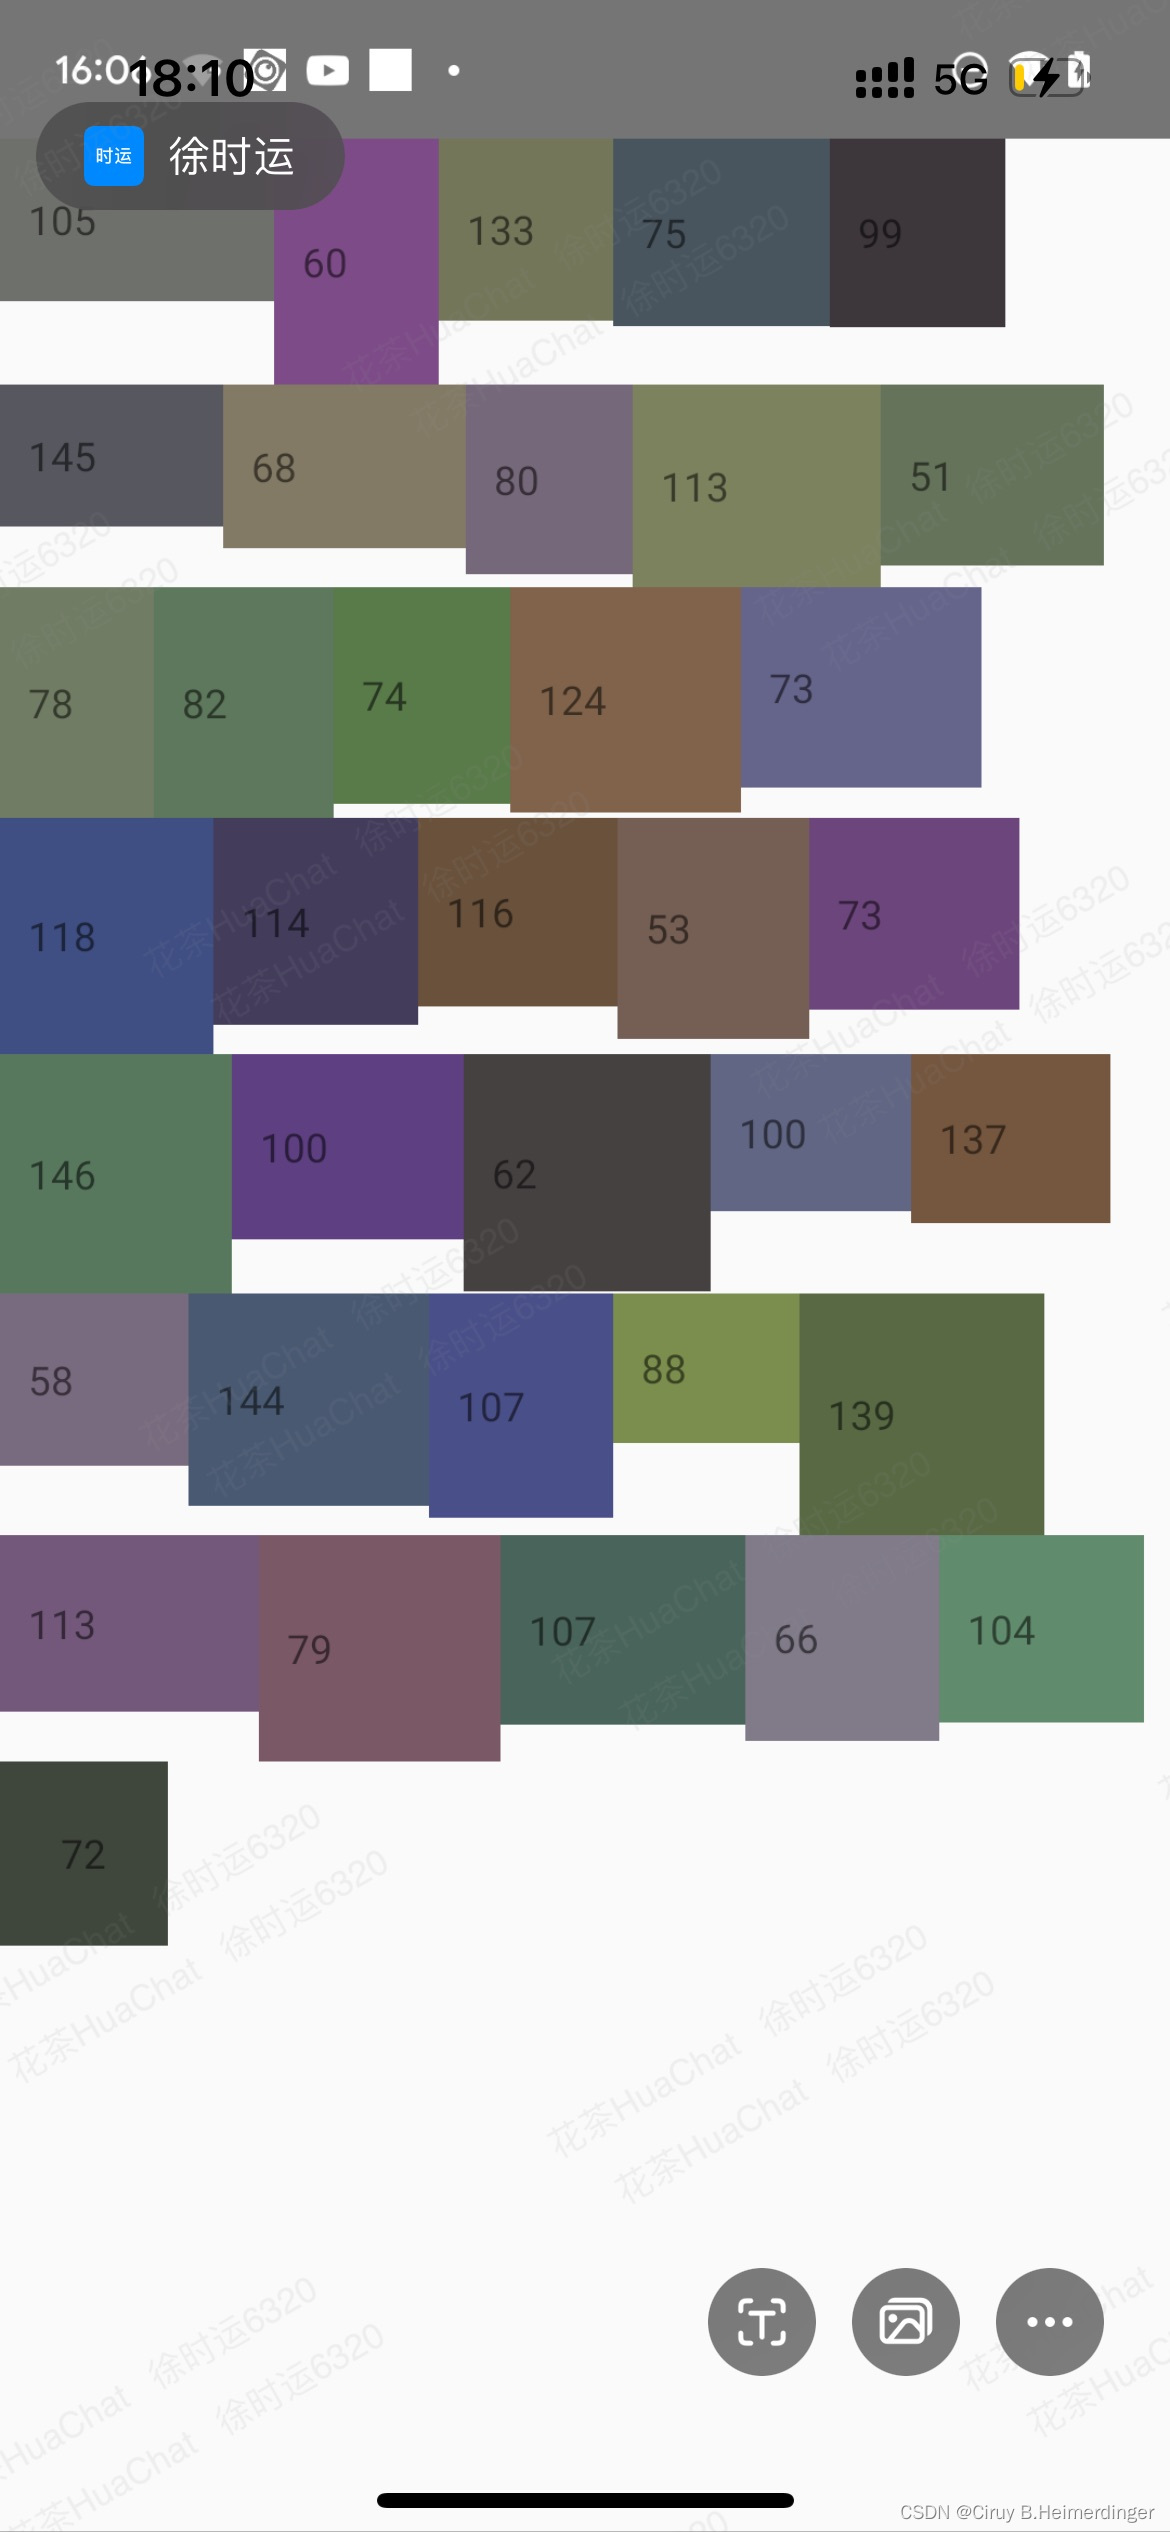
来看看实现的效果,可以,基本符合要求了,能自动换行,高度也符合标准了。









![[解决Github 克隆错误] unable to access ‘xxx‘: Recv failure: Connect](https://img-blog.csdnimg.cn/68ba496faf3d4186899005d646438643.png)
