在第一个基于cnn的架构(AlexNet)赢得ImageNet 2012比赛之后,每个随后的获胜架构都在深度神经网络中使用更多的层来降低错误率。这适用于较少的层数,但当我们增加层数时,深度学习中会出现一个常见的问题,称为消失/爆炸梯度。这会导致梯度变为0或太大。因此,当我们增加层数时,训练和测试错误率也会增加。
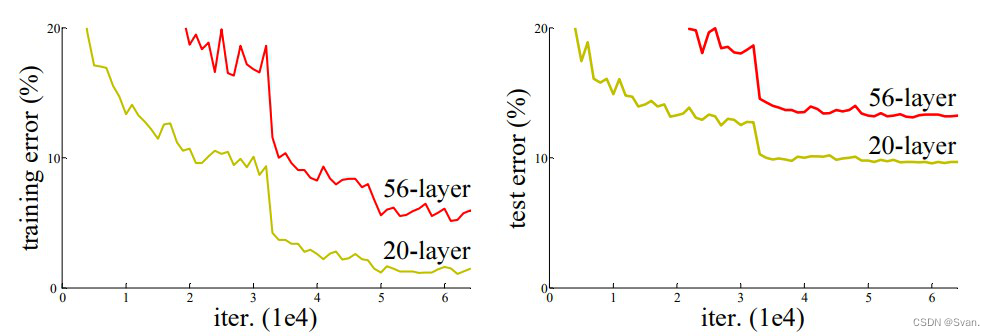
在上图中,我们可以观察到56层的CNN在训练和测试数据集上的错误率都高于20层的CNN架构。通过对错误率的进一步分析,得出错误率是由梯度消失/爆炸引起的结论。
ResNet于2015年由微软研究院的研究人员提出,引入了一种名为残余网络的新架构。
Residual Networks ResNet– Deep Learning
- 1、残差网路
- 2、网络架构
- 3、代码运行
- 4、结果与总结
1、残差网路
为了解决梯度消失/爆炸的问题,该架构引入了残差块的概念。在这个网络中,我们使用一种称为跳过连接的技术。跳过连接通过跳过中间的一些层将一个层的激活连接到其他层。这就形成了一个残块。通过将这些剩余的块堆叠在一起形成Resnets。
这个网络背后的方法不是层学习底层映射,而是允许网络拟合残差映射。所以我们不用H(x)初始映射,让网络适合。
F(x) := H(x) - x which gives H(x) := F(x) + x.
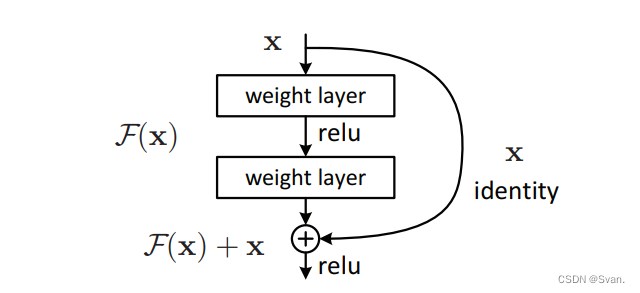
添加这种类型的跳过连接的优点是,如果任何层损害了体系结构的性能,那么将通过正则化跳过它。因此,这可以训练一个非常深的神经网络,而不会出现梯度消失/爆炸引起的问题。本文作者在CIFAR-10数据集的100-1000层上进行了实验。
还有一种类似的方法叫做“高速公路网”,这些网络也采用跳线连接。与LSTM类似,这些跳过连接也使用参数门。这些门决定有多少信息通过跳过连接。然而,这种体系结构并没有提供比ResNet体系结构更好的准确性。
2、网络架构
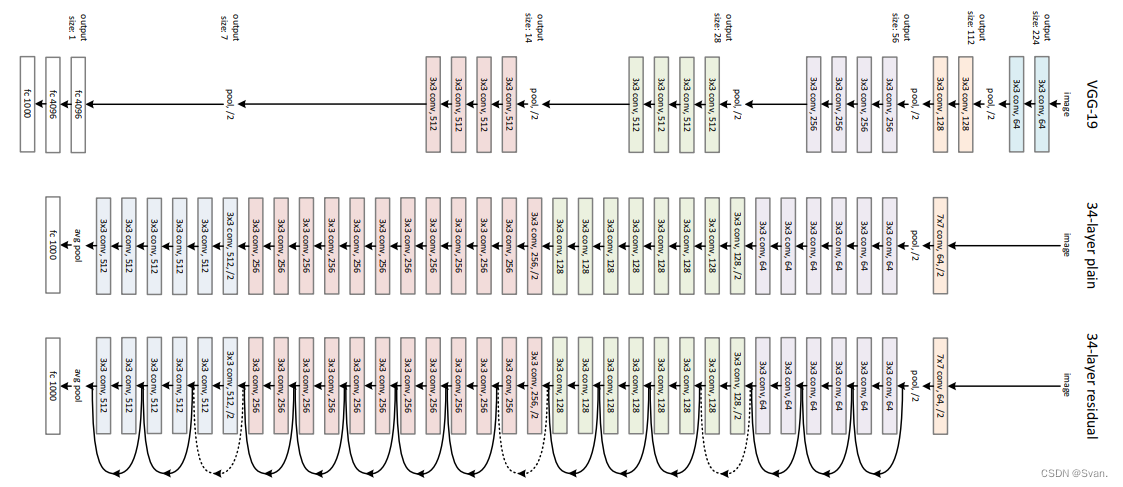
该网络采用受VGG-19启发的34层平面网络架构,并增加了快捷连接。然后,这些快捷连接将架构转换为剩余网络。
3、代码运行
使用Tensorflow和Keras API,我们可以从头开始设计ResNet架构(包括残块)。下面是不同的ResNet架构的实现。对于这个实现,我们使用CIFAR-10数据集。该数据集包含10个不同类别(飞机、汽车、鸟、猫、鹿、狗、青蛙、马、船和卡车)等的60,000张32×32彩色图像。该数据集可以通过keras进行评估。datasets API函数。
第1步:首先,我们导入keras模块及其api。这些api有助于构建ResNet模型的体系结构。
代码:导入库
# Import Keras modules and its important APIs
import keras
from keras.layers import Dense, Conv2D, BatchNormalization, Activation
from keras.layers import AveragePooling2D, Input, Flatten
from keras.optimizers import Adam
from keras.callbacks import ModelCheckpoint, LearningRateScheduler
from keras.callbacks import ReduceLROnPlateau
from keras.preprocessing.image import ImageDataGenerator
from keras.regularizers import l2
from keras import backend as K
from keras.models import Model
from keras.datasets import cifar10
import numpy as np
import os
第2步:现在,我们设置ResNet架构所需的不同超参数。我们还对数据集做了一些预处理,为训练做准备。
代码:设置训练超参数
# Setting Training Hyperparameters
batch_size = 32  # original ResNet paper uses batch_size = 128 for training
epochs = 200
data_augmentation = True
num_classes = 10

# Data Preprocessing
subtract_pixel_mean = True
n = 3

# Select ResNet Version
version = 1

# Computed depth of
if version == 1:
    depth = n * 6 + 2
elif version == 2:
    depth = n * 9 + 2

# Model name, depth and version
model_type = 'ResNet % dv % d' % (depth, version)

# Load the CIFAR-10 data.
(x_train, y_train), (x_test, y_test) = cifar10.load_data()

# Input image dimensions.
input_shape = x_train.shape[1:]

# Normalize data.
x_train = x_train.astype('float32') / 255
x_test = x_test.astype('float32') / 255

# If subtract pixel mean is enabled
if subtract_pixel_mean:
    x_train_mean = np.mean(x_train, axis = 0)
    x_train -= x_train_mean
    x_test -= x_train_mean

# Print Training and Test Samples
print('x_train shape:', x_train.shape)
print(x_train.shape[0], 'train samples')
print(x_test.shape[0], 'test samples')
print('y_train shape:', y_train.shape)

# Convert class vectors to binary class matrices.
y_train = keras.utils.to_categorical(y_train, num_classes)
y_test = keras.utils.to_categorical(y_test, num_classes)
第3步:在这一步中,我们根据epoch的个数来设置学习率。随着迭代次数的增加,学习率必须降低以保证更好的学习。
代码:设置不同epoch数的LR
# Setting LR for different number of Epochs
def lr_schedule(epoch):
    lr = 1e-3
    if epoch > 180:
        lr *= 0.5e-3
    elif epoch > 160:
        lr *= 1e-3
    elif epoch > 120:
        lr *= 1e-2
    elif epoch > 80:
        lr *= 1e-1
    print('Learning rate: ', lr)
    return lr
第4步:定义基本的ResNet构建块,可以用来定义ResNet V1和V2架构。
代码:基本的ResNet构建块
# Basic ResNet Building Block


def resnet_layer(inputs,
                 num_filters=16,
                 kernel_size=3,
                 strides=1,
                 activation='relu',
                 batch_normalization=True,
    conv=Conv2D(num_filters,
                  kernel_size=kernel_size,
                  strides=strides,
                  padding='same',
                  kernel_initializer='he_normal',
                  kernel_regularizer=l2(1e-4))

    x=inputs
    if conv_first:
        x = conv(x)
        if batch_normalization:
            x = BatchNormalization()(x)
        if activation is not None:
            x = Activation(activation)(x)
    else:
        if batch_normalization:
            x = BatchNormalization()(x)
        if activation is not None:
            x = Activation(activation)(x)
        x = conv(x)
    return x
第5步:定义基于我们上面定义的ResNet构建块的ResNet V1架构:
代码:ResNet V1架构
def resnet_v1(input_shape, depth, num_classes=10):

    if (depth - 2) % 6 != 0:
        raise ValueError('depth should be 6n + 2 (eg 20, 32, 44 in [a])')
    # Start model definition.
    num_filters = 16
    num_res_blocks = int((depth - 2) / 6)

    inputs = Input(shape=input_shape)
    x = resnet_layer(inputs=inputs)
    # Instantiate the stack of residual units
    for stack in range(3):
        for res_block in range(num_res_blocks):
            strides = 1
            if stack & gt
            0 and res_block == 0:  # first layer but not first stack
                strides = 2  # downsample
            y = resnet_layer(inputs=x,
                             num_filters=num_filters,
                             strides=strides)
            y = resnet_layer(inputs=y,
                             num_filters=num_filters,
                             activation=None)
            if stack & gt
            0 and res_block == 0:  # first layer but not first stack
                # linear projection residual shortcut connection to match
                # changed dims
                x = resnet_layer(inputs=x,
                                 num_filters=num_filters,
                                 kernel_size=1,
                                 strides=strides,
                                 activation=None,
                                 batch_normalization=False)
            x = keras.layers.add([x, y])
            x = Activation('relu')(x)
        num_filters *= 2

    # Add classifier on top.
    # v1 does not use BN after last shortcut connection-ReLU
    x = AveragePooling2D(pool_size=8)(x)
    y = Flatten()(x)
    outputs = Dense(num_classes,
                    activation='softmax',
                    kernel_initializer='he_normal')(y)

    # Instantiate model.
    model = Model(inputs=inputs, outputs=outputs)
    return model
第6步:定义基于我们上面定义的ResNet构建块的ResNet V2架构:
代码:ResNet V2架构
# ResNet V2 architecture
def resnet_v2(input_shape, depth, num_classes=10):
    if (depth - 2) % 9 != 0:
        raise ValueError('depth should be 9n + 2 (eg 56 or 110 in [b])')
    # Start model definition.
    num_filters_in = 16
    num_res_blocks = int((depth - 2) / 9)

    inputs = Input(shape=input_shape)
    # v2 performs Conv2D with BN-ReLU on input before splitting into 2 paths
    x = resnet_layer(inputs=inputs,
                     num_filters=num_filters_in,
                     conv_first=True)

    # Instantiate the stack of residual units
    for stage in range(3):
        for res_block in range(num_res_blocks):
            activation = 'relu'
            batch_normalization = True
            strides = 1
            if stage == 0:
                num_filters_out = num_filters_in * 4
                if res_block == 0:  # first layer and first stage
                    activation = None
                    batch_normalization = False
            else:
                num_filters_out = num_filters_in * 2
                if res_block == 0:  # first layer but not first stage
                    strides = 2    # downsample

            # bottleneck residual unit
            y = resnet_layer(inputs=x,
                             num_filters=num_filters_in,
                             kernel_size=1,
                             strides=strides,
                             activation=activation,
                             batch_normalization=batch_normalization,
                             conv_first=False)
            y = resnet_layer(inputs=y,
                             num_filters=num_filters_in,
                             conv_first=False)
            y = resnet_layer(inputs=y,
                             num_filters=num_filters_out,
                             kernel_size=1,
                             conv_first=False)
            if res_block == 0:
                # linear projection residual shortcut connection to match
                # changed dims
                x = resnet_layer(inputs=x,
                                 num_filters=num_filters_out,
                                 kernel_size=1,
                                 strides=strides,
                                 activation=None,
                                 batch_normalization=False)
            x = keras.layers.add([x, y])

        num_filters_in = num_filters_out

    # Add classifier on top.
    # v2 has BN-ReLU before Pooling
    x = BatchNormalization()(x)
    x = Activation('relu')(x)
    x = AveragePooling2D(pool_size=8)(x)
    y = Flatten()(x)
    outputs = Dense(num_classes,
                    activation='softmax',
                    kernel_initializer='he_normal')(y)

    # Instantiate model.
    model = Model(inputs=inputs, outputs=outputs)
    return model
第7步:下面的代码用于训练和测试我们上面定义的ResNet v1和v2架构:
代码:Main函数
# Main function
if version == 2:
    model = resnet_v2(input_shape = input_shape, depth = depth)
else:
    model = resnet_v1(input_shape = input_shape, depth = depth)

model.compile(loss ='categorical_crossentropy',
              optimizer = Adam(learning_rate = lr_schedule(0)),
              metrics =['accuracy'])
model.summary()
print(model_type)

# Prepare model saving directory.
save_dir = os.path.join(os.getcwd(), 'saved_models')
model_name = 'cifar10_% s_model.{epoch:03d}.h5' % model_type
if not os.path.isdir(save_dir):
    os.makedirs(save_dir)
filepath = os.path.join(save_dir, model_name)

# Prepare callbacks for model saving and for learning rate adjustment.
checkpoint = ModelCheckpoint(filepath = filepath,
                             monitor ='val_acc',
                             verbose = 1,
                             save_best_only = True)

lr_scheduler = LearningRateScheduler(lr_schedule)

lr_reducer = ReduceLROnPlateau(factor = np.sqrt(0.1),
                               cooldown = 0,
                               patience = 5,
                               min_lr = 0.5e-6)

callbacks = [checkpoint, lr_reducer, lr_scheduler]

# Run training, with or without data augmentation.
if not data_augmentation:
    print('Not using data augmentation.')
    model.fit(x_train, y_train,
              batch_size = batch_size,
              epochs = epochs,
              validation_data =(x_test, y_test),
              shuffle = True,
              callbacks = callbacks)
else:
    print('Using real-time data augmentation.')
    # This will do preprocessing and realtime data augmentation:
    datagen = ImageDataGenerator(
        # set input mean to 0 over the dataset
        featurewise_center = False,
        # set each sample mean to 0
        samplewise_center = False,
        # divide inputs by std of dataset
        featurewise_std_normalization = False,
        # divide each input by its std
        samplewise_std_normalization = False,
        # apply ZCA whitening
        zca_whitening = False,
        # epsilon for ZCA whitening
        zca_epsilon = 1e-06,
        # randomly rotate images in the range (deg 0 to 180)
        rotation_range = 0,
        # randomly shift images horizontally
        width_shift_range = 0.1,
        # randomly shift images vertically
        height_shift_range = 0.1,
        # set range for random shear
        shear_range = 0.,
        # set range for random zoom
        zoom_range = 0.,
        # set range for random channel shifts
        channel_shift_range = 0.,
        # set mode for filling points outside the input boundaries
        fill_mode ='nearest',
        # value used for fill_mode = "constant"
        cval = 0.,
        # randomly flip images
        horizontal_flip = True,
        # randomly flip images
        vertical_flip = False,
        # set rescaling factor (applied before any other transformation)
        rescale = None,
        # set function that will be applied on each input
        preprocessing_function = None,
        # image data format, either "channels_first" or "channels_last"
        data_format = None,
        # fraction of images reserved for validation (strictly between 0 and 1)
        validation_split = 0.0)

    # Compute quantities required for featurewise normalization
    # (std, mean, and principal components if ZCA whitening is applied).
    datagen.fit(x_train)

    # Fit the model on the batches generated by datagen.flow().
    model.fit_generator(datagen.flow(x_train, y_train, batch_size = batch_size),
                        validation_data =(x_test, y_test),
                        epochs = epochs, verbose = 1, workers = 4,
                        callbacks = callbacks)

# Score trained model.
scores = model.evaluate(x_test, y_test, verbose = 1)
print('Test loss:', scores[0])
print('Test accuracy:', scores[1])
4、结果与总结
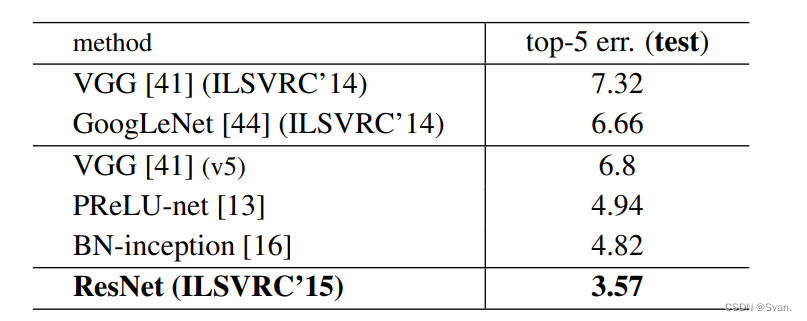
在ImageNet数据集上,作者使用了152层的ResNet,其深度是VGG19的8倍,但参数仍然较少。在ImageNet测试集上,这些ResNets的集合产生的错误率仅为3.7%,这一结果赢得了ILSVRC 2015竞赛。在COCO对象检测数据集上,由于它的深度表示,也产生了28%的相对改进。

- 上面的结果表明,快捷连接将能够解决增加层数所带来的问题,因为当我们将层数从18层增加到34层时,ImageNet验证集上的错误率也会与普通网络不同而降低。
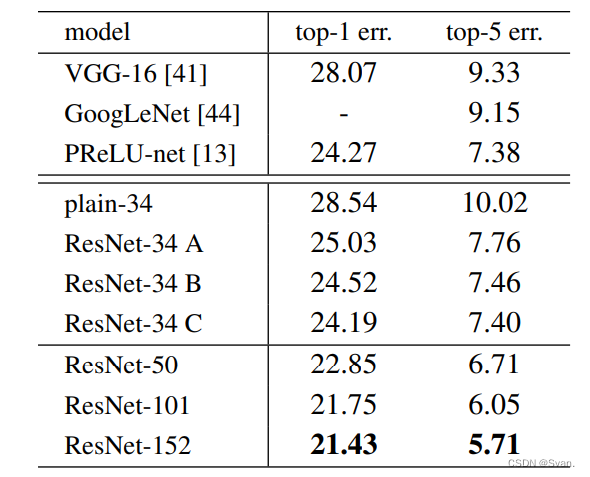
- 下面是ImageNet测试集的结果。ResNet的前5名错误率为3.57%,是最低的,因此ResNet架构在2015年ImageNet分类挑战中排名第一。
