利用RNN-attention模型实现
写在前面
在前文介绍了项目的数据集构建:传送门,以及利用seq2seq-attention模型实现意图分类与槽位填充任务:传送门
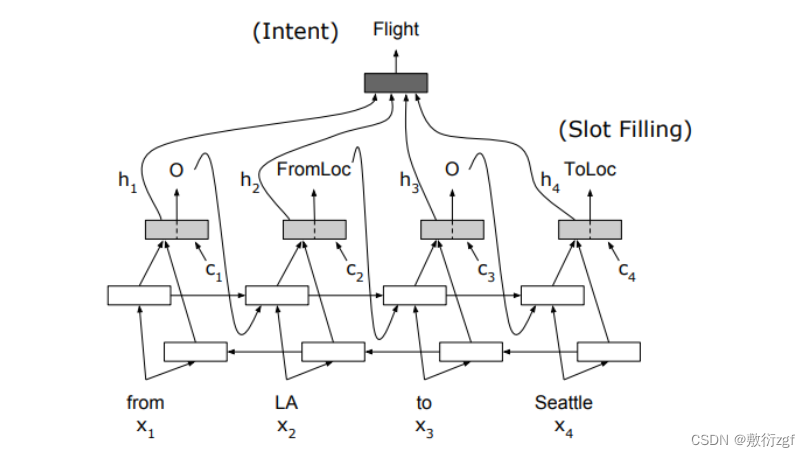
本文利用BiRNN-attention实现:实现细节请参考论文:《Attention-Based Recurrent Neural Network Models for Joint Intent Detection and Slot Filling》
1.利用encoder中的最后一个time step中的双向隐层,再加上平均池化或者利用attention加权平均,最后接一个fc层进行意图分类;
2.槽位填充是序列标注,双向隐藏状态加attention权重,再经过一个单元GRUcell,最后接一个fc层分类。这里注意一点是,槽的每一步的预测输出会输入到GRUcell中的前向传播时间步中;
3.总的loss = 意图分类loss + 槽位填充loss
一、模型结构图
二、构建attention权重计算方式
class Attention(nn.Module):
    def __init__(self, hidden_dim):
        super(Attention, self).__init__()
        self.attn = nn.Linear((hidden_dim * 2), hidden_dim)
        self.v = nn.Linear(hidden_dim, 1, bias=False)

    def concat_score(self, hidden, encoder_output):
        seq_len = encoder_output.shape[1]
        hidden = hidden.unsqueeze(1).repeat(1, seq_len, 1) # [batch_size, seq_len, hidden_size]
        energy = torch.tanh(self.attn(torch.cat((hidden, encoder_output),dim=2))) # [batch_size, seq_len, hidden_dim]
        attention = self.v(energy).squeeze(2) #[batch_size, seq_len]
        return attention #[batch_size, seq_len]

    def forward(self, hidden, encoder_output):
        # hidden = [batch_size, hidden_size]
        # #encoder_output=[batch_size, seq_len, hidden_size]

        attn_energies = self.concat_score(hidden, encoder_output)

        return F.softmax(attn_energies, dim=1).unsqueeze(1)
- 初始化方法(init):接收一个隐藏维度 hidden_dim 作为输入参数。在初始化过程中,通过调用父类 nn.Module 的构造函数进行初始化操作,然后创建了两个线性层 (nn.Linear),即 self.attn 和 self.v;
- self.attn 是一个线性层,将输入的维度设为 (hidden_dim * 2),输出的维度设为 hidden_dim;
- self.v 是另一个线性层,将输入的维度设为 hidden_dim,输出的维度设为 1。此处设置了 bias=False,表示不使用偏置项;
- concat_score 方法:接收隐藏状态 hidden 和编码器输出 encoder_output 作为输入,计算注意力分数(attention scores);
- 首先,在 seq_len 维度上将 hidden 进行复制并展开,使其与 encoder_output 的形状相匹配(使用 unsqueeze 和 repeat 操作)得到的张量形状为 [batch_size, seq_len, hidden_dim];
- 将复制后的 hidden 和 encoder_output 进行拼接(使用 torch.cat),然后通过线性层 self.attn 将其映射到维度为 hidden_dim 的张量;
- 对映射后的张量应用 tanh 函数,得到energy张量,形状为 [batch_size, seq_len, hidden_dim];
- 将张量输入到线性层 self.v 中,将其映射为形状为 [batch_size, seq_len, 1] 的张量,并去掉最后一个维度,得到注意力分数张量,形状为 [batch_size, seq_len];
- forward 方法:前向传播函数,接收隐藏状态 hidden 和编码器输出 encoder_output 作为输入;
- 调用 concat_score 方法,计算注意力分数;
- 对注意力分数进行 softmax 归一化处理,以便获得注意力权重,即每个位置的重要程度。使用 PyTorch 中的 F.softmax 函数,在 dim=1 维度上进行归一化操作,保持维度不变。最后,在第一个维度上增加一个维度(使用 unsqueeze 操作),得到形状为 [batch_size, 1, seq_len] 的张量。
三、构建模型
class BirnnAttention(nn.Module):
    def __init__(self, source_input_dim, source_emb_dim, hidden_dim, n_layers, dropout, pad_index, slot_output_size, intent_output_size, slot_embed_dim, predict_flag):
        super(BirnnAttention, self).__init__()
        self.pad_index = pad_index
        self.hidden_dim = hidden_dim//2 # 双向lstm
        self.n_layers = n_layers
        self.slot_output_size = slot_output_size
        # 是否预测模式
        self.predict_flag = predict_flag

        self.source_embedding = nn.Embedding(source_input_dim, source_emb_dim, padding_idx=pad_index)
        # 双向gru,隐层维度是hidden_dim
        self.source_gru = nn.GRU(source_emb_dim, self.hidden_dim, n_layers, dropout=dropout, bidirectional=True, batch_first=True) #使用双向
        # 单个cell的隐层维度与gru隐层维度一样,为hidden_dim
        self.gru_cell = nn.GRUCell(slot_embed_dim + (2 * hidden_dim), hidden_dim)
        self.attention = Attention(hidden_dim)
        # 意图intent预测
        self.intent_output = nn.Linear(hidden_dim * 2, intent_output_size)
        # 槽slot预测
        self.slot_output = nn.Linear(hidden_dim, slot_output_size)
        self.slot_embedding = nn.Embedding(slot_output_size, slot_embed_dim)
    def forward(self, source_input, source_len):
        '''
        source_input:[batch_size, seq_len]
        source_len:[batch_size]
        '''
        if self.predict_flag:
            assert len(source_input) == 1, '预测时一次输入一句话'
            seq_len = source_len[0]

            # 1.Encoder阶段,将输入的source进行编码
            # source_embedded:[batch_size, seq_len, source_emb_dim]
            source_embedded = self.source_embedding(source_input)
            packed = torch.nn.utils.rnn.pack_padded_sequence(source_embedded, source_len, batch_first=True,
                                                             enforce_sorted=True)  # 这里enfore_sotred=True要求数据根据词数排序
            source_output, hidden = self.source_gru(packed)
            # source_output=[batch_size, seq_len, 2 * self.hidden_size],这里的2*self.hidden_size = hidden_dim
            # hidden=[n_layers * 2, batch_size, self.hidden_size]
            source_output, _ = torch.nn.utils.rnn.pad_packed_sequence(source_output, batch_first=True,
                                                                      padding_value=self.pad_index, total_length=len(
                    source_input[0]))  # 这个会返回output以及压缩后的legnths
            '''
            source_hidden[-2,:,:]是gru最后一步的forward
            source_hidden[-1,:,:]是gru最后一步的backward
            '''
            # source_hidden=[batch_size, 2*self.hidden_size]
            source_hidden = torch.cat((hidden[-2, :, :], hidden[-1, :, :]), dim=1)
            # 保存注意力向量
            attention_context = torch.zeros(1, seq_len, self.hidden_dim * 2)
            output_tokens = []

            aligns = source_output.transpose(0, 1)  # 对齐向量

            input = torch.tensor(2).unsqueeze(0)  # 预测阶段解码器输入第一个token-> <sos>
            for s in range(seq_len):
                aligned = aligns[s].unsqueeze(1)  # [batch_size, 1, hidden_size*2]
                # embedded=[1, 1, slot_embed_dim]
                slot_embedded = self.slot_embedding(input)
                slot_embedded = slot_embedded.unsqueeze(0)
                # 利用利用上一步的hidden与encoder_output,计算attention权重
                # attention_weights=[batch_size, 1, seq_len]
                attention_weights = self.attention(source_hidden, source_output)

                '''
                以下是计算上下文:利用attention权重与encoder_output计算attention上下文向量
                注意力权重分布用于产生编码器隐藏状态的加权和,加权平均的过程。得到的向量称为上下文向量
                '''
                context = attention_weights.bmm(source_output)
                attention_context[:, s, :] = context

                combined_grucell_input = torch.cat([aligned, slot_embedded, context], dim=2)

                source_hidden = self.gru_cell(combined_grucell_input.squeeze(1), source_hidden)

                slot_prediction = self.slot_output(source_hidden)

                input = slot_prediction.argmax(1)
                output_token = input.squeeze().detach().item()

                output_tokens.append(output_token)

            # 意图识别
            # 拼接注意力向量和encoder的输出
            combined_attention_sourceoutput = torch.cat([attention_context, source_output], dim=2)
            intent_outputs = self.intent_output(torch.mean(combined_attention_sourceoutput, dim=1))
            intent_outputs = intent_outputs.squeeze()
            intent_outputs = intent_outputs.argmax()
            return output_tokens, intent_outputs

        else:
            # 1.Encoder阶段,将输入的source进行编码
            # source_embedded:[batch_size, seq_len, source_emb_dim]
            source_embedded = self.source_embedding(source_input)
            packed = torch.nn.utils.rnn.pack_padded_sequence(source_embedded, source_len, batch_first=True,
                                                             enforce_sorted=True)  # 这里enfore_sotred=True要求数据根据词数排序
            source_output, hidden = self.source_gru(packed)
            # source_output=[batch_size, seq_len, 2 * self.hidden_size],这里的2*self.hidden_size = hidden_dim
            # hidden=[n_layers * 2, batch_size, self.hidden_size]
            source_output, _ = torch.nn.utils.rnn.pad_packed_sequence(source_output, batch_first=True,
                                                                      padding_value=self.pad_index, total_length=len(
                    source_input[0]))  # 这个会返回output以及压缩后的legnths
            '''
            source_hidden[-2,:,:]是gru最后一步的forward
            source_hidden[-1,:,:]是gru最后一步的backward
            '''
            # source_hidden=[batch_size, 2*self.hidden_size]
            source_hidden = torch.cat((hidden[-2, :, :], hidden[-1, :, :]), dim=1)

            # 2.Decoder阶段,预测slot与intent
            batch_size = source_input.shape[0]
            seq_len = source_input.shape[1]
            # 保存slot的预测概率
            slot_outputs = torch.zeros(batch_size, seq_len, self.slot_output_size).to(device)

            # 保存注意力向量
            attention_context = torch.zeros(batch_size, seq_len, self.hidden_dim * 2).to(device)

            # 每个batch数据的第一个字符<sos>对应的是index是2
            input = torch.tensor(2).repeat(batch_size).to(device)
            aligns = source_output.transpose(0, 1)  # 利用encoder output最后一层的每一个时间步
            # 槽识别
            for t in range(1, seq_len):
                '''
                解码器输入的初始hidden为encoder的最后一步的hidden
                接收输出即predictions和新的hidden状态
                '''
                aligned = aligns[t].unsqueeze(1)  # [batch_size, 1, hidden_size] # hidden_size包含前向和后向隐状态向量
                input = input.unsqueeze(1)
                # input=[batch_size, 1]
                # hidden=[batch_size, hidden_size] 初始化为encoder的最后一层 [batch_size, hidden_size]
                # encoder_output=[batch_size, seq_len, hidden_dim*2]
                # aligned=[batch_size, 1, hidden_dim*2]

                # embedded=[batch_sze, 1, slot_embed_dim]
                slot_embedded = self.slot_embedding(input)

                # 利用利用上一步的hidden与encoder_output,计算attention权重
                # attention_weights=[batch_size, 1, seq_len]
                attention_weights = self.attention(source_hidden, source_output)

                '''
                以下是计算上下文:利用attention权重与encoder_output计算attention上下文向量
                注意力权重分布用于产生编码器隐藏状态的加权和,加权平均的过程。得到的向量称为上下文向量
                '''
                context = attention_weights.bmm(
                    source_output)  # [batch_size, 1, seq_len] * [batch_size, seq_len, hidden_dim]=[batch_size, 1, hidden_dim]
                attention_context[:, t, :] = context.squeeze(1)
                # combined_grucell_input=[batch_size, 1, (hidden_size + slot_embed_dim + hidden_dim)]
                combined_grucell_input = torch.cat([aligned, slot_embedded, context], dim=2)
                # [batch_size, hidden_dim]
                source_hidden = self.gru_cell(combined_grucell_input.squeeze(1), source_hidden)
                # 预测slot, [batch_size, slot_output_size]
                slot_prediction = self.slot_output(source_hidden)
                slot_outputs[:, t, :] = slot_prediction
                # 获取预测的最大概率的token
                input = slot_prediction.argmax(1)
            # 意图识别,不同于原论文。这里拼接了slot所有时间步attention_context与句子编码后的输出,通过均值后作为意图识别的输入
            # 拼接注意力向量和encoder的输出,[batch_size, seq_len, hidden_dim * 2]
            combined_attention_sourceoutput = torch.cat([attention_context, source_output], dim=2)
            intent_outputs = self.intent_output(torch.mean(combined_attention_sourceoutput, dim=1))

            return slot_outputs, intent_outputs
构建模型,优化函数,损失函数,学习率衰减函数
def build_model(source, target, label, source_emb_dim, hidden_dim, n_layers, dropout, slot_embed_dim, lr, gamma,
                weight_decay):
    '''
    训练seq2seq model
    input与output的维度是字典的大小。
    encoder与decoder的embedding与dropout可以不同
    网络的层数与hiden/cell状态的size必须相同
    '''
    input_dim = len(source.vocab)  # source 词典大小(即词数量)
    output_dim = len(target.vocab)  # target 词典大小(即实体类型数量)
    label_dim = len(label.vocab)  # label 词典大小(即意图类别数量)

    model = BirnnAttention(input_dim, source_emb_dim, hidden_dim, n_layers, dropout,
                           source.vocab.stoi[source.pad_token], output_dim, label_dim, slot_embed_dim, False).to(device)

    model.apply(init_weights)

    # 定义优化函数
    optimizer = optim.Adam(model.parameters(), lr=lr)  # , weight_decay=weight_decay)
    # optimizer = torch.optim.SGD(model.parameters(), lr=lr) #, momentum=0.9, nesterov=True)
    # 定义lr衰减
    # scheduler = lr_scheduler.ExponentialLR(optimizer, gamma=gamma)

    '''
        当网络的评价指标不在提升的时候,可以通过降低网络的学习率来提高网络性能:
        optimer指的是网络的优化器
        mode (str) ,可选择‘min’或者‘max’,min表示当监控量停止下降的时候,学习率将减小,max表示当监控量停止上升的时候,学习率将减小。默认值为‘min’
        factor 学习率每次降低多少,new_lr = old_lr * factor
        patience=10,容忍网路的性能不提升的次数,高于这个次数就降低学习率
        verbose(bool) - 如果为True,则为每次更新向stdout输出一条消息。 默认值:False
        threshold(float) - 测量新最佳值的阈值,仅关注重大变化。 默认值:1e-4
        cooldown(int): 冷却时间“,当调整学习率之后,让学习率调整策略冷静一下,让模型再训练一段时间,再重启监测模式。
        min_lr(float or list):学习率下限,可为 float,或者 list,当有多个参数组时,可用 list 进行设置。
        eps(float):学习率衰减的最小值,当学习率变化小于 eps 时,则不调整学习率。
    '''
    scheduler = lr_scheduler.ReduceLROnPlateau(optimizer=optimizer, mode='min', factor=0.1, patience=2, verbose=False)
    # 这里忽略<pad>的损失。
    target_pad_index = target.vocab.stoi[source.pad_token]
    # 定义损失函数(实体识别)
    loss_slot = nn.CrossEntropyLoss(ignore_index=target_pad_index)
    # 定义损失函数(意图识别)
    loss_intent = nn.CrossEntropyLoss()

    return model, optimizer, scheduler, loss_slot, loss_intent
训练
def train(model, iterator, optimizer, loss_slot, loss_intent, clip):
    '''
    开始训练:
        1.得到source与target句子
        2.上一批batch的计算梯度归0
        3.给模型喂source与target,并得到输出output
        4.由于损失函数只适用于带有1维target和2维的input,我们需要用view进行flatten(在计算损失时,从output与target中忽略了第一列<sos>)
        5.反向传播计算梯度loss.backward()
        6.梯度裁剪,防止梯度爆炸
        7.更新模型参数
        8.损失值求和(返回所有batch的损失的均值)
    '''
    model.train()
    epoch_loss = 0

    for i, batch in enumerate(iterator):
        src, src_lens = batch.source  # src=[batch_size, seq_len],这里batch.src返回src和src的长度,因为在使用torchtext.Field时设置include_lengths=True
        trg, _ = batch.target  # trg=[batch_size, seq_len]
        label = batch.intent  # [batch_size]
        src = src.to(device)
        trg = trg.to(device)
        label = label.to(device)

        # slot_outputs=[batch_size, trg_len, trg_vocab_size], intetn_outputs=[batch_size, intent_size]
        slot_outputs, intent_outputs = model(src, src_lens)

        # 以下在计算损失时,忽略了每个tensor的第一个元素及<sos>
        output_dim = slot_outputs.shape[-1]
        slot_outputs = slot_outputs[:, 1:, :].reshape(-1, output_dim)  # output=[batch_size * (seq_len - 1), output_dim]
        trg = trg[:, 1:].reshape(-1)  # trg=[batch_size * (seq_len - 1)]
        loss1 = loss_slot(slot_outputs, trg)
        loss2 = loss_intent(intent_outputs, label)
        loss = loss1 + loss2

        with amp.scale_loss(loss, optimizer) as scaled_loss:
            scaled_loss.backward()
        torch.nn.utils.clip_grad_norm_(model.parameters(), clip)
        optimizer.step()
        optimizer.zero_grad()
        epoch_loss += float(loss.item())
        # print('epoch_loss:{}'.format(float(loss.item())))
    return epoch_loss / len(iterator)
def train_model(model, train_iterator, val_iterator, optimizer, scheduler, loss_slot, loss_intent, n_epochs, clip,
                model_path, writer):
    '''
    开始训练我们的模型:
    1.每一次epoch,都会检查模型是否达到的最佳的validation loss,如果达到了,就更新
    最好的validation loss以及保存模型参数
    2.打印每个epoch的loss以及困惑度。
    '''
    best_valid_loss = float('inf')
    for epoch in range(n_epochs):
        start_time = time.time()
        train_loss = train(model, train_iterator, optimizer, loss_slot, loss_intent, clip)
        writer.add_scalar('loss', train_loss, global_step=epoch + 1)

        valid_loss = evaluate(model, val_iterator, loss_slot, loss_intent)
        end_time = time.time()
        epoch_mins, epoch_secs = epoch_time(start_time, end_time)

        if valid_loss < best_valid_loss:
            best_valid_loss = valid_loss
            torch.save(model.state_dict(), model_path)
        scheduler.step(valid_loss)
        print('epoch:{},time-mins:{},time-secs:{}'.format(epoch + 1, epoch_mins, epoch_secs))
        print('train loss:{},train perplexity:{}'.format(train_loss, math.exp(train_loss)))
        print('val loss:{}, val perplexity:{}'.format(valid_loss, math.exp(valid_loss)))
    writer.flush()
    writer.close()

    # 每个epoch所花时间


def epoch_time(start_time, end_time):
    run_tim = end_time - start_time
    run_mins = int(run_tim / 60)
    run_secs = int(run_tim - (run_mins * 60))
    return run_mins, run_secs


# 对所有模块和子模块进行权重初始化
def init_weights(model):
    for name, param in model.named_parameters():
        nn.init.uniform_(param.data, -0.08, 0.08)
评估
def evaluate(model, iterator, loss_slot, loss_intent):
    model.eval()  # 评估模型,切断dropout与batchnorm
    epoch_loss = 0
    with torch.no_grad():  # 不更新梯度
        for i, batch in enumerate(iterator):
            src, src_len = batch.source  # src=[batch_size, seq_len]
            trg, _ = batch.target  # trg=[batch_size, seq_len]
            label = batch.intent
            src = src.to(device)
            trg = trg.to(device)
            label = label.to(device)
            # output=[batch_size, seq_len, output_dim]
            slot_outputs, intent_outputs = model(src, src_len)

            output_dim = slot_outputs.shape[-1]
            slot_outputs = slot_outputs[:, 1:, :].reshape(-1,
                                                          output_dim)  # output=[batch_size * (seq_len - 1), output_dim]
            trg = trg[:, 1:].reshape(-1)  # trg=[batch_size * (seq_len - 1)]
            loss1 = loss_slot(slot_outputs, trg)
            loss2 = loss_intent(intent_outputs, label)
            loss = loss1 + loss2
            epoch_loss += float(loss.item())
    return epoch_loss / len(iterator)
定义模型参数
from torch.utils.tensorboard import SummaryWriter
writer = SummaryWriter(os.getcwd()+'/log', comment='intent_slot')

source_emb_dim = 64
slot_embed_dim = 64
hidden_dim = 128
n_layers = 1
dropout = 0.5
lr = 0.01
gamma = 0.1
weight_decay = 0.1
n_epochs = 50
clip = 5.0
model_path = os.path.join(os.getcwd(), "model.h5")
model, optimizer, scheduler, loss_slot, loss_intent = build_model(SOURCE,
                                                                  TARGET,
                                                                  LABEL,
                                                                  source_emb_dim,
                                                                  hidden_dim,
                                                                  n_layers,
                                                                  dropout,
                                                                  slot_embed_dim,
                                                                  lr,
                                                                  gamma,
                                                                  weight_decay)
model, optimizer = amp.initialize(model, optimizer, opt_level='O1') 混合精度训练技术,将模型和优化器与AMP(Automatic Mixed Precision)库相结合。传入模型model,优化器optimizer,并指定了混合精度的级别01。
混合精度训练是一种加速神经网络训练的技术,它通过同时使用低精度(如半精度浮点数)和高精度(如单精度浮点数)来进行计算,从而在保持模型准确性的同时提高训练速度。这种技术利用了低精度计算的优势,减少了存储和计算的开销。
在混合精度训练中,模型的参数更新步骤通常使用高精度计算,而前向传播、反向传播和梯度计算可以使用低精度计算。这样可以提高训练速度,并且在大多数情况下不会对模型的准确性产生显著影响。
使用AMP库的initialize()函数可以自动配置模型和优化器,使其适用于混合精度训练。
train_model(model,
            train_iter,
            val_iter,
            optimizer,
            scheduler,
            loss_slot,
            loss_intent,
            n_epochs,
            clip,
            model_path,
            writer)
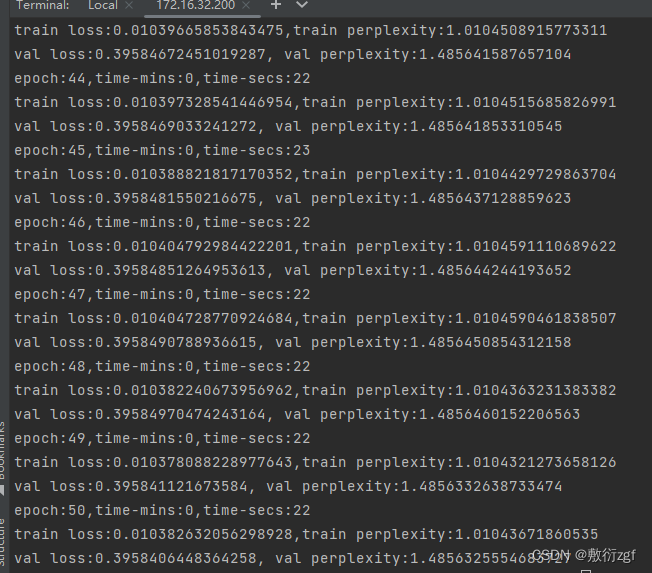
训练结果
