文章目录
- 前言
- 一、线程池
- 二、线程安全的单例模式
- 什么是单例模式
- 什么是设计模式
- 单例模式的特点
- 三、STL,智能指针和线程安全
- STL中的容器是否是线程安全的?
- 智能指针是否是线程安全的?
- 四、其他常见的各种锁
- 五、读者写者问题
- 读写锁
- 读写锁接口
- 初始化和销毁
- 加锁和解锁
- 读写锁的案例
- 总结
前言
正文开始!
一、线程池
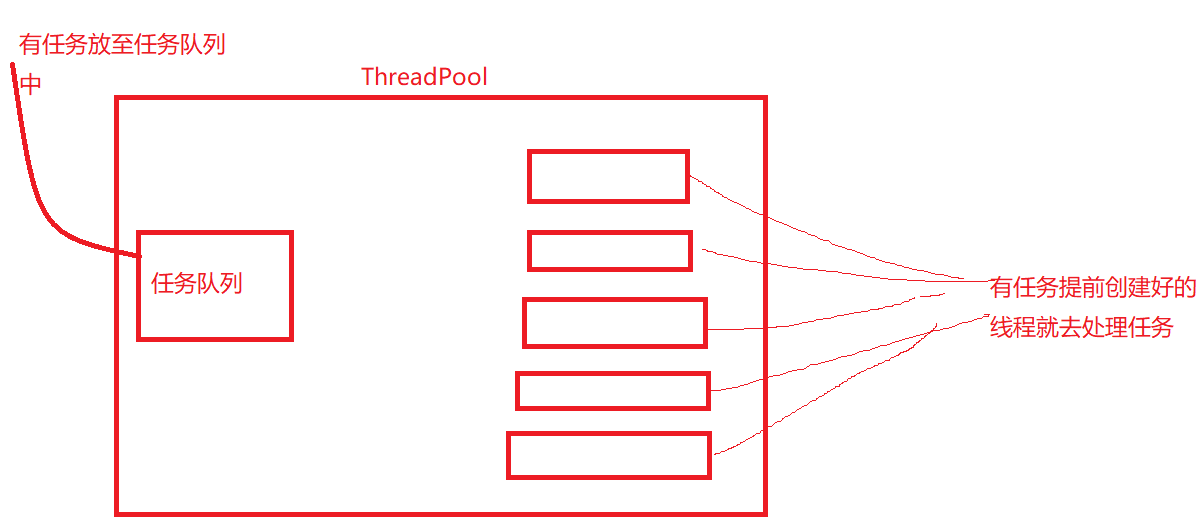
线程池是一种线程使用模式。线程过多会带来调度开销,进而影响缓存局部性和整体性能。而线程池维护着多个线程,等待着监督管理者分配可并发执行的任务。这避免了在处理短时间任务时创建和销毁线程的代价。线程池不仅能够保证内核的充分利用,还能防止过分调度。可用线程数量应该取决于可用的并发处理器,处理器内核,内存,网络sockets等的数量。
线程池的应用场景:
- 需要大量的线程来完成任务,且完成任务的时间比较短。WEB服务器完成网页请求这样的任务,使用线程池技术是非常合适的。因为单个任务小,而任务数量巨大,你可以想象一个热门网站的点击次数。但对于长时间的任务,比如一个Telenet连接请求,线程池的优点就不明显了。因为Telent会话时间比线程的创建时间大多了。
- 对性能要求苛刻的应用,比如要求服务器迅速响应客户请求
- 接受突发性的大量请求,但不至于使服务器因此产生大量线程的应用。突发性大量客户请求,在没有线程池情况下,将产生大量线程,虽然理论上大部分操作系统线程数目最大值不是问题,短时间内产生大量线程可能使内存达到极限,出现错误。
线程池的种类:
线程池示例:
- 创建固定数量线程池,循环从任务队列中获取任务对象。
- 获取到任务对象后,执行任务对象中的任务接口。
//log.hpp
#pragma once

#include<iostream>
#include<ctime>
#include<pthread.h>

std::ostream& Log()
{
   std::cout << "For Debug |" << " timestamp: " << (uint64_t)time(nullptr)
   << " | "<<"Thread: ["<<pthread_self()<<"] | ";
    return std::cout;
}
//Task.hpp
#pragma once
#include <iostream>
#include <string>

class Task
{
public:
    Task(int one = 0, int two = 0, char op = '+')
        : _elemOne(one), _elemTwo(two), _operator(op)
    {}
    int operator()()
    {
        return run();
    }
    int run()
    {
        int result = 0;
        switch (_operator)
        {
        case '+':
            result = _elemOne + _elemTwo;
            break;
        case '-':
            result = _elemOne - _elemTwo;
            break;
        case '*':
            result = _elemOne * _elemTwo;
            break;
        case '/':
        {
            if (_elemTwo == 0)
            {
                std::cout << "div zero,abort" << std::endl;
                result = -1;
            }
            else
            {
                result = _elemOne / _elemTwo;
            }
        }
        break;
        case '%':
        {
            if (_elemTwo == 0)
            {
                std::cout << "mod zero,abort" << std::endl;
                result = -1;
            }
            else
            {
                result = _elemOne % _elemTwo;
            }
        }
        break;
        default:
            std::cout << "非法操作: " << _operator << std::endl;
            break;
        }
        return result;
    }
    void get(int& one,int& two,char& op)
    {
        one=_elemOne;
        two=_elemTwo;
        op=_operator;
    }
private:
    int _elemOne;
    int _elemTwo;
    char _operator;
};
//ThreadPool.hpp
template <class T>
class ThreadPool
{
public:
    ThreadPool(int threadNum = gThreadNum)
        : _threadNum(threadNum), _isStart(false)
    {
        assert(_threadNum > 0);
        pthread_mutex_init(&_mutex, nullptr);
        pthread_cond_init(&_cond, nullptr);
    }
    ~ThreadPool()
    {
        pthread_mutex_destroy(&_mutex);
        pthread_cond_destroy(&_cond);
    }
    //类内成员,成员函数都有默认参数this
    static void *threadRoutine(void *args)
    {
        pthread_detach(pthread_self());
        ThreadPool<T> *tp = static_cast<ThreadPool<T> *>(args);
        while (true)
        {
            tp->lockQueue();
            while (!tp->haveTask())
            {
                tp->waitForTask();
            }
            T tmp = tp->pop();
            tp->unlockQueue();

            //for debug
            int one, two;
            char oper;
            tmp.get(one, two, oper);
            //规定所有的任务都必须要有一个run方法
            Log() << "新线程完成计算任务: " << one << oper << two << "="
                  << tmp.run() << "\n";
        }
    }
    void start()
    {
        assert(!_isStart);
        for (int i = 0; i < _threadNum; i++)
        {
            pthread_t tmp;
            pthread_create(&tmp, nullptr, threadRoutine, this);
        }
        _isStart = true;
    }
    void push(const T &in)
    {
        lockQueue();
        _taskQueue.push(in);
        choiceThreadForHandler();
        unlockQueue();
    }

private:
    void lockQueue() { pthread_mutex_lock(&_mutex); }
    void unlockQueue() { pthread_mutex_unlock(&_mutex); }
    bool haveTask() { return !_taskQueue.empty(); }
    void waitForTask() { pthread_cond_wait(&_cond, &_mutex); }
    void choiceThreadForHandler() { pthread_cond_signal(&_cond); }
    T pop()
    {
        T tmp = _taskQueue.front();
        _taskQueue.pop();
        return tmp;
    }

private:
    bool _isStart;
    int _threadNum;
    queue<T> _taskQueue;
    pthread_mutex_t _mutex;
    pthread_cond_t _cond;

};

//main.cc
int main()
{
    unique_ptr<ThreadPool<Task>> tp(new ThreadPool<Task>());
    tp->start();
    srand((unsigned long)time(nullptr)^getpid()^pthread_self());
    //派发任务的线程
    while(true)
    {
        int one=rand()%50;
        int two=rand()%20;
        char oper=opers[rand()%opers.size()];
        Log()<<"派发计算任务: "<<one<<oper<<two<<"=?"<<"\n";
        Task t(one,two,oper);
        tp->push(t);
        sleep(1);
    }
    return 0;
}
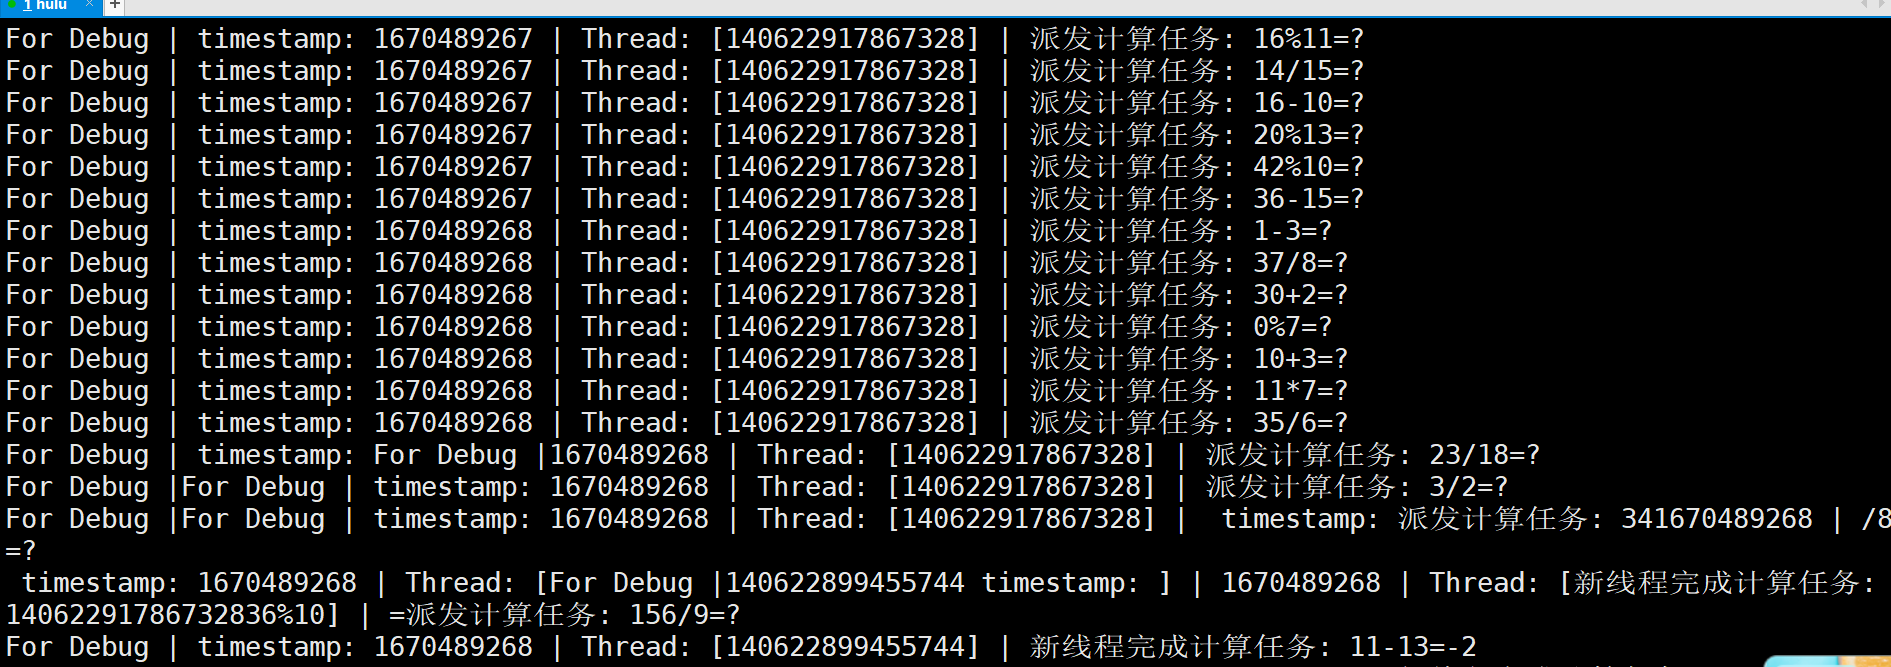
派发任务慢一点
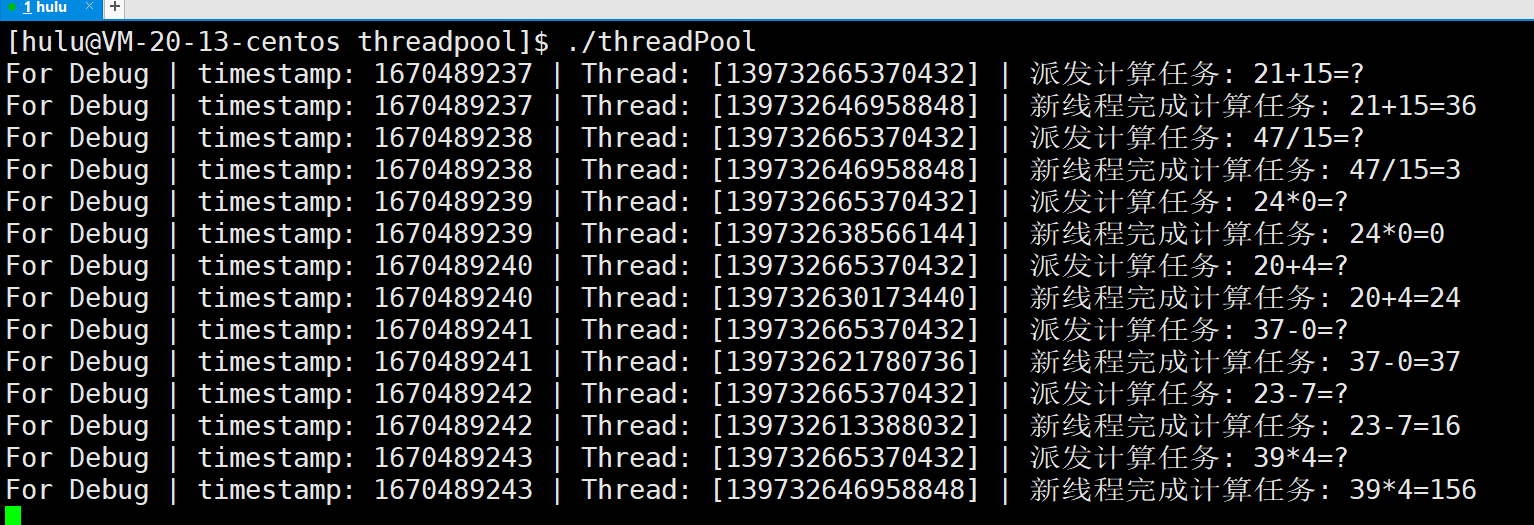
派发任务不加访问控制!
打出来的东西很乱!
二、线程安全的单例模式
什么是单例模式
单例模式是一种"经典的,常用的,常考的"设计模式。
什么是设计模式
IT行业这么或,涌入的人很多。俗话说林子大了啥鸟都有。大佬和菜鸡们两极分化越来越严重。为了让菜鸟们不太拖大佬的后退,于是大佬们针对一些经典的常见的场景,给定了一些对应的解决方案,这个就是设计模式。
单例模式的特点
某些类,应该只有一个对象(实例),就称之为单例。
在很多服务器开发场景中,经常需要让服务器加载很多的数据(上百G)到内存中。此时往往需要用一个单例的类来管理这些数据。
线程池改为单例模式
#pragma once

#include <iostream>
#include <queue>
#include <cassert>
#include <cstdlib>
#include <unistd.h>
#include <pthread.h>
#include<sys/prctl.h>
#include "Log.hpp"
#include "Task.hpp"
#include "lock.hpp"
using namespace std;

const int gThreadNum = 5;

//设计为懒汉模式
template <class T>
class ThreadPool
{
private:
    ThreadPool(int threadNum = gThreadNum)
        : _threadNum(threadNum), _isStart(false)
    {
        assert(_threadNum > 0);
        pthread_mutex_init(&_mutex, nullptr);
        pthread_cond_init(&_cond, nullptr);
    }
    ThreadPool(const ThreadPool<T> &) = delete;
    void operator=(const ThreadPool<T> &) = delete;

public:
    static ThreadPool<T> *getInstance()
    {
        static Mutex mutex;
        if (nullptr == instance)//仅仅是过滤重复的判断
        {
            LockGuard lockguard(&mutex);//进入代码块,加锁,退出代码块,自动解锁
            if (nullptr == instance)
            {
                instance = new ThreadPool<T>();
            }
        }
        return instance;
    }
    ~ThreadPool()
    {
        pthread_mutex_destroy(&_mutex);
        pthread_cond_destroy(&_cond);
    }
    //类内成员,成员函数都有默认参数this
    static void *threadRoutine(void *args)
    {
        pthread_detach(pthread_self());
        ThreadPool<T> *tp = static_cast<ThreadPool<T> *>(args);
        prctl(PR_SET_NAME,"follower");
        while (true)
        {
            tp->lockQueue();
            while (!tp->haveTask())
            {
                tp->waitForTask();
            }
            T tmp = tp->pop();
            tp->unlockQueue();

            // for debug
            int one, two;
            char oper;
            tmp.get(one, two, oper);
            //规定所有的任务都必须要有一个run方法
            Log() << "新线程完成计算任务: " << one << oper << two << "="
                  << tmp.run() << "\n";
        }
    }
    void start()
    {
        assert(!_isStart);
        for (int i = 0; i < _threadNum; i++)
        {
            pthread_t tmp;
            pthread_create(&tmp, nullptr, threadRoutine, this);
        }
        _isStart = true;
    }
    void push(const T &in)
    {
        lockQueue();
        _taskQueue.push(in);
        choiceThreadForHandler();
        unlockQueue();
    }

private:
    void lockQueue() { pthread_mutex_lock(&_mutex); }
    void unlockQueue() { pthread_mutex_unlock(&_mutex); }
    bool haveTask() { return !_taskQueue.empty(); }
    void waitForTask() { pthread_cond_wait(&_cond, &_mutex); }
    void choiceThreadForHandler() { pthread_cond_signal(&_cond); }
    T pop()
    {
        T tmp = _taskQueue.front();
        _taskQueue.pop();
        return tmp;
    }

private:
    bool _isStart;
    int _threadNum;
    queue<T> _taskQueue;
    pthread_mutex_t _mutex;
    pthread_cond_t _cond;
    static ThreadPool<T> *instance;
};

template <class T>
ThreadPool<T> *ThreadPool<T>::instance = nullptr;
#include"ThreadPool.hpp"
#include<memory>
#include<ctime>

const string opers="+-*/%";

int main()
{
    prctl(PR_SET_NAME,"master");
    unique_ptr<ThreadPool<Task>> tp(ThreadPool<Task>::getInstance());
    tp->start();
    srand((unsigned long)time(nullptr)^getpid()^pthread_self());
    //派发任务的线程
    while(true)
    {
        int one=rand()%50;
        int two=rand()%20;
        char oper=opers[rand()%opers.size()];
        Log()<<"派发计算任务: "<<one<<oper<<two<<"=?"<<"\n";
        Task t(one,two,oper);
        tp->push(t);
        sleep(1);
    }
    return 0;
}
三、STL,智能指针和线程安全
STL中的容器是否是线程安全的?
不是!
原因是STL的设计初衷是将性能挖掘到极致,而一旦涉及到加锁保证线程安全,回对性能造成巨大的影响。
而且对于不同的容器,加锁的方式不同,性能可能也不同(例如hash表的锁表和锁桶)
因此STl默认不是线程安全的。如果需要在多线程下使用,往往需要调用者自行保证线程安全。
智能指针是否是线程安全的?
对于unqiue_ptr,由于只是在当前代码块范围内生效,因此不涉及线程安全问题。
对于shared_ptr,多个对象需要公用一个引用计数变量,所以会存在线程安全问题。但是标准库实现的时候考虑到这个问题,基于原子操作(CAS)的方式保证shared_ptr能够高效,原子的引用操作计数。
四、其他常见的各种锁
- 悲观锁:在每次取数据时,总是担心数据会被其他线程修改,所以会在取数据前先加锁(读锁,写锁,行锁等),当其他线程想要访问数据时,被阻塞挂起。
- 乐观锁:每次取数据的时候,总是乐观的认为数据不会被其他线程修改,因此不上锁。但是在更新数据前会判断其他数据在更新前有没有对数据进行修改。主要采用两种方式:版本号机制和CSA操作。
- CAS操作:当需要更新数据时,判断当前内存值和之前取得的值是否相等。如果相等则用新值更新。若不等则失败,失败即重试,一般是一个自旋的过程,即不断重试。
- 自旋锁,公平锁,非公平锁…

自旋锁的接口和互斥锁的接口使用方法是类似的!


五、读者写者问题
读写锁
在编写多线程的时候,有一种情况是十分常见的。那就是,有些公共数据修改的机会比较少。相比较改写,他们读的机会反而高的多。通常而言,在读的过程中,往往伴随着查找的操作,中间耗时很长。给这种代码段加锁,会极大地降低我们程序的效率。那么有没有一种方法,可以专门处理这种多读少写的情况呢?---->有,那就是读写锁!
写者和写者是互斥关系!
读者和读者没有关系!
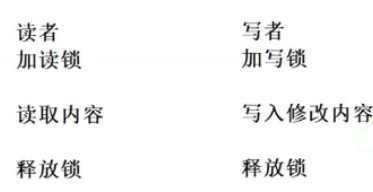
读者和写者是互斥和关系!
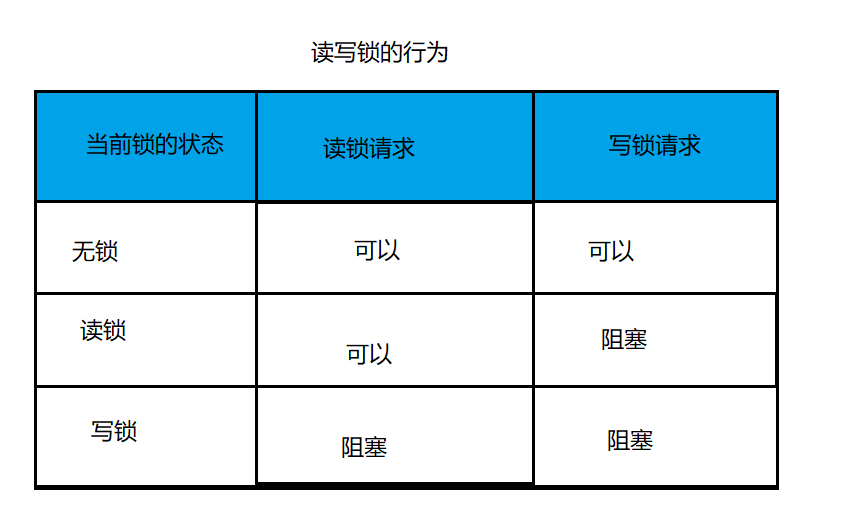
**注意:**写独占,读共享,读锁优先级高
读者写者 VS 生产者消费者本质区别:消费者会把数据拿走,而读者不会!
读写锁接口
初始化和销毁

加锁和解锁


读写锁的案例
读者写者进行操作的时候,读者非常多,频率特别高。写者比较少,频率高!
默认读写锁是读者优先的!
这样就可能会造成写者的饥饿问题!
读者优先
写者优先
#include <iostream>
#include <unistd.h>
#include <pthread.h>

using namespace std;

int board = 0;

pthread_rwlock_t rw;

void *reader(void *args)
{
    const char *name = static_cast<const char *>(args);
    sleep(2);
    cout << "sleep down" << endl;
    cout << "run..." << endl;
    while (true)
    {
        pthread_rwlock_rdlock(&rw);
        cout << "reader read: " << board << endl;
        pthread_rwlock_unlock(&rw);
    }
}
void *writer(void *args)
{
    const char *name = static_cast<const char *>(args);
    while (true)
    {
        pthread_rwlock_wrlock(&rw);
        board++;
        cout << "I am writer" << endl;
        pthread_rwlock_unlock(&rw);
    }
}

int main()
{
    pthread_rwlock_init(&rw, nullptr);
    pthread_t r1, r2, r3, r4, r5, w;
    pthread_create(&r1, nullptr, reader, (void *)"reader");
    pthread_create(&r2, nullptr, reader, (void *)"reader");
    pthread_create(&r3, nullptr, reader, (void *)"reader");
    pthread_create(&r4, nullptr, reader, (void *)"reader");
    pthread_create(&r5, nullptr, reader, (void *)"reader");
    pthread_create(&w, nullptr, writer, (void *)"writer");

    pthread_join(r1, nullptr);
    pthread_join(r2, nullptr);
    pthread_join(r3, nullptr);
    pthread_join(r4, nullptr);
    pthread_join(r5, nullptr);
    pthread_join(w, nullptr);
    pthread_rwlock_destroy(&rw);

    return 0;
}
这个现象不是很好的去控制,我也就不给大家操作了!
总结
至此,Linux的线程内容结束!下章开始网络的原理和网络编程!
(本章完!)


