目录
开始写我们的第一个测试
首先得有个 Bug
创建一个测试来暴露这个 bug
运行测试
修复这个 bug
更全面的测试
测试视图
针对视图的测试
Django 测试工具之 Client
改善视图代码
测试新视图
测试 DetailView
集中管理用例文件
使用Django测试运行器
源码等资料获取方法
本文初略的记录了Django测试板块相关信息,详情请阅官方文档:Django 中的测试 | Django 文档 | Django
开始写我们的第一个测试
首先得有个 Bug
幸运的是,我们的 polls 应用现在就有一个小 bug 需要被修复:我们的要求是如果 Question 是在一天之内发布的, Question.was_published_recently() 方法将会返回 True ,然而现在这个方法在 Question 的 pub_date 字段比当前时间还晚时(即未来)也会返回 True(这是个 Bug)。
创建一个测试来暴露这个 bug
按照惯例,Django 应用的测试应该写在应用的 tests.py 文件里。测试系统会自动的在所有以 tests 开头的文件里寻找以test开头的方法并执行测试代码。
将下面的代码写入 polls 应用里的 tests.py 文件内:
import datetime

from django.test import TestCase
from django.utils import timezone
from polls.models import Questions

# Create your tests here.


class QuestionModelTests(TestCase):

    def test_was_published_recently_with_future_question(self):
        """
        当pubdate的时间在未来时 was_published_recently() 返回 False
        """
        time = timezone.now() + datetime.timedelta(days=30)
        future_question = Questions(pub_date=time)
        self.assertIs(future_question.was_published_recently(), False)
我们创建了一个 django.test.TestCase 的子类,并添加了一个方法,此方法创建一个 pub_date 在未来某天的 Question 实例。然后检查它的 was_published_recently() 方法的返回值——根据在一天之内发布的要求,它应该是 False。
运行测试
在终端中,我们通过输入以下代码运行测试:
$ python manage.py test polls # polls为目录名称你将会看到运行结果:
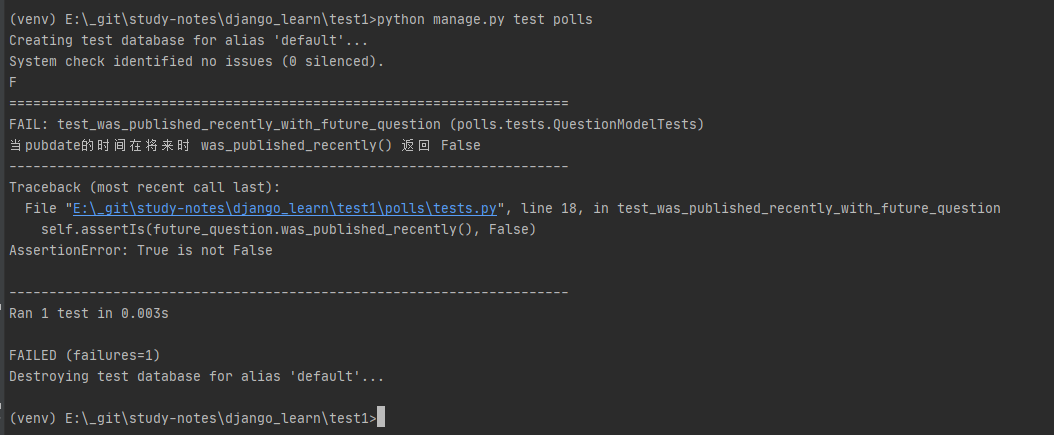
发生了什么呢?以下是测试的运行过程:
命令python manage.py test polls将会寻找polls应用里以tests开头的测试文件的代码- 它找到了 django.test.TestCase 的一个子类
- 它创建一个特殊的数据库供测试使用
- 它在类中寻找测试方法——以
test开头的方法。 - 在
test_was_published_recently_with_future_question方法中,它创建了一个pub_date值为 30 天后的Question实例。 - 接着使用
assertls()方法,发现was_published_recently()返回了True,而我们期望它返回False。
测试系统通知我们哪些测试样例失败了,和造成测试失败的代码所在的行号。
修复这个 bug
我们早已知道,当 pub_date 为未来某天时, Question.was_published_recently() 应该返回 False。我们修改 test1/polls/models.py 里的方法,让它只在日期是过去式的时候才返回 True:
def was_published_recently(self):
    now = timezone.now()
    return now >= self.pub_date >= now - datetime.timedelta(days=1)
然后重新运行测试:
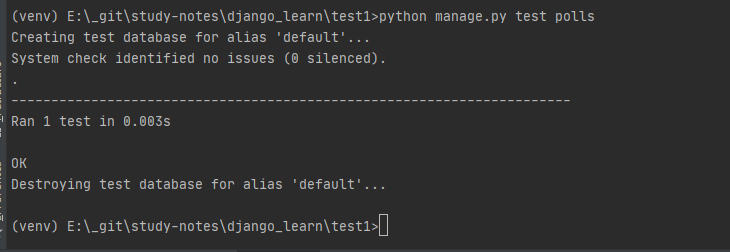
发现 bug 后,我们编写了能够暴露这个 bug 的自动化测试。在修复 bug 之后,我们的代码顺利的通过了测试。
未来,我们的应用可能会出现其他的问题,但是我们可以肯定的是,一定不会再次出现这个 bug,因为只要运行一遍测试,就会立刻收到警告。我们可以认为应用的这一小部分代码永远是安全的。
更全面的测试
我们已经搞定一小部分了,现在可以考虑全面的测试 was_published_recently() 这个方法以确定它的安全性,然后就可以把这个方法稳定下来了。事实上,在修复一个 bug 时不小心引入另一个 bug 会是非常令人尴尬的。
在test1/polls/tests.py 文件中,我们在上次写的类里再增加两个测试,来更全面的测试这个方法:
def test_was_published_recently_with_old_question(self):
    """
    当pubdate的时间距离现在超过一天时 was_published_recently() 返回 False
    """
    time = timezone.now() - datetime.timedelta(days=1, seconds=1)
    future_question = Questions(pub_date=time)
    self.assertIs(future_question.was_published_recently(), False)

def test_was_published_recently_with_recent_question(self):
    """
    当pubdate的时间距离现在在一天之内时 was_published_recently() 返回 True
    """
    time = timezone.now() - datetime.timedelta(hours=23, minutes=59)
    future_question = Questions(pub_date=time)
    self.assertIs(future_question.was_published_recently(), True)
现在,我们有三个测试来确保 Question.was_published_recently() 方法对于过去,最近,和未来的三种情况都返回正确的值。
再次申明,尽管 polls 现在是个小型的应用,但是无论它以后变得到多么复杂,无论他和其他代码如何交互,我们可以在一定程度上保证我们为之编写测试的方法将按照预期的方式运行。
测试视图
我们的投票应用对所有问题都一视同仁:它将会发布所有的问题,也包括那些 pub_date 字段值是未来的问题。我们应该改善这一点。如果 pub_date 设置为未来某天,这应该被解释为这个问题将在所填写的时间点才被发布,而在之前是不可见的。
针对视图的测试
为了修复上述 bug ,我们这次先编写测试,然后再去改代码。事实上,这是一个「测试驱动」开发模式的实例,但其实这两者的顺序不太重要。
在我们的第一个测试中,我们关注代码的内部行为。我们通过模拟用户使用浏览器访问被测试的应用来检查代码行为是否符合预期。
在我们动手之前,先看看需要用到的工具们。
Django 测试工具之 Client
Django 提供了一个供测试使用的 Client ,Client 是一个Python类,它充当虚拟Web浏览器来模拟用户和视图层代码的交互。 我们能在 tests.py 甚至是 shell 中使用它。
我们依照惯例从 shell 开始,首先我们要做一些在 tests.py 里不是必须的准备工作。第一步是在 shell 中配置测试环境:
$ python manage.py shell


>>> from django.test.utils import setup_test_environment
>>> setup_test_environment()
setup_test_environment() 提供了一个模板渲染器,允许我们为 responses 添加一些额外的属性,例如 response.context,未安装此 app 无法使用此功能。注意,这个方法不会配置测试数据库,所以接下来的代码将会在当前存在的数据库上运行,输出的内容可能由于数据库内容的不同而不同。如果你的 settings.py 中关于 TIME_ZONE 的设置不对,你可能无法获取到期望的结果。如果你之前忘了设置,在继续之前检查一下。
然后我们需要导入 django.test.TestCase 类(在后续 tests.py 的实例中我们将会使用 django.test.TestCase 类,这个类里包含了自己的 client 实例,所以不需要这一步):
>>> from django.test import Client
>>> # 创建供我们使用的客户端实例
>>> client = Client()
搞定了之后,我们可以使用 client 工作了:
>>> # 获取 ‘/’ 路径的响应信息
>>> response = client.get('/')
Not Found: /
>>> # 响应状态应该是404; 如果您看到一个“无效的HTTP_HOST标头”错误和400响应,您可能省略了前面描述的setup_test_environment()调用。
>>> response.status_code
404
>>> # 我们期望在'/ polls /'处获取一些信息,将使用'reverse()'而不是硬编码的URL
>>> from django.urls import reverse
>>> # 发送get请求
>>> response = client.get(reverse('polls:index'))
>>> response.status_code
200
>>> response.content
b'<!DOCTYPE html>\n<html lang="en">\n<head>\n    <meta charset="UTF-8">\n    <title>\xe6\x8a\x95\xe7\xa5\xa8\xe9\xa6\x96\xe9\xa1\xb5</title>\n
</head>\n<body>\n    <h1>\xe6\x8a\x95\xe7\xa5\xa8\xe9\xa6\x96\xe9\xa1\xb5</h1>\n    <ul>\n        \n            <li><a href="/polls/2/detail">
\xe4\xbd\xa0\xe7\x9a\x84\xe4\xbc\x91\xe9\x97\xb2\xe6\x96\xb9\xe5\xbc\x8f\xef\xbc\x9f</a></li>\n        \n            <li><a href="/polls/1/det
ail">\xe4\xbb\x8a\xe5\xa4\xa9\xe5\x90\x83\xe4\xbb\x80\xe4\xb9\x88\xef\xbc\x9f</a></li>\n        \n    </ul>\n</body>\n</html>'
>>> response.context['questions']
<QuerySet [<Questions: 你的休闲方式?>, <Questions: 今天吃什么?>]>
>>> # 发送POST请求
>>> client.post(reverse("polls:generic_vote", args=(1,)), {'choice': 2})
<HttpResponseRedirect status_code=302, "text/html; charset=utf-8", url="/polls/generic/1/result">
>>>
改善视图代码
现在的投票列表会显示未来的投票( pub_date 值是未来的某天)。我们来修复这个问题。
在 通用视图 里,我们介绍了基于 ListView 的视图类:
class IndexView(generic.ListView):
    template_name = 'polls/generic_index.html'      # 也可以在urls的.as_view()中当成参数传入
    context_object_name = 'questions'

    def get_queryset(self):
        return Questions.objects.all()
我们需要改进 get_queryset() 方法,让他它能通过将 Question 的 pub_data 属性与 timezone.now() 相比较来判断是否应该显示此 Question。首先我们需要一行 import 语句:
from django.utils import timezone然后我们把 get_queryset 方法改写成下面这样:
测试新视图
启动服务器、在浏览器中载入站点、创建一些发布时间在过去和未来的 Questions ,然后检验只有已经发布的 Questions 会展示出来,现在你可以对自己感到满意了。你不想每次修改可能与这相关的代码时都重复这样做 —— 所以让我们基于以上 shell 会话中的内容,再编写一个测试。
将下面的代码添加到 polls/tests.py :
from django.urls import reverse然后我们写一个公用的快捷函数用于创建投票问题,再为视图创建一个测试类:
# 封装创建投票项的流程
def create_question(question_text, days):
    time = timezone.now() + datetime.timedelta(days=days)
    return Questions.objects.create(question_text=question_text, pub_date=time)


class QuestionIndexViewTests(TestCase):

    def atest_no_questions(self):
        """ questions对象集为空时,应该友好提示 """
        response = self.client.get(reverse("polls:index"))
        # 断言响应状态嘛等于200
        self.assertEqual(response.status_code, 200)
        # 断言响应的内容包含 "No polls are available."
        self.assertContains(response, "No polls are available.")
        # 断言响应的上下文中的questions的值是个空集
        self.assertQuerysetEqual(response.context['questions'], [])

    def test_past_question(self):
        """ questions对象集如果只有已发布的问题,则在index界面显示 """
        create_question(question_text="Past question.", days=-30)
        response = self.client.get(reverse("polls:index"))
        # 断言响应的上下文中的questions的值等于['<Questions: Past question.>']
        self.assertQuerysetEqual(response.context['questions'], ['<Questions: Past question.>'])

    def test_future_question(self):
        """ questions对象集如果只有未发布的问题,则在index界面不显示 """
        create_question(question_text="Future question.", days=30)
        response = self.client.get(reverse("polls:index"))
        self.assertContains(response, "No polls are available.")
        self.assertQuerysetEqual(response.context['questions'], [])

    def test_future_question_and_past_question(self):
        """ questions对象集如果既存在已发布的又存在未发布的问题,则只显示已发布的问题 """
        create_question(question_text="Past question.", days=-30)
        create_question(question_text="Future question.", days=30)
        response = self.client.get(reverse("polls:index"))
        self.assertQuerysetEqual(response.context['questions'], ['<Questions: Past question.>'])

    def test_two_past_questions(self):
        """ questions对象集如果存在两条已发布的问题时,应显示两条问题 """
        create_question(question_text="Past question 1.", days=-30)
        create_question(question_text="Past question 2.", days=-5)
        response = self.client.get(reverse("polls:index"))
        self.assertQuerysetEqual(response.context['questions'], ['<Questions: Past question 2.>', '<Questions: Past question 1.>'])

    def test_allowed_hosts_access(self):
        """ settings.py的 ALLOWED_HOSTS 配置的 host 能访问 IndexView 视图 """
        create_question(question_text='question 1!!!', days=-5)
        response = self.client.get(reverse("polls:generic_index"), HTTP_HOST="django.test.com:8000")
        self.assertEqual(response.status_code, 200)

    @override_settings(ALLOWED_HOSTS="django.test.com")     # override_settings 清除配置
    def test_test_not_allowed_hosts_access(self):
        """ settings.py的 ALLOWED_HOSTS 未配置的 host 不能访问 IndexView 视图 """
        create_question(question_text='question 1!!!', days=-5)
        response = self.client.get(reverse("polls:generic_index"), HTTP_HOST="django.test.com:8000")
        self.assertEqual(response.status_code, 400)
测试 DetailView
我们的工作似乎已经很完美了?不,还有一个问题:就算在发布日期时未来的那些投票不会在目录页 index 里出现,但是如果用户知道或者猜到正确的 URL ,还是可以访问到它们。所以我们得在 DetailView 里增加一些约束:
def get_queryset(self):
    return Questions.objects.filter(pub_date__lte=timezone.now())
然后,我们应该增加一些测试来检验 pub_date 在过去的 Question 能够被显示出来,而 pub_date 在未来的则不可以:
class QuestionDetailViewTests(TestCase):
    def test_future_question(self):
        """
        若发布时间在未来,则返回404
        """
        future_question = create_question(question_text='Future question.', days=5)
        url = reverse('polls:detail', args=(future_question.id,))
        response = self.client.get(url)
        self.assertEqual(response.status_code, 404)

    def test_past_question(self):
        """
        若发布时间在过去,则返回投票详情信息
        """
        past_question = create_question(question_text='Past Questions!', days=-5)
        url = reverse('polls:detail', args=(past_question.id,))
        response = self.client.get(url)
        self.assertContains(response, past_question.question_text)
集中管理用例文件
用例文件放在各自应用,在项目多了后会感觉用例文件很分散,我们可以参考 templates管理模板文件的方式,在项目目录下新增一个 tests 目录并在该目录下创建一个以应用名称命名的目录(所有目录需要创建__init__.py文件) 用于管理用例文件。
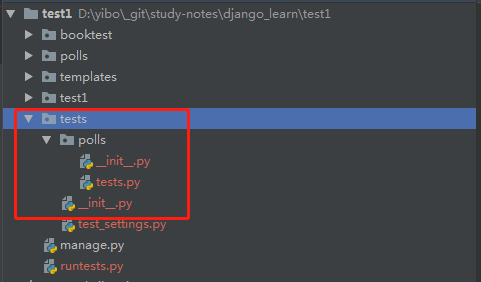
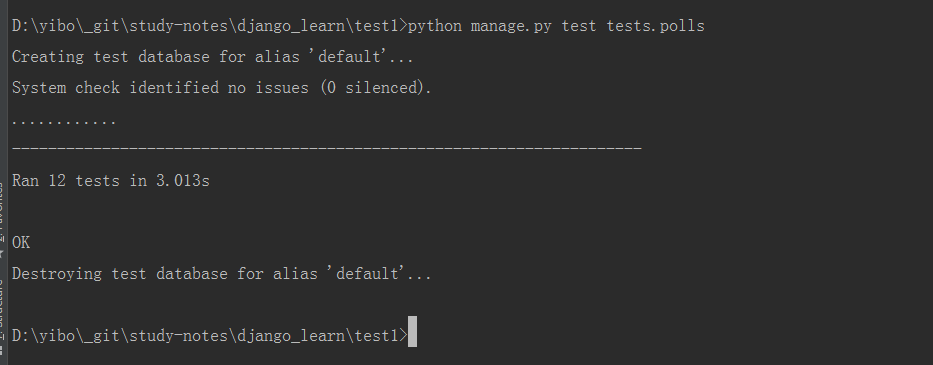
在终端中,我们通过输入以下代码运行测试进行验证:
# 执行tests目录下所有用例
$ python manage.py test tests

# 执行tests目录下 polls 目录下的用例
$ python manage.py test tests.polls
执行结果如下:
使用Django测试运行器
在终端执行命令默认使用的是项目的配置,如果测试的时候需要修改配置,比如,上面测试域名白名单的用例就需要在 test1/settings.py 配置文件中的 ALLOWED_HOSTS 增加 django.test.com 配置,这种直接修改项目配置的操作风险是很大的,因此,我们需要使用 Django 测试运行器来规避这个问题。运行器结构如下:
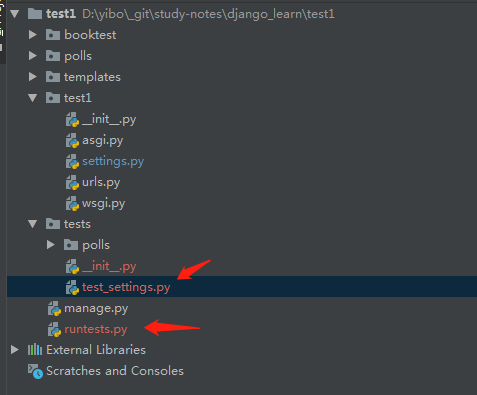
在 tests 目录下新增测试配置文件 tests/test_settings.py ,文件代码直接复制项目配置文件 test1/settings.py 的信息
在项目根目录下新增 runtest.py文件,文件代码如下:
import os
import sys

import django
from django.conf import settings
from django.test.utils import get_runner


if __name__ == '__main__':
    # 指定配置文件
    # os.environ['DJANGO_SETTINGS_MODULE'] = 'test1.settings'
    os.environ['DJANGO_SETTINGS_MODULE'] = 'tests.test_settings'

    # 重启 django ;因为上面修改了 django 的配置文件
    django.setup()

    # 读取配置,并创建运行器
    TestRunner = get_runner(settings)
    test_runner = TestRunner()

    # 执行指定目录下的用例文件
    # 执行tests目录下的用例文件
    # failures = test_runner.run_tests(["tests"])
    # 执行 tests/polls 下的测试用例
    failures = test_runner.run_tests(["tests.polls"])

    sys.exit(bool(failures))
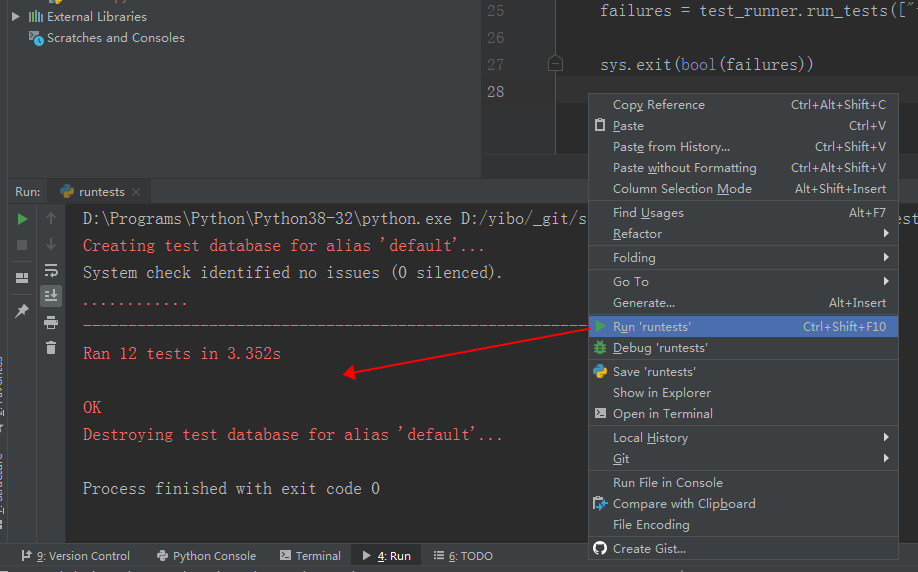
运行器创建好后,直接执行 runtest.py 文件
源码等资料获取方法

各位想获取源码的朋友请点赞 + 评论 + 收藏,三连!
三连之后我会在评论区挨个私信发给你们~


