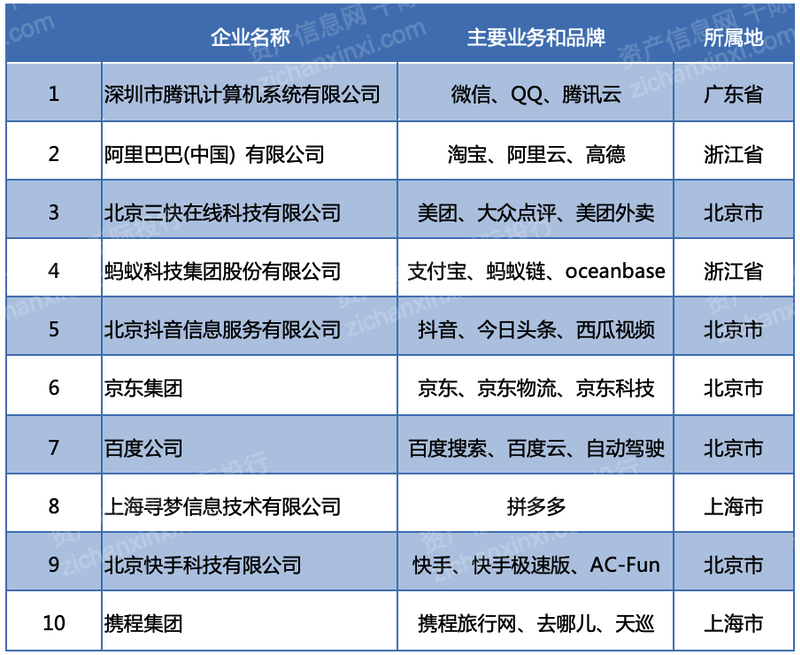
flutter开发实战-自定义Switch开关控件
在flutter中实现自定义Switch,主要实现类似IOS的UISwitch样式的开关控件
一、效果图

二、实现Switch开关的Widget
实现自定义Switch的Widget,主要实现交织动画。
交织动画
有些时候我们可能会需要一些复杂的动画,这些动画可能由一个动画序列或重叠的动画组成。一个动画组合在不同阶段包含了多种动画,要实现这种效果,需要使用交织动画(Stagger Animation)实现会比较方法。
Stagger Animation
- 1、使用多个动画对象(Animation)。
- 2、多个Animation使用同一个AnimationController控制。
- 3、需要设置每一个动画对象指定时间间隔(Interval)
这里实现自定义Switch的Widget用到了colorAnimation,positionAnimation,更改颜色动画及位置动画。多个动画的时候需要在Widget中添加TickerProviderStateMixin。通过TickerProviderStateMixin实现TickerProvider获取对象的通知。TickerProvider来控制Ticker的通知,Ticker可以应用在Flutter中的每个对象上,一旦某个对象实现了Ticker的功能,每次动画帧改变,屏幕重绘时就会通知这个对象。
自定义Switch定义了onChanged实现将开关callback到使用的Widget上。
具体代码实现如下
/// 定制switch
class CustomSwitch extends StatefulWidget {
const CustomSwitch({
Key? key,
required this.value,
this.bgColor,
this.bgBorderColor,
this.bgOpenBorderColor,
this.bgBorderWidth,
this.openBgColor,
this.color,
this.openColor,
this.width,
this.height,
this.borderColor,
this.openBorderColor,
this.borderWidth,
required this.onChanged,
}) : super(key: key);
final bool value;
final double? width;
final double? height;
final Color? bgBorderColor;
final Color? bgOpenBorderColor;
final double? bgBorderWidth;
final Color? bgColor;
final Color? openBgColor;
final Color? color;
final Color? openColor;
final Color? borderColor;
final Color? openBorderColor;
final double? borderWidth;
final ValueChanged<bool>? onChanged;
State<CustomSwitch> createState() => _CustomSwitchState();
}
class _CustomSwitchState extends State<CustomSwitch>
with TickerProviderStateMixin {
late AnimationController _controller;
late Animation<double> _positionAnimation;
late Animation<Color?> _colorAnimation;
late Animation<Color?> _bgColorAnimation;
late Animation<Color?> _bgBorderColorAnimation;
late Animation<Color?> _borderColorAnimation;
bool _switchOpen = false;
Color _bgColor = Colors.black12;
Color _openBgColor = Colors.lightBlueAccent;
Color _color = Colors.black26;
Color _openColor = Colors.lightBlue;
Color _bgBorderColor = Colors.black12;
Color _bgOpenBorderColor = Colors.lightBlueAccent;
Color _borderColor = Colors.black12;
Color _openBorderColor = Colors.lightBlue;
double _width = 50.0;
double _height = 30.0;
double _minSize = 30.0;
bool _isAnimating = false; // 动画中
double _space = 2.0;
bool _isStartAnimating = false;
void initState() {
// TODO: implement initState
_switchOpen = widget.value;
_bgColor = widget.bgColor ?? Colors.black12;
_openBgColor = widget.openBgColor ?? Colors.lightBlueAccent;
_color = widget.color ?? Colors.blueGrey;
_openColor = widget.openColor ?? Colors.lightBlue;
_bgBorderColor = widget.bgBorderColor ?? Colors.black12;
_bgOpenBorderColor = widget.bgOpenBorderColor ?? Colors.lightBlueAccent;
_borderColor = widget.borderColor ?? Colors.black12;
_openBorderColor = widget.openBorderColor ?? Colors.lightBlue;
if (widget.width != null && widget.height != null) {
_width = widget.width!;
_height = widget.height!;
}
_minSize = min(_width, _height) - _space;
super.initState();
runAnimation();
}
void runAnimation() {
Color _bgBeginColor;
Color _bgEndColor;
Color _beginColor;
Color _endColor;
double _beginP;
double _endP;
Color _bgBorderBeginColor;
Color _bgBorderEndColor;
Color _borderBeginColor;
Color _borderEndColor;
if (_switchOpen) {
_bgBeginColor = _openBgColor;
_bgEndColor = _bgColor;
_beginColor = _openColor;
_endColor = _color;
_bgBorderBeginColor = _bgOpenBorderColor;
_bgBorderEndColor = _bgBorderColor;
_borderBeginColor = _openBorderColor;
_borderEndColor = _borderColor;
_beginP = _width - _minSize - _space;
_endP = _space;
} else {
_bgBeginColor = _bgColor;
_bgEndColor = _openBgColor;
_beginColor = _color;
_endColor = _openColor;
_bgBorderBeginColor = _bgBorderColor;
_bgBorderEndColor = _bgOpenBorderColor;
_borderBeginColor = _borderColor;
_borderEndColor = _openBorderColor;
_beginP = _space;
_endP = _width - _minSize - _space;
}
_controller =
AnimationController(vsync: this, duration: Duration(milliseconds: 200));
// 移动位置
_positionAnimation = Tween<double>(
begin: _beginP,
end: _endP,
).animate(
CurvedAnimation(
parent: _controller,
curve: Interval(
0.0, 1.0, //间隔,后20%的动画时间
curve: Curves.ease,
),
),
);
_colorAnimation = ColorTween(
begin: _beginColor,
end: _endColor,
).animate(
CurvedAnimation(
parent: _controller,
curve: const Interval(
0.0, 1.0, //间隔,前60%的动画时间
curve: Curves.ease,
),
),
);
_bgColorAnimation = ColorTween(
begin: _bgBeginColor,
end: _bgEndColor,
).animate(
CurvedAnimation(
parent: _controller,
curve: const Interval(
0.0, 1.0, //间隔,前60%的动画时间
curve: Curves.ease,
),
),
);
_bgBorderColorAnimation = ColorTween(
begin: _bgBorderBeginColor,
end: _bgBorderEndColor,
).animate(
CurvedAnimation(
parent: _controller,
curve: const Interval(
0.0, 1.0, //间隔,前60%的动画时间
curve: Curves.ease,
),
),
);
_borderColorAnimation = ColorTween(
begin: _borderBeginColor,
end: _borderEndColor,
).animate(
CurvedAnimation(
parent: _controller,
curve: const Interval(
0.0, 1.0, //间隔,前60%的动画时间
curve: Curves.ease,
),
),
);
_controller.addListener(() {
if (mounted) {
setState(() {});
}
});
_controller.addStatusListener((status) {
if (status == AnimationStatus.completed) {
_isAnimating = false;
_isStartAnimating = true;
// 完成
if (widget.onChanged != null) {
widget.onChanged!(!_switchOpen);
}
}
});
}
void animationDispose() {
_controller.dispose();
}
void onSwitchPressed() {
if (_isAnimating) {
return;
}
_isAnimating = true;
if (_isStartAnimating) {
_switchOpen = !_switchOpen;
}
runAnimation();
_controller.forward();
}
void dispose() {
// TODO: implement dispose
animationDispose();
super.dispose();
}
Widget build(BuildContext context) {
double radius = _minSize / 2.0;
double bgRadius = _height / 2.0;
return GestureDetector(
onTap: () {
onSwitchPressed();
},
child: Container(
width: _width,
height: _height,
child: Stack(
alignment: Alignment.center,
children: [
Container(
width: _width,
height: _height,
decoration: BoxDecoration(
color: _bgColorAnimation.value,
borderRadius: BorderRadius.circular(bgRadius),
border: Border.all(
color: _bgBorderColorAnimation.value ?? Colors.transparent,
width: widget.bgBorderWidth ?? 0,
style: BorderStyle.solid,
),
),
),
Positioned(
left: _positionAnimation.value,
child: Container(
width: _minSize,
height: _minSize,
decoration: BoxDecoration(
color: _colorAnimation.value,
borderRadius: BorderRadius.circular(radius),
border: Border.all(
color: _borderColorAnimation.value ?? Colors.transparent,
width: widget.borderWidth ?? 0,
style: BorderStyle.solid,
),
),
),
),
],
),
),
);
}
}
三、小结
flutter开发实战-自定义Switch开关控件,主要交织动画(Stagger Animation),通过控制不同的动画来实现类似iOS中的UISwitch控件样式。
学习记录,每天不停进步。