Spring创建对象方式
通过构造函数创建对象,通过静态工厂方式创建对象,通过实例工厂方式创建对象
1、通过构造函数创建对象
无参构造函数:
最基本的对象创建方式,只需要有一个无参构造函数(类中没有写任何的构造函数,默认就是有一个构造函数,如果写了任何一个构造函数,默认的无参构造函数就不会自动创建哦!!)和字段的setter方法。
1.1 实体类User对象:
package com.java.entity;

public class User {
    public User() {
        System.err.println("空参构造方法!");
    }

    private String name;
    private Integer password;
    private String dir;
    private Integer age;

    public String getName() {
        return name;
    }

    public void setName(String name) {
        this.name = name;
    }

    public Integer getPassword() {
        return password;
    }

    public void setPassword(Integer password) {
        this.password = password;
    }

    public String getDir() {
        return dir;
    }

    public void setDir(String dir) {
        this.dir = dir;
    }

    public Integer getAge() {
        return age;
    }

    public void setAge(Integer age) {
        this.age = age;
    }

    @Override
    public String toString() {
        return "user [name=" + name + ", password=" + password + ", dir=" + dir + ", age=" + age + "]";
    }
}
1.2 核心配置文件:applicationContext.xml文件:
<?xml version="1.0" encoding="UTF-8"?>
<beans xmlns:xsi="http://www.w3.org/2001/XMLSchema-instance" xmlns="http://www.springframework.org/schema/beans" xsi:schemaLocation="http://www.springframework.org/schema/beans http://www.springframework.org/schema/beans/spring-beans-4.2.xsd ">
    <!-- 创建对象方式一:空参构造 -->
    <bean name="user" class="com.java.entity.User"></bean>
</beans>
1.3 测试类:
@Test
// 空参构造创建对象的方式
public void test1(){
    // 加载核心配置文件  --- 此步中applicationContext会直接将所有的实体类创建出来;
     ApplicationContext c=new ClassPathXmlApplicationContext("applicationContext.xml");
     User user=(User)c.getBean("user");
     System.out.println(user);
}

若是将测试方法中的:
User user=(User)c.getBean("user");
System.out.println(user);
这两行屏蔽(或去)掉,依然会有一个实体类中的空参调用的提示打印出来,因为ApplicationContext是一经加载此容器就会将其所管辖的所有对象都创建出来;
有参构造函数创建对象:(创建一个有初始化数据的对象)
实体类:
package com.wshy.pojo;

/**
 * @title: User
 * @Author: wshy
 */
public class User {
    private String name;

    private int age;

    private String address;

    //public User () {
    //    System.out.println ("Spring-User无参构造函数!");
    //}

    public User (String name) {
        System.out.println ("Spring-User有参构造函数!");
        this.name = name;
    }

    public String getName () {
        return name;
    }

    public void setName (String name) {
        this.name = name;
    }

    public int getAge () {
        return age;
    }

    public void setAge (int age) {
        this.age = age;
    }

    public String getAddress () {
        return address;
    }

    public void setAddress (String address) {
        this.address = address;
    }
}
使用下标赋值创建对象:
<bean id="user" class="com.wshy.spring.User">
    <constructor-arg index="0" value="wshy"/>
</bean>
constructor-arg标签:根据下标赋值创建对象,此时index=0表示对User实体类表中的第一个字段值赋值,value表示显示值
使用类型创建对象:
<bean id="user" class="com.wshy.spring.User">
    <constructor-arg type="java.lang.String" value="wshy"/>
</bean>
constructor-arg标签:根据type类型创建对象,此时index="java.lang.String"表示对User有参构造函数的入参为String类型的字段赋值并创建对象,value表示显示值,但此时,如果有参构造函数中入参为多个时,并且都为String类型,根据类型创建对象就有局限性了!
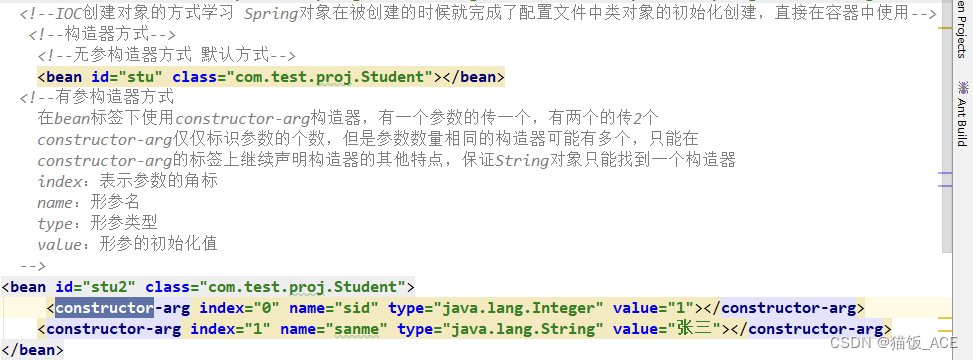
使用参数创建对象
<!--
constructor-arg标签:根据type类型创建对象,name为传入参数,value指定参数传入值
-->
<bean id="user" class="com.wshy.pojo.User">
    <constructor-arg name="name" value="根据参数创建对象"/>
</bean>
2、通过静态工厂方式创建对象,有个对应实体的静态工厂方法
2.1 该实体类对象和构造函数创建对象中的实体类对象相同
2.2 创建对象的静态工厂方法:UserFactory.java User工厂
package com.java.Factory;
import com.java.entity.User;

public class UserFactory {

    public static User crivateUser() {
        System.out.println("静态工厂构造对象!");
        User user = new User();
        return user;
    }
}
2.3 核心配置文件:ApplicationContext.xml 核心配置文件
<?xml version="1.0" encoding="UTF-8"?>
<beans xmlns:xsi="http://www.w3.org/2001/XMLSchema-instance" xmlns="http://www.springframework.org/schema/beans" xsi:schemaLocation="http://www.springframework.org/schema/beans http://www.springframework.org/schema/beans/spring-beans-4.2.xsd ">
    <!-- 创建对象方式二:静态工厂构造 -->
    <bean name="user2" class="com.java.Factory.UserFactory" factory-method="crivateUser"></bean>
</beans>
class属性的属性值不再是实体对象的全路径了,而是实体对象的静态工厂的的全路径;其次,多了一个属性,此属性值是静态工厂中创建实体对象的方法名;
2.4 测试类
@Test
// 静态工厂构造创建对象的方式
public void test2(){
    ApplicationContext c=new ClassPathXmlApplicationContext("applicationContext.xml");
    User user=(User)c.getBean("user2");
    System.out.println(user);
}

3、通过实例工厂方式创建对象
3.1 该实体类对象和构造函数创建对象中的实体类对象相同
3.2 实体对象工厂:UserFactory.java User工厂
package com.java.Factory;
import com.java.entity.User;

public class UserFactory {

    public  User crivateUser2() {
        System.out.println("实例工厂构造对象!");
        User user = new User();
        return user;
    }
}
3.3 核心配置文件:ApplicationContext.xml 核心配置文件:
<?xml version="1.0" encoding="UTF-8"?>
<beans xmlns:xsi="http://www.w3.org/2001/XMLSchema-instance" xmlns="http://www.springframework.org/schema/beans" xsi:schemaLocation="http://www.springframework.org/schema/beans http://www.springframework.org/schema/beans/spring-beans-4.2.xsd ">
    <!-- 创建对象方式三:实例工厂构造 -->
    <bean name="user3" factory-bean="UserFactory" factory-method="crivateUser2"></bean>
    <bean name="UserFactory" class="com.java.Factory.UserFactory"></bean>
</beans>
因为使用的是动态(实例)方法调用,因此,在方法名的配置上和静态工厂的不同,需要先将要调用的动态(实例)工厂的工厂名(UserFactory)和方法名(crivateUser2)在第一个Bean元素中写出来,然后再根据工厂名(UserFactory)在第二个Bean元素中配置工厂名的全路径;
3.4 测试方法
@Test
// 实例工厂构造创建对象的方式
public void test3(){
    ApplicationContext c = new ClassPathXmlApplicationContext("applicationContext.xml");
    User user = (User) c.getBean("user3");
    System.out.println(user);
}

Java创建对象方式
Java中六种常见的创建对象的方式,分别是使用 new关键字、Class的newInstance()方法、Constructor的newInstance()方法、clone()方法、反序列化、工厂模式等。
1、使用new关键字
Java中最常用的创建对象的方式。通过调用类的构造函数,new关键字实例化一个对象。
public class Person {
    String name;
    int age;

    public Person(String name, int age) {
        this.name = name;
        this.age = age;
    }
}

Person person = new Person("小明", 18);
2、反射:使用Class类的newInstance()方法(类派发一个对象)
在运行时创建一个类的新实例。它等效于使用new操作符,但是语法更加动态。
public class Person {
    String name;
    int age;

    public Person(String name, int age) {
        this.name = name;
        this.age = age;
    }
}

try {
    Person person = Person.class.newInstance();
    person.name = "小明";
    person.age = 18;
} catch (Exception e) {
    e.printStackTrace();
}
3、反射:使用Constructor的newInstance()方法,构造一个对象
该方法可以在运行时创建一个类的新实例,并且可以传入构造函数的参数。这种方式比Class的newInstance()方法更加灵活,因为可以选择不同的构造函数。
public class Person {
    String name;
    int age;

    public Person(String name, int age) {
        this.name = name;
        this.age = age;
    }
}

try {
    Constructor<Person> constructor = Person.class.getConstructor(String.class, int.class);
    Person person = constructor.newInstance("小明", 18);
} catch (Exception e) {
    e.printStackTrace();
}
4、使用clone()方法
无论何时我们调用一个对象的clone方法,JVM就会创建一个新的对象,将前面的对象的内容全部拷贝进去,用clone方法创建对象并不会调用任何构造函数。使用克隆的好处就是可以快速创建一个和原对象值一样的对象,对象的字段值一样,但是两个不同的“引用”。
浅拷贝只克隆基本类型的字段,引用类型的需要再重写 clone() 方法手动赋下引用字段的值。
public class Person implements Cloneable {
    String name;
    int age;

    public Person(String name, int age) {
        this.name = name;
        this.age = age;
    }

    @Override
    protected Object clone() throws CloneNotSupportedException {
        return super.clone();
    }
}

Person person = new Person("小明", 18);
Person clone = null;
try {
    clone = (Person) person.clone();
} catch (CloneNotSupportedException e) {
    e.printStackTrace();
}
5、使用反序列化
反序列化是将对象从字节流中恢复的过程。通过序列化后,可以把对象存储到文件或网络中,然后再通过反序列化的方式恢复成对象。
当我们序列化和反序列化一个对象,JVM会给我们创建一个单独的对象。在反序列化时,JVM创建对象并不会调用任何构造函数。
public class Person implements Serializable {
    String name;
    int age;

    public Person(String name, int age) {
        this.name = name;
        this.age = age;
    }
}

Person person = new Person("小明", 18);

try {
    ObjectOutputStream oos = new ObjectOutputStream(new FileOutputStream("person.dat"));
    oos.writeObject(person);
    oos.close();

    ObjectInputStream ois = new ObjectInputStream(new FileInputStream("person.dat"));
    Person clone = (Person) ois.readObject();
    ois.close();
} catch (Exception e) {
    e.printStackTrace();
}
6、使用工厂模式
工厂模式可以将对象的创建和使用解耦。通过定义一个对象工厂,可以更加灵活地产生对象。
public interface Animal {
    String getName();
}

public class Cat implements Animal {
    @Override
    public String getName() {
        return "Cat";
    }
}

public class Dog implements Animal {
    @Override
    public String getName() {
        return "Dog";
    }
}

public class AnimalFactory {
    public Animal createAnimal(String type) {
        switch (type) {
            case "Cat":
                return new Cat();
            case "Dog":
                return new Dog();
            default:
                throw new IllegalArgumentException("Unsupported animal type: " + type);
        }
    }
}

AnimalFactory factory = new AnimalFactory();
Animal cat = factory.createAnimal("Cat");
Animal dog = factory.createAnimal("Dog");



![[NPUCTF2020]你好sao啊](https://img-blog.csdnimg.cn/61be560e046e4fe4b3b0c1815a1f7d85.png)


