服务端代码:
<!DOCTYPE html>
<html lang="en">

<head>
    <meta charset="UTF-8">
    <meta name="viewport" content="width=device-width, initial-scale=1.0">
    <title>Document</title>
</head>

<body>

</body>
<script>
    // 1、创建对象
    const xhr = new XMLHttpRequest();
    // 2、初始化:设置请求类型和url
    xhr.open('POST', 'http://127.0.0.1:8000/server');

    // 设置请求头
    // Content-Type:设置请求体内容类型
    // application/x-www-form-urlencoded:请求参数的类型
    xhr.setRequestHeader('Content-Type', 'application/x-www-form-urlencoded');
    // 3、发送:设置请求体(POST请求的参数)
    xhr.send("id:1&name:CUYG")
    // 4、事件绑定
    xhr.onreadystatechange = function () {
        // 判断
        if (xhr.readyState === 4) {
            if (xhr.status >= 200 && xhr.status < 300) {
                console.log(xhr.response);
            }
        }
    };
</script>

</html>
主要代码
// 第一步:设置发给客户端的JSON格式数据
var data={
code:200,
msg:"成功"
}
// 第二步:由于response.send()只能发送字符串,所以要把JSON转换成字符串
data = JSON.stringify(data)
// 第三步:发送数据
response.send(data);

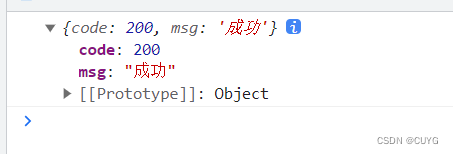
根据上图表示客户端接收到数据,打印出的响应参数是字符串

方法一:使用JSON.parse(xhr.response)把字符串转换为JSON
<script>
    // 1、创建对象
    const xhr = new XMLHttpRequest();
    // 2、初始化:设置请求类型和url
    xhr.open('POST', 'http://127.0.0.1:8000/server');
    // 设置请求头
    // Content-Type:设置请求体内容类型
    // application/x-www-form-urlencoded:请求参数的类型
    xhr.setRequestHeader('Content-Type', 'application/x-www-form-urlencoded');
    // 3、发送:设置请求体(POST请求的参数)
    xhr.send("id:1&name:CUYG")
    // 4、事件绑定
    xhr.onreadystatechange = function () {
        // 判断
        if (xhr.readyState === 4) {
            if (xhr.status >= 200 && xhr.status < 300) {
                console.log(JSON.parse(xhr.response));
            }
        }
    };
</script>
方法二:设置响应体数据类型:xhr.responseType="json"
<script>
    // 1、创建对象
    const xhr = new XMLHttpRequest();
    // 2、初始化:设置请求类型和url
    xhr.open('POST', 'http://127.0.0.1:8000/server');

    // 设置请求头
    // Content-Type:设置请求体内容类型
    // application/x-www-form-urlencoded:请求参数的类型
    xhr.responseType="json"
    xhr.setRequestHeader('Content-Type', 'application/x-www-form-urlencoded');
    // 3、发送:设置请求体(POST请求的参数)
    xhr.send("id:1&name:CUYG")
    // 4、事件绑定
    xhr.onreadystatechange = function () {
        // 判断
        if (xhr.readyState === 4) {
            if (xhr.status >= 200 && xhr.status < 300) {
                console.log(xhr.response);
            }
        }
    };
</script>