目录
1. 需求提出
2. 代码实现
3. 功能讲解
3.1. 设置地面半透明
3.2. 设置镜面倒影成像
3.3. 设置地面颜色
3.4. 设置相机初始位置
4. 总结
1. 需求提出
平时的业务需求,有时需要实现镜面成像、倒影效果,如下:

奶牛站在绿色半透明的地砖上,从而形成倒影。
2. 代码实现
代码实现如下:
#include <iostream>
#include<osgViewer/Viewer>
#include<osg/ArgumentParser>
#include<osg/Group>
#include<osgDB/readFile>
#include<osg/MatrixTransform>
#include<osg/BlendFunc>
#include<osgGA/TrackballManipulator>

osg::Program* createShaderProg()
{
	std::stringstream fp;
	fp << "#version 420 compatibility\n"
		<< "\n"
		<< "void main()\n"
		<< "{\n"
		<< "   gl_FragColor = vec4(0.0, 1.0, 0.0, 0.3);\n"
		<< "}\n";
	osg::Shader* fpShader = new osg::Shader(osg::Shader::FRAGMENT, fp
		.str());

	osg::Program* program = new osg::Program;
	program->addShader(fpShader);

	return program;
}

osg::ref_ptr<osg::Geode> createGround(float cowBoundRadius)
{
	osg::ref_ptr<osg::Geode> spGeode = new osg::Geode;

	osg::ref_ptr<osg::Geometry>spGeometry = new osg::Geometry;
	spGeode->addChild(spGeometry);

	auto maxPos = 3.5 * cowBoundRadius;

	auto pVertVarray = new osg::Vec3dArray();
	pVertVarray->push_back(osg::Vec3d(-maxPos, -maxPos, -cowBoundRadius));      // 左前
	pVertVarray->push_back(osg::Vec3d(maxPos, -maxPos, -cowBoundRadius));       // 右前
	pVertVarray->push_back(osg::Vec3d(maxPos, maxPos, -cowBoundRadius));      // 左后
	pVertVarray->push_back(osg::Vec3d(-maxPos, maxPos, -cowBoundRadius));       // 右后

	spGeometry->setVertexArray(pVertVarray);
	spGeometry->addPrimitiveSet(new osg::DrawArrays(GL_QUADS, 0, pVertVarray->size()));

    spGeode->getOrCreateStateSet()->setMode(GL_BLEND, osg::StateAttribute::ON);
	osg::BlendFunc* pBlendFun = new osg::BlendFunc(GL_SRC_ALPHA, GL_ONE_MINUS_SRC_ALPHA);
	spGeode->getOrCreateStateSet()->setAttributeAndModes(pBlendFun, osg::StateAttribute::ON);

// 采用着色器来涂色
	spGeometry->getOrCreateStateSet()->setAttributeAndModes(createShaderProg(), osg::StateAttribute::ON | osg::StateAttribute::OVERRIDE | osg::StateAttribute::PROTECTED);

	return spGeode;

}


int main(int argc, char *argv[])
{
	osg::ref_ptr<osg::Group> spRoot = new osg::Group;

	auto spCow = osgDB::readRefNodeFile("cow.osg");
	if (nullptr == spCow)
	{
		OSG_WARN << "node is null";
		return 1;
	}

	spRoot->addChild(spCow);

	// 绘制镜子,奶牛站在地面上
	auto groundPos = 6.85;                // 这个值是反复微调出来的
	auto pGeode = createGround(3.5);      // 这个值是反复微调出来的
	spRoot->addChild(pGeode);

	osg::ref_ptr<osg::MatrixTransform> spMatrixTran = new osg::MatrixTransform;
	spMatrixTran->setMatrix(osg::Matrix::scale(1.0, 1.0, -1.0) * osg::Matrix::translate(0.0, 0.0, -groundPos)); // 注意:必须先缩放再平移,-1表示沿着z轴镜面成像

	spMatrixTran->addChild(spCow);

	spRoot->addChild(spMatrixTran);

	osg::ref_ptr<osg::MatrixTransform> spRootMatrixTran = new osg::MatrixTransform;
	spRootMatrixTran->setMatrix(osg::Matrix::rotate(osg::DegreesToRadians(30.0), osg::Vec3(1, 0, 0))); // 沿着X轴旋转30°,便于观察
	spRootMatrixTran->addChild(spRoot);

	osgViewer::Viewer viewer;

	osg::Vec3d              _homeEye(0.0, -48.0, 0.0);// -48是反复微调出来的
	osg::Vec3d              _homeCenter(0.0, 0.0, 0.0);
	osg::Vec3d              _homeUp(0.0, 0.0, 1.0);
	viewer.setCameraManipulator(new osgGA::TrackballManipulator());
	viewer.getCameraManipulator()->setHomePosition(_homeEye, _homeCenter, _homeUp);

	viewer.setSceneData(spRootMatrixTran);
	viewer.run();
}
3. 功能讲解
要实现镜面成像、实现倒影效果,最重要的是要实现如下3点:
- 开启混合功能,设置混合功能因子。
- 通过osg::Matrix::scale,在成像方向上设置缩放值为-1。
- 将目标颜色的alpha设置为小1的某个值,具体值可进行反复微调,直到结果满意时位置。这里的目标是地面。
3.1. 设置地面半透明
在createGround函数创建地表面时,利用如下代码开启混合功能,并分别设置源图像(即将要绘制的图像)和目标图像(帧缓冲区中的存放的图像)RGB颜色值的混合因子为GL_SRC_ALPHA和GL_ONE_MINUS_SRC_ALPHA。
spGeode->getOrCreateStateSet()->setMode(GL_BLEND, osg::StateAttribute::ON);

// 设置混合因子,测试发现,不要这两行代码也行,估计osg内部默认的混合因子是GL_SRC_ALPHA, 和GL_ONE_MINUS_SRC_ALPHA吧
osg::BlendFunc* pBlendFun = new osg::BlendFunc(GL_SRC_ALPHA, GL_ONE_MINUS_SRC_ALPHA);
spGeode->getOrCreateStateSet()->setAttributeAndModes(pBlendFun, osg::StateAttribute::ON);
本例子将混合因子设置为GL_SRC_ALPHA, GL_ONE_MINUS_SRC_ALPHA。关于这两个值的含义及glBlendFunc(osg::BlendFunc内部其实调用的就是glBlendFunc)的作用,在任何一本讲述OPenGL的书中都会提到,请自己查阅。个人觉得将混合讲的比较好的是下列链接中的文章,可以参考:
LearnOpenGL - Blending
3.2. 设置镜面倒影成像
osg::Matrix::scale实现对物体缩放。大多数情况下,在x、y、z轴缩放方向上,传入正值。传入负数表示以指定方向镜面成像,也即镜像。镜像也叫反射,是一种变换,其作用是物体沿着直线(2D中)或平面(3D中)翻折,如下为沿着2D中的轴镜像效果:

3.3. 设置地面颜色
本例设置地面颜色的通过着色器来设置的,为了是练习osg中怎么调用着色器及如何着色器编程,也可以通过非着色器实现,代码如下:
    auto pColorArray = new osg::Vec4Array();
	pColorArray->push_back(osg::Vec4f(0.0, 1.0, 0.0, 0.3));
	spGeometry->setColorArray(pColorArray, osg::Array::Binding::BIND_OVERALL);
3.4. 设置相机初始位置
当去掉如下设置相机初始位置代码时:
    osg::Vec3d              _homeEye(0.0, -48.0, 0.0);
	osg::Vec3d              _homeCenter(0.0, 0.0, 0.0);
	osg::Vec3d              _homeUp(0.0, 0.0, 1.0);
	viewer.setCameraManipulator(new osgGA::TrackballManipulator());
	viewer.getCameraManipulator()->setHomePosition(_homeEye, _homeCenter, _homeUp);
场景离得很远,看起来很小,如下:
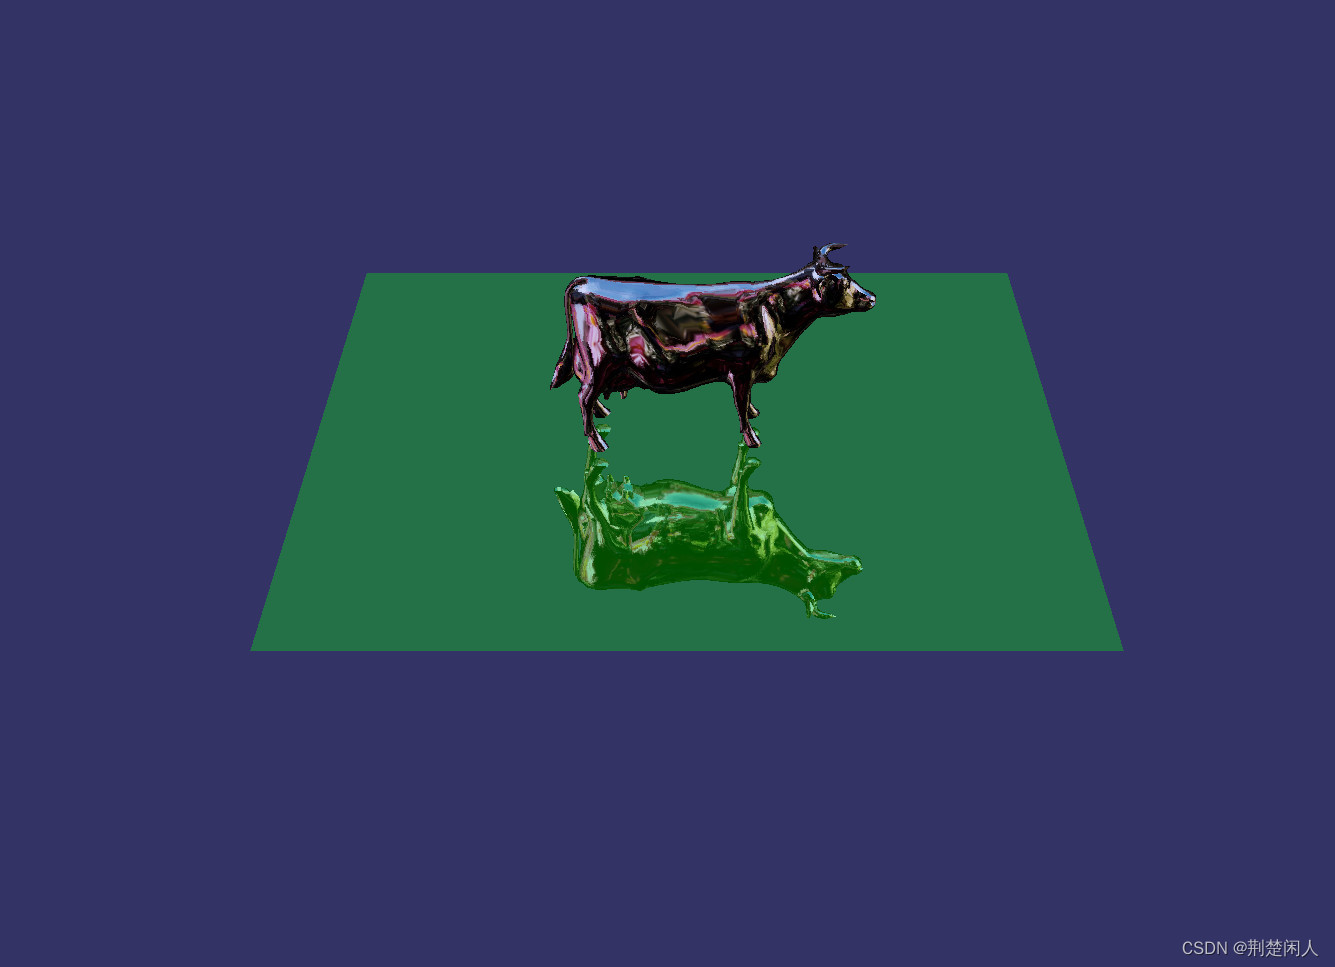
上述代码是将相机设置得离场景近些,这样看起来场景中的奶牛大些。如下代码不能实现这样的功能:
    osg::Vec3d              _homeEye(0.0, -48.0, 0.0);
	osg::Vec3d              _homeCenter(0.0, 0.0, 0.0);
	osg::Vec3d              _homeUp(0.0, 0.0, 1.0);
    viewer.getCamera()->setViewMatrixAsLookAt(_homeEye, _homeCenter, _homeUp);
4. 总结
通过这个例子,需要掌握如下技术点:
- osg如何实现透明、半透明效果。
- 通过osg::Matrix::scale实现镜像。
- osg着色器编程。
- 操作相机,以改变相机离场景的距离,从而使场景中的物体看起来更大或更小。


