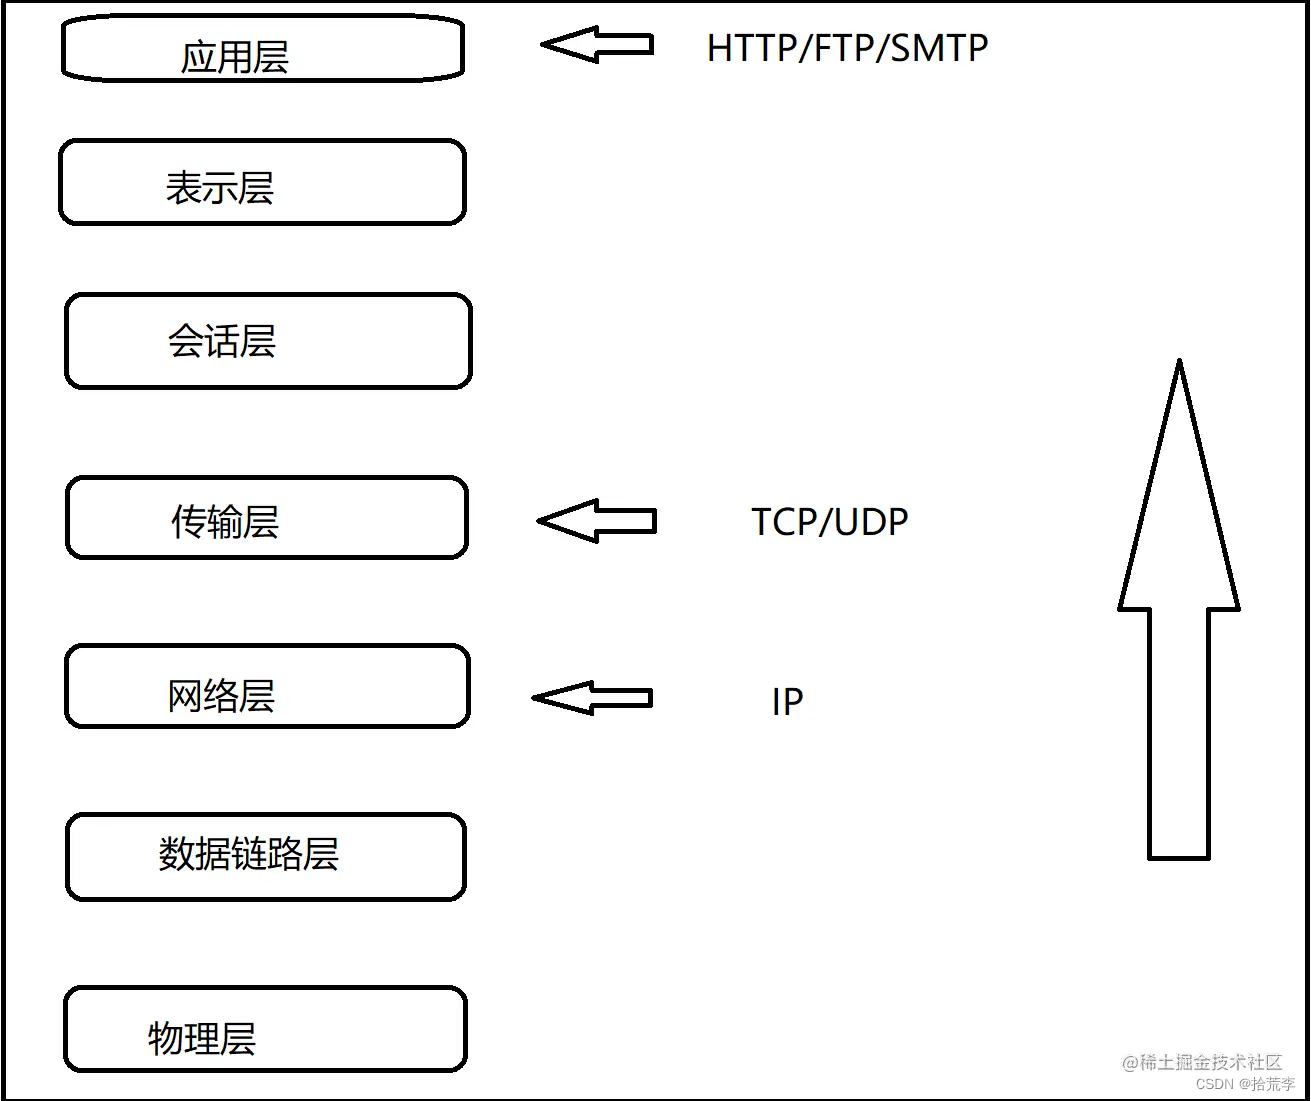
SpringBoot3-Web开发
SpringBoot的Web开发能力,由SpringMVC提供。
0. WebMvcAutoConfiguration原理
1. 生效条件
@AutoConfiguration(after = { DispatcherServletAutoConfiguration.class, TaskExecutionAutoConfiguration.class,
		ValidationAutoConfiguration.class }) //在这些自动配置之后
@ConditionalOnWebApplication(type = Type.SERVLET) //如果是web应用就生效,类型SERVLET、REACTIVE 响应式web
@ConditionalOnClass({ Servlet.class, DispatcherServlet.class, WebMvcConfigurer.class })
@ConditionalOnMissingBean(WebMvcConfigurationSupport.class) //容器中没有这个Bean,才生效。默认就是没有
@AutoConfigureOrder(Ordered.HIGHEST_PRECEDENCE + 10)//优先级
@ImportRuntimeHints(WebResourcesRuntimeHints.class)//一些指标统计不用管
public class WebMvcAutoConfiguration {
}
2. 效果
- 放了两个Filter:
- a.
HiddenHttpMethodFilter;页面表单提交Rest请求(GET、POST、PUT、DELETE) - b.
FormContentFilter: 表单内容Filter,GET(数据放URL后面)、POST(数据放请求体)请求可以携带数据,PUT、DELETE 的请求体数据会被忽略,为了让Tomcat服务器不忽略它们携带的数据,使用它可以不被忽略
- a.
- 给容器中放了
WebMvcConfigurer组件;给SpringMVC添加各种定制功能- a. 所有的功能最终会和配置文件进行绑定
- b. WebMvcProperties:
spring.mvc配置文件 - c. WebProperties:
spring.web配置文件
	@Configuration(proxyBeanMethods = false)
	@Import(EnableWebMvcConfiguration.class) //额外导入了其他配置
	@EnableConfigurationProperties({ WebMvcProperties.class, WebProperties.class })
	@Order(0)
	public static class WebMvcAutoConfigurationAdapter implements WebMvcConfigurer, ServletContextAware{

    }
3. WebMvcConfigurer接口
提供了配置SpringMVC底层的所有组件入口

- 参数解析器:SpringMVC的组件里面的参数自动获取需要从ioc获取
- 跨域:用于前后端分离
- 格式化器:如从配置文件的日期字节流读成规定格式的如Date类型的数据
- 拦截器:SpringMVC的拦截器,我的SpringMVC笔记
- 资源处理器:处理静态资源规则
- 视图控制器:springmvc学过,不写Controller方法,直接在配置文件里写的一些网页,如index
- 消息转化器:做消息转化用的,一般不用管
4. 静态资源规则源码
@Override
public void addResourceHandlers(ResourceHandlerRegistry registry) {
    if (!this.resourceProperties.isAddMappings()) {
        logger.debug("Default resource handling disabled");
        return;
    }
    //1、
    addResourceHandler(registry, this.mvcProperties.getWebjarsPathPattern(),
            "classpath:/META-INF/resources/webjars/");
    addResourceHandler(registry, this.mvcProperties.getStaticPathPattern(), (registration) -> {
        registration.addResourceLocations(this.resourceProperties.getStaticLocations());
        if (this.servletContext != null) {
            ServletContextResource resource = new ServletContextResource(this.servletContext, SERVLET_LOCATION);
            registration.addResourceLocations(resource);
        }
    });
}
常见的类路径就是带颜色的java包路径,和带颜色的resource包路径(带颜色需要Idea给它标记,默认一般都有)
- 规则一:访问:
/webjars/**路径就去classpath:/META-INF/resources/webjars/下找资源.- a. maven 导入依赖(不太常用,了解一下即可)
- b.
- 规则二:访问:
/**路径就去静态资源默认的四个位置找资源- a.
classpath:/META-INF/resources/ - b.
classpath:/resources/ - c.
classpath:/static/ - d.
classpath:/public/
- a.
- 规则三:静态资源默认都有缓存规则的设置
- a. 所有缓存的设置,直接通过配置文件:
spring.web - b. cachePeriod: 缓存周期; 多久不用找服务器要新的。 默认没有,以s为单位
- c. cacheControl: HTTP缓存控制;参考网站
- d. useLastModified:是否使用最后一次修改。配合HTTP Cache规则。最后一次修改时间作对比有就上一次浏览器缓存的,时间不同就从服务器获取。
- a. 所有缓存的设置,直接通过配置文件:
如果浏览器访问了一个静态资源
index.js,如果服务这个资源没有发生变化,下次访问的时候就可以直接让浏览器用自己缓存中的东西,而不用给服务器发请求。
registration.setCachePeriod(getSeconds(this.resourceProperties.getCache().getPeriod()));
registration.setCacheControl(this.resourceProperties.getCache().getCachecontrol().toHttpCacheControl());
registration.setUseLastModified(this.resourceProperties.getCache().isUseLastModified());
5. EnableWebMvcConfiguration 源码
在1. 生效条件可以看到 WebMvcAutoConfiguration 存在ConditionMissBean,指的就是WebMvcConfigurationSupport 组件
//SpringBoot 给容器中放 WebMvcConfigurationSupport 组件。
//我们如果自己放了 WebMvcConfigurationSupport 组件,Boot的WebMvcAutoConfiguration都会失效。
@Configuration(proxyBeanMethods = false)
@EnableConfigurationProperties(WebProperties.class)
public static class EnableWebMvcConfiguration extends DelegatingWebMvcConfiguration implements ResourceLoaderAware
{


}
HandlerMapping: 根据请求路径/a找那个handler能处理请求- a.
WelcomePageHandlerMapping:- ①. 访问
/**路径下的所有请求,都在以前四个静态资源路径下找,欢迎页也一样 - ②. 找
index.html:只要静态资源的位置有一个index.html页面,项目启动默认访问
- ①. 访问
- a.
6. 为什么容器中放一个WebMvcConfigurer就能配置底层行为
专门写了一个授权类,然后让WebMvcAutoConfiguration类去继承,在这个delegate类中注入所有的webMvcConfiguration配置类,然后让所有的配置类生效 ——>雷神视频p32讲解
- WebMvcAutoConfiguration 是一个自动配置类,它里面有一个
EnableWebMvcConfiguration内部静态类 EnableWebMvcConfiguration继承于DelegatingWebMvcConfiguration,这两个都生效DelegatingWebMvcConfiguration利用 DI (@AutoWire)把容器中 所有WebMvcConfigurer注入进来- 别人调用
DelegatingWebMvcConfiguration的方法配置底层规则,而它遍历调用所有WebMvcConfigurer的配置底层方法。
7. WebMvcConfigurationSupport
提供了很多的默认设置。
判断系统中是否有相应的类:如果有,就加入相应的 HttpMessageConverter
jackson2Present = ClassUtils.isPresent("com.fasterxml.jackson.databind.ObjectMapper", classLoader) &&
				ClassUtils.isPresent("com.fasterxml.jackson.core.JsonGenerator", classLoader);
jackson2XmlPresent = ClassUtils.isPresent("com.fasterxml.jackson.dataformat.xml.XmlMapper", classLoader);
jackson2SmilePresent = ClassUtils.isPresent("com.fasterxml.jackson.dataformat.smile.SmileFactory", classLoader);
1. Web场景
1. 自动配置
1、整合web场景
        <dependency>
            <groupId>org.springframework.boot</groupId>
            <artifactId>spring-boot-starter-web</artifactId>
        </dependency>
2、引入了 autoconfigure 功能
3、@EnableAutoConfiguration注解使用@Import(AutoConfigurationImportSelector.class)批量导入组件
4、加载 META-INF/spring/org.springframework.boot.autoconfigure.AutoConfiguration.imports 文件中配置的所有组件
5、所有自动配置类如下
org.springframework.boot.autoconfigure.web.client.RestTemplateAutoConfiguration
org.springframework.boot.autoconfigure.web.embedded.EmbeddedWebServerFactoryCustomizerAutoConfiguration
====以下是响应式web场景和现在的没关系======
org.springframework.boot.autoconfigure.web.reactive.HttpHandlerAutoConfiguration
org.springframework.boot.autoconfigure.web.reactive.ReactiveMultipartAutoConfiguration
org.springframework.boot.autoconfigure.web.reactive.ReactiveWebServerFactoryAutoConfiguration
org.springframework.boot.autoconfigure.web.reactive.WebFluxAutoConfiguration
org.springframework.boot.autoconfigure.web.reactive.WebSessionIdResolverAutoConfiguration
org.springframework.boot.autoconfigure.web.reactive.error.ErrorWebFluxAutoConfiguration
org.springframework.boot.autoconfigure.web.reactive.function.client.ClientHttpConnectorAutoConfiguration
org.springframework.boot.autoconfigure.web.reactive.function.client.WebClientAutoConfiguration
================以上没关系=================
org.springframework.boot.autoconfigure.web.servlet.DispatcherServletAutoConfiguration
org.springframework.boot.autoconfigure.web.servlet.ServletWebServerFactoryAutoConfiguration
org.springframework.boot.autoconfigure.web.servlet.error.ErrorMvcAutoConfiguration
org.springframework.boot.autoconfigure.web.servlet.HttpEncodingAutoConfiguration
org.springframework.boot.autoconfigure.web.servlet.MultipartAutoConfiguration
org.springframework.boot.autoconfigure.web.servlet.WebMvcAutoConfiguration
6、绑定了配置文件的一堆配置项,可以通过进入这些类看他们的@EnableConfigurationProperties()注解逐个查看
- 1、SpringMVC的所有配置
spring.mvc - 2、Web场景通用配置
spring.web - 3、文件上传配置
spring.servlet.multipart - 4、服务器的配置
server: 比如:编码方式
2. 默认效果
默认配置:
- 包含了
ContentNegotiatingViewResolver和BeanNameViewResolver组件,方便视图解析,现在前后端分离,一般是返回json数据 - 默认的静态资源处理机制: 静态资源放在
static文件夹下即可直接访问 - 自动注册了
Converter,GenericConverter,Formatter组件,适配常见数据类型转换和格式化需求 - 支持
HttpMessageConverters,可以方便返回json等数据类型 - 注册
MessageCodesResolver,方便国际化及错误消息处理,用的比较少,一般企业都会做两套网站 - 支持 静态
index.html - 自动使用
ConfigurableWebBindingInitializer,实现消息处理、数据绑定、类型转化、数据校验等功能
重要:
● 如果想保持 boot mvc 的默认配置,并且自定义更多的 mvc 配置,如:interceptors, formatters, view controllers 等。可以使用@Configuration注解添加一个WebMvcConfigurer类型的配置类,并不要标注@EnableWebMvc
● 如果想保持 boot mvc 的默认配置,但要自定义核心组件实例,比如:RequestMappingHandlerMapping,RequestMappingHandlerAdapter, 或ExceptionHandlerExceptionResolver,给容器中放一个WebMvcRegistrations组件即可
● 如果想全面接管 Spring MVC,@Configuration标注一个配置类,并加上@EnableWebMvc注解,实现WebMvcConfigurer接口
2. 静态资源
1. 默认规则
1. 静态资源映射
静态资源映射规则在 WebMvcAutoConfiguration 中进行了定义:
/webjars/**的所有路径 资源都在classpath:/META-INF/resources/webjars//**的所有路径 资源都在classpath:/META-INF/resources/、classpath:/resources/、classpath:/static/、classpath:/public/- 所有静态资源都定义了
缓存规则。【浏览器访问过一次,就会缓存一段时间】,但此功能参数无默认值
a.period: 缓存间隔。 默认 0S;
b.cacheControl:缓存控制。 默认无;
c.useLastModified:是否使用lastModified头。 默认 false;
2. 静态资源缓存
如前面所述
- 所有静态资源都定义了
缓存规则。【浏览器访问过一次,就会缓存一段时间】,但此功能参数无默认值
a.period: 缓存间隔。 默认 0S;
b.cacheControl:缓存控制。 默认无;
c.useLastModified:是否使用lastModified头。 默认 false;
3. 欢迎页
欢迎页规则在 WebMvcAutoConfiguration 中进行了定义:
- 在静态资源目录下找
index.html - 没有就在
templates下找index模板页
4. Favicon
- 在静态资源目录下找
favicon.ico- 非重点:其实根据官网知道,springboot配合浏览器,浏览器一般可能会请求一个favicon.ico的资源,也就是网站图标,springboot中如果把图标放在上述静态资源的四个目录之一,也能让项目运行自带图标
5. 缓存实验
server.port=9000

#1、spring.web:
# 1.配置国际化的区域信息
# 2.静态资源策略(开启、处理链、缓存)

#开启静态资源映射规则 (默认是开启的)
spring.web.resources.add-mappings=true

#设置缓存
#spring.web.resources.cache.period=3600
##缓存详细合并项控制,覆盖period配置:
## 浏览器第一次请求服务器,服务器告诉浏览器此资源缓存7200秒,7200秒以内的所有此资源访问不用发给服务器请求,7200秒以后发请求给服务器
spring.web.resources.cache.cachecontrol.max-age=7200
#使用资源 last-modified 时间,来对比服务器和浏览器的资源是否相同没有变化。相同返回 304
spring.web.resources.cache.use-last-modified=true
浏览器返回状态码304表示请求的资源未被修改,可以直接使用缓存的版本。
2. 自定义静态资源规则
自定义静态资源路径、自定义缓存规则
1. 配置方式
spring.mvc: 静态资源访问前缀路径
spring.web:
● 静态资源目录
● 静态资源缓存策略
总配置
#1、spring.web:
# 1.配置国际化的区域信息
# 2.静态资源策略(开启、处理链、缓存)

#开启静态资源映射规则
spring.web.resources.add-mappings=true

#设置缓存
spring.web.resources.cache.period=3600
##缓存详细合并项控制,覆盖period配置:
## 浏览器第一次请求服务器,服务器告诉浏览器此资源缓存7200秒,7200秒以内的所有此资源访问不用发给服务器请求,7200秒以后发请求给服务器
spring.web.resources.cache.cachecontrol.max-age=7200
## 共享缓存
spring.web.resources.cache.cachecontrol.cache-public=true
#使用资源 last-modified 时间,来对比服务器和浏览器的资源是否相同没有变化。相同返回 304
spring.web.resources.cache.use-last-modified=true

#自定义静态资源文件夹位置
spring.web.resources.static-locations=classpath:/a/,classpath:/b/,classpath:/static/

#2、 spring.mvc
## 2.1. 自定义webjars路径前缀
spring.mvc.webjars-path-pattern=/wj/**
## 2.2. 静态资源访问路径前缀 这样就不用非得使用拦截器去做处理
spring.mvc.static-path-pattern=/static/**
开启静态资源映射规则对应源码
# 开启静态资源映射规则
spring.web.resources.add-mappings=true

2. 代码方式
● 容器中只要有一个 WebMvcConfigurer 组件。配置的底层行为都会生效
● @EnableWebMvc //禁用boot的默认配置
遇到不太会写或者遗忘的情况,可以去看WebMvcAutoConfiguration类,它实现了WebMvcConfigurer接口,并重写了默认的方法,我们根据它的代码学习如何重写。
这里哪怕我们没有调用父类方法,它依然在,因为默认会调用父类的方法,把默认路径加上。
@Configuration //这是一个配置类
public class MyConfig implements WebMvcConfigurer {


    @Override
    public void addResourceHandlers(ResourceHandlerRegistry registry) {
        // 保留以前的springmvc自定义的配置,不写也成立 boot的会自动调用
        // WebMvcConfigurer.super.addResourceHandlers(registry);
        //自己写新的规则。
        registry.addResourceHandler("/static/**")
                .addResourceLocations("classpath:/a/","classpath:/b/")
                .setCacheControl(CacheControl.maxAge(1180, TimeUnit.SECONDS));
    }
}
@Configuration //这是一个配置类,给容器中放一个 WebMvcConfigurer 组件,就能自定义底层
public class MyConfig  /*implements WebMvcConfigurer*/ {


    @Bean
    public WebMvcConfigurer webMvcConfigurer(){
        return new WebMvcConfigurer() {
            @Override
            public void addResourceHandlers(ResourceHandlerRegistry registry) {
                registry.addResourceHandler("/static/**")
                        .addResourceLocations("classpath:/a/", "classpath:/b/")
                        .setCacheControl(CacheControl.maxAge(1180, TimeUnit.SECONDS));
            }
        };
    }

}
3. 路径匹配
Spring5.3 之后加入了更多的
请求路径匹配的实现策略;
以前只支持AntPathMatcher策略, 现在提供了PathPatternParser策略。并且可以让我们指定到底使用那种策略。
1. Ant风格路径用法
Ant 风格的路径模式语法具有以下规则:
*:表示任意数量的字符。?:表示任意一个字符。**:表示任意数量的目录。{}:表示一个命名的模式占位符。[]:表示字符集合,例如[a-z]表示小写字母。
例如:*.html匹配任意名称,扩展名为.html的文件。/folder1/*/*.java匹配在folder1目录下的任意两级目录下的.java文件。/folder2/**/*.jsp匹配在folder2目录下任意目录深度的.jsp文件。/{type}/{id}.html匹配任意文件名为{id}.html,在任意命名的{type}目录下的文件。
注意:Ant 风格的路径模式语法中的特殊字符需要转义,如:- 要匹配文件路径中的星号,则需要转义为
\\* - 要匹配文件路径中的问号,则需要转义为
\\?
2. 模式切换
AntPathMatcher与PathPatternParser
●PathPatternParser在 jmh 基准测试下,有 6~8 倍吞吐量提升,降低 30%~40%空间分配率
●PathPatternParser兼容AntPathMatcher语法,并支持更多类型的路径模式
●PathPatternParser"**"多段匹配 的支持仅允许在模式末尾使用
    @GetMapping("/a*/b?/{p1:[a-f]+}")
    public String hello(HttpServletRequest request,
                        @PathVariable("p1") String path) {

        log.info("路径变量p1: {}", path);
        //获取请求路径
        String uri = request.getRequestURI();
        return uri;
    }
总结:
- 使用默认的路径匹配规则,是由
PathPatternParser提供的 - 如果路径中间需要有 **,替换成ant风格路径
# 改变路径匹配策略:
# ant_path_matcher 老版策略;
# path_pattern_parser 新版策略;
spring.mvc.pathmatch.matching-strategy=ant_path_matcher
4. 内容协商
一套系统适配多端数据返回

1. 多端内容适配
1. 默认规则
- SpringBoot 多端内容适配。
1.1. 基于请求头内容协商:(默认开启)
1.1.1. 客户端向服务端发送请求,携带HTTP标准的Accept请求头。
1.1.1.1. Accept:application/json、text/xml、text/yaml
1.1.1.2. 服务端根据客户端请求头期望的数据类型进行动态返回
1.2. 基于请求参数内容协商:(需要开启)
1.2.1. 发送请求GET /projects/spring-boot?format=json
1.2.2. 匹配到@GetMapping("/projects/spring-boot")
1.2.3. 根据参数协商,优先返回 json 类型数据**【需要开启参数匹配设置】**
1.2.4. 发送请求GET /projects/spring-boot?format=xml,优先返回 xml 类型数据
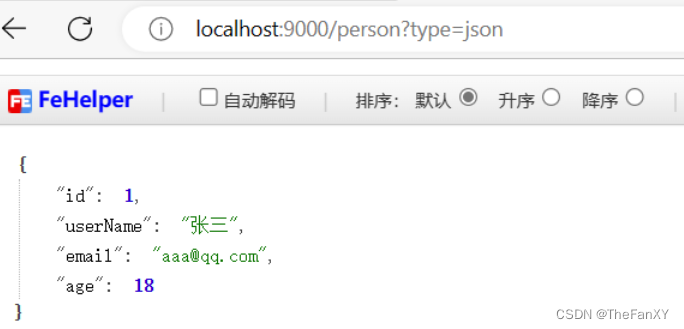
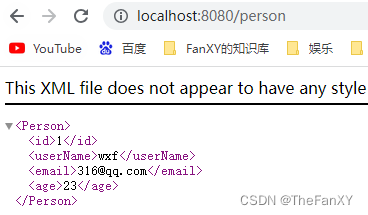
2. 效果演示
请求同一个接口,可以返回json和xml不同格式数据
springboot的web场景启动器默认导入了jackson的包,默认支持把java对象返回为json类型数据。
- 引入支持写出xml内容依赖
<dependency>
    <groupId>com.fasterxml.jackson.dataformat</groupId>
    <artifactId>jackson-dataformat-xml</artifactId>
</dependency>
- 标注注解
@JacksonXmlRootElement  // 可以写出为xml文档
@Data
public class Person {
    private Long id;
    private String userName;
    private String email;
    private Integer age;
}
- 开启基于请求参数的内容协商
# 开启基于请求参数的内容协商功能。 默认参数名:format。 默认此功能不开启
spring.mvc.contentnegotiation.favor-parameter=true
# 指定内容协商时使用的参数名。默认是 format
spring.mvc.contentnegotiation.parameter-name=type
- 效果
3. 配置协商规则与支持类型
- 修改内容协商方式
#使用参数进行内容协商
spring.mvc.contentnegotiation.favor-parameter=true
#自定义参数名,默认为format
spring.mvc.contentnegotiation.parameter-name=myparam
但是现在也就只能返回xml和json数据类型,如果想用别的需要进行配置
- 大多数 MediaType 都是开箱即用的。也可以自定义内容类型,如:
spring.mvc.contentnegotiation.media-types.yaml=text/yaml
2. 自定义内容返回
1. 增加yaml返回支持
导入依赖
<dependency>
    <groupId>com.fasterxml.jackson.dataformat</groupId>
    <artifactId>jackson-dataformat-yaml</artifactId>
</dependency>
把对象写出成YAML
    public static void main(String[] args) throws JsonProcessingException {
        Person person = new Person();
        person.setId(1L);
        person.setUserName("张三");
        person.setEmail("aaa@qq.com");
        person.setAge(18);
		// 这个设置可以把默认添加的分页符 --- 去除,还有别的一些配置方法
        YAMLFactory factory = new YAMLFactory().disable(YAMLGenerator.Feature.WRITE_DOC_START_MARKER);
        ObjectMapper mapper = new ObjectMapper(factory);

        String s = mapper.writeValueAsString(person);
        System.out.println(s);
    }
编写配置
#新增一种媒体类型
spring.mvc.contentnegotiation.media-types.yaml=text/yaml
在我们刚刚使用的配置类中,配置的WebMvcConfigurer组件中,增加HttpMessageConverter组件,专门负责把对象写出为yaml格式
    @Bean
    public WebMvcConfigurer webMvcConfigurer(){
        return new WebMvcConfigurer() {
            @Override //配置一个能把对象转为yaml的messageConverter
            public void configureMessageConverters(List<HttpMessageConverter<?>> converters) {
                converters.add(new MyYamlHttpMessageConverter());
            }
        };
    }
2. 思考:如何增加其他
- 配置媒体类型支持:
spring.mvc.contentnegotiation.media-types.yaml=text/yaml
- 编写对应的
HttpMessageConverter,要告诉Boot这个支持的媒体类型- 按照3的示例
- 把MessageConverter组件加入到底层
- 容器中放一个
WebMvcConfigurer组件,并配置底层的MessageConverter
- 容器中放一个
3. HttpMessageConverter的示例写法
一般我们把这种类型的组件类都放在component包下
public class MyYamlHttpMessageConverter extends AbstractHttpMessageConverter<Object> {

    private ObjectMapper objectMapper = null; //把对象转成yaml

    public MyYamlHttpMessageConverter(){
        //告诉SpringBoot这个MessageConverter支持哪种媒体类型  //媒体类型
        super(new MediaType("text", "yaml", Charset.forName("UTF-8")));
        YAMLFactory factory = new YAMLFactory()
                .disable(YAMLGenerator.Feature.WRITE_DOC_START_MARKER);
        this.objectMapper = new ObjectMapper(factory);
    }

    @Override
    protected boolean supports(Class<?> clazz) {
        //只要是对象类型,不是基本类型
        return true;
    }

    @Override  //@RequestBody
    protected Object readInternal(Class<?> clazz, HttpInputMessage inputMessage) throws IOException, HttpMessageNotReadableException {
        return null;
    }

    @Override //@ResponseBody 把对象怎么写出去
    protected void writeInternal(Object methodReturnValue, HttpOutputMessage outputMessage) throws IOException, HttpMessageNotWritableException {

        //try-with写法,自动关流
        try(OutputStream os = outputMessage.getBody()){
            this.objectMapper.writeValue(os,methodReturnValue);
        }

    }
}
3. 内容协商原理-HttpMessageConverter
●
HttpMessageConverter怎么工作?合适工作?
● 定制HttpMessageConverter来实现多端内容协商
● 编写WebMvcConfigurer提供的configureMessageConverters底层,修改底层的MessageConverter
1. @ResponseBody由HttpMessageConverter处理
雷神源码级讲解 P35
标注了@ResponseBody的返回值 将会由支持它的 HttpMessageConverter写给浏览器
- 如果controller方法的返回值标注了
@ResponseBody注解
1.1. 请求进来先来到DispatcherServlet的doDispatch()进行处理
1.2. 找到一个HandlerAdapter适配器。利用适配器执行目标方法
1.3.RequestMappingHandlerAdapter来执行,调用invokeHandlerMethod()来执行目标方法
1.4. 目标方法执行之前,准备好两个东西
1.4.1.HandlerMethodArgumentResolver:参数解析器,确定目标方法每个参数值
1.4.2.HandlerMethodReturnValueHandler:返回值处理器,确定目标方法的返回值改怎么处理
1.5.RequestMappingHandlerAdapter里面的invokeAndHandle()真正执行目标方法
1.6. 目标方法执行完成,会返回返回值对象
1.7. 找到一个合适的返回值处理器HandlerMethodReturnValueHandler
1.8. 最终找到RequestResponseBodyMethodProcessor能处理 标注了@ResponseBody注解的方法
1.9.RequestResponseBodyMethodProcessor调用writeWithMessageConverters,利用MessageConverter(消息转换器)把返回值写出去
上面解释:
@ResponseBody由HttpMessageConverter处理
HttpMessageConverter会先进行内容协商
2.1. 遍历所有的MessageConverter看谁支持这种内容类型的数据
2.2. 默认MessageConverter有以下
2.3.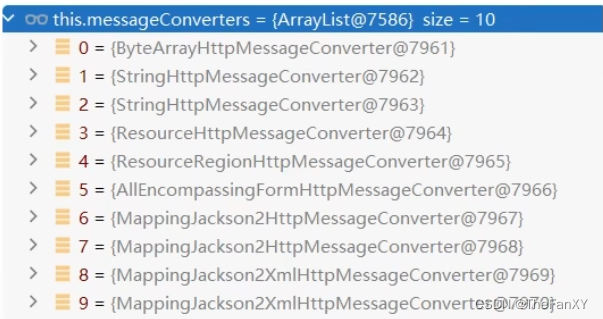
2.4. 最终因为要json所以MappingJackson2HttpMessageConverter支持写出json
2.5. jackson用ObjectMapper把对象写出去
2. WebMvcAutoConfiguration提供几种默认HttpMessageConverters
● EnableWebMvcConfiguration通过 addDefaultHttpMessageConverters添加了默认的MessageConverter;如下:
○ ByteArrayHttpMessageConverter: 支持字节数据读写
○ StringHttpMessageConverter: 支持字符串读写
○ ResourceHttpMessageConverter:支持资源读写
○ ResourceRegionHttpMessageConverter: 支持分区资源写出
○ AllEncompassingFormHttpMessageConverter:支持表单xml/json读写
○ MappingJackson2HttpMessageConverter: 支持请求响应体Json读写
默认8个:
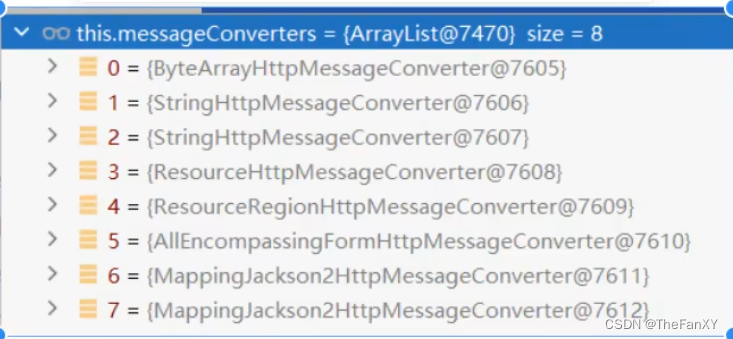
这里可能系统出现一些bug,同样的转换器配置了两遍
系统提供默认的
MessageConverter功能有限,仅用于json或者普通返回数据。额外增加新的内容协商功能,必须增加新的HttpMessageConverter
5. 模板引擎
- 由于 SpringBoot 使用了嵌入式 Servlet 容器。所以 JSP 默认是不能使用的。
- 如果需要服务端页面渲染,优先考虑使用
模板引擎。
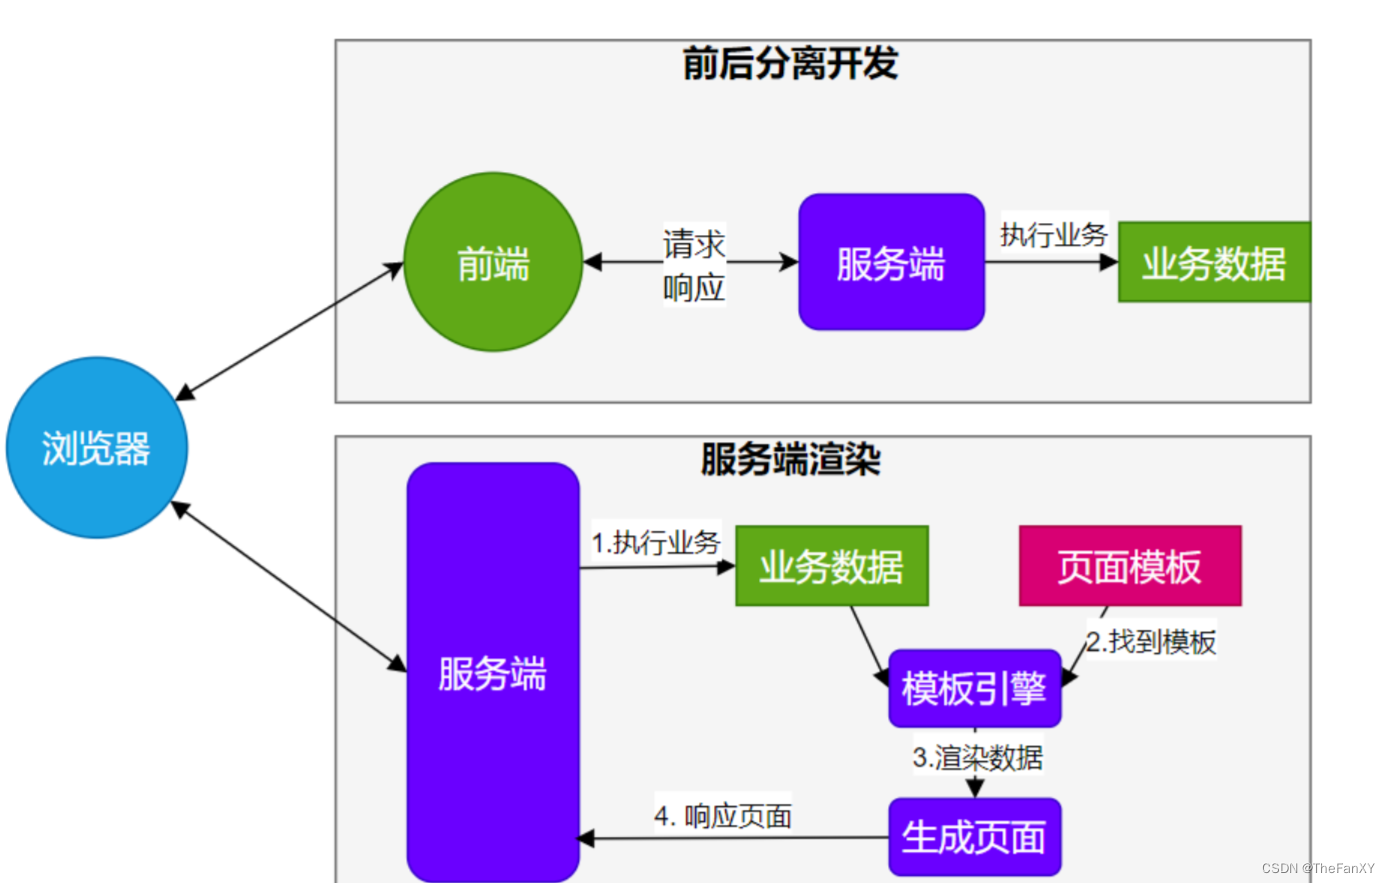
模板引擎页面默认放在 src/main/resources/templates
SpringBoot 包含以下模板引擎的自动配置
● FreeMarker
● Groovy
● Thymeleaf
● Mustache
Thymeleaf官网
<!DOCTYPE html>
<html xmlns:th="http://www.thymeleaf.org">
<head>
	<title>Good Thymes Virtual Grocery</title>
	<meta http-equiv="Content-Type" content="text/html; charset=UTF-8" />
	<link rel="stylesheet" type="text/css" media="all" th:href="@{/css/gtvg.css}" />
</head>
<body>
	<p th:text="#{home.welcome}">Welcome to our grocery store!</p>
</body
</html>
1. Thymeleaf整合
<dependency>
    <groupId>org.springframework.boot</groupId>
    <artifactId>spring-boot-starter-thymeleaf</artifactId>
</dependency>
自动配置原理
- 开启了
org.springframework.boot.autoconfigure.thymeleaf.ThymeleafAutoConfiguration自动配置 - 属性绑定在
ThymeleafProperties中,对应配置文件spring.thymeleaf内容 - 所有的模板页面默认在
classpath:/templates文件夹下 - 默认效果
- 所有的模板页面在
classpath:/templates/下面找 - 找后缀名为
.html的页面
- 所有的模板页面在
2. 基础语法
1. 核心用法
th:xxx:动态渲染指定的 html 标签属性值、或者th指令(遍历、判断等)
th:text:标签体内文本值渲染th:utext:不会转义,显示为html原本的样子。
th:属性:标签指定属性渲染th:attr:标签任意属性渲染th:ifth:each...:其他th指令- 例如:
<p th:text="${content}">原内容</p>
<a th:href="${url}">登录</a>
<img src="../../images/gtvglogo.png"
     th:attr="src=@{/images/gtvglogo.png},title=#{logo},alt=#{logo}" />
表达式:用来动态取值
${}:变量取值;使用model共享给页面的值都直接用${}@{}:url路径;#{}:国际化消息~{}:片段引用*{}:变量选择:需要配合th:object绑定对象
系统工具&内置对象:详细文档
param:请求参数对象session:session对象application:application对象#execInfo:模板执行信息#messages:国际化消息#uris:uri/url工具#conversions:类型转换工具#dates:日期工具,是java.util.Date对象的工具类#calendars:类似#dates,只不过是java.util.Calendar对象的工具类#temporals: JDK8+java.timeAPI 工具类#numbers:数字操作工具#strings:字符串操作#objects:对象操作#bools:bool操作#arrays:array工具#lists:list工具#sets:set工具#maps:map工具#aggregates:集合聚合工具(sum、avg)#ids:id生成工具
2. 语法示例
表达式:
- 变量取值:
${...} - url 取值:
@{...} - 国际化消息:
#{...} - 变量选择:
*{...} - 片段引用:
~{...}
常见:
- 文本:
'one text','another one!',… - 数字:
0,34,3.0,12.3,… - 布尔:
true、false - null:
null - 变量名:
one,sometext,main…
文本操作:
- 拼串:
+ - 文本替换:
| The name is ${name} |
布尔操作:
- 二进制运算:
and,or - 取反:
!,not
比较运算:
- 比较:
>,<,<=,>=(gt,lt,ge,le) - 等值运算:
==,!=(eq,ne)
条件运算:
- if-then:
(if)?(then) - if-then-else:
(if)?(then):(else) - default:
(value)?:(defaultValue)
特殊语法:
- 无操作:
_
所有以上都可以嵌套组合
'User is of type ' + (${user.isAdmin()} ? 'Administrator' : (${user.type} ?: 'Unknown'))
3. 属性设置
th:href="@{/product/list}"th:attr="class=${active}"th:attr="src=@{/images/gtvglogo.png},title=${logo},alt=#{logo}"th:checked="${user.active}"
<p th:text="${content}">原内容</p>
<a th:href="${url}">登录</a>
<img src="../../images/gtvglogo.png"
     th:attr="src=@{/images/gtvglogo.png},title=#{logo},alt=#{logo}" />
4. 遍历
语法: th:each=“元素名,迭代状态 : ${集合}”
<tr th:each="prod : ${prods}">
  <td th:text="${prod.name}">Onions</td>
  <td th:text="${prod.price}">2.41</td>
  <td th:text="${prod.inStock}? #{true} : #{false}">yes</td>
</tr>

<tr th:each="prod,iterStat : ${prods}" th:class="${iterStat.odd}? 'odd'">
  <td th:text="${prod.name}">Onions</td>
  <td th:text="${prod.price}">2.41</td>
  <td th:text="${prod.inStock}? #{true} : #{false}">yes</td>
</tr>
iterStat 有以下属性:
index:当前遍历元素的索引,从0开始count:当前遍历元素的索引,从1开始size:需要遍历元素的总数量current:当前正在遍历的元素对象even/odd:是否偶数/奇数行first:是否第一个元素last:是否最后一个元素
5. 判断
th:if
<a
  href="comments.html"
  th:href="@{/product/comments(prodId=${prod.id})}"
  th:if="${not #lists.isEmpty(prod.comments)}"
  >view</a>
th:switch
<div th:switch="${user.role}">
  <p th:case="'admin'">User is an administrator</p>
  <p th:case="#{roles.manager}">User is a manager</p>
  <p th:case="*">User is some other thing</p>
</div>
6. 属性优先级
- 片段
- 遍历
- 判断
<ul>
  <li th:each="item : ${items}" th:text="${item.description}">Item description here...</li>
</ul>
| Order | Feature | Attributes |
|---|---|---|
| 1 | 片段包含 | th:insert th:replace |
| 2 | 遍历 | th:each |
| 3 | 判断 | th:if th:unless th:switch th:case |
| 4 | 定义本地变量 | th:object th:with |
| 5 | 通用方式属性修改 | th:attr th:attrprepend th:attrappend |
| 6 | 指定属性修改 | th:value th:href th:src ... |
| 7 | 文本值 | th:text th:utext |
| 8 | 片段指定 | th:fragment |
| 9 | 片段移除 | th:remove |
7. 行内写法
[[...]] or [(...)]
<p>Hello, [[${session.user.name}]]!</p>
8. 变量选择
<div th:object="${session.user}">
  <p>Name: <span th:text="*{firstName}">Sebastian</span>.</p>
  <p>Surname: <span th:text="*{lastName}">Pepper</span>.</p>
  <p>Nationality: <span th:text="*{nationality}">Saturn</span>.</p>
</div>
等同于
<div>
  <p>Name: <span th:text="${session.user.firstName}">Sebastian</span>.</p>
  <p>Surname: <span th:text="${session.user.lastName}">Pepper</span>.</p>
  <p>Nationality: <span th:text="${session.user.nationality}">Saturn</span>.</p>
</div>
9. 模板布局
- 定义模板:
th:fragment - 引用模板:
~{templatename::selector} - 插入模板:
th:insert、th:replace
<footer th:fragment="copy">© 2011 The Good Thymes Virtual Grocery</footer>
<body>
<div th:insert="~{footer :: copy}"></div>
<div th:replace="~{footer :: copy}"></div>
</body>
<body>
结果:
<body>
<div>
<footer>© 2011 The Good Thymes Virtual Grocery</footer>
</div>
<footer>© 2011 The Good Thymes Virtual Grocery</footer>
</body>
</body>
10. devtools
      <dependency>
        <groupId>org.springframework.boot</groupId>
        <artifactId>spring-boot-devtools</artifactId>
      </dependency>
修改页面后;ctrl+F9刷新效果;
java代码的修改,如果devtools热启动了,可能会引起一些bug,难以排查
6. 国际化
国际化的自动配置参照MessageSourceAutoConfiguration
实现步骤:
- Spring Boot 在类路径根下查找
messages资源绑定文件。文件名为:messages.properties - 多语言可以定义多个消息文件,命名为
messages_区域代码.properties。如:messages.properties:默认messages_zh_CN.properties:中文环境messages_en_US.properties:英语环境
- 在程序中可以自动注入
MessageSource组件,获取国际化的配置项值 - 在页面中可以使用表达式
#{}获取国际化的配置项值
    @Autowired  //国际化取消息用的组件
    MessageSource messageSource;
    @GetMapping("/haha")
    public String haha(HttpServletRequest request){

        Locale locale = request.getLocale();
        //利用代码的方式获取国际化配置文件中指定的配置项的值
        String login = messageSource.getMessage("login", null, locale);
        return login;
    }
7. 错误处理
1. 默认机制
错误处理的自动配置都在
ErrorMvcAutoConfiguration中,两大核心机制:
- SpringBoot 会 自适应 处理错误,响应页面或JSON数据
- SpringMVC的错误处理机制 依然保留,MVC处理不了,才会 交给boot进行处理

- 发生错误以后,转发给/error路径,SpringBoot在底层写好一个 BasicErrorController的组件,专门处理这个请求
	@RequestMapping(produces = MediaType.TEXT_HTML_VALUE) //返回HTML
	public ModelAndView errorHtml(HttpServletRequest request, HttpServletResponse response) {
		HttpStatus status = getStatus(request);
		Map<String, Object> model = Collections
			.unmodifiableMap(getErrorAttributes(request, getErrorAttributeOptions(request, MediaType.TEXT_HTML)));
		response.setStatus(status.value());
		ModelAndView modelAndView = resolveErrorView(request, response, status, model);
		return (modelAndView != null) ? modelAndView : new ModelAndView("error", model);
	}

	@RequestMapping  //返回 ResponseEntity, JSON
	public ResponseEntity<Map<String, Object>> error(HttpServletRequest request) {
		HttpStatus status = getStatus(request);
		if (status == HttpStatus.NO_CONTENT) {
			return new ResponseEntity<>(status);
		}
		Map<String, Object> body = getErrorAttributes(request, getErrorAttributeOptions(request, MediaType.ALL));
		return new ResponseEntity<>(body, status);
	}
错误页面是这么解析到的
//1、解析错误的自定义视图地址
ModelAndView modelAndView = resolveErrorView(request, response, status, model);
//2、如果解析不到错误页面的地址,默认的错误页就是 error
return (modelAndView != null) ? modelAndView : new ModelAndView("error", model);
容器中专门有一个错误视图解析器
@Bean
@ConditionalOnBean(DispatcherServlet.class)
@ConditionalOnMissingBean(ErrorViewResolver.class)
DefaultErrorViewResolver conventionErrorViewResolver() {
    return new DefaultErrorViewResolver(this.applicationContext, this.resources);
}
SpringBoot解析自定义错误页的默认规则
	@Override
	public ModelAndView resolveErrorView(HttpServletRequest request, HttpStatus status, Map<String, Object> model) {
		ModelAndView modelAndView = resolve(String.valueOf(status.value()), model);
		if (modelAndView == null && SERIES_VIEWS.containsKey(status.series())) {
			modelAndView = resolve(SERIES_VIEWS.get(status.series()), model);
		}
		return modelAndView;
	}

	private ModelAndView resolve(String viewName, Map<String, Object> model) {
		String errorViewName = "error/" + viewName;
		TemplateAvailabilityProvider provider = this.templateAvailabilityProviders.getProvider(errorViewName,
				this.applicationContext);
		if (provider != null) {
			return new ModelAndView(errorViewName, model);
		}
		return resolveResource(errorViewName, model);
	}

	private ModelAndView resolveResource(String viewName, Map<String, Object> model) {
		for (String location : this.resources.getStaticLocations()) {
			try {
				Resource resource = this.applicationContext.getResource(location);
				resource = resource.createRelative(viewName + ".html");
				if (resource.exists()) {
					return new ModelAndView(new HtmlResourceView(resource), model);
				}
			}
			catch (Exception ex) {
			}
		}
		return null;
	}
容器中有一个默认的名为 error 的 view; 提供了默认白页功能
@Bean(name = "error")
@ConditionalOnMissingBean(name = "error")
public View defaultErrorView() {
    return this.defaultErrorView;
}
封装了JSON格式的错误信息
	@Bean
	@ConditionalOnMissingBean(value = ErrorAttributes.class, search = SearchStrategy.CURRENT)
	public DefaultErrorAttributes errorAttributes() {
		return new DefaultErrorAttributes();
	}
规则:
- 解析一个错误页
- 如果发生了500、404、503、403 这些错误
- ① 如果有模板引擎,默认在
classpath:/templates/error/精确码.html - ② 如果没有模板引擎,在静态资源文件夹下找
精确码.html
- ① 如果有模板引擎,默认在
- 如果匹配不到
精确码.html这些精确的错误页,就去找5xx.html,4xx.html模糊匹配- ① 如果有模板引擎,默认在
classpath:/templates/error/5xx.html - ② 如果没有模板引擎,在静态资源文件夹下找
5xx.html
- ① 如果有模板引擎,默认在
- 如果发生了500、404、503、403 这些错误
- 如果模板引擎路径
templates下有error.html页面,就直接渲染
2. 自定义错误响应
1. 自定义json响应
使用@ControllerAdvice + @ExceptionHandler 进行统一异常处理
2. 自定义页面响应
根据boot的错误页面规则,自定义页面模板
3. 最佳实战
- 前后分离
- 后台发生的所有错误,
@ControllerAdvice + @ExceptionHandler进行统一异常处理。
- 后台发生的所有错误,
- 服务端页面渲染
- 不可预知的一些,HTTP码表示的服务器或客户端错误
- 给
classpath:/templates/error/下面,放常用精确的错误码页面。500.html,404.html - 给
classpath:/templates/error/下面,放通用模糊匹配的错误码页面。5xx.html,4xx.html
- 给
- 发生业务错误
- 核心业务,每一种错误,都应该代码控制,跳转到自己定制的错误页。
- 通用业务,classpath:/templates/error.html页面,显示错误信息。
- 不可预知的一些,HTTP码表示的服务器或客户端错误
页面,JSON,可用的Model数据如下

8. 嵌入式容器
Servlet容器:管理、运行Servlet组件(Servlet、Filter、Listener)的环境,一般指服务器
1. 自动配置原理
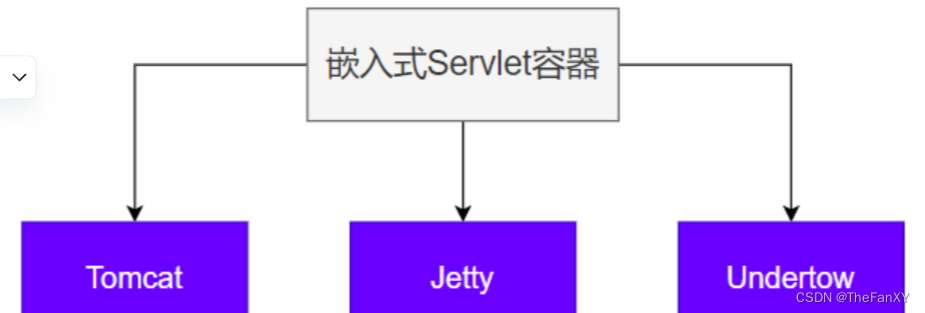
- SpringBoot 默认嵌入Tomcat作为Servlet容器。
- 自动配置类是
ServletWebServerFactoryAutoConfiguration,EmbeddedWebServerFactoryCustomizerAutoConfiguration - 自动配置类开始分析功能。
xxxxAutoConfiguration
@AutoConfiguration
@AutoConfigureOrder(Ordered.HIGHEST_PRECEDENCE)
@ConditionalOnClass(ServletRequest.class)
@ConditionalOnWebApplication(type = Type.SERVLET)
@EnableConfigurationProperties(ServerProperties.class)
@Import({ ServletWebServerFactoryAutoConfiguration.BeanPostProcessorsRegistrar.class,
		ServletWebServerFactoryConfiguration.EmbeddedTomcat.class,
		ServletWebServerFactoryConfiguration.EmbeddedJetty.class,
		ServletWebServerFactoryConfiguration.EmbeddedUndertow.class })
public class ServletWebServerFactoryAutoConfiguration {

}
ServletWebServerFactoryAutoConfiguration自动配置了嵌入式容器场景- 绑定了
ServerProperties配置类,所有和服务器有关的配置server ServletWebServerFactoryAutoConfiguration导入了 嵌入式的三大服务器Tomcat、Jetty、Undertow- 导入
Tomcat、Jetty、Undertow都有条件注解。系统中有这个类才行(也就是导了包) - 默认
Tomcat配置生效。给容器中放 TomcatServletWebServerFactory - 都给容器中
ServletWebServerFactory放了一个 web服务器工厂(造web服务器的) - web服务器工厂 都有一个功能,
getWebServer获取web服务器 - TomcatServletWebServerFactory 创建了 tomcat。
- 导入
- ServletWebServerFactory 什么时候会创建 webServer出来。
ServletWebServerApplicationContextioc容器,启动的时候会调用创建web服务器- Spring容器刷新(启动) 的时候,会预留一个时机,刷新子容器。
onRefresh() - refresh() 容器刷新 十二大步的刷新子容器会调用
onRefresh()
	@Override
	protected void onRefresh() {
		super.onRefresh();
		try {
			createWebServer();
		}
		catch (Throwable ex) {
			throw new ApplicationContextException("Unable to start web server", ex);
		}
	}
Web场景的Spring容器启动,在onRefresh的时候,会调用创建web服务器的方法。
Web服务器的创建是通过WebServerFactory搞定的。容器中又会根据导了什么包条件注解,启动相关的 服务器配置,默认EmbeddedTomcat会给容器中放一个TomcatServletWebServerFactory,导致项目启动,自动创建出Tomcat。
2. 自定义
切换服务器
<properties>
    <servlet-api.version>3.1.0</servlet-api.version>
</properties>
<dependency>
    <groupId>org.springframework.boot</groupId>
    <artifactId>spring-boot-starter-web</artifactId>
    <exclusions>
        <!-- Exclude the Tomcat dependency -->
        <exclusion>
            <groupId>org.springframework.boot</groupId>
            <artifactId>spring-boot-starter-tomcat</artifactId>
        </exclusion>
    </exclusions>
</dependency>
<!-- Use Jetty instead -->
<dependency>
    <groupId>org.springframework.boot</groupId>
    <artifactId>spring-boot-starter-jetty</artifactId>
</dependency>
3. 最佳实践
用法:
- 修改
server下的相关配置就可以修改服务器参数 - 通过给容器中放一个
ServletWebServerFactory,来禁用掉SpringBoot默认放的服务器工厂,实现自定义嵌入任意服务器。
9. 全面接管SpringMVC
● SpringBoot 默认配置好了 SpringMVC 的所有常用特性。
● 如果我们需要全面接管SpringMVC的所有配置并禁用默认配置,仅需要编写一个WebMvcConfigurer配置类,并标注@EnableWebMvc即可
● 全手动模式
○@EnableWebMvc: 禁用默认配置
○WebMvcConfigurer组件:定义MVC的底层行为
1. WebMvcAutoConfiguration 到底自动配置了哪些规则
SpringMVC自动配置场景给我们配置了如下所有默认行为
WebMvcAutoConfigurationweb场景的自动配置类
1.1. 支持RESTful的filter:HiddenHttpMethodFilter
1.2. 支持非POST请求,请求体携带数据:FormContentFilter
1.3. 导入EnableWebMvcConfiguration:
1.3.1.RequestMappingHandlerAdapter
1.3.2.WelcomePageHandlerMapping: 欢迎页功能支持(模板引擎目录、静态资源目录放index.html),项目访问/ 就默认展示这个页面.
1.3.3.RequestMappingHandlerMapping:找每个请求由谁处理的映射关系
1.3.4.ExceptionHandlerExceptionResolver:默认的异常解析器
1.3.5.LocaleResolver:国际化解析器
1.3.6.ThemeResolver:主题解析器
1.3.7.FlashMapManager:临时数据共享
1.3.8.FormattingConversionService: 数据格式化 、类型转化
1.3.9.Validator: 数据校验JSR303提供的数据校验功能
1.3.10.WebBindingInitializer:请求参数的封装与绑定
1.3.11.ContentNegotiationManager:内容协商管理器
1.4.WebMvcAutoConfigurationAdapter配置生效,它是一个WebMvcConfigurer,定义mvc底层组件
1.4.1. 定义好 WebMvcConfigurer 底层组件默认功能;所有功能详见列表
1.4.2. 视图解析器:InternalResourceViewResolver
1.4.3. 视图解析器:BeanNameViewResolver,**视图名(controller方法的返回值字符串)**就是组件名
1.4.4. 内容协商解析器:ContentNegotiatingViewResolver
1.4.5. 请求上下文过滤器:RequestContextFilter: 任意位置直接获取当前请求
1.4.6. 静态资源链规则
1.4.7.ProblemDetailsExceptionHandler:错误详情
1.4.7.1. SpringMVC内部场景异常被它捕获:
1.5. 定义了MVC默认的底层行为:WebMvcConfigurer
2. @EnableWebMvc 禁用默认行为
@EnableWebMvc给容器中导入DelegatingWebMvcConfiguration组件,
他是WebMvcConfigurationSupportWebMvcAutoConfiguration有一个核心的条件注解,@ConditionalOnMissingBean(WebMvcConfigurationSupport.class),容器中没有WebMvcConfigurationSupport,WebMvcAutoConfiguration才生效.@EnableWebMvc导入WebMvcConfigurationSupport导致WebMvcAutoConfiguration失效。导致禁用了默认行为
● @EnableWebMVC 禁用了 Mvc的自动配置
● WebMvcConfigurer 定义SpringMVC底层组件的功能类
2. WebMvcConfigurer 功能
定义扩展SpringMVC底层功能
| 提供方法 | 核心参数 | 功能 | 默认 |
|---|---|---|---|
| addFormatters | FormatterRegistry | 格式化器:支持属性上@NumberFormat和@DatetimeFormat的数据类型转换 | GenericConversionService |
| getValidator | 无 | 数据校验:校验 Controller 上使用@Valid标注的参数合法性。需要导入starter-validator | 无 |
addInterceptors | InterceptorRegistry | 拦截器:拦截收到的所有请求 | 无 |
configureContentNegotiation | ContentNegotiationConfigurer | 内容协商:支持多种数据格式返回。需要配合支持这种类型的HttpMessageConverter | 支持 json |
configureMessageConverters | List<HttpMessageConverter<?>> | 消息转换器:标注@ResponseBody的返回值会利用MessageConverter直接写出去 | 8 个,支持byte,string, multipart, resource,json |
| addViewControllers | ViewControllerRegistry | 视图映射:直接将请求路径与物理视图映射。用于无 java 业务逻辑的直接视图页渲染 | 无 |
<mvc:view-controller> | |||
| configureViewResolvers | ViewResolverRegistry | 视图解析器:逻辑视图转为物理视图 | ViewResolverComposite |
| addResourceHandlers | ResourceHandlerRegistry | 静态资源处理:静态资源路径映射、缓存控制 | ResourceHandlerRegistry |
| configureDefaultServletHandling | DefaultServletHandlerConfigurer | 默认 Servlet:可以覆盖 Tomcat 的DefaultServlet。让DispatcherServlet拦截 / | 无 |
| configurePathMatch | PathMatchConfigurer | 路径匹配:自定义 URL 路径匹配。可以自动为所有路径加上指定前缀,比如/api | 无 |
configureAsyncSupport | AsyncSupportConfigurer | 异步支持 | TaskExecutionAutoConfiguration |
| addCorsMappings | CorsRegistry | 跨域 | 无 |
| addArgumentResolvers | List<HandlerMethodArgumentResolver> | 参数解析器 | mvc 默认提供 |
| addReturnValueHandlers | List<HandlerMethodReturnValueHandler> | 返回值解析器 | mvc 默认提供 |
| configureHandlerExceptionResolvers | List<HandlerExceptionResolver> | 异常处理器 | 默认 3 个 |
| ExceptionHandlerExceptionResolver | |||
| ResponseStatusExceptionResolver | |||
| DefaultHandlerExceptionResolver | |||
| getMessageCodesResolver | 无 | 消息码解析器:国际化使用 | 无 |
10. 最佳实践
SpringBoot 已经默认配置好了Web开发场景常用功能。我们直接使用即可。
三种方式
| 方式 | 用法 | 效果 | |
|---|---|---|---|
| 全自动 | 直接编写控制器逻辑 | 全部使用自动配置默认效果 | |
| 手自一体 | @Configuration + 配置 WebMvcConfigurer + 配置 WebMvcRegistrations | 不要标注@EnableWebMvc | 保留自动配置效果手动 设置部分功能 定义MVC底层组件 |
| 全手动 | @Configuration + 配置 WebMvcConfigurer | 标注 @EnableWebMvc | 禁用自动配置效果 全手动设置 |
总结:
给容器中写一个配置类 @Configuration 实现 WebMvcConfigurer 但是不要标注 @EnableWebMvc注解,实现手自一体的效果。
两种模式
1、前后分离模式: @RestController 响应JSON数据
2、前后不分离模式:@Controller + Thymeleaf 模板引擎
11. Web新特性
1. Problemdetails
RFC 7807: https://www.rfc-editor.org/rfc/rfc7807
错误信息返回新格式
原理
@Configuration(proxyBeanMethods = false)
//配置过一个属性 spring.mvc.problemdetails.enabled=true
@ConditionalOnProperty(prefix = "spring.mvc.problemdetails", name = "enabled", havingValue = "true")
static class ProblemDetailsErrorHandlingConfiguration {

    @Bean
    @ConditionalOnMissingBean(ResponseEntityExceptionHandler.class)
    ProblemDetailsExceptionHandler problemDetailsExceptionHandler() {
        return new ProblemDetailsExceptionHandler();
    }

}
ProblemDetailsExceptionHandler是一个@ControllerAdvice集中处理系统异常- 处理以下异常。如果系统出现以下异常,会被SpringBoot支持以
RFC 7807规范方式返回错误数据
	@ExceptionHandler({
			HttpRequestMethodNotSupportedException.class, //请求方式不支持
			HttpMediaTypeNotSupportedException.class,
			HttpMediaTypeNotAcceptableException.class,
			MissingPathVariableException.class,
			MissingServletRequestParameterException.class,
			MissingServletRequestPartException.class,
			ServletRequestBindingException.class,
			MethodArgumentNotValidException.class,
			NoHandlerFoundException.class,
			AsyncRequestTimeoutException.class,
			ErrorResponseException.class,
			ConversionNotSupportedException.class,
			TypeMismatchException.class,
			HttpMessageNotReadableException.class,
			HttpMessageNotWritableException.class,
			BindException.class
		})
效果:
默认响应错误的json。状态码 405
{
    "timestamp": "2023-04-18T11:13:05.515+00:00",
    "status": 405,
    "error": "Method Not Allowed",
    "trace": "org.springframework.web.HttpRequestMethodNotSupportedException: Request method 'POST' is not supported\r\n\tat org.springframework.web.servlet.mvc.method.RequestMappingInfoHandlerMapping.handleNoMatch(RequestMappingInfoHandlerMapping.java:265)\r\n\tat org.springframework.web.servlet.handler.AbstractHandlerMethodMapping.lookupHandlerMethod(AbstractHandlerMethodMapping.java:441)\r\n\tat org.springframework.web.servlet.handler.AbstractHandlerMethodMapping.getHandlerInternal(AbstractHandlerMethodMapping.java:382)\r\n\tat org.springframework.web.servlet.mvc.method.RequestMappingInfoHandlerMapping.getHandlerInternal(RequestMappingInfoHandlerMapping.java:126)\r\n\tat org.springframework.web.servlet.mvc.method.RequestMappingInfoHandlerMapping.getHandlerInternal(RequestMappingInfoHandlerMapping.java:68)\r\n\tat org.springframework.web.servlet.handler.AbstractHandlerMapping.getHandler(AbstractHandlerMapping.java:505)\r\n\tat org.springframework.web.servlet.DispatcherServlet.getHandler(DispatcherServlet.java:1275)\r\n\tat org.springframework.web.servlet.DispatcherServlet.doDispatch(DispatcherServlet.java:1057)\r\n\tat org.springframework.web.servlet.DispatcherServlet.doService(DispatcherServlet.java:974)\r\n\tat org.springframework.web.servlet.FrameworkServlet.processRequest(FrameworkServlet.java:1011)\r\n\tat org.springframework.web.servlet.FrameworkServlet.doPost(FrameworkServlet.java:914)\r\n\tat jakarta.servlet.http.HttpServlet.service(HttpServlet.java:563)\r\n\tat org.springframework.web.servlet.FrameworkServlet.service(FrameworkServlet.java:885)\r\n\tat jakarta.servlet.http.HttpServlet.service(HttpServlet.java:631)\r\n\tat org.apache.catalina.core.ApplicationFilterChain.internalDoFilter(ApplicationFilterChain.java:205)\r\n\tat org.apache.catalina.core.ApplicationFilterChain.doFilter(ApplicationFilterChain.java:149)\r\n\tat org.apache.tomcat.websocket.server.WsFilter.doFilter(WsFilter.java:53)\r\n\tat org.apache.catalina.core.ApplicationFilterChain.internalDoFilter(ApplicationFilterChain.java:174)\r\n\tat org.apache.catalina.core.ApplicationFilterChain.doFilter(ApplicationFilterChain.java:149)\r\n\tat org.springframework.web.filter.RequestContextFilter.doFilterInternal(RequestContextFilter.java:100)\r\n\tat org.springframework.web.filter.OncePerRequestFilter.doFilter(OncePerRequestFilter.java:116)\r\n\tat org.apache.catalina.core.ApplicationFilterChain.internalDoFilter(ApplicationFilterChain.java:174)\r\n\tat org.apache.catalina.core.ApplicationFilterChain.doFilter(ApplicationFilterChain.java:149)\r\n\tat org.springframework.web.filter.FormContentFilter.doFilterInternal(FormContentFilter.java:93)\r\n\tat org.springframework.web.filter.OncePerRequestFilter.doFilter(OncePerRequestFilter.java:116)\r\n\tat org.apache.catalina.core.ApplicationFilterChain.internalDoFilter(ApplicationFilterChain.java:174)\r\n\tat org.apache.catalina.core.ApplicationFilterChain.doFilter(ApplicationFilterChain.java:149)\r\n\tat org.springframework.web.filter.CharacterEncodingFilter.doFilterInternal(CharacterEncodingFilter.java:201)\r\n\tat org.springframework.web.filter.OncePerRequestFilter.doFilter(OncePerRequestFilter.java:116)\r\n\tat org.apache.catalina.core.ApplicationFilterChain.internalDoFilter(ApplicationFilterChain.java:174)\r\n\tat org.apache.catalina.core.ApplicationFilterChain.doFilter(ApplicationFilterChain.java:149)\r\n\tat org.apache.catalina.core.StandardWrapperValve.invoke(StandardWrapperValve.java:166)\r\n\tat org.apache.catalina.core.StandardContextValve.invoke(StandardContextValve.java:90)\r\n\tat org.apache.catalina.authenticator.AuthenticatorBase.invoke(AuthenticatorBase.java:493)\r\n\tat org.apache.catalina.core.StandardHostValve.invoke(StandardHostValve.java:115)\r\n\tat org.apache.catalina.valves.ErrorReportValve.invoke(ErrorReportValve.java:93)\r\n\tat org.apache.catalina.core.StandardEngineValve.invoke(StandardEngineValve.java:74)\r\n\tat org.apache.catalina.connector.CoyoteAdapter.service(CoyoteAdapter.java:341)\r\n\tat org.apache.coyote.http11.Http11Processor.service(Http11Processor.java:390)\r\n\tat org.apache.coyote.AbstractProcessorLight.process(AbstractProcessorLight.java:63)\r\n\tat org.apache.coyote.AbstractProtocol$ConnectionHandler.process(AbstractProtocol.java:894)\r\n\tat org.apache.tomcat.util.net.NioEndpoint$SocketProcessor.doRun(NioEndpoint.java:1741)\r\n\tat org.apache.tomcat.util.net.SocketProcessorBase.run(SocketProcessorBase.java:52)\r\n\tat org.apache.tomcat.util.threads.ThreadPoolExecutor.runWorker(ThreadPoolExecutor.java:1191)\r\n\tat org.apache.tomcat.util.threads.ThreadPoolExecutor$Worker.run(ThreadPoolExecutor.java:659)\r\n\tat org.apache.tomcat.util.threads.TaskThread$WrappingRunnable.run(TaskThread.java:61)\r\n\tat java.base/java.lang.Thread.run(Thread.java:833)\r\n",
    "message": "Method 'POST' is not supported.",
    "path": "/list"
}
开启ProblemDetails返回, 使用新的MediaType
Content-Type: application/problem+json + 额外扩展返回
{
    "type": "about:blank",
    "title": "Method Not Allowed",
    "status": 405,
    "detail": "Method 'POST' is not supported.",
    "instance": "/list"
}
2. 函数式Web
SpringMVC 5.2以后 允许我们使用函数式的方式,定义Web的请求处理流程。
函数式接口
Web请求处理的方式:
@Controller + @RequestMapping:耦合式 (路由、业务耦合)- 函数式Web:分离式(路由、业务分离)
1. 场景
场景:User RESTful - CRUD
- GET /user/1 获取1号用户
- GET /users 获取所有用户
- POST /user 请求体携带JSON,新增一个用户
- PUT /user/1 请求体携带JSON,修改1号用户
- DELETE /user/1 删除1号用户
2. 核心类
- RouterFunction
- RequestPredicate
- ServerRequest
- ServerResponse
3. 示例
import org.springframework.context.annotation.Bean;
import org.springframework.context.annotation.Configuration;
import org.springframework.http.MediaType;
import org.springframework.web.servlet.function.RequestPredicate;
import org.springframework.web.servlet.function.RouterFunction;
import org.springframework.web.servlet.function.ServerResponse;

import static org.springframework.web.servlet.function.RequestPredicates.accept;
import static org.springframework.web.servlet.function.RouterFunctions.route;

@Configuration(proxyBeanMethods = false)
public class MyRoutingConfiguration {

    private static final RequestPredicate ACCEPT_JSON = accept(MediaType.APPLICATION_JSON);

    @Bean
    public RouterFunction<ServerResponse> routerFunction(MyUserHandler userHandler) {
        return route()
                .GET("/{user}", ACCEPT_JSON, userHandler::getUser)
                .GET("/{user}/customers", ACCEPT_JSON, userHandler::getUserCustomers)
                .DELETE("/{user}", ACCEPT_JSON, userHandler::deleteUser)
                .build();
    }
}
import org.springframework.stereotype.Component;
import org.springframework.web.servlet.function.ServerRequest;
import org.springframework.web.servlet.function.ServerResponse;

@Component
public class MyUserHandler {

    public ServerResponse getUser(ServerRequest request) {
        ...
        return ServerResponse.ok().build();
    }

    public ServerResponse getUserCustomers(ServerRequest request) {
        ...
        return ServerResponse.ok().build();
    }

    public ServerResponse deleteUser(ServerRequest request) {
        ...
        return ServerResponse.ok().build();
    }

}