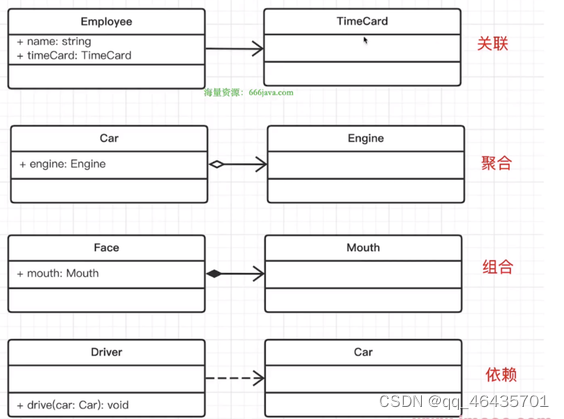
UML类图
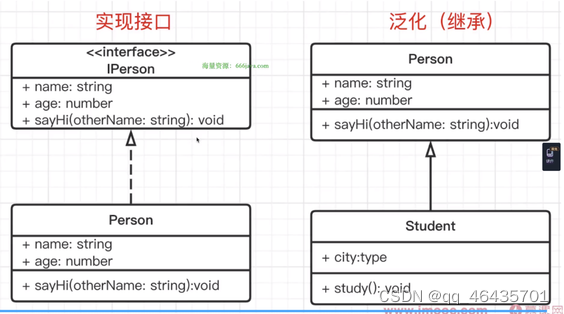
1.工厂模式
设计原则:最重要的就是开放封闭原则,对扩展开放,对修改封闭。
1.工厂和类分离,解耦
2.可以扩展多个类
3.工厂的创建逻辑也可以自由扩展
工厂模式可以拆分成三个,分别是工厂方法模式、抽象工厂模式和建造者模式。
1.1.简易工厂模式
// 简易工厂模式
class Product {
    name: string
    constructor(name: string) {
        this.name = name
    }
    fn1(){
        console.log('11111');
    }
    fn2(){
        console.log('22222');
    }
}

//工厂
class Creator {
    create (name:string):Product {
        return new Product(name)
    }
}
//test
const creator = new Creator()
const p1  = creator.create('p1')
const p2  = creator.create('p2')
const p3  = creator.create('p3')
UML类图
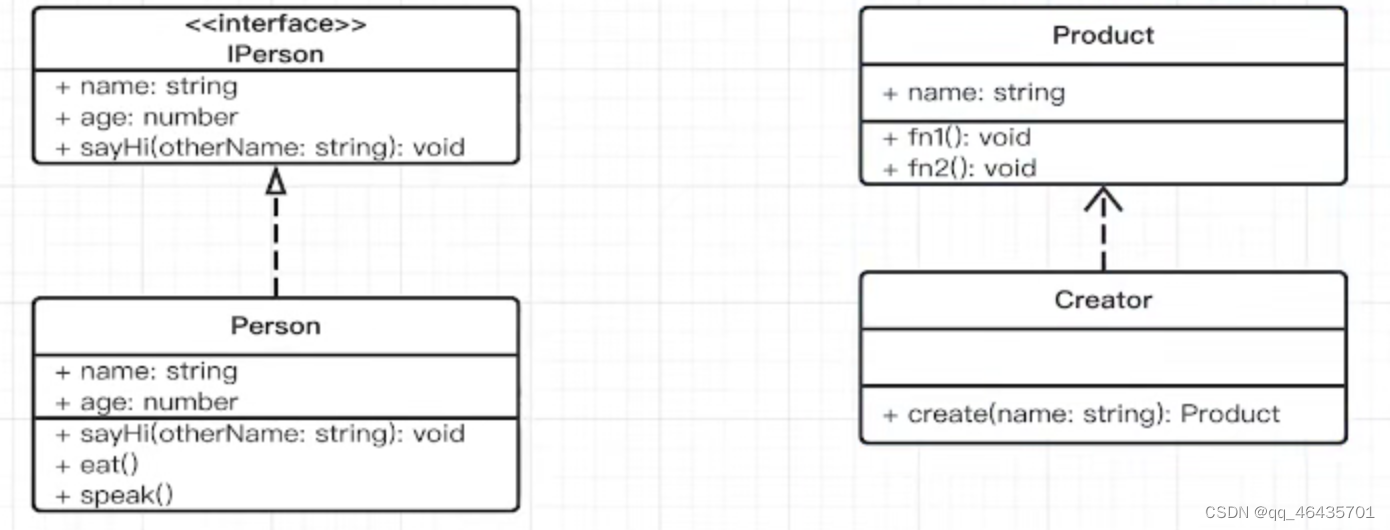
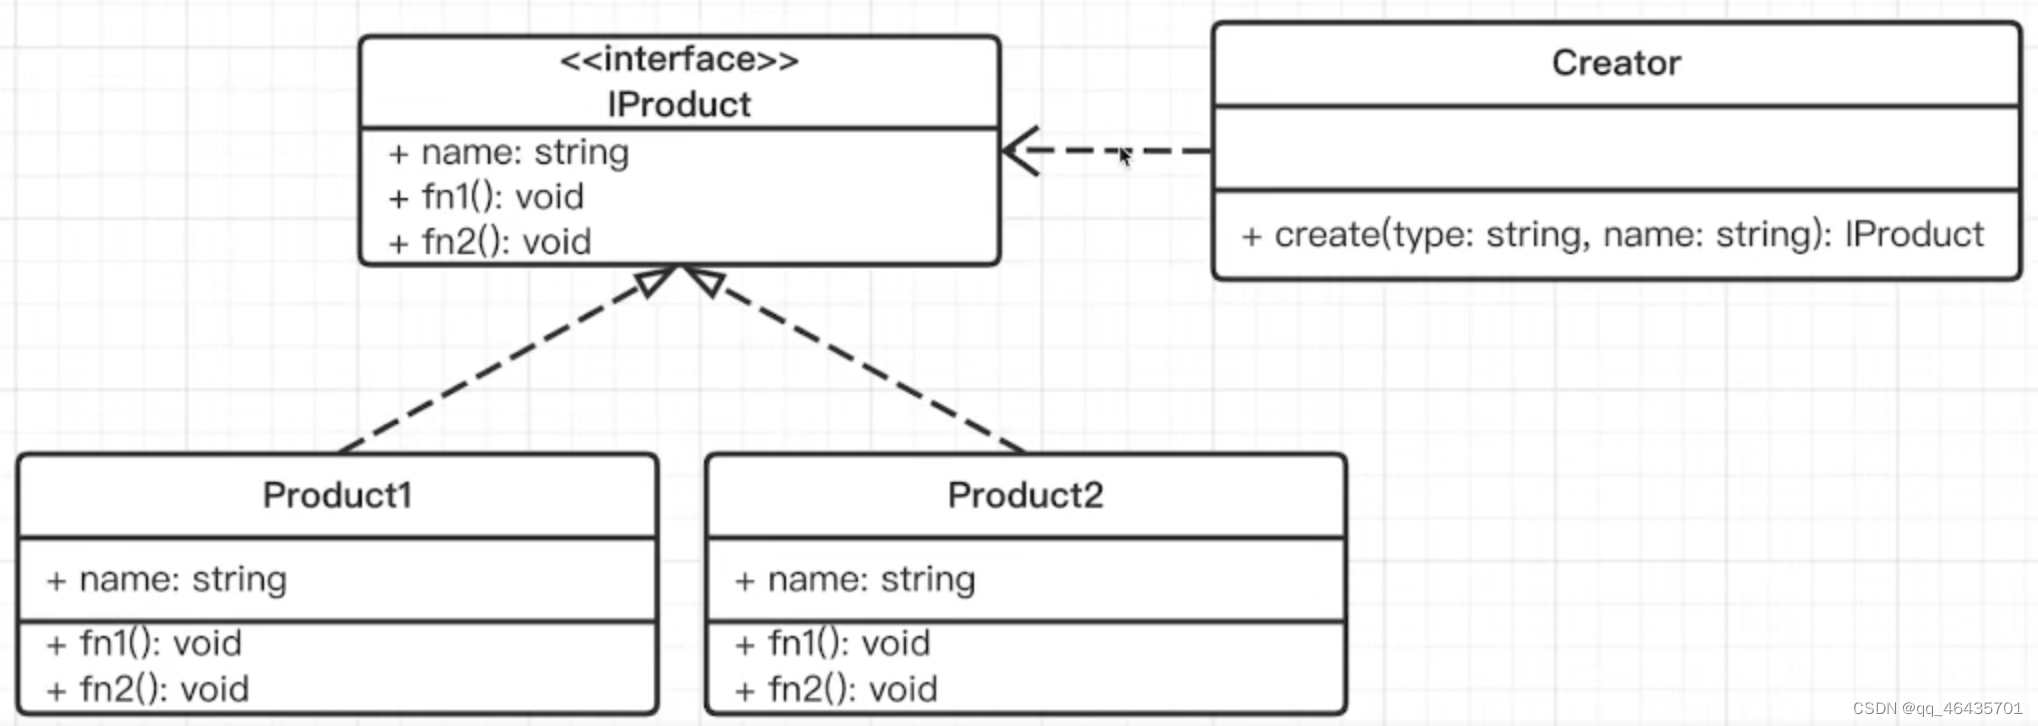
1.2 标准的工厂模式
interface IProduct {
    name: string
    fn1: () => void
    fn2: () => void
}
class Product1 implements IProduct {
    name:string
    constructor(name:string){
        this.name = name
    }
    fn1(){
        console.log('1111');
    }
    fn2(){
        console.log('22222');
    }
}
class Product2 implements IProduct {
    name:string
    constructor(name:string){
        this.name = name
    }
    fn1(){
        console.log('1111');
    }
    fn2(){
        console.log('22222');
    }
}
class Creator {
    create(type: string, name: string): IProduct {
        if (type === 'p1') {
            return new Product1(name)
        }
        if (type === 'p2') {
            return new Product2(name)
        }
        throw new Error('Invalid type')
    }
}
const creator = new Creator()
const p1 = creator.create('p1','name1')
const p2 = creator.create('p2','name2')
UML类图
 1.3 jQuery应用场景
// jQuery应用
declare interface Window {
    $: (selector: string) => Jquery
}
class Jquery {
    selector: string
    length: number
    constructor(selector: string) {
        const domList = Array.prototype.slice.call(document.querySelectorAll(selector))
        const length = domList.length
        for (let i = 0; i++; i < length) {
            //@ts-ignore
            this[i] = domList[i]
        }
        this.selector = selector
        this.length = length
    }
    append(elem: HTMLElement): Jquery {
        // append的具体操作
        return this
    }
    addClass(className: string): Jquery {
        //addClass 的操作
        return this
    }
}
// 不用工厂模式
// const $div = new Jquery('div')
// const $p = new Jquery('p')

//使用工厂模式
function $(selector: string) {
    return new Jquery(selector)
}
window.$ = $
const $div = $('div')
const $p = $('p')
console.log($p);
console.log($div);
1.4 Vue_createElementVNode和React createElement应用场景
工厂模式应用:从Render函数变成vnode的过程中运用
function createElement() {
    // 逻辑判断
    return VNode()
}
createElement(c,d)
2.单例模式
一个对象/实例,只能被创建一次
创建之后缓存起来,以后继续使用
即 一个系统只有一个
例:
登录框,遮罩层,一个系统只有一个即可,多了无用(创建好一个实例,哪个页面需要使用就直接从缓存里那过来使用即可)
Vuex Redux的store,一个系统中个只能有一个,多了就会出错
静态属性:
class Foo {
	// 实例/对象 属性
    name: string
    constructor(name: string) {
        this.name = name
    }
    getName() {
        return this.name
    }
    // 静态属性
    static flag: string = 'abc'
    static getFlag() {
        // this === Foo
        return Foo.flag
    }
}
const f1 = new Foo('zs')
f1.name // 'zs'
f1.getName() // 'zs'
console.log(Foo.flag);
console.log(Foo.getFlag);
UML类图
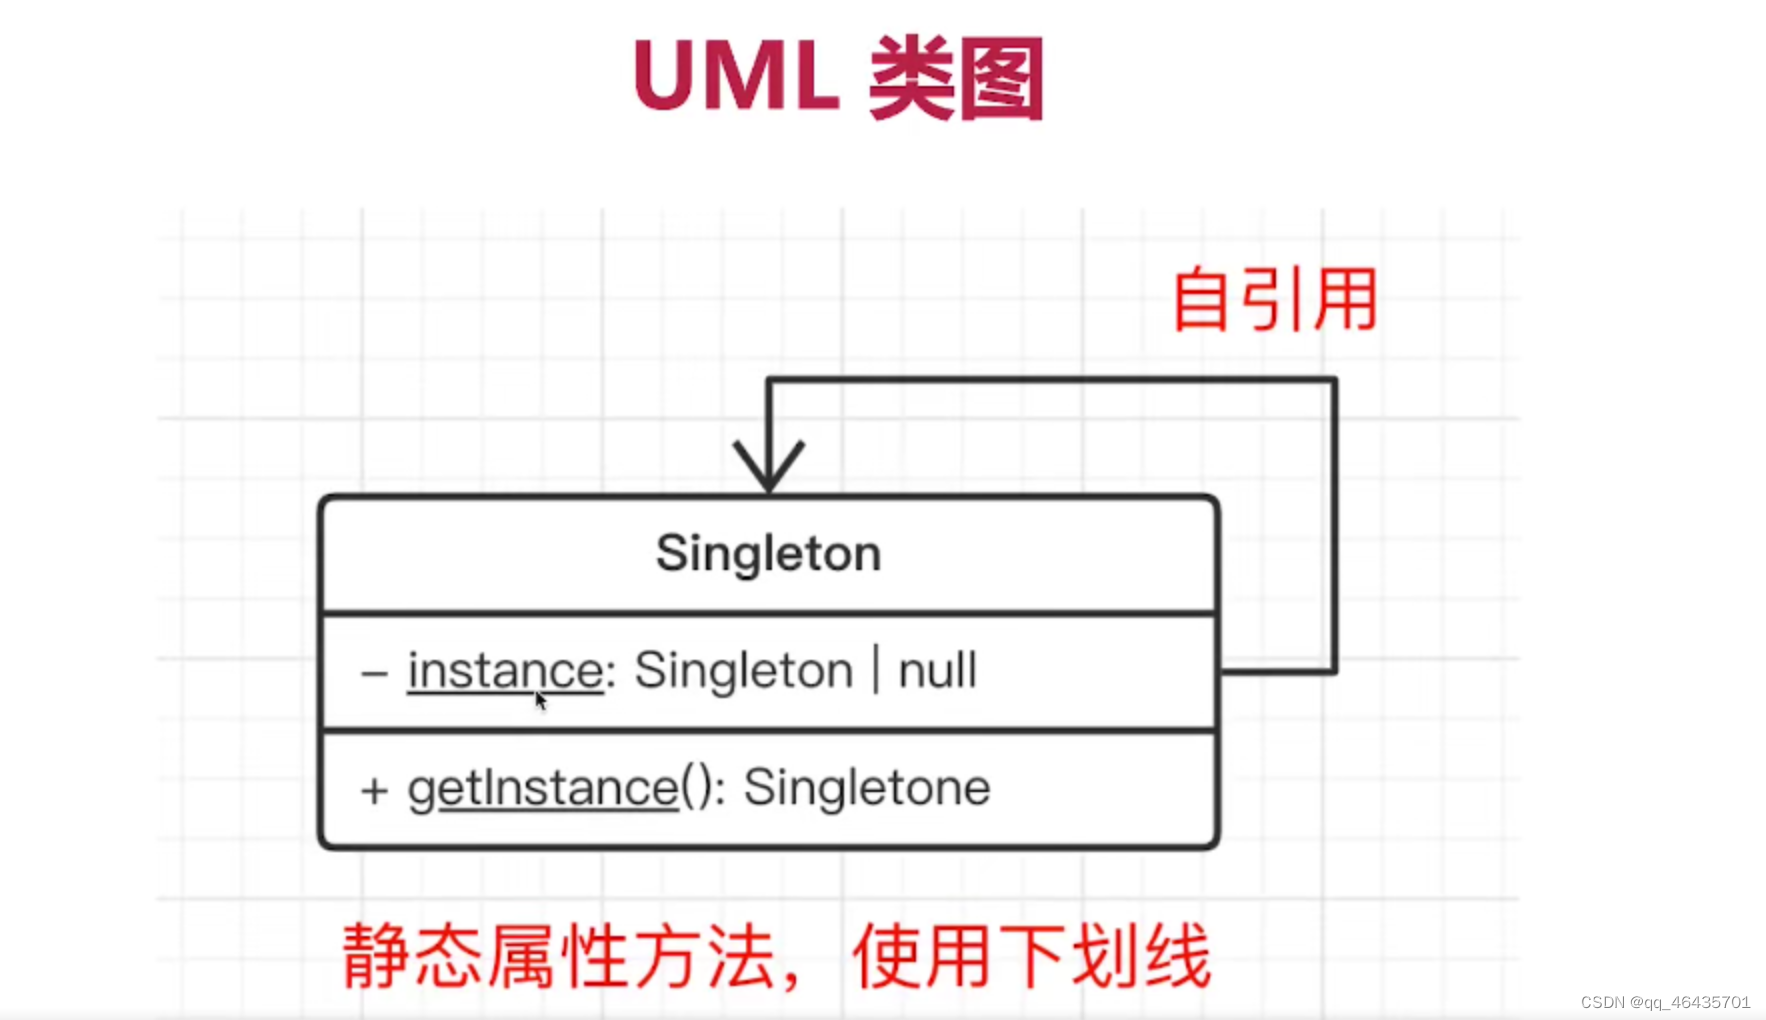
2.1 TS代码演示
class SingleTon {
    // private 无法在外面实例化
    private constructor() { }
    private static instance: SingleTon | null
    // 获取单例
    static getInstance(): SingleTon {
        if (SingleTon.instance == null) {
            SingleTon.instance = new SingleTon()
        }
        return SingleTon.instance
    }
}

const s1 = SingleTon.getInstance()
const s2 = SingleTon.getInstance()
console.log(s1 === s2);
2.2 登录框代码演示
class LoginForm {
    private state: string = 'hide'
    private constructor() { }
    show() {
        //this 也能写成 LoginForm
        if (this.state === 'show') {
            console.log('show-----');
            return
        }
        console.log('显示LoginForm');
        this.state = 'show'
    }
    hide() {
        if (this.state = 'hide') {
            console.log('hide---');
            return
        }
        console.log('隐藏LoginForm');
        this.state = 'hide'
    }
    private static instance: LoginForm | null = null
    static getInstance(): LoginForm {
        if (this.instance == null) {
            this.instance = new LoginForm()
        }
        return this.instance
    }
}
// test
const loginForm1 = LoginForm.getInstance()
const loginForm2 = LoginForm.getInstance()
console.log(loginForm1 === loginForm2);
3.观察者模式
UML类图
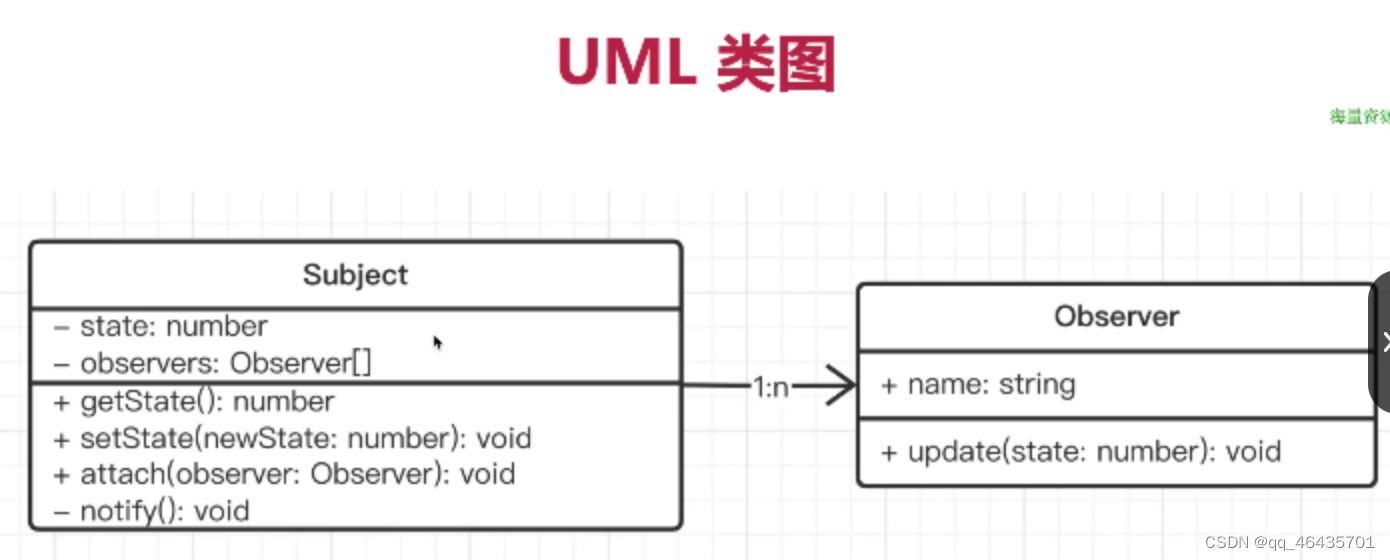
3.1 源码
class Subject {
    private state: number = 0
    private observers: Observer[] = []
    getState(): number {
        return this.state
    }
    setState(newState: number) {
        this.state = newState
        this.noticy()
    }
    // 添加观察者
    attach(observers: Observer) {
        this.observers.push(observers)
    }
    // 通知
    private noticy() {
        this.observers.forEach(observer => {
            observer.update(this.state)
        })
    }
}
class Observer {
    name: string
    constructor(name: string) {
        this.name = name
    }
    update(state: number) {
        console.log(`${this.name} updated,state is ${state}`);
    }
}
const sub = new Subject()
const observer1 = new Observer('A')
const observer2 = new Observer('B')
sub.attach(observer1)
sub.attach(observer2)
sub.setState(1)
3.2 应用场景
3.2.1 场景1
const http = require('http')
function serverCallback(req, res) {
    console.log('url', req.url);
    res.end('hello')
}
http.createServer(serverCallback).listen(8081)
console.log("开始监听8081端口----");
3.2.2 场景2
const { log } = require('console')
const fs = require('fs')
const readStream = fs.createReadStream('./data/yarn.lock.txt')
//文件字符的length
let length = 0
readStream.on('data', function (chunk) {
    let streamLen = chunk.toString().length
    console.log('current length', streamLen);
    length += streamLen

})
readStream.on('end', function () {
    console.log(length);
})
3.3.3 场景3
const readLine = require('readline')
const fs = require('fs')

const rl = readLine.createInterface({
    input: fs.createReadStream('./data/yarn.lock.txt')
})

// 文件的行数
let lineNum = 0
rl.on('line', function (line) {
    lineNum++
})
rl.on('close', function () {
    console.log('lineNum', lineNum);
})
3.3 观察者模式和发布订阅模式的区别
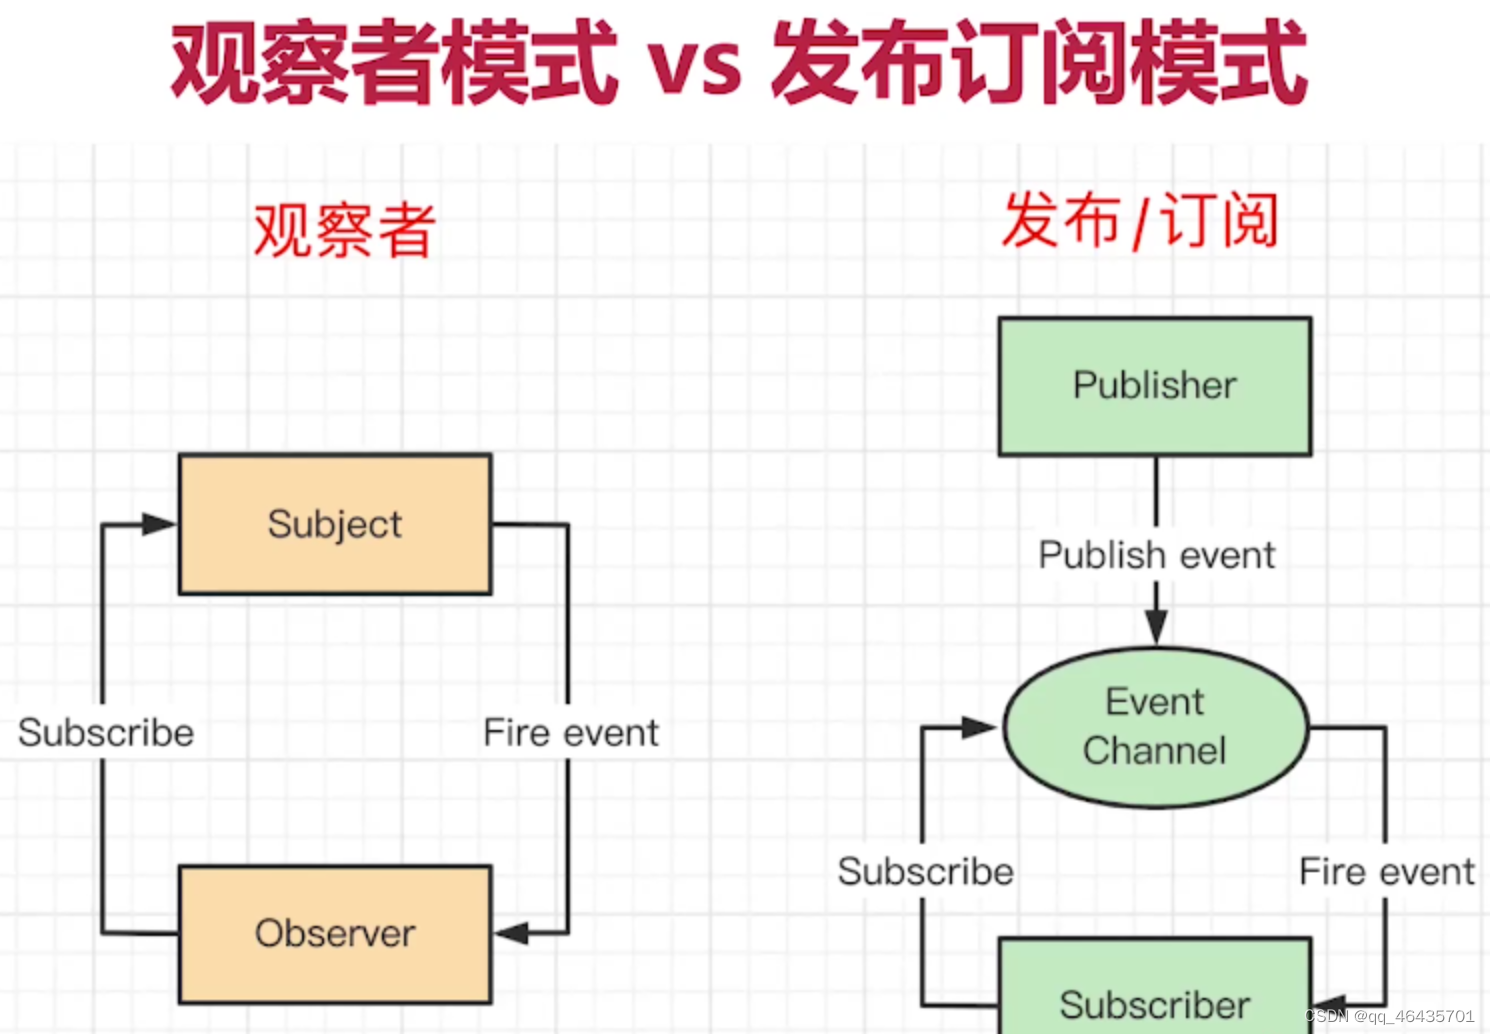

3.4 发布订阅模式场景
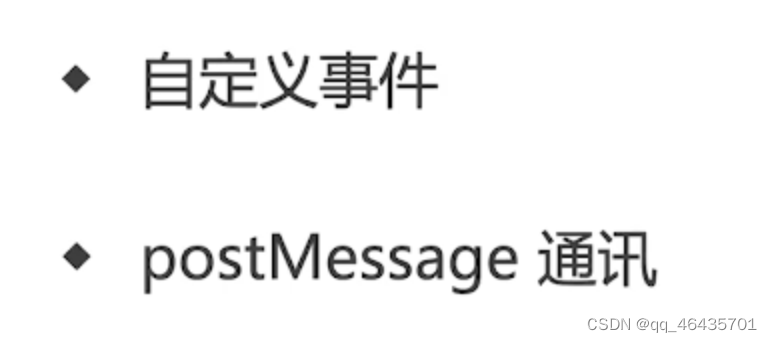
import eventEmitter from "event-emitter";
const emitter = eventEmitter()

emitter.on('change', (value: string, name: string) => {
    console.log('change1', value, name);
})

emitter.on('change', () => {
    console.log('change2');
})

emitter.once('change', () => {
    console.log('change3');
})
emitter.emit('change', 'aaa', 'hello')
emitter.emit('change')
emitter.emit('change')
4.迭代器模式
4.1 迭代器概念
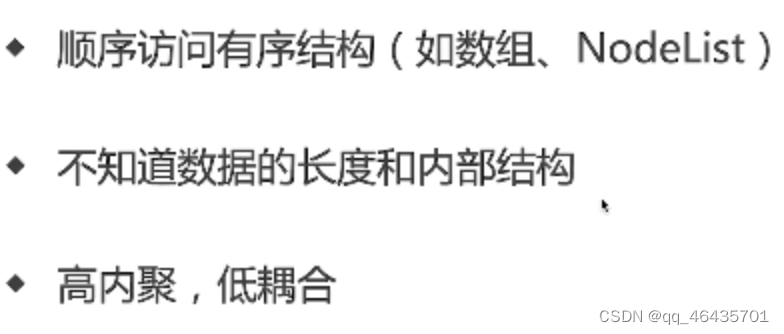
4.2代码
// 迭代器
class DataIterator {
    private data: number[]
    private index = 0
    constructor(container: DataContainer) {
        this.data = container.data
    }
    next(): number | null {
        if (this.hasNext()) {
            return this.data[this.index++]
        }
        return null
    }
    hasNext(): boolean {
        if (this.index >= this.data.length) {
            return false
        }
        return true
    }
}
class DataContainer {
    data = [10, 20, 30, 40, 50]
    getIterator() {
        // 获取迭代器
        return new DataIterator(this)
    }
}

const container = new DataContainer()
const iterator = container.getIterator() //获取迭代器

while (iterator.hasNext()) {
    const num = iterator.next()
    console.log(num);
}
4.3 UML类图

4.4 自定义简易迭代器
interface IteratorRes {
    value: number | undefined
    done: boolean
}
class CustomIterator {
    private length = 3
    private index = 0
    next(): IteratorRes {
        this.index++
        if (this.index <= this.length) {
            return { value: this.index, done: false }
        }
        return { value: undefined, done: true }
    }
    [Symbol.iterator]() {
        return this
    }
}
const iterator = new CustomIterator()
console.log(iterator.next());
console.log(iterator.next());
console.log(iterator.next());
console.log(iterator.next());
4.5 Generator + yield 遍历DOM树
function* traverse(elemList: Element[]): any {
    for (const elem of elemList) {
        yield elem
        const children = Array.from(elem.children)
        if (children.length) {
            yield* traverse(children)
        }
    }
}
const container = document.getElementById('aaa')
if (container) {
    for (let node of traverse([container])) {
        console.log(node);
    }
}
5.原型模式
5.1 UML类图
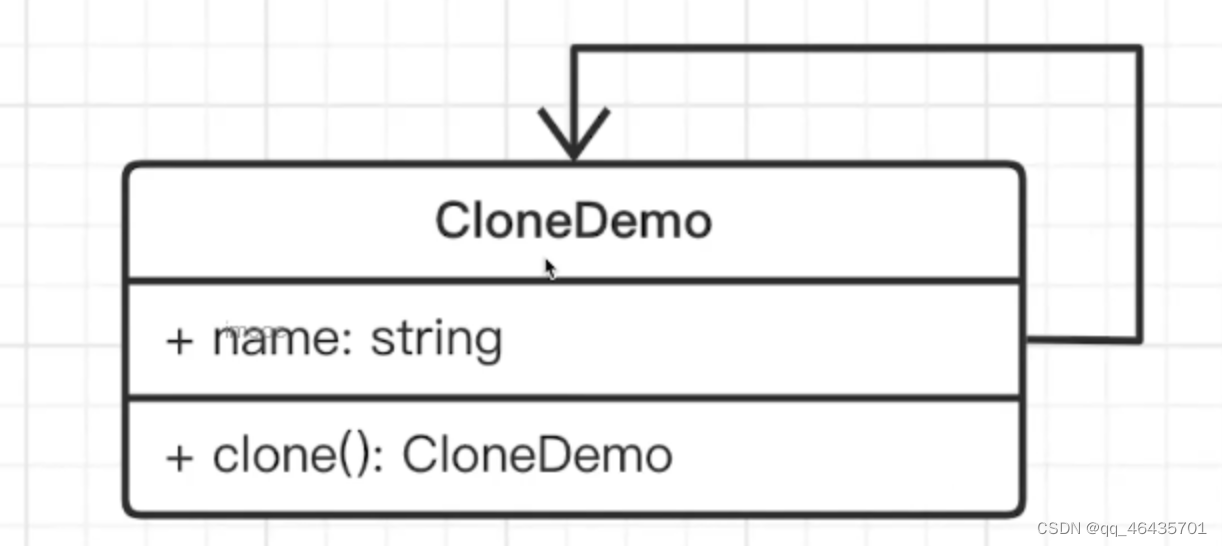
5.2 代码演示
// 原型模式
class CloneDemo {
    name = 'clone demo'
    clone(): CloneDemo {
        return new CloneDemo()
    }
}
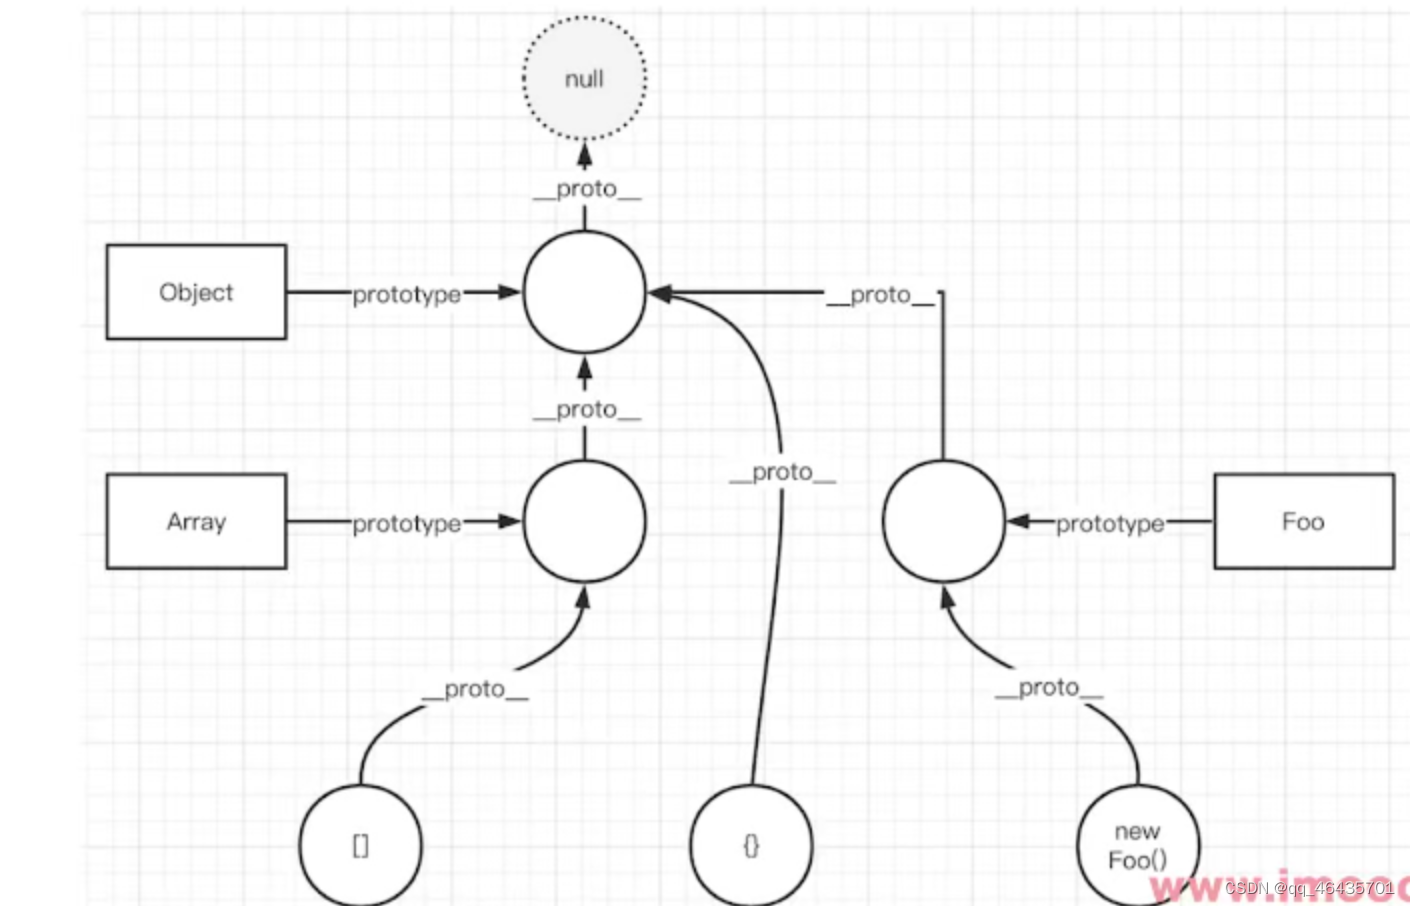
5.3 原型链
继承的本质就是原型链
5.4 使用场景
Object.create()
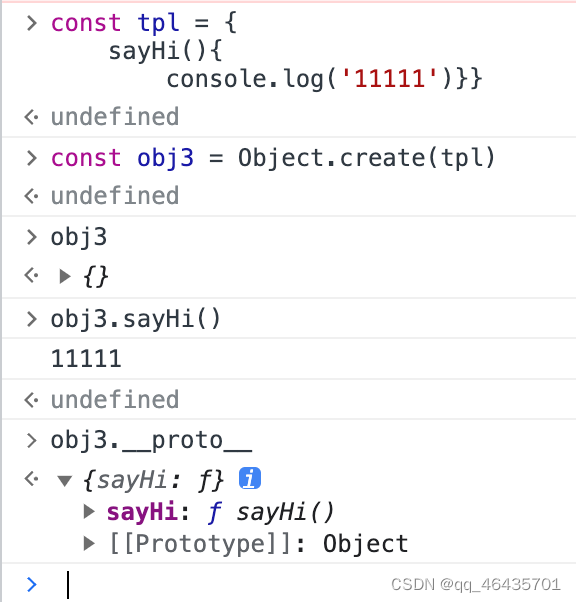
创建对象的区别:
使用 Object.create() 是将对象继承到原型链上,然后可以通过对象实例的 _ proto _ 属性进行访问原型链上的属性。
new Object() 默认继承了 Object 对象上的 prototype 。
{} 本质上和 new Object() 没有区别,默认都是继承了 Object 对象上的 prototype 。
5.5 对象属性描述符
Object.getOwnPropertyDescriptor()方法获取指定对象指定的自有属性的属性描述符。
Object.defineproperty()的作用就是直接在一个对象上定义一个新属性,或者修改一个已经存在的属性
Object.defineproperty()可以接收三个参数
Object.defineproperty(obj, prop, desc)
obj : 第一个参数就是要在哪个对象身上添加或者修改属性
prop : 第二个参数就是添加或修改的属性名
desc : 配置项,一般是一个对象
原型属性的enumerable

只要enumerable为true,就可以遍历出来
遍历Symbol属性
通过Reflect.ownKeys()可以遍历获取到
6.装饰器模式
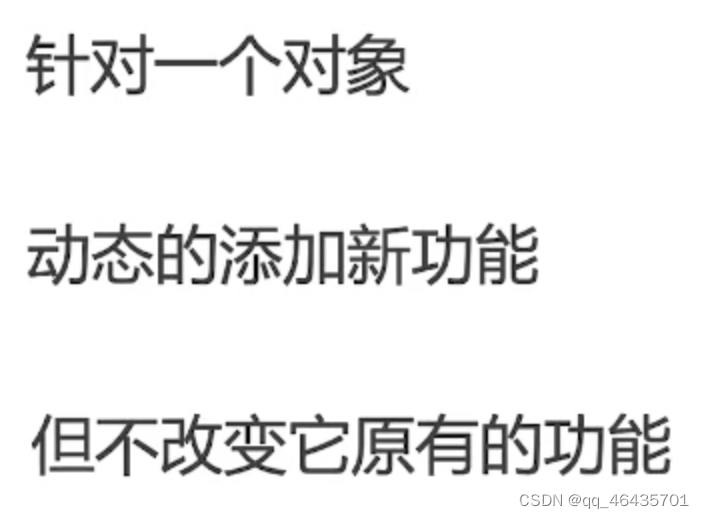
6.1 概念
6.2 UML类图

6.3 代码
class Circle {
    draw() {
        console.log('draw');
    }
}
class Decorator {
    private circle: Circle
    constructor(circle: Circle) {
        this.circle = circle
    }
    draw() {
        this.circle.draw()
        this.setBorder()
    }
    private setBorder() {
        console.log('setBorder');
    }
}

const circle = new Circle()
const decorator = new Decorator(circle)
decorator.draw()
6.4 应用场景
/**
 * readOnly 装饰器
 * @param target 实例
 * @param key key
 * @param descriptor 属性描述符
 */
function readOnly(target: any, key: string, descriptor: PropertyDescriptor) {
    console.log(target, 'target');
    console.log(key, 'key');
    console.log(descriptor, 'descriptor');
    descriptor.writable = false
}
// 装饰器工厂函数
function configurable(val: boolean) {
    return function (target: any, key: string, descriptor: PropertyDescriptor) {
        descriptor.configurable = val
    }
}

class Foo {
    private name = 'zs'
    private age = 20

    @readOnly
    getName() {
        return this.name
    }
    @configurable(false)
    getAge() {
        return this.age
    }
}

const f = new Foo()
// @ts-ignore
console.log(Object.getOwnPropertyDescriptor(f.__proto__, 'getAge'));
7.代理模式
7.1 UMl类图

7.2 代码
/ 代理模式
class RealImg {
    fileName: string
    constructor(fileName: string) {
        this.fileName = fileName
    }
    display() {
        this.loadFromDist()
        console.log('display---');
    }
    private loadFromDist() {
        console.log('loadFromDist---');

    }
}
class ProxyImg {
    realImg: RealImg
    constructor(fileName: string) {
        this.realImg = new RealImg(fileName)
    }
    //代理
    display() {
        this.realImg.display()
    }
}

const proxyImg = new ProxyImg('xxx.png')
proxyImg.display()
7.3 场景
7.3.1 DOM事件代理概念

7.3.2 DOM事件代理代码
const container = document.getElementById('container')
if (container) {
    // DOM 事件代理(委托)
    container.addEventListener('click', event => {
        const target = event.target as Element
        if (target.nodeName === 'A') {
            alert(target.innerHTML)
        }
    })
}
7.3.3 Webpack devServer proxy
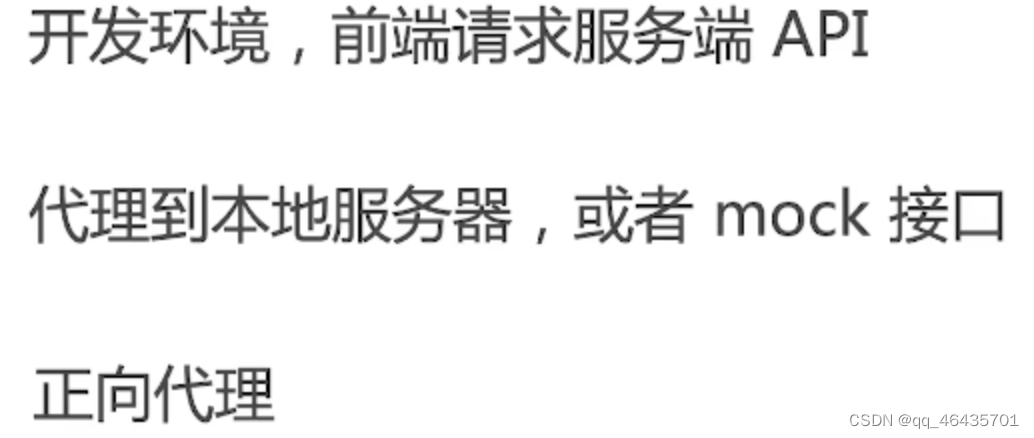
正向代理:又称客户端代理,由webpack来做代理,每一个开发者都需要配置webpack。
反向代理:又称服务端代理,nginx,由后端来进行代理到不同的端口,前端不需要做任何处理。
7.3.4 Proxy语法代码
const star = {
    name: 'zs',
    age: 25,
    phone: 123456789,
    price: 0
}
const agent = new Proxy(star, {
    get(target, key) {
        if (key === 'phone') {
            return '13912345678'
        }
        if (key === 'price') {
            return 10 * 1000
        }
        return Reflect.get(target, key)
    },
    set(target, key, val): boolean {
        if (key === 'price') {
            if (val < 100 * 1000) {
                throw new Error('to low')
            } else {
                console.log('成交!');
                return Reflect.set(target, key, val)
            }
        }
        // 其他属性不可修改
        return false
    }
})
console.log(agent.name);
console.log(agent.age);
console.log(agent.phone);
agent.price = 110000
console.log(agent.price);
7.3.5 Proxy使用场景
1.跟踪属性访问
vue3数据响应式 Proxy
const user = {
    name: 'zs'
}
const proxy = new Proxy(user, {
    get(...args) {
        console.log('get...');
        return Reflect.get(...args)
    },
    set(target, key, val) {
        console.log('set...');
        return Reflect.set(target, key, val)
    }
})

proxy.name
proxy.name = 'lisi'
2. 隐藏属性
const hiddenProps = ['girlFriend']
const user = {
    name: 'zs',
    age: 23,
    girlFriend: 'lisi'
}
const proxy = new Proxy(user, {
    get(target, key) {
        if (hiddenProps.includes(key as string)) return undefined
        return Reflect.get(target, key)
    },
    has(target, key) {
        if (hiddenProps.includes(key as string)) return false
        return Reflect.has(target, key)
    },
    set(target, key, val) {
        if (hiddenProps.includes(key as string)) return false
        return Reflect.set(target, key, val)
    }
})
// proxy.girlFriend = 'hahahs'
console.log(proxy.girlFriend);
console.log('girlFriend' in proxy);
3.验证属性格式
const user = {
    name: 'zs',
    age: 23
}
const proxy = new Proxy(user, {
    set(target, key, val) {
        if (key === 'age') {
            if (typeof val !== 'number') {
                return false
            }
        }
        return Reflect.set(target, key, val)
    },
})
// 类型报错
proxy.age = '12'
4.记录实例
const userList = new Set()
class User {
    name: string
    constructor(name: string) {
        this.name = name
    }
}
const ProxyUser = new Proxy(User, {
    construct(...args) {
        const user = Reflect.construct(...args)
        userList.add(user)
        return user
    }
})
const user1 = new ProxyUser('zs')
const user2 = new ProxyUser('lisi')
console.log('userList', userList);
7.3.6 Proxy踩坑
1.捕获器不变式
无法改变自身属性导致的无法改变
const obj = { x: 100, y: 200 }
Object.defineProperty(obj, 'y', {
    value: 200,
    writable: false,
    configurable: false
})

const proxy = new Proxy(obj, {
    get() {
        return 'abc'
    }
})
console.log(proxy.x);
console.log(proxy.y);
2.this
proxy.getName()的this变成了proxy
const user = {
    name: 'zs',
    getName() {
        console.log('this...', this); //this是在执行时才确定
        return this.name
    }
}
const proxy = new Proxy(user, {})
proxy.getName()
user.getName()
8.职责链模式
8.1 概念
8.2 场景
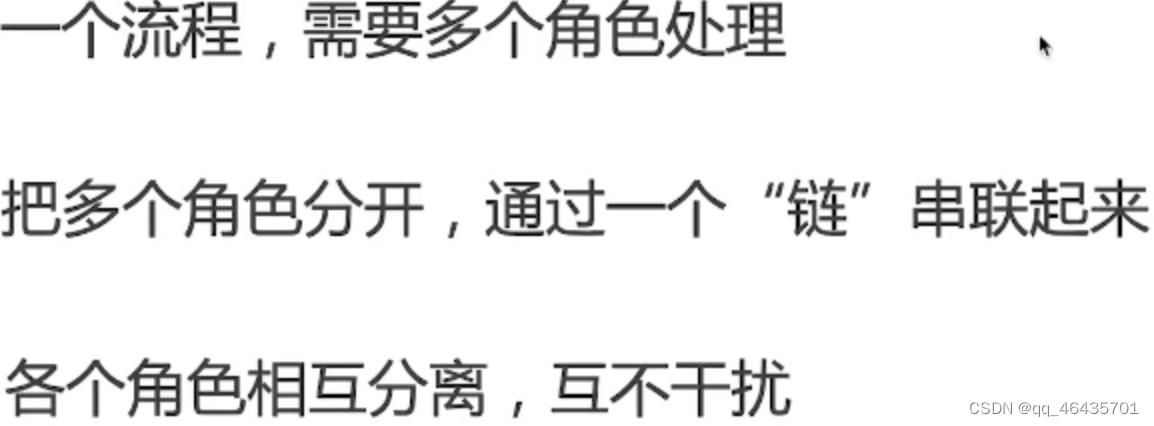
jQuery链式操作
Promise链式调用
9.策略模式
解决大量的if else问题
interface IUser {
    buy: () => void
}
class OrdinaryUser implements IUser {
    buy() {
        console.log('普通用户');
    }
}
class MemberUser implements IUser {
    buy() {
        console.log('会员用户');
    }
}
class VipUser implements IUser {
    buy() {
        console.log('vip用户');
    }
}
const user1 = new OrdinaryUser()
user1.buy()
10.适配器模式
function getUsers() {
  return [
    {
      name: 'zs',
      age: 30
    },
    {
      name: 'ls',
      age: 20
    }
  ]
}

// 不想修改上面代码,但想获取 [{zs: 30}, {ls: 20}]格式的数据

/**
 * 适配器
 * @param {Array} users
 */
function adaptor(users) {
  let result = [];
  users.forEach(user => {
    result.push({
      [user.name]: user.age
    })
  });
  return result;
}

let res = getUsers();
console.log(res);
// [ { name: 'zs', age: 30 }, { name: 'ls', age: 20 } ]
console.log(adaptor(res));
// [ { zs: 30 }, { ls: 20 } ]
11.面试题——打车
抽象类:必须被子类实现,不能直接new出来
抽象属性:必须在抽象类里面,必须被子类重写
class Car {
    name: string
    number: string
    price = 0
    constructor(name: string, number: string) {
        this.name = name
        this.number = number
    }
}
class ExpressCar extends Car {
    price = 1
    constructor(name: string, number: string) {
        super(name, number)
    }
}
class SpecialCar extends Car {
    price = 2
    constructor(name: string, number: string) {
        super(name, number)
    }
}
class Trip {
    car: Car
    constructor(car: Car) {
        this.car = car
    }
    start() {
        console.log('开始行程了----');
    }
    end() {
        console.log('结束行程了----');
    }
}
const car = new ExpressCar('byd', '13476878787')
const trip = new Trip(car)
trip.start()
trip.end()
UML类图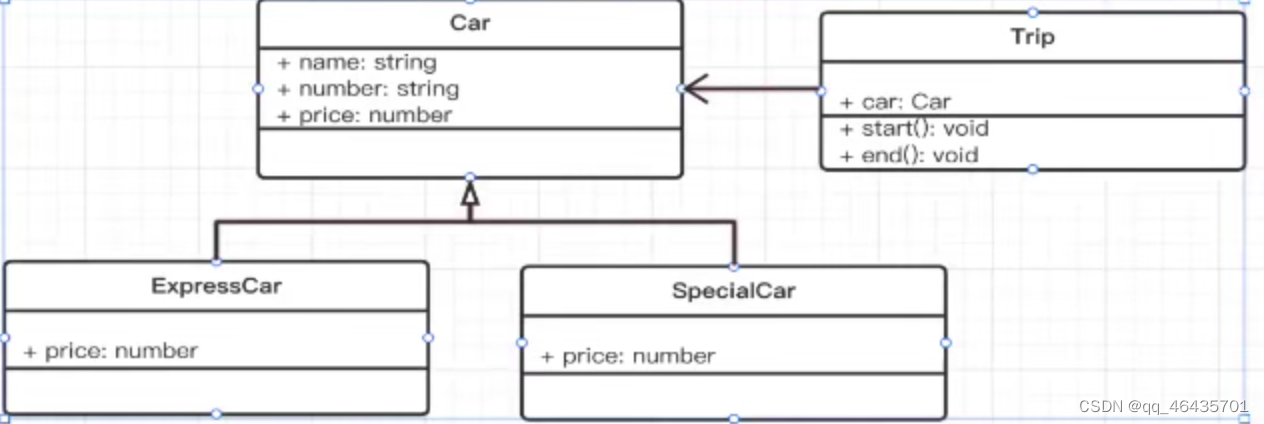
12. 面试题——停车场

//停车信息
interface IEntryInfo {
    number: string
    inTime: number
    place?: ParkPlace // 可有可无
}
class Car {
    number: string
    constructor(number: string) {
        this.number = number
    }
}
// 入口摄像头
class ParkCamera {
    shot(car: Car): IEntryInfo {
        return {
            number: car.number,
            inTime: Date.now()
        }
    }
}
//出口显示器
class ParkScreen {
    show(info: IEntryInfo) {
        const { number, inTime } = info
        const duration = Date.now() - inTime //停车时长
        console.log(`${number},停车时长${duration}`);
    }
}
// 车位
class ParkPlace {
    isEmpty = true
    getInfo() {
        this.isEmpty = false
    }
    out() {
        this.isEmpty = true
    }
}

// 层
class ParkFloor {
    index: number
    parkPlaces: ParkPlace[]
    constructor(index: number, places: ParkPlace[]) {
        this.index = index
        this.parkPlaces = places
    }
    get emptyPlaceNum(): number {
        let num = 0
        for (const place of this.parkPlaces) {
            if (place.isEmpty) num++
        }
        return num
    }
}
// 停车场
class Park {
    parkFloors: ParkFloor[]
    parkCamera = new ParkCamera()
    parkScreen = new ParkScreen()
    entryInfoList: Map<string, IEntryInfo> = new Map()
    constructor(floors: ParkFloor[]) {
        this.parkFloors = floors
    }
    getInfo(car: Car) {
        // 调用摄像头拍照
        const entryInfo = this.parkCamera.shot(car)
        // 某个车位
        const i = Math.round((Math.random() * 100) % 100)
        const place = this.parkFloors[0].parkPlaces[i] // 停在第一层的某个位置
        // 进入车位
        place.getInfo()
        // 记录停车信息
        entryInfo.place = place
        this.entryInfoList.set(car.number, entryInfo)
    }
    out(car: Car) {
        // 获取停车信息
        const entryInfo = this.entryInfoList.get(car.number)
        if (entryInfo == null) return
        const { place } = entryInfo
        if (place == null) {
            return
        }

        // 离开车位
        place.out()
        // 出口显示屏显示
        this.parkScreen.show(entryInfo)
        // 删除停车信息的记录
        this.entryInfoList.delete(car.number)
    }

    get emptyInfo(): string {
        return this.parkFloors.map(floor => {
            return `${floor.index}层还有${floor.emptyPlaceNum}个空闲车位`
        }).join('\n')
    }
}

// 初始化停车场
const floors: ParkFloor[] = []
// 3层
for (let i = 0; i < 3; i++) {
    const places: ParkPlace[] = []
    //每层100个车位
    for (let i = 0; i < 100; i++) {
        places[i] = new ParkPlace()
    }
    floors[i] = new ParkFloor(i + 1, places)
}
const park = new Park(floors)
const car1 = new Car('A1')
const car2 = new Car('A2')
const car3 = new Car('A3')


document.getElementById('btn-car1-into')?.addEventListener('click', () => {
    console.log('第一辆车进入');
    console.log(park.emptyInfo);
    park.getInfo(car1)
})
document.getElementById('btn-car1-out')?.addEventListener('click', () => {
    console.log('第一辆车离开');
    park.out(car1)
})

document.getElementById('btn-car2-into')?.addEventListener('click', () => {
    console.log('第二辆车进入');
    console.log(park.emptyInfo);
    park.getInfo(car2)
})

document.getElementById('btn-car2-out')?.addEventListener('click', () => {
    console.log('第二辆车离开');
    park.out(car2)
})

document.getElementById('btn-car3-into')?.addEventListener('click', () => {
    console.log('第三辆车进入');
    console.log(park.emptyInfo);
    park.getInfo(car3)
})

document.getElementById('btn-car3-out')?.addEventListener('click', () => {
    console.log('第三辆车离开');
    park.out(car3)
})
