本文接续基础知识文章。我们将从一些基本的计算着色器开始,然后希望继续讨论解决现实世界问题并写一些示例。
在上一篇文章中,制作了一个非常简单的计算着色器,可以将数字加倍。
这是着色器
@group(0) @binding(0) var<storage, read_write> data: array<f32>;

@compute @workgroup_size(1) fn computeSomething(
  @builtin(global_invocation_id) id: vec3<u32>
) {
  let i = id.x;
  data[i] = data[i] * 2.0;
}
然后像这样有效地运行计算着色器
 ...
  pass.dispatchWorkgroups(count);
我们需要回顾一下工作组的定义。
可以将工作组视为 小的线程集合。每个线程并行运行。在 WGSL 中静态定义工作组的大小。工作组大小以 3 个维度定义,缺省时每个维度默认为 1,因此 @workgroup_size(1) 等同于 @workgroup_size(1, 1, 1) 。
如果将工作组定义为 @workgroup_size(3, 4, 2) ,那么将定义 3 * 4 * 2 个线程,或者换句话说,每个工作组有 24 线程。
If we then call pass.dispatchWorkgroups(4, 3, 2) we’re saying, execute a workgroup of 24 threads, 4 * 3 * 2 times (24) for a total of 576 threads.
如果随后调用 pass.dispatchWorkgroups(4, 3, 2) ,意思是,执行一个包含 24 个线程的工作组,4 * 3 * 2 次 (24),总共 576 个线程 【(43 2)(3 4* 2)=24*24=576】。

在计算着色器的每个“调用(invocation)”中,以下内置(builtin )变量可用。
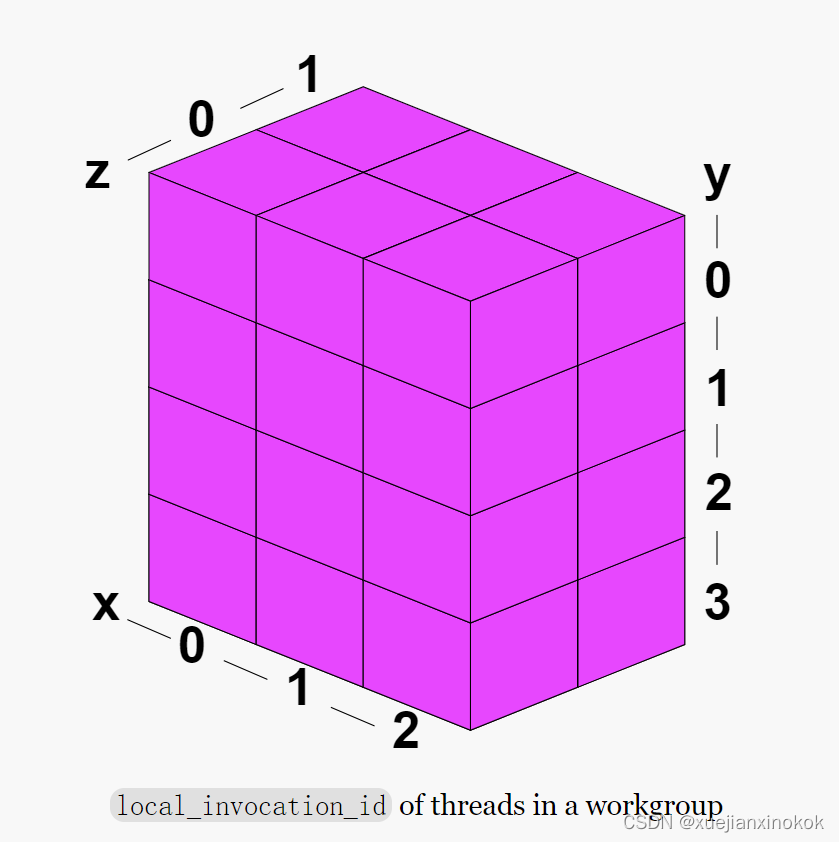
- local_invocation_id: The id of this thread within a workgroup
See the diagram above.
见上图。 - workgroup_id: The id of the workgroup.
工作组中的每个线程都将具有相同的工作组 ID。见上图。
-
global_invocation_id: A unique id for each thread
可以认为是
global_invocation_id = workgroup_id * workgroup_size +local_invocation_id -
num_workgroups: What you passed to pass.dispatchWorkgroups
-
local_invocation_index: The id of this thread linearized
你可以认为这是
rowSize   = workgroup_size.x
sliceSize = rowWidth* workgroup_size.y
local_invocation_index =
      local_invocation_id.x +
      local_invocation_id.y * rowSize +
      local_invocation_id.z * sliceSize
让我们制作一个示例来使用这些值。只需将每次调用的值写入缓冲区,然后打印出这些值
这是着色器
const dispatchCount = [4, 3, 2];
const workgroupSize = [2, 3, 4];

// multiply all elements of an array
const arrayProd = arr => arr.reduce((a, b) => a * b);

const numThreadsPerWorkgroup = arrayProd(workgroupSize);

const code = `
// NOTE!: vec3u is padded to by 4 bytes
@group(0) @binding(0) var<storage, read_write> workgroupResult: array<vec3u>;
@group(0) @binding(1) var<storage, read_write> localResult: array<vec3u>;
@group(0) @binding(2) var<storage, read_write> globalResult: array<vec3u>;

@compute @workgroup_size(${workgroupSize}) fn computeSomething(
    @builtin(workgroup_id) workgroup_id : vec3<u32>,
    @builtin(local_invocation_id) local_invocation_id : vec3<u32>,
    @builtin(global_invocation_id) global_invocation_id : vec3<u32>,
    @builtin(local_invocation_index) local_invocation_index: u32,
    @builtin(num_workgroups) num_workgroups: vec3<u32>
) {
  // workgroup_index is similar to local_invocation_index except for
  // workgroups, not threads inside a workgroup.
  // It is not a builtin so we compute it ourselves.

  let workgroup_index =
     workgroup_id.x +
     workgroup_id.y * num_workgroups.x +
     workgroup_id.z * num_workgroups.x * num_workgroups.y;

  // global_invocation_index is like local_invocation_index
  // except linear across all invocations across all dispatched
  // workgroups. It is not a builtin so we compute it ourselves.

  let global_invocation_index =
     workgroup_index * ${numThreadsPerWorkgroup} +
     local_invocation_index;

  // now we can write each of these builtins to our buffers.
  workgroupResult[global_invocation_index] = workgroup_id;
  localResult[global_invocation_index] = local_invocation_id;
  globalResult[global_invocation_index] = global_invocation_id;
`;
使用了 JavaScript 字符串模板,因此可以从 JavaScript 变量 workgroupSize 设置工作组大小。这最终被硬编码到着色器中。
现在我们有了着色器,可以设置3 个缓冲区来存储这些结果。
const numWorkgroups = arrayProd(dispatchCount);
  const numResults = numWorkgroups * numThreadsPerWorkgroup;
  const size = numResults * 4 * 4;  // vec3f * u32

  let usage = GPUBufferUsage.STORAGE | GPUBufferUsage.COPY_SRC;
  const workgroupBuffer = device.createBuffer({size, usage});
  const localBuffer = device.createBuffer({size, usage});
  const globalBuffer = device.createBuffer({size, usage});
As we pointed out before, we can not map storage buffers into JavaScript so we need some buffers to we can map. We’ll copy the results from the storage buffers to these mappable result buffers and then read the results.
之前提到过,无法直接将storage 缓冲区映射到 JavaScript,因此需要一些缓冲区来进行映射。会将结果从存储缓冲区复制到这些可映射的结果缓冲区,然后读取结果。
  usage = GPUBufferUsage.MAP_READ | GPUBufferUsage.COPY_DST;
  const workgroupReadBuffer = device.createBuffer({size, usage});
  const localReadBuffer = device.createBuffer({size, usage});
  const globalReadBuffer = device.createBuffer({size, usage});
创建一个绑定组来绑定所有的storage 缓冲区
const bindGroup = device.createBindGroup({
    layout: pipeline.getBindGroupLayout(0),
    entries: [
      { binding: 0, resource: { buffer: workgroupBuffer }},
      { binding: 1, resource: { buffer: localBuffer }},
      { binding: 2, resource: { buffer: globalBuffer }},
    ],
  });
We start an encoder and a compute pass encoder, the same as our previous example, then add the commands to run the compute shader.
启动一个编码器和一个计算通道编码器,与之前的示例相同,然后添加运行计算着色器的命令。
  // Encode commands to do the computation
  const encoder = device.createCommandEncoder({ label: 'compute builtin encoder' });
  const pass = encoder.beginComputePass({ label: 'compute builtin pass' });

  pass.setPipeline(pipeline);
  pass.setBindGroup(0, bindGroup);
  pass.dispatchWorkgroups(...dispatchCount);
  pass.end();
We need to copy the results from the storage buffers to the mappable result buffers.
需要将结果从storage 缓冲区复制到可映射结果缓冲区。
  encoder.copyBufferToBuffer(workgroupBuffer, 0, workgroupReadBuffer, 0, size);
  encoder.copyBufferToBuffer(localBuffer, 0, localReadBuffer, 0, size);
  encoder.copyBufferToBuffer(globalBuffer, 0, globalReadBuffer, 0, size);
然后结束编码器并提交命令缓冲区。
 // Finish encoding and submit the commands
  const commandBuffer = encoder.finish();
  device.queue.submit([commandBuffer]);
Like before, to read the results we map the buffers and once they are ready we get typed array views of their contents.
像以前一样,为了读取结果,我们映射了缓冲区,一旦它们准备就绪,就得到了它们内容的类型化数组视图。
   // Read the results
   await Promise.all([
    workgroupReadBuffer.mapAsync(GPUMapMode.READ),
    localReadBuffer.mapAsync(GPUMapMode.READ),
    globalReadBuffer.mapAsync(GPUMapMode.READ),
  ]);

  const workgroup = new Uint32Array(workgroupReadBuffer.getMappedRange());
  const local = new Uint32Array(localReadBuffer.getMappedRange());
  const global = new Uint32Array(globalReadBuffer.getMappedRange());
Important: We mapped 3 buffers here and used await Promise.all to wait for them all to be ready to use. You can *NOT just wait on the last buffer. You must wait on all 3 buffers.
重要提示:在这里映射了 3 个缓冲区,并使用 await Promise.all 等待它们都准备好使用。不能不只是等待最后一个缓冲区。您必须等待所有 3 个缓冲区。
最后我们可以打印出来
const get3 = (arr, i) => {
    const off = i * 4;
    return `${arr[off]}, ${arr[off + 1]}, ${arr[off + 2]}`;
  };

  for (let i = 0; i < numResults; ++i) {
    if (i % numThreadsPerWorkgroup === 0) {
      log(`\
 ---------------------------------------
 global                 local     global   dispatch: ${i / numThreadsPerWorkgroup}
 invoc.    workgroup    invoc.    invoc.
 index     id           id        id
 ---------------------------------------`);
    }
    log(` ${i.toString().padStart(3)}:      ${get3(workgroup, i)}      ${get3(local, i)}   ${get3(global, i)}`)
  }
}

function log(...args) {
  const elem = document.createElement('pre');
  elem.textContent = args.join(' ');
  document.body.appendChild(elem);
}
这是结果
---------------------------------------
global                 local     global   dispatch: 0
invoc.    workgroup    invoc.    invoc.
index     id           id        id
---------------------------------------
  0:      0, 0, 0      0, 0, 0   0, 0, 0
  1:      0, 0, 0      1, 0, 0   1, 0, 0
  2:      0, 0, 0      0, 1, 0   0, 1, 0
  3:      0, 0, 0      1, 1, 0   1, 1, 0
  4:      0, 0, 0      0, 2, 0   0, 2, 0
  5:      0, 0, 0      1, 2, 0   1, 2, 0
  6:      0, 0, 0      0, 0, 1   0, 0, 1
  7:      0, 0, 0      1, 0, 1   1, 0, 1
  8:      0, 0, 0      0, 1, 1   0, 1, 1
  9:      0, 0, 0      1, 1, 1   1, 1, 1
 10:      0, 0, 0      0, 2, 1   0, 2, 1
 11:      0, 0, 0      1, 2, 1   1, 2, 1
 12:      0, 0, 0      0, 0, 2   0, 0, 2
 13:      0, 0, 0      1, 0, 2   1, 0, 2
 14:      0, 0, 0      0, 1, 2   0, 1, 2
 15:      0, 0, 0      1, 1, 2   1, 1, 2
 16:      0, 0, 0      0, 2, 2   0, 2, 2
 17:      0, 0, 0      1, 2, 2   1, 2, 2
 18:      0, 0, 0      0, 0, 3   0, 0, 3
 19:      0, 0, 0      1, 0, 3   1, 0, 3
 20:      0, 0, 0      0, 1, 3   0, 1, 3
 21:      0, 0, 0      1, 1, 3   1, 1, 3
 22:      0, 0, 0      0, 2, 3   0, 2, 3
 23:      0, 0, 0      1, 2, 3   1, 2, 3
---------------------------------------
global                 local     global   dispatch: 1
invoc.    workgroup    invoc.    invoc.
index     id           id        id
---------------------------------------
 24:      1, 0, 0      0, 0, 0   2, 0, 0
 25:      1, 0, 0      1, 0, 0   3, 0, 0
 26:      1, 0, 0      0, 1, 0   2, 1, 0
 27:      1, 0, 0      1, 1, 0   3, 1, 0
 28:      1, 0, 0      0, 2, 0   2, 2, 0
 29:      1, 0, 0      1, 2, 0   3, 2, 0
 30:      1, 0, 0      0, 0, 1   2, 0, 1
 31:      1, 0, 0      1, 0, 1   3, 0, 1
 32:      1, 0, 0      0, 1, 1   2, 1, 1
 33:      1, 0, 0      1, 1, 1   3, 1, 1
 34:      1, 0, 0      0, 2, 1   2, 2, 1
 35:      1, 0, 0      1, 2, 1   3, 2, 1
 36:      1, 0, 0      0, 0, 2   2, 0, 2
 37:      1, 0, 0      1, 0, 2   3, 0, 2
 38:      1, 0, 0      0, 1, 2   2, 1, 2
 39:      1, 0, 0      1, 1, 2   3, 1, 2
 40:      1, 0, 0      0, 2, 2   2, 2, 2
 41:      1, 0, 0      1, 2, 2   3, 2, 2
 42:      1, 0, 0      0, 0, 3   2, 0, 3
 43:      1, 0, 0      1, 0, 3   3, 0, 3
 44:      1, 0, 0      0, 1, 3   2, 1, 3
 45:      1, 0, 0      1, 1, 3   3, 1, 3
 46:      1, 0, 0      0, 2, 3   2, 2, 3
 47:      1, 0, 0      1, 2, 3   3, 2, 3
---------------------------------------
global                 local     global   dispatch: 2
invoc.    workgroup    invoc.    invoc.
index     id           id        id
---------------------------------------
 48:      2, 0, 0      0, 0, 0   4, 0, 0
 49:      2, 0, 0      1, 0, 0   5, 0, 0
 50:      2, 0, 0      0, 1, 0   4, 1, 0
 51:      2, 0, 0      1, 1, 0   5, 1, 0
 52:      2, 0, 0      0, 2, 0   4, 2, 0
 53:      2, 0, 0      1, 2, 0   5, 2, 0
 54:      2, 0, 0      0, 0, 1   4, 0, 1
 55:      2, 0, 0      1, 0, 1   5, 0, 1
 56:      2, 0, 0      0, 1, 1   4, 1, 1
 57:      2, 0, 0      1, 1, 1   5, 1, 1
 58:      2, 0, 0      0, 2, 1   4, 2, 1
 59:      2, 0, 0      1, 2, 1   5, 2, 1
 60:      2, 0, 0      0, 0, 2   4, 0, 2
 61:      2, 0, 0      1, 0, 2   5, 0, 2
 62:      2, 0, 0      0, 1, 2   4, 1, 2
 63:      2, 0, 0      1, 1, 2   5, 1, 2
 64:      2, 0, 0      0, 2, 2   4, 2, 2
 65:      2, 0, 0      1, 2, 2   5, 2, 2
 66:      2, 0, 0      0, 0, 3   4, 0, 3
 67:      2, 0, 0      1, 0, 3   5, 0, 3
 68:      2, 0, 0      0, 1, 3   4, 1, 3
 69:      2, 0, 0      1, 1, 3   5, 1, 3
 70:      2, 0, 0      0, 2, 3   4, 2, 3
 71:      2, 0, 0      1, 2, 3   5, 2, 3
---------------------------------------
...
These builtins are generally the only inputs that change per thread of a compute shader for one call to pass.dispatchWorkgroups so to be effective you need to figure out how to use them to design a compute shader function to do what you want, given these …_id builtins as input.
这些内置函数通常是计算着色器的 每个线程为一次调用 pass.dispatchWorkgroups 而改变的唯一输入,因此为了有效,需要弄清楚如何使用它们来设计计算着色器函数来执行想要的操作,给定这些 ..._id 内置作为输入。
工作组大小( Workgroup Size )
你应该建立一个多大的工作组?这个问题经常出现,为什么不总是使用 @workgroup_size(1, 1, 1) ,然后仅通过 pass.dispatchWorkgroups 的参数来决定要运行多少次迭代会更简单。
The reason is multiple threads within a workgroup are faster than individual dispatches.
原因是工作组中的多个线程比单个调度更快。
For one, threads in a workgroup often run in lockstep so running 16 of them is just as fast as running 1.
其一,工作组中的线程通常以锁步(lockstep ,意思为 同步)方式运行,因此运行 16 个线程与运行 1 个线程一样快。
WebGPU 的默认限制如下
- maxComputeInvocationsPerWorkgroup: 256
- maxComputeWorkgroupSizeX: 256
- maxComputeWorkgroupSizeY: 256
- maxComputeWorkgroupSizeZ: 64
如上,第一个限制 maxComputeInvocationsPerWorkgroup 意味着 @workgroup_size 的3 个参数不能乘以大于256 的数字。换句话说
   @workgroup_size(256, 1, 1)   // ok
   @workgroup_size(128, 2, 1)   // ok
   @workgroup_size(16, 16, 1)   // ok
   @workgroup_size(16, 16, 2)   // bad 16 * 16 * 2 = 512
Unfortunately, the perfect size is GPU dependent and WebGPU can not provide that info. The general advice for WebGPU is to choose a workgroup size of 64 unless you have some specific reason to choose another size. Apparently most GPUs can efficiently run 64 things in lockstep. If you choose a higher number and the GPU can’t do it as a fast path it will chose a slower path. If on the other hand you chose a number below what the GPU can do then you may not get the maximum performance.
不幸的是,完美的大小取决于 GPU,而 WebGPU 无法提供该信息。 WebGPU 的一般建议是选择 64 的工作组大小,除非您有某些特定原因选择其他大小。显然大多数 GPU 可以高效地同步运行 64 个东西。如果您选择一个更高的数字,而 GPU 不能将其作为快速路径执行,它将选择一个较慢的路径。另一方面,如果您选择的数字低于 GPU 的能力,那么您可能无法获得最佳性能。
计算着色器中的竞争 (Races in Compute Shaders)
A common mistake in WebGPU is not handling race conditions. A race condition is where multiple threads are running at the same time and effectively they are in a race for who comes in first or last.
WebGPU 的一个常见错误是没有处理竞争条件。竞争条件是多个线程同时运行并且实际上它们在竞争谁先到或最后。
假设你有这个计算着色器
@group(0) @binding(0) var<storage, read_write> result: array<f32>;

@compute @workgroup_size(32) fn computeSomething(
    @builtin(local_invocation_id) local_invocation_id : vec3<u32>,
) {
  result[0] = local_invocation_id.x;
`;
如果这很难理解,这里是类似的 JavaScript
const result = [];
for (let i = 0; i < 32; ++i) {
  result[0] = i;
}
在 JavaScript 的情况下,代码运行后, result[0] 显然是 31。但是在计算着色器的情况下,着色器的所有 32 次迭代都是并行运行的。最后完成的那个是价值将在 result[0] 中的那个。最后运行哪一个是未定义的。
WebGPU 标准:
WebGPU 不提供以下保证:
-
Whether invocations from different workgroups execute concurrently.
That is, you cannot assume more than one workgroup executes at a
time.来自不同工作组的调用是否同时执行。也就是说,您不能假定同时执行多个工作组。
-
Whether, once invocations from a workgroup begin executing, that
other workgroups are blocked from execution. That is, you cannot
assume that only one workgroup executes at a time. While a workgroup
is executing, the implementation may choose to concurrently execute
other workgroups as well, or other queued but unblocked work.一旦来自一个工作组的调用开始执行,其他工作组是否被阻止执行。也就是说,您不能假设一次只有一个工作组执行。当一个工作组正在执行时,实现可以选择同时执行其他工作组,或其他排队但未阻塞的工作。
-
Whether invocations from one particular workgroup begin executing
before the invocations of another workgroup. That is, you cannot
assume that workgroups are launched in a particular order.来自一个特定工作组的调用是否在另一个工作组的调用之前开始执行。也就是说,您不能假定工作组以特定顺序启动。
We’ll go over some of the ways to deal with this issue in future examples. For now, our two examples have no race conditions as each iteration of the compute shader does something unaffected by the other iterations.
我们将在以后的示例中介绍一些处理此问题的方法。目前,我们的两个示例没有竞争条件,因为计算着色器的每次迭代都会执行一些不受其他迭代影响的操作。
原文地址


![[Unity][疑难杂症]Mac电脑打开工程unity attempt to write a readonly database](https://img-blog.csdnimg.cn/img_convert/b91fde33040ddfcce2f5d7c76966b570.png)