FX Graph Mode量化模式
训练后量化有多种量化类型(仅权重、动态和静态),配置通过qconfig_mapping ( prepare_fx函数的参数)完成。
FXPTQ API 示例:
import torch
from torch.ao.quantization import (
  get_default_qconfig_mapping,
  get_default_qat_qconfig_mapping,
  QConfigMapping,
)
import torch.ao.quantization.quantize_fx as quantize_fx
import copy

model_fp = UserModel()

#
# post training dynamic/weight_only quantization
#

# we need to deepcopy if we still want to keep model_fp unchanged after quantization since quantization apis change the input model
model_to_quantize = copy.deepcopy(model_fp)
model_to_quantize.eval()
qconfig_mapping = QConfigMapping().set_global(torch.ao.quantization.default_dynamic_qconfig)
# a tuple of one or more example inputs are needed to trace the model
example_inputs = (input_fp32)
# prepare
model_prepared = quantize_fx.prepare_fx(model_to_quantize, qconfig_mapping, example_inputs)
# no calibration needed when we only have dynamic/weight_only quantization
# quantize
model_quantized = quantize_fx.convert_fx(model_prepared)

#
# post training static quantization
#

model_to_quantize = copy.deepcopy(model_fp)
qconfig_mapping = get_default_qconfig_mapping("qnnpack")
model_to_quantize.eval()
# prepare
model_prepared = quantize_fx.prepare_fx(model_to_quantize, qconfig_mapping, example_inputs)
# calibrate (not shown)
# quantize
model_quantized = quantize_fx.convert_fx(model_prepared)

#
# quantization aware training for static quantization
#

model_to_quantize = copy.deepcopy(model_fp)
qconfig_mapping = get_default_qat_qconfig_mapping("qnnpack")
model_to_quantize.train()
# prepare
model_prepared = quantize_fx.prepare_qat_fx(model_to_quantize, qconfig_mapping, example_inputs)
# training loop (not shown)
# quantize
model_quantized = quantize_fx.convert_fx(model_prepared)

#
# fusion
#
model_to_quantize = copy.deepcopy(model_fp)
model_fused = quantize_fx.fuse_fx(model_to_quantize)
量化堆栈
量化是将浮点模型转换为量化模型的过程。因此,在高层次上,量化堆栈可以分为两部分:1)。量化模型的构建块或抽象 2)。将浮点模型转换为量化模型的量化流程的构建块或抽象
量化模型
量化张量
为了在 PyTorch 中进行量化,我们需要能够用张量表示量化数据。量化张量允许存储量化数据(表示为 int8/uint8/int32)以及量化参数(如比例和 Zero_point)。除了允许以量化格式序列化数据之外,量化张量还允许许多有用的操作,使量化算术变得容易。
PyTorch 支持每张量和每通道的对称和非对称量化。每个张量意味着张量内的所有值都使用相同的量化参数以相同的方式量化。每个通道意味着对于每个维度(通常是张量的通道维度),张量中的值使用不同的量化参数进行量化。这可以减少将张量转换为量化值时的错误,因为异常值只会影响其所在的通道,而不是整个张量。
映射是通过使用转换浮点张量来执行的

请注意,我们确保浮点中的零在量化后表示没有错误,从而确保诸如填充之类的操作不会导致额外的量化误差。
以下是量化张量的几个关键属性:
-
QScheme (torch.qscheme):一个枚举,指定我们量化张量的方式
-
torch.per_tensor_affine
-
torch.per_tensor_对称
-
torch.per_channel_affine
-
torch.per_channel_symmetry
-
-
dtype (torch.dtype):量化张量的数据类型
-
火炬.quint8
-
火炬.qint8
-
火炬.qint32
-
火炬.float16
-
-
量化参数(根据 QScheme 的不同而变化):所选量化方式的参数
-
torch.per_tensor_affine 的量化参数为
-
刻度(浮动)
-
零点(整数)
-
-
torch.per_channel_affine 的量化参数为
-
per_channel_scales(浮点数列表)
-
per_channel_zero_points(整数列表)
-
轴(整数)
-
-
量化和反量化
模型的输入和输出都是浮点张量,但量化模型中的激活是量化的,因此我们需要运算符在浮点和量化张量之间进行转换。
-
量化(浮点 -> 量化)
-
torch.quantize_per_tensor(x, 尺度, 零点, dtype)
-
torch.quantize_per_channel(x, 尺度, Zero_points, 轴, dtype)
-
torch.quantize_per_tensor_dynamic(x,dtype,reduce_range)
-
到(火炬.float16)
-
-
反量化(量化 -> 浮点)
-
quantized_tensor.dequantize() - 在 torch.float16 张量上调用 dequantize 会将张量转换回 torch.float
-
火炬.反量化(x)
-
量化运算符/模块
-
量化算子是以量化Tensor为输入,输出量化Tensor的算子。
-
量化模块是执行量化操作的 PyTorch 模块。它们通常是为线性和卷积等加权运算定义的。
量化引擎
当执行量化模型时,qengine (torch.backends.quantized.engine) 指定使用哪个后端来执行。重要的是要确保qengine在量化激活和权重的取值范围方面与量化模型兼容。
量化流程
观察者和 FakeQuantize
-
观察者是 PyTorch 模块,用于:
-
收集张量统计信息,例如通过观察者的张量的最小值和最大值
-
并根据收集的张量统计数据计算量化参数
-
-
FakeQuantize 是 PyTorch 模块,用于:
-
模拟网络中张量的量化(执行量化/反量化)
-
它可以根据观察者收集的统计数据计算量化参数,也可以学习量化参数
-
查询配置
-
QConfig 是 Observer 或 FakeQuantize Module 类的命名元组,可以使用 qscheme、dtype 等进行配置。它用于配置应如何观察操作员
-
算子/模块的量化配置
-
不同类型的 Observer/FakeQuantize
-
数据类型
-
q方案
-
quant_min/quant_max:可用于模拟较低精度的张量
-
-
目前支持激活和权重的配置
-
我们根据为给定运算符或模块配置的 qconfig 插入输入/权重/输出观察器
-
一般量化流程
一般来说,流程如下
-
准备
-
根据用户指定的 qconfig 插入 Observer/FakeQuantize 模块
-
-
校准/训练(取决于训练后量化或量化感知训练)
-
允许观察者收集统计数据或 FakeQuantize 模块来学习量化参数
-
-
转变
-
将校准/训练模型转换为量化模型
-
量化有不同的模式,它们可以分为两种方式:
就我们应用量化流程的位置而言,我们有:
-
Post Training Quantization(训练后应用量化,量化参数根据样本校准数据计算)
-
量化感知训练(在训练过程中模拟量化,以便使用训练数据与模型一起学习量化参数)
就我们如何量化运算符而言,我们可以:
-
仅权重量化(仅权重静态量化)
-
动态量化(权重静态量化,激活动态量化)
-
静态量化(权重和激活都是静态量化的)
我们可以在同一量化流程中混合不同的量化运算符方式。例如,我们可以进行具有静态和动态量化运算符的训练后量化。
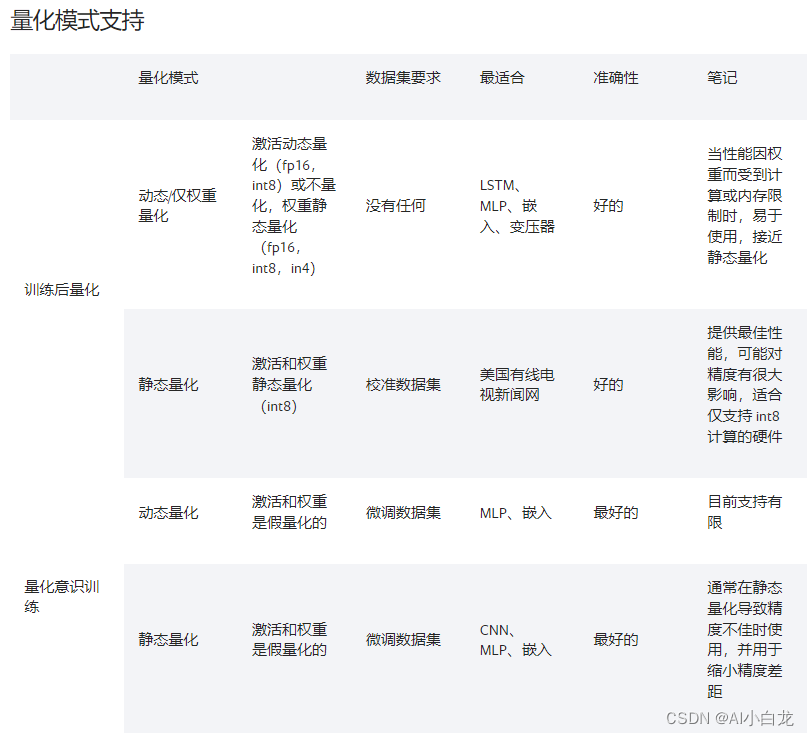
量化支持矩阵
量化定制
虽然提供了观察者根据观察到的张量数据选择比例因子和偏差的默认实现,但开发人员可以提供自己的量化函数。量化可以选择性地应用于模型的不同部分,或者针对模型的不同部分进行不同的配置。
我们还为conv1d()、conv2d()、 conv3d()和Linear()的每通道量化提供支持。
量化工作流程通过在模型的模块层次结构中添加(例如,将观察者添加为 .observer子模块)或替换(例如,转换nn.Conv2d为 nn.quantized.Conv2d)子模块来工作。这意味着该模型nn.Module在整个过程中保持基于常规的实例,因此可以与 PyTorch API 的其余部分一起使用。
量化自定义模块 API
Eager 模式和 FX 图形模式量化 API 都为用户提供了一个钩子,以指定以自定义方式量化的模块,并使用用户定义的逻辑进行观察和量化。用户需要指定:
-
源 fp32 模块的 Python 类型(模型中存在)
-
被观察模块的Python类型(由用户提供)。该模块需要定义一个from_float函数,该函数定义如何从原始 fp32 模块创建观察到的模块。
-
量化模块的Python类型(由用户提供)。该模块需要定义一个from_observed函数,该函数定义如何从观察到的模块创建量化模块。
-
描述上述 (1)、(2)、(3) 的配置,传递给量化 API。
然后框架将执行以下操作:
-
在准备模块交换期间,它将使用 (2) 中类的from_float函数将 (1) 中指定类型的每个模块转换为 (2) 中指定的类型。
-
在转换模块交换期间,它将使用 (3) 中类的from_observed函数将 (2) 中指定类型的每个模块转换为(3) 中指定的类型。
目前,要求ObservedCustomModule将具有单个 Tensor 输出,并且框架(而不是用户)将在该输出上添加观察者。观察者将作为自定义模块实例的属性存储在activation_post_process键下。未来可能会放宽这些限制。
自定义 API 示例:
import torch
import torch.ao.nn.quantized as nnq
from torch.ao.quantization import QConfigMapping
import torch.ao.quantization.quantize_fx

# original fp32 module to replace
class CustomModule(torch.nn.Module):
    def __init__(self):
        super().__init__()
        self.linear = torch.nn.Linear(3, 3)

    def forward(self, x):
        return self.linear(x)

# custom observed module, provided by user
class ObservedCustomModule(torch.nn.Module):
    def __init__(self, linear):
        super().__init__()
        self.linear = linear

    def forward(self, x):
        return self.linear(x)

    @classmethod
    def from_float(cls, float_module):
        assert hasattr(float_module, 'qconfig')
        observed = cls(float_module.linear)
        observed.qconfig = float_module.qconfig
        return observed

# custom quantized module, provided by user
class StaticQuantCustomModule(torch.nn.Module):
    def __init__(self, linear):
        super().__init__()
        self.linear = linear

    def forward(self, x):
        return self.linear(x)

    @classmethod
    def from_observed(cls, observed_module):
        assert hasattr(observed_module, 'qconfig')
        assert hasattr(observed_module, 'activation_post_process')
        observed_module.linear.activation_post_process = \
            observed_module.activation_post_process
        quantized = cls(nnq.Linear.from_float(observed_module.linear))
        return quantized

#
# example API call (Eager mode quantization)
#

m = torch.nn.Sequential(CustomModule()).eval()
prepare_custom_config_dict = {
    "float_to_observed_custom_module_class": {
        CustomModule: ObservedCustomModule
    }
}
convert_custom_config_dict = {
    "observed_to_quantized_custom_module_class": {
        ObservedCustomModule: StaticQuantCustomModule
    }
}
m.qconfig = torch.ao.quantization.default_qconfig
mp = torch.ao.quantization.prepare(
    m, prepare_custom_config_dict=prepare_custom_config_dict)
# calibration (not shown)
mq = torch.ao.quantization.convert(
    mp, convert_custom_config_dict=convert_custom_config_dict)
#
# example API call (FX graph mode quantization)
#
m = torch.nn.Sequential(CustomModule()).eval()
qconfig_mapping = QConfigMapping().set_global(torch.ao.quantization.default_qconfig)
prepare_custom_config_dict = {
    "float_to_observed_custom_module_class": {
        "static": {
            CustomModule: ObservedCustomModule,
        }
    }
}
convert_custom_config_dict = {
    "observed_to_quantized_custom_module_class": {
        "static": {
            ObservedCustomModule: StaticQuantCustomModule,
        }
    }
}
mp = torch.ao.quantization.quantize_fx.prepare_fx(
    m, qconfig_mapping, torch.randn(3,3), prepare_custom_config=prepare_custom_config_dict)
# calibration (not shown)
mq = torch.ao.quantization.quantize_fx.convert_fx(
    mp, convert_custom_config=convert_custom_config_dict)