文章目录
- 前言
- 一、需求分析
- 1.功能
- 2.环境
- 二、前端实现
- 1.博客注册页
- 2.博客登录页
- 3.博客列表页
- 4.博客详情页
- 5.博客编辑页
- 三、后端实现
- 1.设计数据库表
- 2.封装连接数据库的公共操作
- 3.封装对博客表和用户表的操作
- 4.实现博客列表页、博客详情页、博客编辑页的后端服务
- 5.实现博客登录页面的后端服务
- 6.实现博客删除的后端服务
- 7.实现博客列表页中的用户信息和博客详情页中的作者信息
- 8.实现博客注销功能的后端服务
- 9.实现博客注册功能的后端服务
- 四、部署到云服务器
- 1.修改pom.xml
- 2.修改DBUtil
- 3.打包
- 4.将包部署到终端上
- 5.验证
- 总结
前言
本篇文章根据前面学过的前端和后端知识,进行实践开发出一个个人的博客系统,这个博客系统主要可以进行查看博客、发布博客以及删除博客,最后部署到云服务器上可被他人所访问。
一、需求分析
1.功能
(1)注册
(2)登录
(3)查看所有博客列表
(4)查看某一篇博客
(5)编写博客并发布
(6)删除博客、注销博客。
2.环境
前端:html、css、js
后端:tomcat、servlet
部署:云服务器。
二、前端实现
1.博客注册页
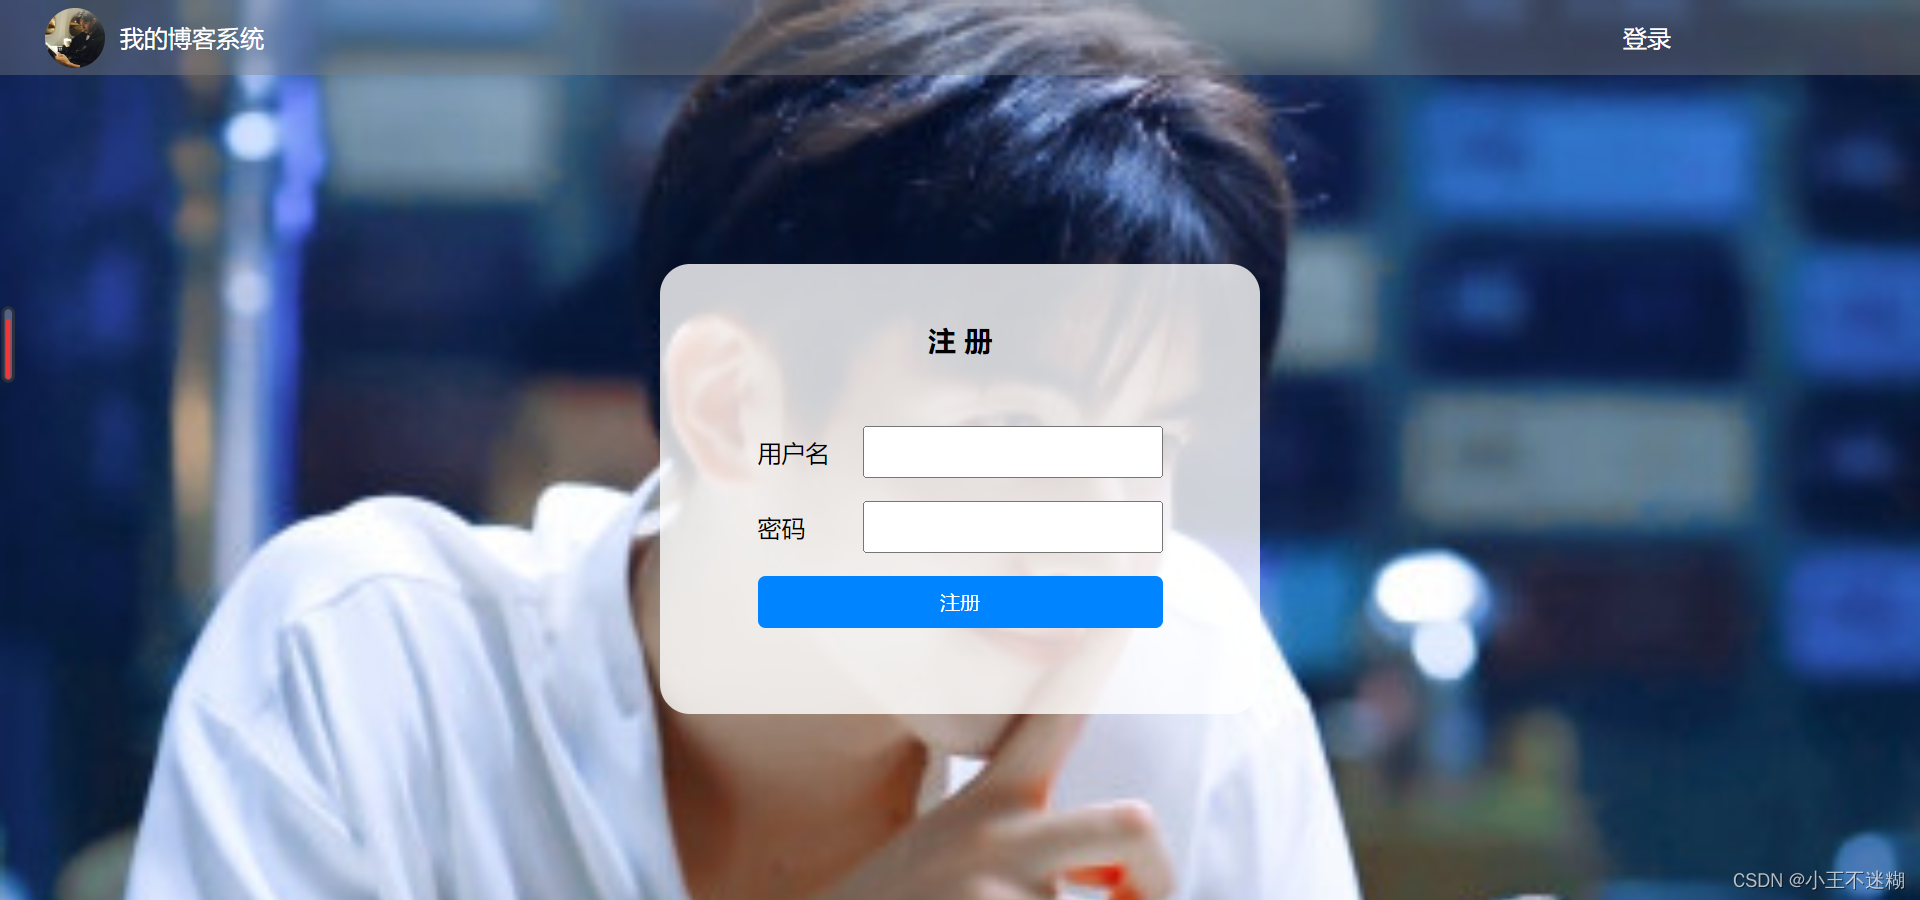
<body>
    <div class="nav">
        <img src="./img/bg2.jpg" alt="">
        <span class="title">我的博客系统</span>

        <div class="spacer"></div>
        <a href="blog_login.html">登录</a>
    </div>
    <div class="regist-container">
        <form action="regist" method="post">
            <div class="dialog">
                <h3>注     册</h3>
                <div class="row">
                    <span>用户名</span>
                    <input type="text" name="username" id="username">
                </div>
                <div class="row">
                    <span>密码</span>
                    <input type="password" name="password" id="password">
                </div>
                <div class="row">
                    <input type="submit" id="regist-button" value="注册"></input>
                </div>
            </div>
        </form>
    </div>

</body>
2.博客登录页
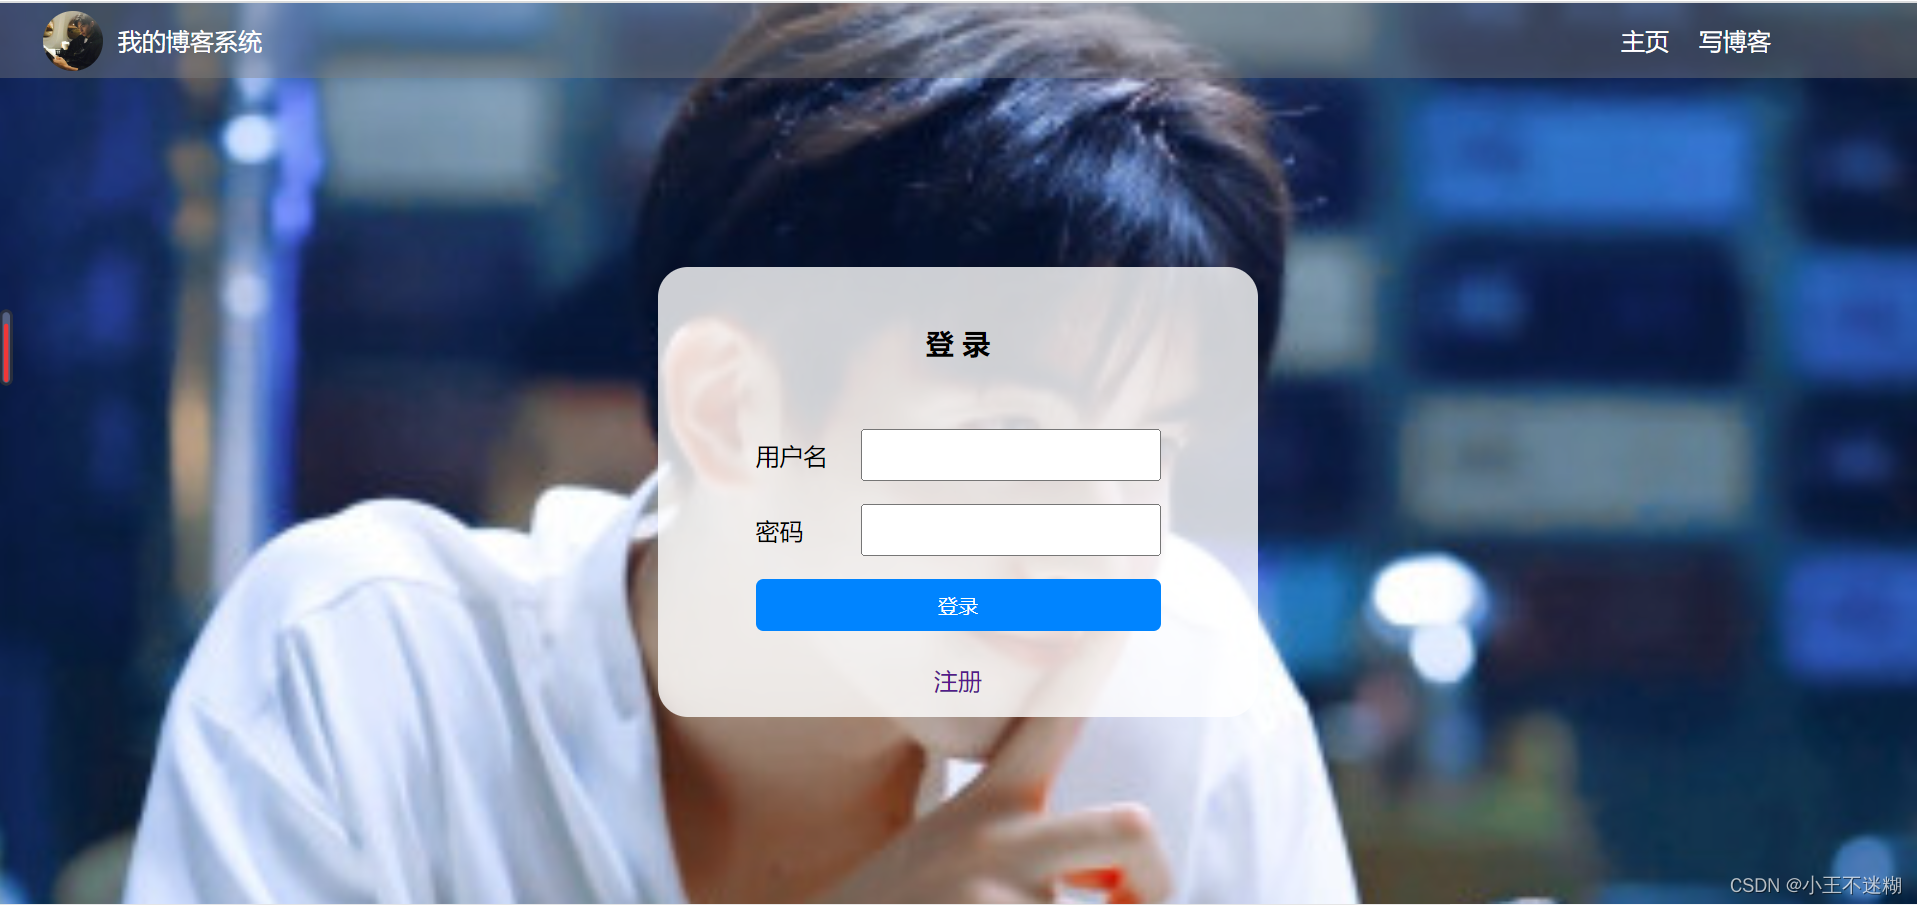
<body>
    <div class="nav">
        <img src="./img/bg2.jpg" alt="">
        <span class="title">我的博客系统</span>

        <div class="spacer"></div>
        <a href="blog_list.html">主页</a>
        <a href="blog_edit.html">写博客</a>
    </div>
    <div class="login-container">
        <form action="login" method="post">
            <div class="dialog">
                <h3>登     录</h3>
                <div class="row">
                    <span>用户名</span>
                    <input type="text" name="username" id="username">
                </div>
                <div class="row">
                    <span>密码</span>
                    <input type="password" name="password" id="password">
                </div>
                <div class="row">
                    <input type="submit" id="login-button" value="登录"></input>
                </div>
                <div class="row">
                    <a href="blog_regist.html">注册</a>
                </div>
            </div>
        </form>
    </div>

</body>
3.博客列表页
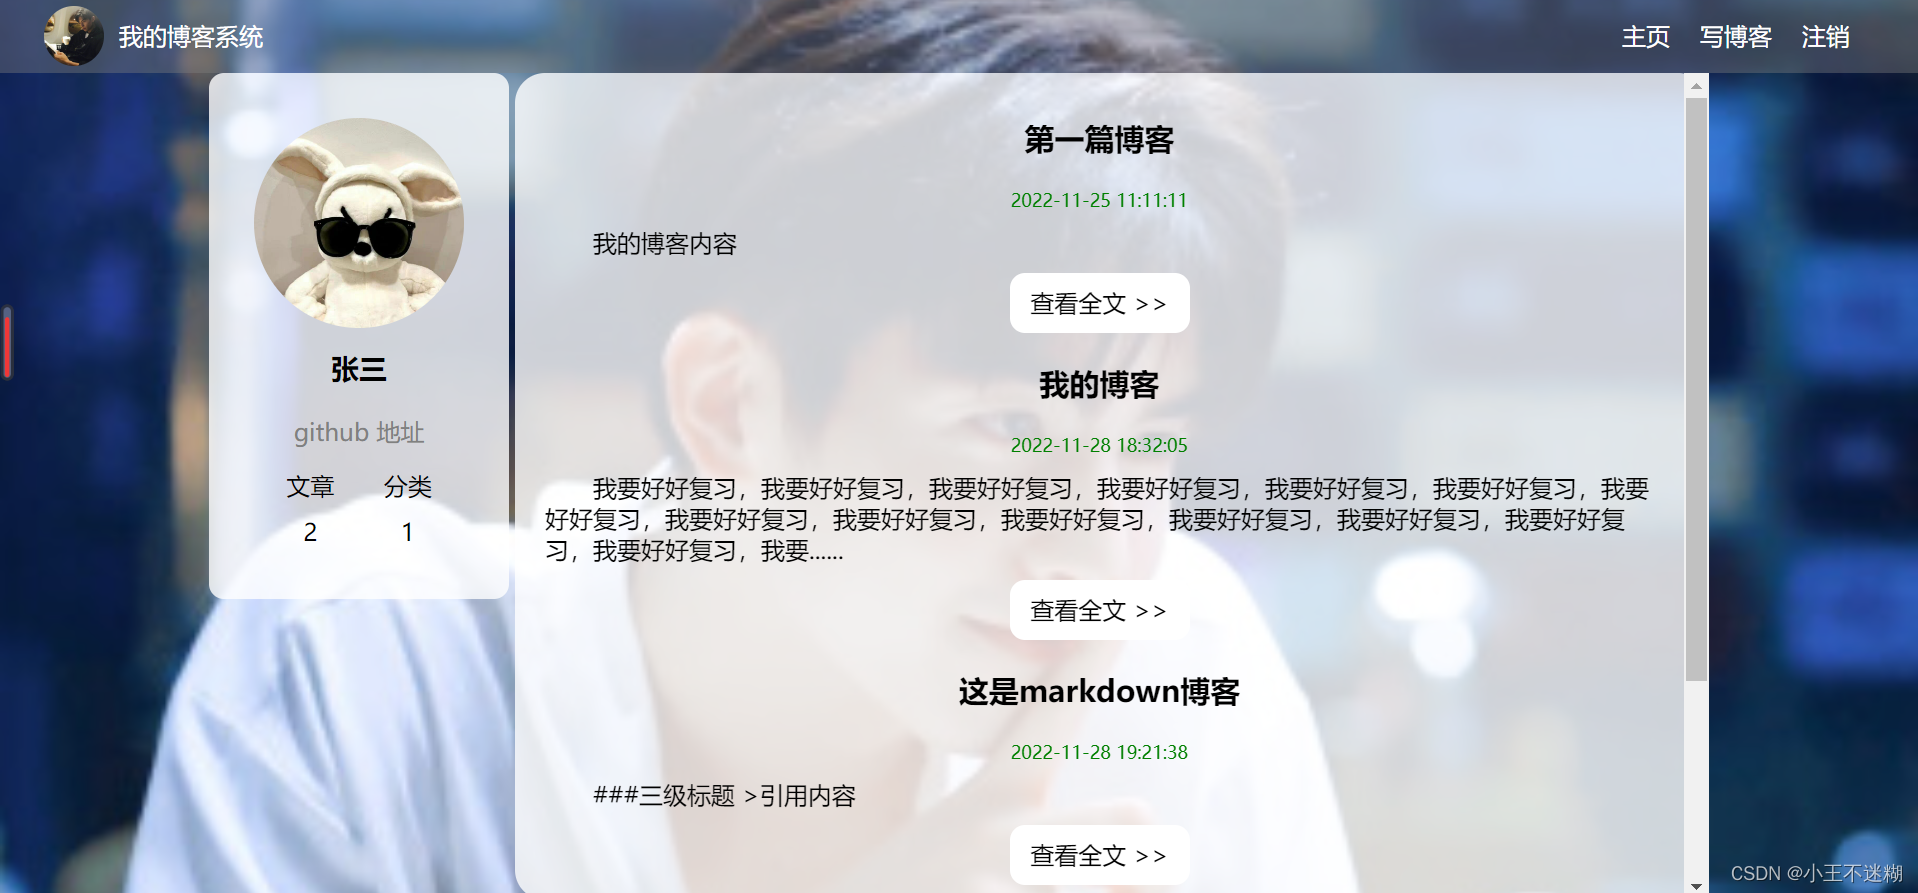
<body>
<div class="nav">
<img src="./img/bg2.jpg" alt="">
<span class="title">我的博客系统</span>
<div class="spacer"></div>
<a href="blog_list.html">主页</a>
<a href="blog_edit.html">写博客</a>
<a href="logout">注销</a>
</div>
<div class="container">
<div class="container-left">
<div class="card">
<img src="./img/pt.jpg" alt="">
<h3></h3>
<a href="github.com">github 地址</a>
<div class="counter">
<span>文章</span>
<span>分类</span>
</div>
<div class="counter">
<span>2</span>
<span>1</span>
</div>
</div>
</div>
<div class="container-right">
<!-- <div class="blog">
<div class="title">我的第一篇博客</div>
<div class="date">2022-11-07 18:09:00</div>
<div class="desc">
Lorem ipsum dolor sit amet consectetur adipisicing elit. Soluta quisquam quae repellendus neque. Quod cupiditate quisquam mollitia doloremque magnam. Laboriosam ipsum temporibus libero amet placeat maiores officiis reprehenderit voluptatibus autem?
</div>
<a href="blog_detail.html">查看全文 >> </a>
</div>
<div class="blog">
<div class="title">我的第一篇博客</div>
<div class="date">2022-11-07 18:09:00</div>
<div class="desc">
Lorem ipsum dolor sit amet consectetur adipisicing elit. Soluta quisquam quae repellendus neque. Quod cupiditate quisquam mollitia doloremque magnam. Laboriosam ipsum temporibus libero amet placeat maiores officiis reprehenderit voluptatibus autem?
</div>
<a href="blog_detail.html">查看全文 >> </a>
</div> -->
</div>
<script src="js/app.js"></script>
<script src="https://apps.bdimg.com/libs/jquery/2.1.4/jquery.min.js"></script>
<script>
function getBlogs() {
$.ajax({
type: 'get',
url: 'blog',
success: function(body) {
//获取放博客的container
let container = document.querySelector('.container-right');
//将从数据库中查到的所有博客都放在blog_list中
for(let blog of body) {
//1.构造blog标签
let blogDiv = document.createElement('div');
blogDiv.className = 'blog';
//2.构造blog的title标签
let titleDiv = document.createElement('div');
titleDiv.className = 'title';
titleDiv.innerHTML = blog.title;
//3.构造blog的date标签
let dateDiv = document.createElement('div');
dateDiv.className = 'date';
dateDiv.innerHTML = blog.postTime;
//4.构造blog的desc标签
let descDiv = document.createElement('div');
descDiv.className = 'desc';
descDiv.innerHTML = blog.content;
//5.构造a标签
let a = document.createElement('a');
a.href = 'blog_detail.html?blogId=' + blog.blogId;
a.innerHTML = ' 查看全文 >>';
//6.将构造的标签添加到父标签
blogDiv.appendChild(titleDiv);
blogDiv.appendChild(dateDiv);
blogDiv.appendChild(descDiv);
blogDiv.appendChild(a);
container.appendChild(blogDiv);
}
}
});
}
//发送get请求,便会从数据库中查询到所有博客放在blog_list中
getBlogs();
//发送get请求,查看当前页面用户的登录状况
getLoginStatus();
//针对博客列表页,获取到当前用户的信息
function getUserInfo() {
$.ajax({
type: 'get',
url: 'userInfo',
success: function(body) {
//将获取成功的对象信息放在左边框的用户信息内容
let h3 = document.querySelector('.container-left>.card>h3');
h3.innerHTML = body.username;
}
});
}
getUserInfo();
</script>
</div>
</body>
4.博客详情页

<body>
    <div class="nav">
        <img src="./img/bg2.jpg" alt="">
        <span class="title">我的博客系统</span>

        <div class="spacer"></div>
        <a href="blog_list.html">主页</a>
        <a href="blog_edit.html">写博客</a>
        <a href="logout">注销</a>
        <a href="#" id="delete-button">删除</a>
    </div>

    <div class="container">
        <div class="container-left">
            <div class="card">
                <img src="./img/pt.jpg" alt="">
                <h3></h3>
                <a href="github.com">github 地址</a>
                <div class="counter">
                    <span>文章</span>
                    <span>分类</span>
                </div>
                <div class="counter">
                    <span>2</span>
                    <span>1</span>
                </div>
            </div>
        </div>
        <div class="container-right">
            <div class="blog-detail">
                <h3></h3>
                <div class="date"></div>
                <div id="content" style="background-color: transparent;">

                </div>
            </div>
        </div>
    </div>
    <script src="js/app.js"></script>
    <script>
        function getBlog() {
            $.ajax({
                type: 'get',
                url: 'blog' + location.search,
                success: function(body) {
                    //1.设置博客标题title
                    let h3 = document.querySelector('.blog-detail>h3');
                    h3.innerHTML = body.title;

                    //2.设置博客发表日期
                    let dateDiv = document.querySelector('.blog-detail>.date');
                    dateDiv.innerHTML = body.postTime;

                    //3.设置博客的内容
                    // let contentDiv = document.querySelector('#content');
                    // contentDiv.innerHTML = body.content;
                    //使用editor.md渲染content
                    editormd.markdownToHTML('content', { markdown: body.content });
                }
            });
        }
        //发送get请求,获取到博客的详细信息
        getBlog();

        //发送get请求,查看当前页面用户的登录状况
        getLoginStatus();

        //请求获取当前博客作者的信息
        function getUserInfo() {
            $.ajax({
                type: 'get',
                url: 'userInfo' + location.search,
                success: function(body) {
                    let h3 = document.querySelector('.card>h3');
                    h3.innerHTML = body.username;
                }
            });
        }
        getUserInfo();

        //设置删除博客中的href
        function updateDeleteURL() {
            let deleteBtn = document.querySelector('#delete-button');
            deleteBtn.href = 'blogDelete' + location.search;
        }
        updateDeleteURL();
    </script>
</body>
5.博客编辑页

<body>
    <div class="nav">
        <img src="./img/bg2.jpg" alt="">
        <span class="title">我的博客系统</span>

        <div class="spacer"></div>
        <a href="blog_list.html">主页</a>
        <a href="blog_edit.html">写博客</a>
        <a href="logout">注销</a>
    </div>
    <div class="blog-edit-container">
        <form action="blog" method="post" style="height: 100%">
            <!-- 编辑区 -->
            <div class="title">
                <input type="text" id="blog-title" placeholder="在这里输入博客标题" name="title">
                <input type="submit" value="发布文章" id="submit"></input>
            </div>
            <div id="editor">
                <!-- 使用form表单提交markdown数据规定通过textarea自动获取 -->
                <textarea name="content" style="display: none"></textarea>
            </div>
        </form>
    </div>
    <script src="js/app.js"></script>
    <script>
        //发送get请求,查看当前页面用户的登录状况
        getLoginStatus();

        // 初始化编辑器, 代码也是截取自 官方文档 .
        var editor = editormd("editor", {
            // 这里的尺寸必须在这里设置. 设置样式会被 editormd 自动覆盖掉.
            width: "100%",
            // 设定编辑器高度
            height: "calc(100% - 50px)",
            // 编辑器中的初始内容
            markdown: "## 这里写下博客正文",
            // 指定 editor.md 依赖的插件路径
            path: "editor.md/lib/",
            saveHTMLToTextarea: true,
        });
    </script>
</body>
三、后端实现
1.设计数据库表
blog表:
blog(blogId,title,content,postTime,userId);
user表:
user(userId,userName,password);


2.封装连接数据库的公共操作
由于我们在进行博客的增删查改都需要连接数据库,所以我们对数据库的连接进行封装。
代码如下(示例):
public class DBUtil {
    private static volatile DataSource dataSource = null;
    private Connection connection = null;
    //将构造方法设为私有,防止不小心new出对象
    private DBUtil() {}
    //1.获取数据源
    public static DataSource getDataSource() {
        if (dataSource == null) {
            synchronized (DBUtil.class) {
                if (dataSource == null) {
                    dataSource = new MysqlDataSource();
                    ((MysqlDataSource)dataSource).setURL("jdbc:mysql://127.0.0.1:3306/java105?characterEncoding=utf8&&useSSL=false");
                    ((MysqlDataSource)dataSource).setUser("root");
                    ((MysqlDataSource)dataSource).setPassword("root");
                }
            }
        }
        return dataSource;
    }
    //2.建立连接
    public static Connection getConnection() throws SQLException {
        return getDataSource().getConnection();
    }
    //3.释放相关资源
    public static void close(Connection connection, PreparedStatement statement, ResultSet resultSet) {
        if (resultSet != null) {
            try {
                resultSet.close();
            } catch (SQLException e) {
                e.printStackTrace();
            }
        }
        if (statement != null) {
            try {
                statement.close();
            } catch (SQLException e) {
                e.printStackTrace();
            }
        }
        if (connection != null) {
            try {
                connection.close();
            } catch (SQLException e) {
                e.printStackTrace();
            }
        }
    }
}
3.封装对博客表和用户表的操作
(1)对数据库中的博客可以进行增删查的操作。
BlogDao:
public class BlogDao {
    //添加:插入一个博客到数据库中
    public void insert(Blog blog) {
        Connection connection = null;
        PreparedStatement statement = null;
        try {
            //1.获取数据源并连接
            connection = DBUtil.getConnection();
            //2.构造sql语句
            String sql = "insert into blog values(null,?,?,now(),?)";
            statement = connection.prepareStatement(sql);
            statement.setString(1, blog.getTitle());
            statement.setString(2,blog.getContent());
            statement.setInt(3,blog.getUserId());
            //3.执行sql
            int ret = statement.executeUpdate();
            if (ret == 1) {
                System.out.println("博客插入成功!");
            }else {
                System.out.println("博客插入失败!");
            }
        } catch (SQLException e) {
            e.printStackTrace();
        } finally {
            //4.释放资源
            DBUtil.close(connection,statement,null);
        }
    }

    //查询:根据博客Id查询指定博客
    public Blog selectOne(int blogId) {
        Connection connection = null;
        PreparedStatement statement = null;
        ResultSet resultSet = null;
        try {
            //1.获取数据源并建立连接
            connection = DBUtil.getConnection();
            //2.构造SQL
            String sql = "select * from blog where blogId = ?";
            statement = connection.prepareStatement(sql);
            statement.setInt(1,blogId);
            //3.执行sql
            resultSet = statement.executeQuery();
            if (resultSet.next()) {
                Blog blog = new Blog();
                blog.setBlogId(resultSet.getInt("blogId"));
                blog.setTitle(resultSet.getString("title"));
                blog.setContent(resultSet.getString("content"));
                blog.setPostTime(resultSet.getTimestamp("postTime"));
                blog.setUserId(resultSet.getInt("userId"));
                return blog;
            }
        } catch (SQLException e) {
            e.printStackTrace();
        } finally {
            //一定别忘记释放资源
            DBUtil.close(connection,statement,resultSet);
        }
        return null;
    }

    //查询:查询博客列表页的所有博客
    public List<Blog> selectAll() {
        List<Blog> blogs = new ArrayList<>();
        Connection connection = null;
        PreparedStatement statement = null;
        ResultSet resultSet = null;
        try {
            //1.获取数据源并建立连接
            connection = DBUtil.getConnection();
            //2.构造sql
            String sql = "select * from blog";
            //3.执行sql
            statement = connection.prepareStatement(sql);
            //4.判读结果
            resultSet = statement.executeQuery();
            while (resultSet.next()) {
                Blog blog = new Blog();
                blog.setBlogId(resultSet.getInt("blogId"));
                blog.setTitle(resultSet.getString("title"));
                //列表页的博客只需要摘录正文一部分就好
                String content = resultSet.getString("content");
                if (content.length() > 100) {
                    content = content.substring(0,100) + "......";
                }
                blog.setContent(content);
                blog.setPostTime(resultSet.getTimestamp("postTime"));
                blog.setUserId(resultSet.getInt("userId"));
                blogs.add(blog);
            }
        } catch (SQLException e) {
            e.printStackTrace();
        } finally {
            DBUtil.close(connection,statement,resultSet);
        }
        return blogs;
    }

    //删除:删除指定博客
    public void delete(int blogId) {
        Connection connection = null;
        PreparedStatement statement = null;
        try {
            connection = DBUtil.getConnection();
            String sql = "delete from blog where blogId=?";
            statement = connection.prepareStatement(sql);
            statement.setInt(1,blogId);
            int ret = statement.executeUpdate();
            if (ret == 1) {
                System.out.println("博客删除成功!");
            } else {
                System.out.println("博客删除失败!");
            }
        } catch (SQLException e) {
            e.printStackTrace();
        } finally {
            DBUtil.close(connection,statement,null);
        }
    }
}
(2)从用户表里面通过userId和userName进行查询的操作。
UserDao:
public class UserDao {
    //查询--by--用户名
    public User selectByName(String username) {
        Connection connection = null;
        PreparedStatement statement = null;
        ResultSet resultSet = null;
        try {
            //1.获取数据源并建立连接
            connection = DBUtil.getConnection();
            //2.构造sql
            String sql = "select * from user where username=?";
            statement = connection.prepareStatement(sql);
            statement.setString(1,username);
            //3.执行sql
            resultSet = statement.executeQuery();
            if (resultSet.next()) {
                User user = new User();
                user.setUserId(resultSet.getInt("userId"));
                user.setUserName(resultSet.getString("username"));
                user.setPassword(resultSet.getString("password"));
                return user;
            }
        } catch (SQLException e) {
            e.printStackTrace();
        } finally {
            DBUtil.close(connection,statement,resultSet);
        }
        return null;
    }

    //查询--by--用户ID
    public User selectById(int userId) {
        Connection connection = null;
        PreparedStatement statement = null;
        ResultSet resultSet = null;
        try {
            connection = DBUtil.getConnection();
            String sql = "select * from user where userId = ?";
            statement = connection.prepareStatement(sql);
            statement.setInt(1,userId);
            resultSet = statement.executeQuery();
            if (resultSet.next()) {
                User user = new User();
                user.setUserId(resultSet.getInt("userId"));
                user.setUserName(resultSet.getString("username"));
                user.setPassword(resultSet.getString("password"));
                return user;
            }
        } catch (SQLException e) {
            e.printStackTrace();
        } finally {
            DBUtil.close(connection,statement,resultSet);
        }
        return null;
    }
    //添加--添加新用户
    public void insert(User user) {
        Connection connection = null;
        PreparedStatement statement = null;
        try {
            //1.获取数据源并建立连接
            connection = DBUtil.getConnection();
            //2.构造sql
            String sql = "insert into user values(null,?,?)";
            //3.执行sql
            statement = connection.prepareStatement(sql);
            statement.setString(1,user.getUsername());
            statement.setString(2,user.getPassword());
            int ret = statement.executeUpdate();
            //4.判断是否添加成功
            if (ret == 1) {
                System.out.println("新用户添加成功!");
            } else {
                System.out.println("新用户添加失败!");
            }
        } catch (SQLException e) {
            e.printStackTrace();
        } finally {
            DBUtil.close(connection,statement,null);
        }
    }
}
4.实现博客列表页、博客详情页、博客编辑页的后端服务
代码如下(示例):
@WebServlet("/blog")
public class BlogServlet extends HttpServlet {
    //可以使用ObjectMapper中的writeValueAsString和readValue两个方法
    ObjectMapper objectMapper = new ObjectMapper();
    @Override
    protected void doGet(HttpServletRequest req, HttpServletResponse resp) throws ServletException, IOException {
        //通过get请求实现blog_list和blog_detail的后端服务
        resp.setContentType("application/json; charset=utf-8");
        BlogDao blogDao = new BlogDao();
        //1.获取blogId
        String blogId = req.getParameter("blogId");
        if (blogId == null) {
            //如果query string中没有blogId说明它是blog_list的请求
            //需要返回所有博客
            List<Blog> blogs = blogDao.selectAll();
            resp.getWriter().write(objectMapper.writeValueAsString(blogs));
        } else {
            //如果不为null 则是blog_detail的请求
            //需要返回blogId这篇博客
            Blog blog = blogDao.selectOne(Integer.parseInt(blogId));
            resp.getWriter().write(objectMapper.writeValueAsString(blog));
        }
    }

    @Override
    protected void doPost(HttpServletRequest req, HttpServletResponse resp) throws ServletException, IOException {
        //通过post请求实现用户提交博客的功能
        //1.获取当前会话
        HttpSession session = req.getSession(false);
        if (session == null) {
            resp.setStatus(403);
            resp.setContentType("text/html; charset=utf-8");
            resp.getWriter().write("当前未登录,发布失败");
            return;
        }
        User user = (User) session.getAttribute("user");
        if (user == null) {
            resp.setStatus(403);
            resp.setContentType("text/html; charset=utf-8");
            resp.getWriter().write("当前未登录,发布失败");
            return;
        }

        //2.得到请求中的参数
        req.setCharacterEncoding("utf8");
        String title = req.getParameter("title");
        String content = req.getParameter("content");

        //3.构造blog对象
        Blog blog = new Blog();
        blog.setTitle(title);
        blog.setContent(content);
        blog.setUserId(user.getUserId());

        //4.将blog对象插入数据库中
        BlogDao blogDao = new BlogDao();
        blogDao.insert(blog);

        //5.发布成功,重定向到列表页
        resp.sendRedirect("blog_list.html");
    }
}
5.实现博客登录页面的后端服务
实现登录功能的后端请求;
实现禁止未登录访问博客列表、博客详情页以及发布博客等功能(非法访问)。
代码如下(示例):
@WebServlet("/login")
public class LoginServlet extends HttpServlet {
    @Override
    protected void doPost(HttpServletRequest req, HttpServletResponse resp) throws ServletException, IOException {
        //1.从请求中获取用户名和密码
        req.setCharacterEncoding("utf8");
        String username = req.getParameter("username");
        String password = req.getParameter("password");
        //2.判断用户名或密码是否为空
        if (username == null || username.equals("") || password == null || password.equals("")) {
            //说明用户或者密码输入为空
            resp.setContentType("text/html; charset=utf8");
            resp.getWriter().write("用户名或密码为空!登录失败!");
            return;
        }
        //3.查询数据库,验证用户名和密码是否正确
        UserDao userDao = new UserDao();
        User user = userDao.selectByName(username);
        if (user == null || !user.getPassword().equals(password)) {
            //说明用户不存在
            resp.setContentType("text/html; charset=utf8");
            resp.getWriter().write("用户不存在或密码错误!登录失败!");
            return;
        }
        //4.正确,创建一个会话对象
        HttpSession session = req.getSession(true);
        session.setAttribute("user",user);

        //5.构造302响应报文
        resp.sendRedirect("blog_list.html");
    }

    @Override
    protected void doGet(HttpServletRequest req, HttpServletResponse resp) throws ServletException, IOException {
        //判定当前登录状态
        //1.获取当前会话
        HttpSession session = req.getSession(false);
        //2.会话不存在,则403
        if (session == null) {
            resp.setStatus(403);
            return;
        }
        //3。会话存在,获取user
        User user = (User) session.getAttribute("user");
        //4.判定用户是否存在
        if (user == null) {
            resp.setStatus(403);
            return;
        }
        //5.会话存在
        resp.setStatus(200);
    }
}
6.实现博客删除的后端服务
代码如下(示例):
@WebServlet("/blogDelete")
public class BlogDeleteServlet extends HttpServlet {
    @Override
    protected void doGet(HttpServletRequest req, HttpServletResponse resp) throws ServletException, IOException {
        //1.判定当前登录状态
        HttpSession session = req.getSession(false);
        if (session == null) {
            resp.setStatus(403);
            resp.setContentType("text/html; charset=utf8");
            resp.getWriter().write("当前用户未登录,不能删除");
            return;
        }
        User user = (User) session.getAttribute("user");
        if (user == null) {
            resp.setStatus(403);
            resp.setContentType("text/html; charset=utf8");
            resp.getWriter().write("当前用户未登录,不能删除");
            return;
        }
        //2.获取blogId
        String blogId = req.getParameter("blogId");
        if (blogId == null) {
            resp.setStatus(403);
            resp.setContentType("text/html; charset=utf8");
            resp.getWriter().write("您当前删除的blogId有误!");
            return;
        }
        //3.查询blogId对应的blog对象
        BlogDao blogDao = new BlogDao();
        Blog blog = blogDao.selectOne(Integer.parseInt(blogId));
        if (blog == null) {
            resp.setStatus(403);
            resp.setContentType("text/html; charset=utf8");
            resp.getWriter().write("您当前删除的博客不存在!blogId="+blogId);
            return;
        }
        //4.判定登录用户是否就是当前作者
        if (blog.getUserId() != user.getUserId()) {
            resp.setStatus(403);
            resp.setContentType("text/html; charset=utf8");
            resp.getWriter().write("您不能删除其他人的博客!");
            return;
        }
        //5.真正执行删除
        blogDao.delete(Integer.parseInt(blogId));
        //6.重定向
        resp.sendRedirect("blog_list.html");
    }
}
7.实现博客列表页中的用户信息和博客详情页中的作者信息
代码如下(示例):
@WebServlet("/userInfo")
public class UserInfoServlet extends HttpServlet {
    ObjectMapper objectMapper = new ObjectMapper();
    @Override
    protected void doGet(HttpServletRequest req, HttpServletResponse resp) throws ServletException, IOException {
        //1.获取用户信息
        String blogId = req.getParameter("blogId");
        //2.判断query string 是否存在blogId
        if (blogId == null) {
            //如果blogId不存在,则说明当前是blog_list页面
            //页面的左边框需要显示的是当前登录用户的信息--从session中获取
            getUserInfoFromSession(req,resp);
        } else {
            //如果blogId存在,则说明当前是blog_detail页面
            //页面的左边框需要显示的是当前博客作者的信息--从数据库中获取
            getUserInfoFromDB(req,resp,Integer.parseInt(blogId));
        }
    }

    private void getUserInfoFromDB(HttpServletRequest req, HttpServletResponse resp, int blogId) throws IOException {
        //1.先根据blogId查看blog对象,获取到博客的userId
        BlogDao blogDao = new BlogDao();
        Blog blog = blogDao.selectOne(blogId);
        if (blog == null) {
            resp.setStatus(403);
            resp.setContentType("text/html; charset=utf-8");
            resp.getWriter().write("blogId不存在");
            return;
        }
        //2.根据userId查询对应的user对象
        UserDao userDao = new UserDao();
        User user = userDao.selectById(blog.getUserId());
        if (user == null) {
            resp.setStatus(403);
            resp.setContentType("text/html; charset=utf-8");
            resp.getWriter().write("blogId不存在");
            return;
        }
        //3.将用户返回给浏览器
        user.setPassword("");
        resp.setContentType("application/json; charset=utf-8");
        resp.getWriter().write(objectMapper.writeValueAsString(user));
    }

    private void getUserInfoFromSession(HttpServletRequest req, HttpServletResponse resp) throws IOException {
        //1.获取当前会话
        HttpSession session = req.getSession(false);
        //2.判断会话是否存在
        if (session == null) {
            //不存在则用户未登录
            resp.setStatus(403);
            resp.setContentType("text/html; charset=utf8");
            resp.getWriter().write("用户未登录");
            return;
        }
        //3.判断用户是否存在
        User user = (User) session.getAttribute("user");
        if (user == null) {
            //不存在则用户未登录
            resp.setStatus(403);
            resp.setContentType("text/html; charset=utf8");
            resp.getWriter().write("用户未登录");
            return;
        }
        //4.成功,将user返回
        user.setPassword("");
        resp.setContentType("application/json; charset=utf8");
        resp.getWriter().write(objectMapper.writeValueAsString(user));
    }
}
8.实现博客注销功能的后端服务
代码如下(示例):
@WebServlet("/logout")
public class LogoutServlet extends HttpServlet {
    @Override
    protected void doGet(HttpServletRequest req, HttpServletResponse resp) throws ServletException, IOException {
        HttpSession session = req.getSession(false);
        if (session == null) {
            resp.setStatus(403);
            return;
        }
        session.removeAttribute("user");
        resp.sendRedirect("blog_login.html");
    }
}
9.实现博客注册功能的后端服务
代码如下(示例):
@WebServlet("/regist")
public class RegistServlet extends HttpServlet {
    @Override
    protected void doPost(HttpServletRequest req, HttpServletResponse resp) throws ServletException, IOException {
        //1.从请求中获取用户名和密码
        req.setCharacterEncoding("utf8");
        String username = req.getParameter("username");
        String password = req.getParameter("password");
        //2.判断用户名或密码是否为空
        if (username == null || username.equals("") || password == null || password.equals("")) {
            //用户名或密码输入为空
            resp.setContentType("text/html; charset=utf8");
            resp.getWriter().write("用户名或密码为空!注册失败!");
            return;
        }
        //3.查询数据库,看是否有相同用户名的用户
        UserDao userDao = new UserDao();
        User user = userDao.selectByName(username);
        if (user != null) {
            //说明数据库中有现在用户注册的用户名
            resp.setContentType("text/html; charset=utf8");
            resp.getWriter().write("用户名重复!注册失败!");
            return;
        }
        //4.真正的注册
        //向数据库中添加该注册用户
        user = new User();
        user.setUsername(username);
        user.setPassword(password);
        userDao.insert(user);
        //5.构造重定向
        resp.sendRedirect("blog_login.html");
    }
}
四、部署到云服务器
1.修改pom.xml
加上打包类型和打包后的包名。
    <packaging>war</packaging>
    <build>
        <finalName>blogSystem2</finalName>
    </build>
2.修改DBUtil
修改DBUtil中的数据库连接的URL、user、password保证和终端的一致。

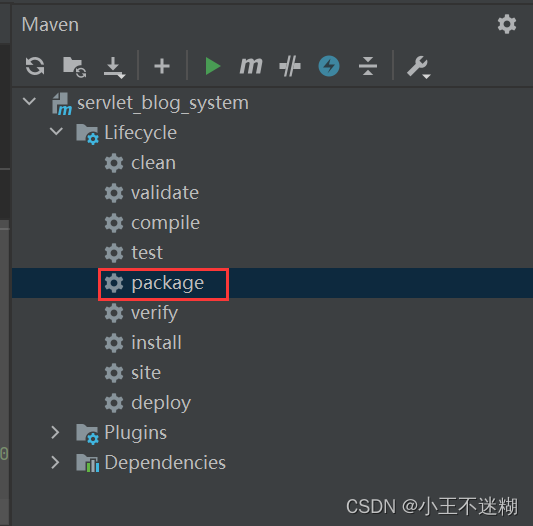
3.打包
双击maven下的package进行打包。
4.将包部署到终端上

5.验证
可访问:http://121.4.74.140:8080/blogSystem2/blog_login.html
注:具体打包过程可以参考上一篇文章
总结
具体代码可以到我的gitee中下载。

