-
场景准备

-
准备一张框选背景图
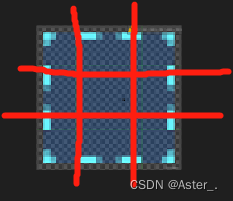
导入到unity之后,修改 Texture Type 为 Sprite,(根据图片需要)在 Sprite Editor 中 编辑 九宫格格式。图片样式的不一致,设置的九宫格格式也不一致。本例中虚线部分需要等距离平铺,所以如下设置即可满足要求。
-
Image组件设置
pivot的正确设置很重要,否则当我们更新Image尺寸的时候,尺寸更新了,不跟随鼠标
由于我选择的框选图片背景是虚线格式的,虚线部分想等距平铺,所以这里Image Type选择Tiled即可。
然后添加boxSelection脚本。实现框选功能。
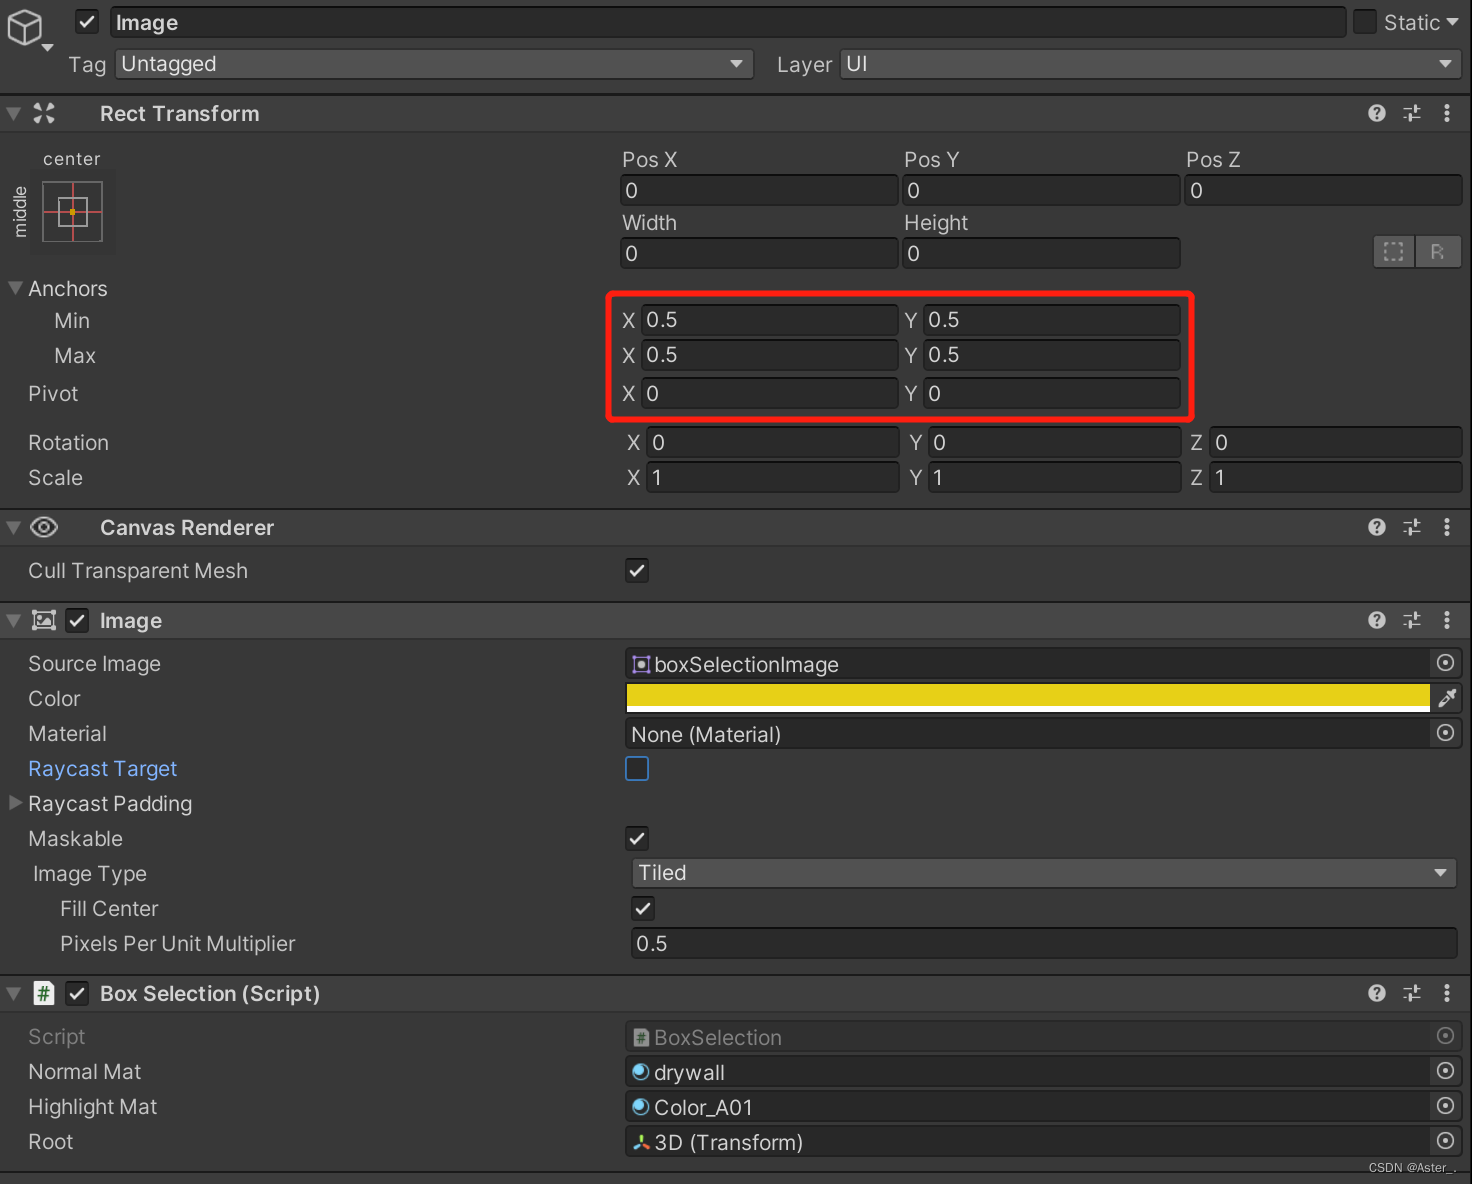
这里是在Update里面通过获取鼠标当前操作,更新image尺寸实现的框选,在鼠标松开时,检测3d区域内物体是否在框选范围内即可。实现方式非常简单易懂,且性能损耗比较小。
	public class BoxSelection : MonoBehaviour
    {
        public Material normalMat;
        public Material highlightMat;
        public Transform root;

        private RectTransform selectionBoxRectTrans;
        private Canvas canvas;
        private bool onDrawingRect;
        private Vector2  startPoint;
        private Vector2  endPoint;
        private Selector selector;

        private void Start()
        {
            canvas = GetComponentInParent<Canvas>();
            selectionBoxRectTrans = GetComponent<RectTransform>();
        }

        void Update()
        {
            if (Input.GetMouseButtonDown(0))
            {
                onDrawingRect = true;
                startPoint = Input.mousePosition;
            }

            if (onDrawingRect)
            {
                UpdateSelection();
            }

            if (onDrawingRect && Input.GetMouseButtonUp(0))
            {
                endPoint = Input.mousePosition;
                onDrawingRect = false;
                ClearSelection();
                selector = new Selector(startPoint, endPoint);
                Selection(selector);
            }
        }

        void UpdateSelection()
        {
            Vector2 currentPoint = Input.mousePosition;
            float minX = Mathf.Min(currentPoint.x, startPoint.x);
            float minY = Mathf.Min(currentPoint.y, startPoint.y);
            float maxX = Mathf.Max(currentPoint.x, startPoint.x);
            float maxY = Mathf.Max(currentPoint.y, startPoint.y);
            selectionBoxRectTrans.position = new Vector3(minX, minY, 0);
            selectionBoxRectTrans.sizeDelta = new Vector2(Mathf.Abs(maxX - minX) / canvas.scaleFactor, Mathf.Abs(maxY - minY) / canvas.scaleFactor);
        }

        void ClearSelection()
        {
            selectionBoxRectTrans.sizeDelta = Vector2.zero;
        }

        void Selection(Selector selector)
        {
            foreach(Transform child in root)
            {
                Vector3 screenPos = Camera.main.WorldToScreenPoint(child.position);
                if (screenPos.x > selector.Xmin && screenPos.x < selector.Xmax && screenPos.y > selector.Ymin && screenPos.y < selector.Ymax)
                {
                    child.GetComponent<MeshRenderer>().material = highlightMat;
                }
                else
                {
                    child.GetComponent<MeshRenderer>().material = normalMat;
                }
            }
        }

        private class Selector
        {
            public float Xmin;
            public float Xmax;
            public float Ymin;
            public float Ymax;

            //构造函数,在创建选定框时自动计算Xmin/Xmax/Ymin/Ymax
            public Selector(Vector3 start, Vector3 end)
            {
                Xmin = Mathf.Min(start.x, end.x);
                Xmax = Mathf.Max(start.x, end.x);
                Ymin = Mathf.Min(start.y, end.y);
                Ymax = Mathf.Max(start.y, end.y);
            }
        }
    }
当然,也可以不使用Image组件,我们可以通过GL绘制的方式,通过OnGUI或者OnPostRender的方法绘制【框】。不需要九宫格图片,将脚本挂载在Camera上即可。
// 画框代码
        public Color GLRectColor;
        public Color GLRectEdgeColor;

        private bool onDrawingRect;
        private Vector3 startPoint;
        private Vector3 currentPoint;
        private Vector3 endPoint;

        private void Start()
        {
            InitMaterial();
        }

        protected Material lineMaterial;

        protected void InitMaterial()
        {
            if (!lineMaterial)
            {
                // Unity3d使用该默认的Shader作为线条材质
                Shader shader = Shader.Find("Hidden/Internal-Colored");
                lineMaterial = new Material(shader);
                lineMaterial.hideFlags = HideFlags.HideAndDontSave;
                // 开启 alpha blending
                lineMaterial.SetInt("_SrcBlend", (int)BlendMode.SrcAlpha);
                lineMaterial.SetInt("_DstBlend", (int)BlendMode.OneMinusSrcAlpha);
                // 开启背面遮挡
                lineMaterial.SetInt("_Cull", (int)CullMode.Off);
                // Turn off depth writes
                lineMaterial.SetInt("_ZWrite", 0);
                lineMaterial.SetInt("_ZTest", (int)CompareFunction.Always);
            }
        }

		void Update()
        {
            if (Input.GetMouseButtonDown(0))
            {
                onDrawingRect = true;
                startPoint = Input.mousePosition;
            }

            if (Input.GetMouseButtonUp( 0 ) )
            {
                onDrawingRect = false;
            }
        }

		void OnGUI()
        {
            if (onDrawingRect)
            {
            	// GL线条材质
                if (!lineMaterial)
                    return;

                currentPoint = Input.mousePosition;

        		// 根据起始点和现在鼠标位置,便可以获取框的四个点的坐标!
                Vector3 p0 = new Vector3(startPoint.x, Screen.height - startPoint.y, 0);
                Vector3 p1 = new Vector3(currentPoint.x, Screen.height - startPoint.y, 0);
                Vector3 p2 = new Vector3(currentPoint.x, Screen.height - currentPoint.y, 0);
                Vector3 p3 = new Vector3(startPoint.x, Screen.height - currentPoint.y, 0);

                lineMaterial.SetPass(0);

                GL.PushMatrix();
                // GL.LoadPixelMatrix();

                /*------第一步,绘制矩形------*/
                GL.Begin(GL.QUADS);
                GL.Color(GLRectColor); // 自己设置颜色
                GL.Vertex(p0);
                GL.Vertex(p1);
                GL.Vertex(p2);
                GL.Vertex(p3);
                GL.End();

                /*------第二步,绘制矩形的边框------*/
                GL.Begin(GL.LINES);
                GL.Color(GLRectEdgeColor); // 自己设置颜色

                GL.Vertex(p0);
                GL.Vertex(p1);

                GL.Vertex(p1);
                GL.Vertex(p2);

                GL.Vertex(p2);
                GL.Vertex(p3);

                GL.Vertex(p3);
                GL.Vertex(p0);
                GL.End();

                GL.PopMatrix();
            }
        }
