目录
一、解决报错ModuleNotFoundError: No module named ‘tensorflow.examples
二、解决报错ModuleNotFoundError: No module named ‘tensorflow.contrib‘
三、安装onnx报错assert CMAKE, ‘Could not find “cmake“ executable!‘
四、ImportError: cannot import name 'builder' from 'google.protobuf.internal'
五、解决ModuleNotFoundError: No module named 'sklearn'
六、解决AttributeError: module ‘torch._C‘ has no attribute ‘_cuda_setDevice‘
七、解决ImportError: Missing optional dependency 'pytables'. Use pip or conda to install pytables.
八、解决AttributeError: module ‘distutils’ has no attribute ‘version’.
一、解决报错ModuleNotFoundError: No module named ‘tensorflow.examples
注意:MNIST数据集下载完成后不要解压,直接放入mnist_data文件夹下读取即可。
问题:我在用tensorflow做mnist数据集案例,报错了。

原因:tensorflow中没有examples。
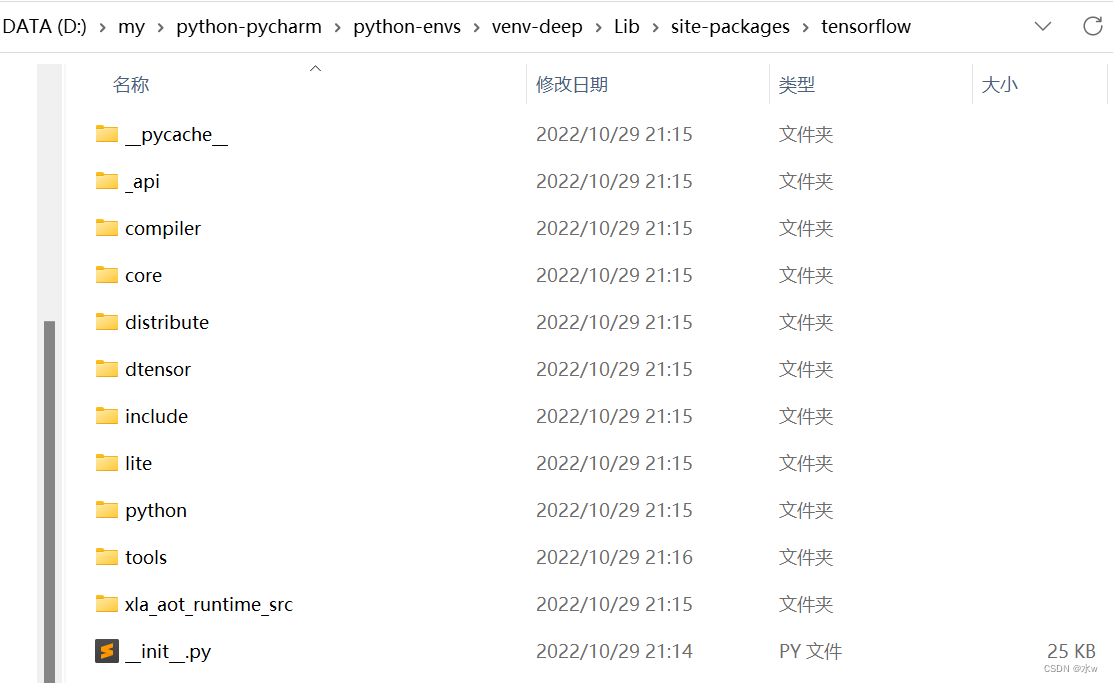
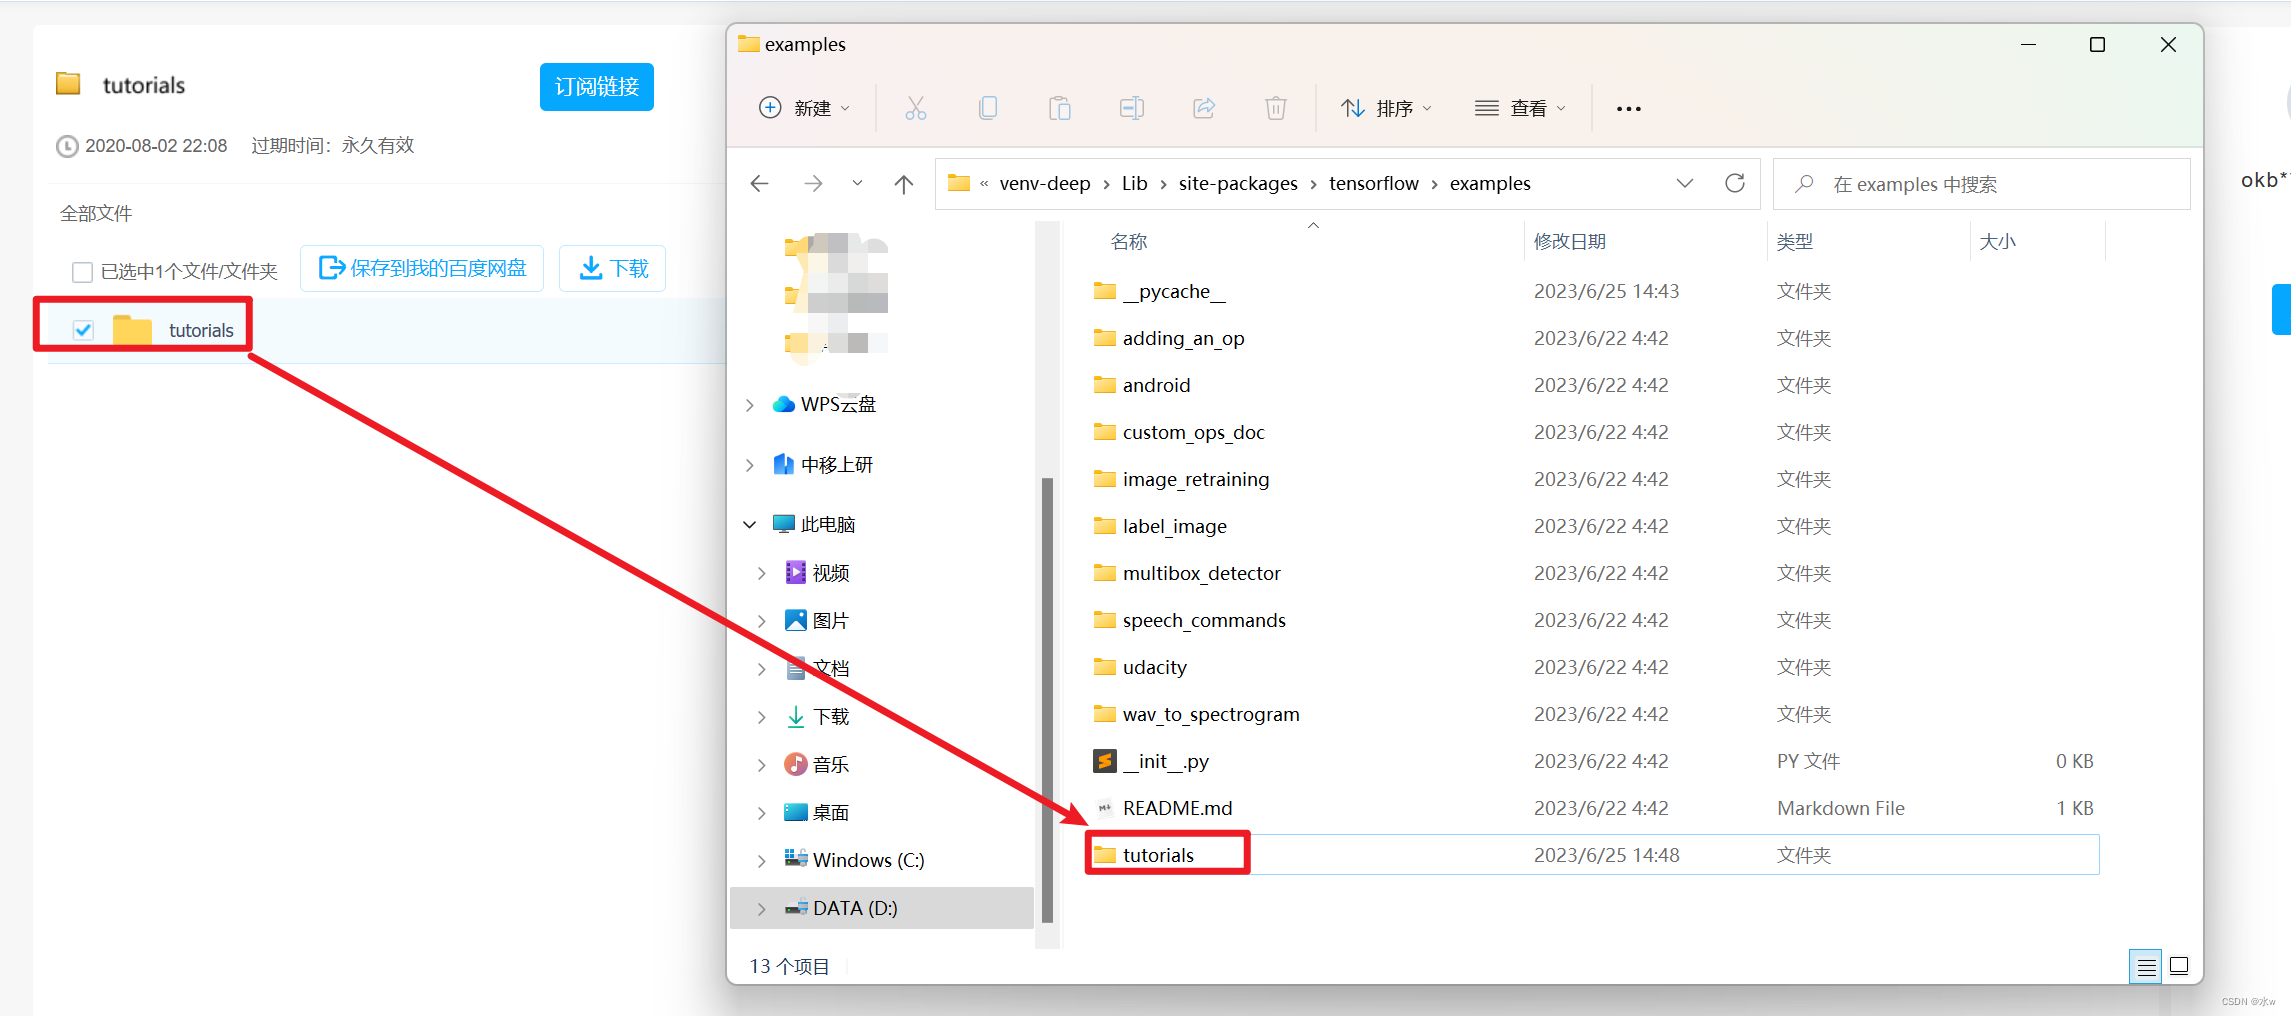
解决方法:(1)首先找到对应tensorflow的文件,我的是在D:\python3\Lib\site-packages\tensorflow(python的安装目录),进入tensorflow文件夹,发现没有examples文件夹。
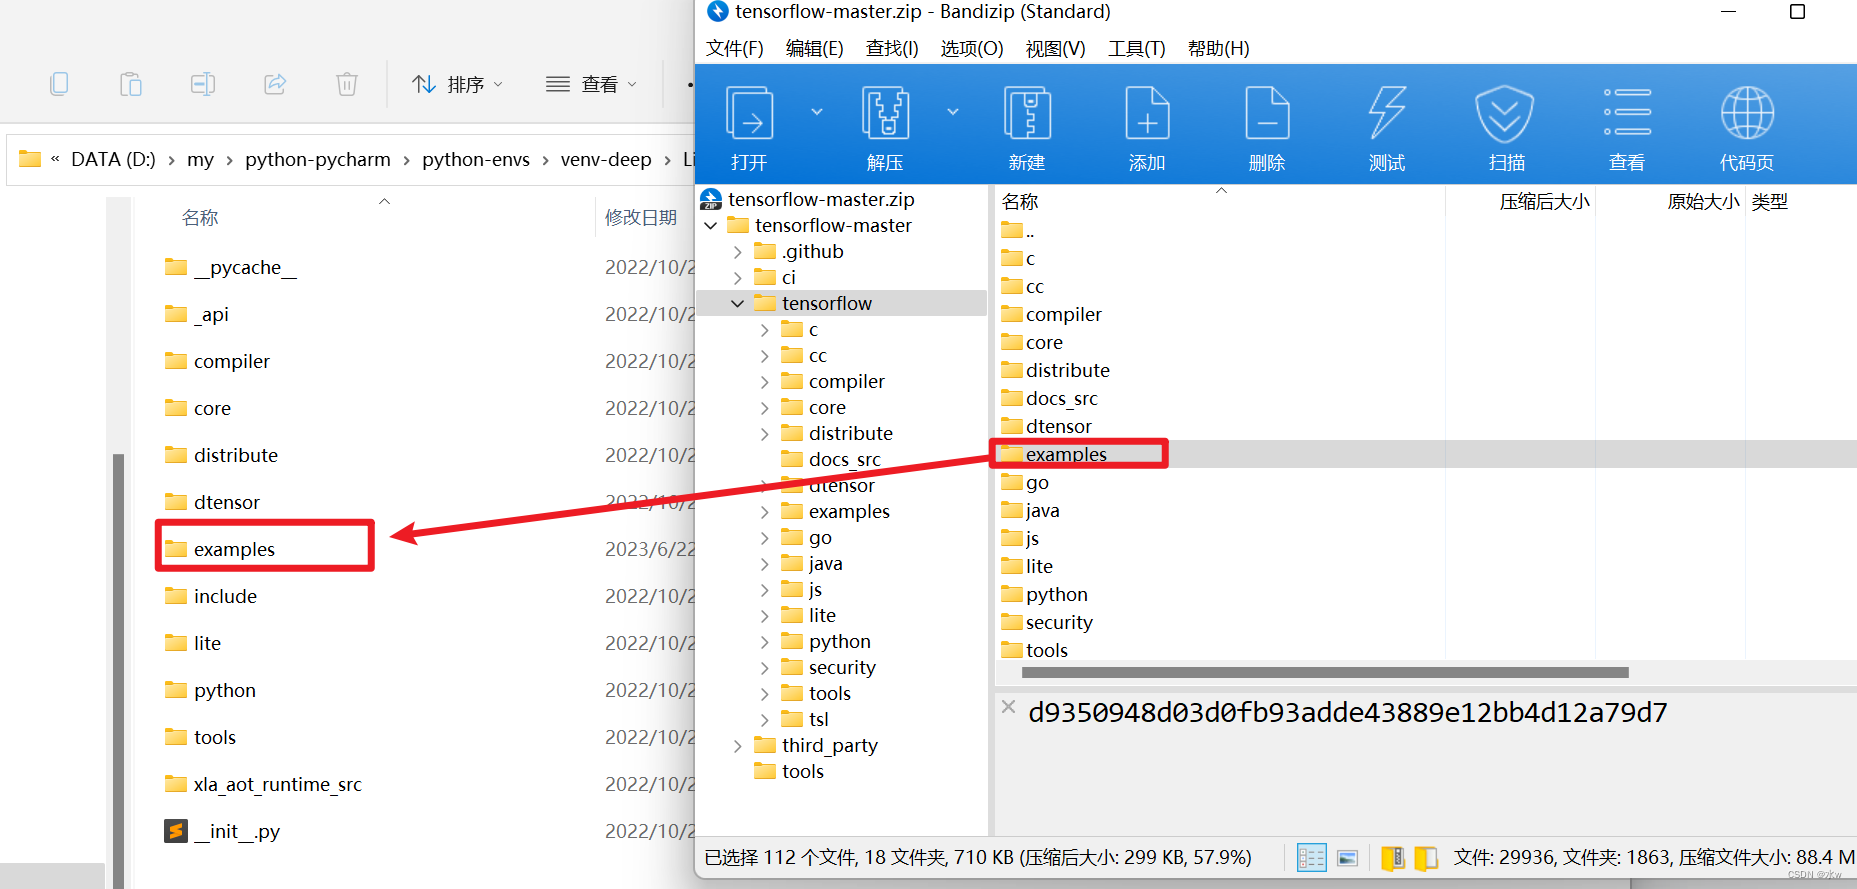
我们可以进入github下载:mirrors / tensorflow / tensorflow · GitCode。
(2)下载完成后将\tensorflow-master\tensorflow\目录下的examples文件夹复制到本地tensorflow文件夹中,然后在重新运行代码即可。
(3)之后发现还是没能解决问题,发现examples中缺少tutorials文件夹。在官方的github中没发现这个文件,在其他博主那里下载到了该文件。

下载地址: 百度网盘 请输入提取码
提取码:cxy7
(4)但是依旧没有解决问题…
前面博主使用的应该是tf1.0的版本。参考其他博主的方法解决了问题。
- 在工程下新建一个input_data.py文件,将tutorials文件夹下mnist中的input_data.py的内容复制到该文件中,
- 再在主文件中import input_data一下。
input_data.py文件内容放在下面,需要的自取。
# Copyright 2016 The TensorFlow Authors. All Rights Reserved.
#
# Licensed under the Apache License, Version 2.0 (the "License");
# you may not use this file except in compliance with the License.
# You may obtain a copy of the License at
#
#     http://www.apache.org/licenses/LICENSE-2.0
#
# Unless required by applicable law or agreed to in writing, software
# distributed under the License is distributed on an "AS IS" BASIS,
# WITHOUT WARRANTIES OR CONDITIONS OF ANY KIND, either express or implied.
# See the License for the specific language governing permissions and
# limitations under the License.
# ==============================================================================
"""Functions for downloading and reading MNIST data (deprecated).

This module and all its submodules are deprecated.
"""

from __future__ import absolute_import
from __future__ import division
from __future__ import print_function

import collections
import gzip
import os

import numpy
from six.moves import urllib
from six.moves import xrange  # pylint: disable=redefined-builtin

from tensorflow.python.framework import dtypes
from tensorflow.python.framework import random_seed
from tensorflow.python.platform import gfile
from tensorflow.python.util.deprecation import deprecated

_Datasets = collections.namedtuple('_Datasets', ['train', 'validation', 'test'])

# CVDF mirror of http://yann.lecun.com/exdb/mnist/
DEFAULT_SOURCE_URL = 'https://storage.googleapis.com/cvdf-datasets/mnist/'


def _read32(bytestream):
  dt = numpy.dtype(numpy.uint32).newbyteorder('>')
  return numpy.frombuffer(bytestream.read(4), dtype=dt)[0]


@deprecated(None, 'Please use tf.data to implement this functionality.')
def _extract_images(f):
  """Extract the images into a 4D uint8 numpy array [index, y, x, depth].

  Args:
    f: A file object that can be passed into a gzip reader.

  Returns:
    data: A 4D uint8 numpy array [index, y, x, depth].

  Raises:
    ValueError: If the bytestream does not start with 2051.

  """
  print('Extracting', f.name)
  with gzip.GzipFile(fileobj=f) as bytestream:
    magic = _read32(bytestream)
    if magic != 2051:
      raise ValueError('Invalid magic number %d in MNIST image file: %s' %
                       (magic, f.name))
    num_images = _read32(bytestream)
    rows = _read32(bytestream)
    cols = _read32(bytestream)
    buf = bytestream.read(rows * cols * num_images)
    data = numpy.frombuffer(buf, dtype=numpy.uint8)
    data = data.reshape(num_images, rows, cols, 1)
    return data


@deprecated(None, 'Please use tf.one_hot on tensors.')
def _dense_to_one_hot(labels_dense, num_classes):
  """Convert class labels from scalars to one-hot vectors."""
  num_labels = labels_dense.shape[0]
  index_offset = numpy.arange(num_labels) * num_classes
  labels_one_hot = numpy.zeros((num_labels, num_classes))
  labels_one_hot.flat[index_offset + labels_dense.ravel()] = 1
  return labels_one_hot


@deprecated(None, 'Please use tf.data to implement this functionality.')
def _extract_labels(f, one_hot=False, num_classes=10):
  """Extract the labels into a 1D uint8 numpy array [index].

  Args:
    f: A file object that can be passed into a gzip reader.
    one_hot: Does one hot encoding for the result.
    num_classes: Number of classes for the one hot encoding.

  Returns:
    labels: a 1D uint8 numpy array.

  Raises:
    ValueError: If the bystream doesn't start with 2049.
  """
  print('Extracting', f.name)
  with gzip.GzipFile(fileobj=f) as bytestream:
    magic = _read32(bytestream)
    if magic != 2049:
      raise ValueError('Invalid magic number %d in MNIST label file: %s' %
                       (magic, f.name))
    num_items = _read32(bytestream)
    buf = bytestream.read(num_items)
    labels = numpy.frombuffer(buf, dtype=numpy.uint8)
    if one_hot:
      return _dense_to_one_hot(labels, num_classes)
    return labels


class _DataSet(object):
  """Container class for a _DataSet (deprecated).

  THIS CLASS IS DEPRECATED.
  """

  @deprecated(None, 'Please use alternatives such as official/mnist/_DataSet.py'
              ' from tensorflow/models.')
  def __init__(self,
               images,
               labels,
               fake_data=False,
               one_hot=False,
               dtype=dtypes.float32,
               reshape=True,
               seed=None):
    """Construct a _DataSet.

    one_hot arg is used only if fake_data is true.  `dtype` can be either
    `uint8` to leave the input as `[0, 255]`, or `float32` to rescale into
    `[0, 1]`.  Seed arg provides for convenient deterministic testing.

    Args:
      images: The images
      labels: The labels
      fake_data: Ignore inages and labels, use fake data.
      one_hot: Bool, return the labels as one hot vectors (if True) or ints (if
        False).
      dtype: Output image dtype. One of [uint8, float32]. `uint8` output has
        range [0,255]. float32 output has range [0,1].
      reshape: Bool. If True returned images are returned flattened to vectors.
      seed: The random seed to use.
    """
    seed1, seed2 = random_seed.get_seed(seed)
    # If op level seed is not set, use whatever graph level seed is returned
    numpy.random.seed(seed1 if seed is None else seed2)
    dtype = dtypes.as_dtype(dtype).base_dtype
    if dtype not in (dtypes.uint8, dtypes.float32):
      raise TypeError('Invalid image dtype %r, expected uint8 or float32' %
                      dtype)
    if fake_data:
      self._num_examples = 10000
      self.one_hot = one_hot
    else:
      assert images.shape[0] == labels.shape[0], (
          'images.shape: %s labels.shape: %s' % (images.shape, labels.shape))
      self._num_examples = images.shape[0]

      # Convert shape from [num examples, rows, columns, depth]
      # to [num examples, rows*columns] (assuming depth == 1)
      if reshape:
        assert images.shape[3] == 1
        images = images.reshape(images.shape[0],
                                images.shape[1] * images.shape[2])
      if dtype == dtypes.float32:
        # Convert from [0, 255] -> [0.0, 1.0].
        images = images.astype(numpy.float32)
        images = numpy.multiply(images, 1.0 / 255.0)
    self._images = images
    self._labels = labels
    self._epochs_completed = 0
    self._index_in_epoch = 0

  @property
  def images(self):
    return self._images

  @property
  def labels(self):
    return self._labels

  @property
  def num_examples(self):
    return self._num_examples

  @property
  def epochs_completed(self):
    return self._epochs_completed

  def next_batch(self, batch_size, fake_data=False, shuffle=True):
    """Return the next `batch_size` examples from this data set."""
    if fake_data:
      fake_image = [1] * 784
      if self.one_hot:
        fake_label = [1] + [0] * 9
      else:
        fake_label = 0
      return [fake_image for _ in xrange(batch_size)
             ], [fake_label for _ in xrange(batch_size)]
    start = self._index_in_epoch
    # Shuffle for the first epoch
    if self._epochs_completed == 0 and start == 0 and shuffle:
      perm0 = numpy.arange(self._num_examples)
      numpy.random.shuffle(perm0)
      self._images = self.images[perm0]
      self._labels = self.labels[perm0]
    # Go to the next epoch
    if start + batch_size > self._num_examples:
      # Finished epoch
      self._epochs_completed += 1
      # Get the rest examples in this epoch
      rest_num_examples = self._num_examples - start
      images_rest_part = self._images[start:self._num_examples]
      labels_rest_part = self._labels[start:self._num_examples]
      # Shuffle the data
      if shuffle:
        perm = numpy.arange(self._num_examples)
        numpy.random.shuffle(perm)
        self._images = self.images[perm]
        self._labels = self.labels[perm]
      # Start next epoch
      start = 0
      self._index_in_epoch = batch_size - rest_num_examples
      end = self._index_in_epoch
      images_new_part = self._images[start:end]
      labels_new_part = self._labels[start:end]
      return numpy.concatenate((images_rest_part, images_new_part),
                               axis=0), numpy.concatenate(
                                   (labels_rest_part, labels_new_part), axis=0)
    else:
      self._index_in_epoch += batch_size
      end = self._index_in_epoch
      return self._images[start:end], self._labels[start:end]


@deprecated(None, 'Please write your own downloading logic.')
def _maybe_download(filename, work_directory, source_url):
  """Download the data from source url, unless it's already here.

  Args:
      filename: string, name of the file in the directory.
      work_directory: string, path to working directory.
      source_url: url to download from if file doesn't exist.

  Returns:
      Path to resulting file.
  """
  if not gfile.Exists(work_directory):
    gfile.MakeDirs(work_directory)
  filepath = os.path.join(work_directory, filename)
  if not gfile.Exists(filepath):
    urllib.request.urlretrieve(source_url, filepath)
    with gfile.GFile(filepath) as f:
      size = f.size()
    print('Successfully downloaded', filename, size, 'bytes.')
  return filepath


@deprecated(None, 'Please use alternatives such as:'
            ' tensorflow_datasets.load(\'mnist\')')
def read_data_sets(train_dir,
                   fake_data=False,
                   one_hot=False,
                   dtype=dtypes.float32,
                   reshape=True,
                   validation_size=5000,
                   seed=None,
                   source_url=DEFAULT_SOURCE_URL):
  if fake_data:

    def fake():
      return _DataSet([], [],
                      fake_data=True,
                      one_hot=one_hot,
                      dtype=dtype,
                      seed=seed)

    train = fake()
    validation = fake()
    test = fake()
    return _Datasets(train=train, validation=validation, test=test)

  if not source_url:  # empty string check
    source_url = DEFAULT_SOURCE_URL

  train_images_file = 'train-images-idx3-ubyte.gz'
  train_labels_file = 'train-labels-idx1-ubyte.gz'
  test_images_file = 't10k-images-idx3-ubyte.gz'
  test_labels_file = 't10k-labels-idx1-ubyte.gz'

  local_file = _maybe_download(train_images_file, train_dir,
                               source_url + train_images_file)
  with gfile.Open(local_file, 'rb') as f:
    train_images = _extract_images(f)

  local_file = _maybe_download(train_labels_file, train_dir,
                               source_url + train_labels_file)
  with gfile.Open(local_file, 'rb') as f:
    train_labels = _extract_labels(f, one_hot=one_hot)

  local_file = _maybe_download(test_images_file, train_dir,
                               source_url + test_images_file)
  with gfile.Open(local_file, 'rb') as f:
    test_images = _extract_images(f)

  local_file = _maybe_download(test_labels_file, train_dir,
                               source_url + test_labels_file)
  with gfile.Open(local_file, 'rb') as f:
    test_labels = _extract_labels(f, one_hot=one_hot)

  if not 0 <= validation_size <= len(train_images):
    raise ValueError(
        'Validation size should be between 0 and {}. Received: {}.'.format(
            len(train_images), validation_size))

  validation_images = train_images[:validation_size]
  validation_labels = train_labels[:validation_size]
  train_images = train_images[validation_size:]
  train_labels = train_labels[validation_size:]

  options = dict(dtype=dtype, reshape=reshape, seed=seed)

  train = _DataSet(train_images, train_labels, **options)
  validation = _DataSet(validation_images, validation_labels, **options)
  test = _DataSet(test_images, test_labels, **options)

  return _Datasets(train=train, validation=validation, test=test)
二、解决报错ModuleNotFoundError: No module named ‘tensorflow.contrib‘
问题:在TensorFlow2.x版本已经不能使用contrib包

三、安装onnx报错assert CMAKE, ‘Could not find “cmake“ executable!‘
 经过百度,查得:安装onnx需要protobuf编译所以安装前需要安装protobuf。
四、ImportError: cannot import name 'builder' from 'google.protobuf.internal'
问题:当运行torch转onnx的代码时,出现ImportError: cannot import name 'builder' from 'google.protobuf.internal',如下图:

原因:由于使用的google.protobuf版本太低而引起的。在较新的版本中,builder模块已经移动到了google.protobuf包中,而不再在google.protobuf.internal中。
解决办法:升级protobuf库
pip install --upgrade protobuf五、解决ModuleNotFoundError: No module named 'sklearn'
问题:sklearn第三方库安装失败

原因:查看别人库的列表,发现sklearn的包名是scikit-learn
解决:安装scikit-learn,
pip install -i https://pypi.tuna.tsinghua.edu.cn/simple scikit-learn
六、解决AttributeError: module ‘torch._C‘ has no attribute ‘_cuda_setDevice‘
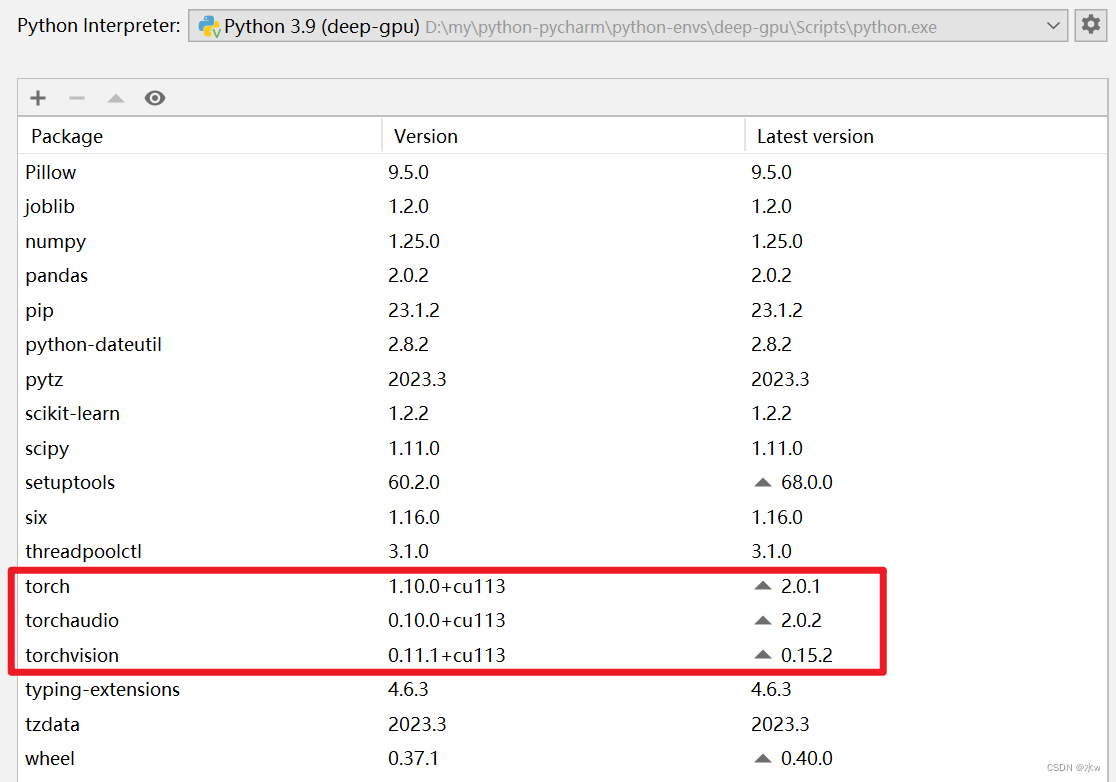
网上查询原因:说我安装的torch是适合CPU的,而不是适合GPU的。于是我查询pytorch版本情况,代码如下,
import torch
torch.cuda.is_available()
结果是False。
显而易见,环境使用的是CPU版本的torch,但是我仔细检查了一下我安装的命令,如下
解决:下载三个安装包,适合GPU版本的,
可以参考这篇(1条消息) GPU版本安装Pytorch教程最新方法_pytorch gpu_水w的博客-CSDN博客

然后分别pip install 他们,这样就能够安装适合GPU版本的torch了。
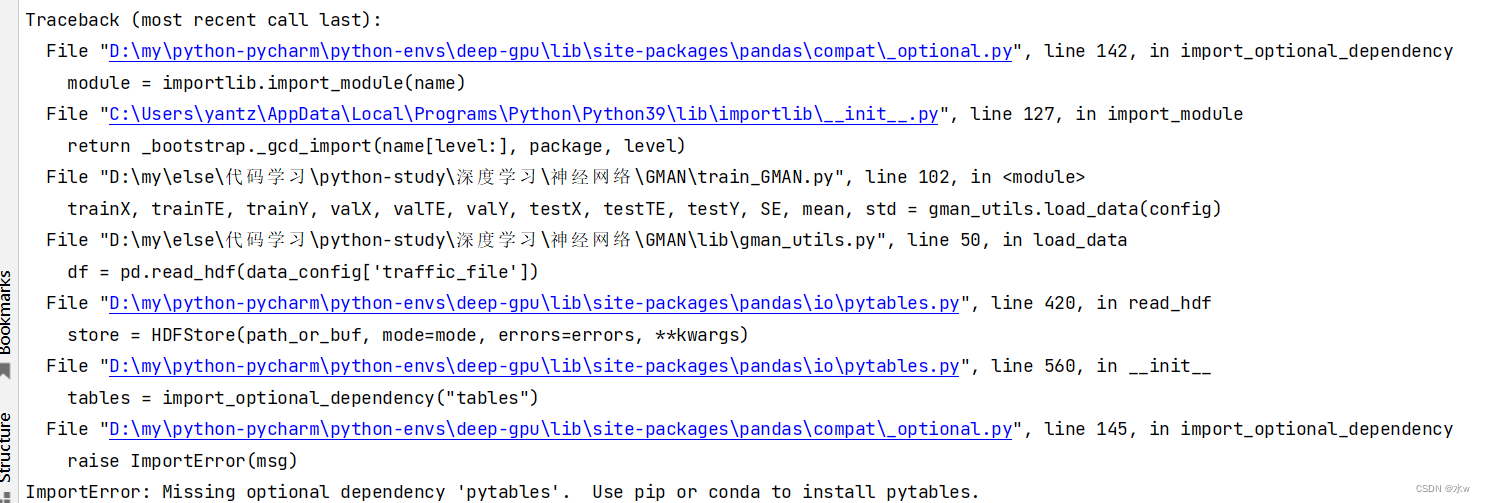
七、解决ImportError: Missing optional dependency 'pytables'. Use pip or conda to install pytables.
问题:运行py文件报错
解决历程:按照提示安装pytables,"pip install pytables"安装失败,然后试了"pip install tables"安装上了。
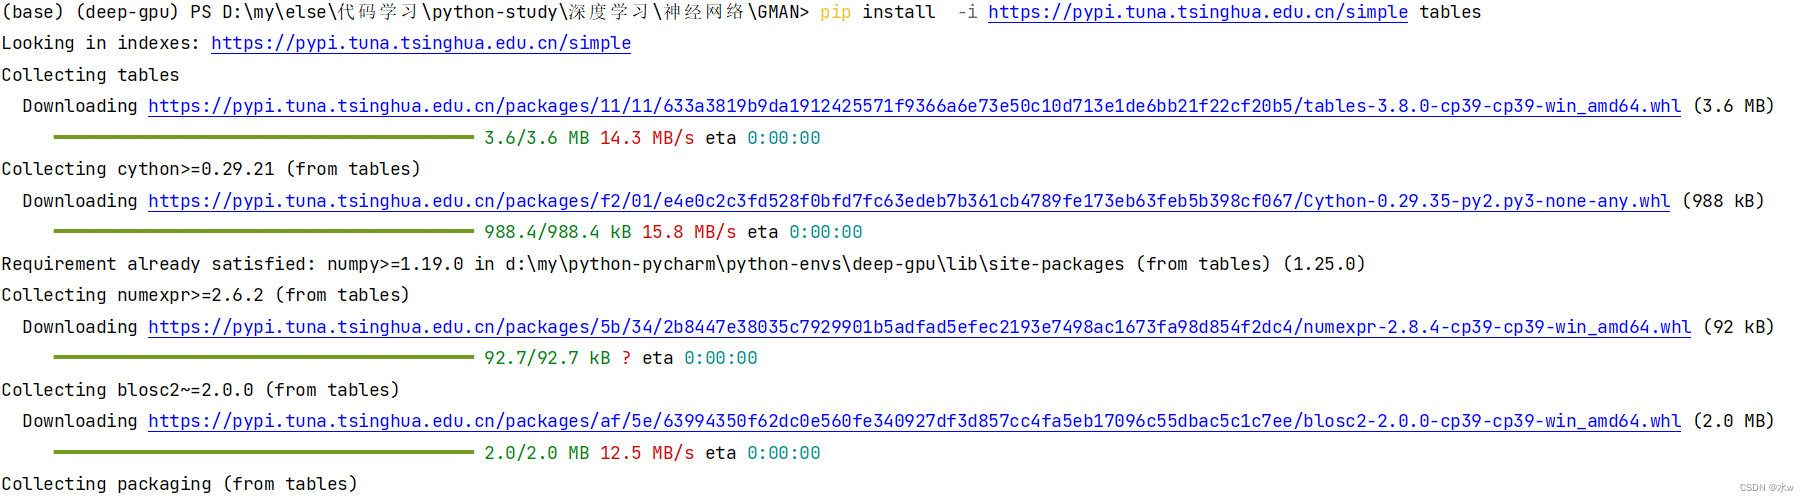
重新运行代码,发现就不报错了。
八、解决AttributeError: module ‘distutils’ has no attribute ‘version’.
问题: AttributeError: module ‘distutils’ has no attribute ‘version’.
解决: setuptools版本问题”,版本过高导致的问题;setuptools版本
- 第一步: pip uninstall setuptools【使用pip,不能使用 conda uninstall setuptools ; 【不能使用conda的命令,原因是,conda在卸载的时候,会自动分析与其相关的库,然后全部删除,如果y的话,整个环境都需要重新配置。
- 第二步: pip或者conda install setuptools==59.5.0【现在最新的版本已经到了65了,之前的老版本只是部分保留,找不到的版本不行
然后重新运行了代码,发现没有报错了。