一、Bean的装配(IOC应用实现)
创建应用组件之间的协作的行为通常称为装配(wiring)。Spring IOC通过应用上下文(ApplicationContext)装载Bean的定义并把他们组装起来。
Spring应用上下文(ApplicationContext)全权负责对象的创建和组装。
ApplicationContext是Spring IoC容器实现的代表,它负责实例化,配置和组装Bean。容器通过读取配置元数据获取有关实例化、配置和组装哪些对象的说明 。配置元数据可以使用XML、Java注解或Java代码来呈现。它允许你处理应用程序的对象与其他对象之间的互相依赖关系。
二、Bean三种装配(实例化)方式
- 构造方法
- 静态工厂
- 实例工厂
// 三种方式 Bean 的实例化,返回的是一个BeanWrapper,半成品
// 实例工厂,静态工厂,构造方法

// 1、工厂实例化
//        1.1、实例工厂方式实例化 return
//        1.2、静态工厂方式实例化 return
// 2、有参构造器实例化(有@Autowired或无@Autowired)
// 3、无参构造实例化
三、搭建spring项目-jar包
如果只是使用spring的基本功能,只需要四个jar包
- spring-beans
- spring-core
- spring-context
- spring-expression(spel表达式)
用maven搭建spring工程,只需要一个context包就够了,maven帮我们做了上述几个jar包的继承
<dependency>
  <groupId>org.springframework</groupId>
  <artifactId>spring-context</artifactId>
  <version>5.2.6.RELEASE</version>
</dependency>
四、Spring进行Bean的装配代码行为实现:
我们可以通过下面三种代码行为实现
- 显示的xml配置文件方式(使用xml配置文件的方式定义Bean)
- 隐示的自动化装配机制(使用Spring自动化注解方式定义Bean)
@Compont(@serivce @controller @repository) @Autowride,Spring 2.5 支持基于注解的元数据配置. SSM框架开发中的使用 - 显示的java注解方式(使用Java注解方式定义Bean)
从 Spring 3.0开始, 由Spring JavaConfig项目提供的功能已经成为Spring核心框架的一部分。因此,你可以使用Java配置来代替XML配置定义外部bean
从spring4.0开始支持springboot1.0之后 springboot完全采用javaConfig的方式进行开发。
1、代码实现一:显示的xml配置文件方式(XML)
原理:xml+dom4j+反射
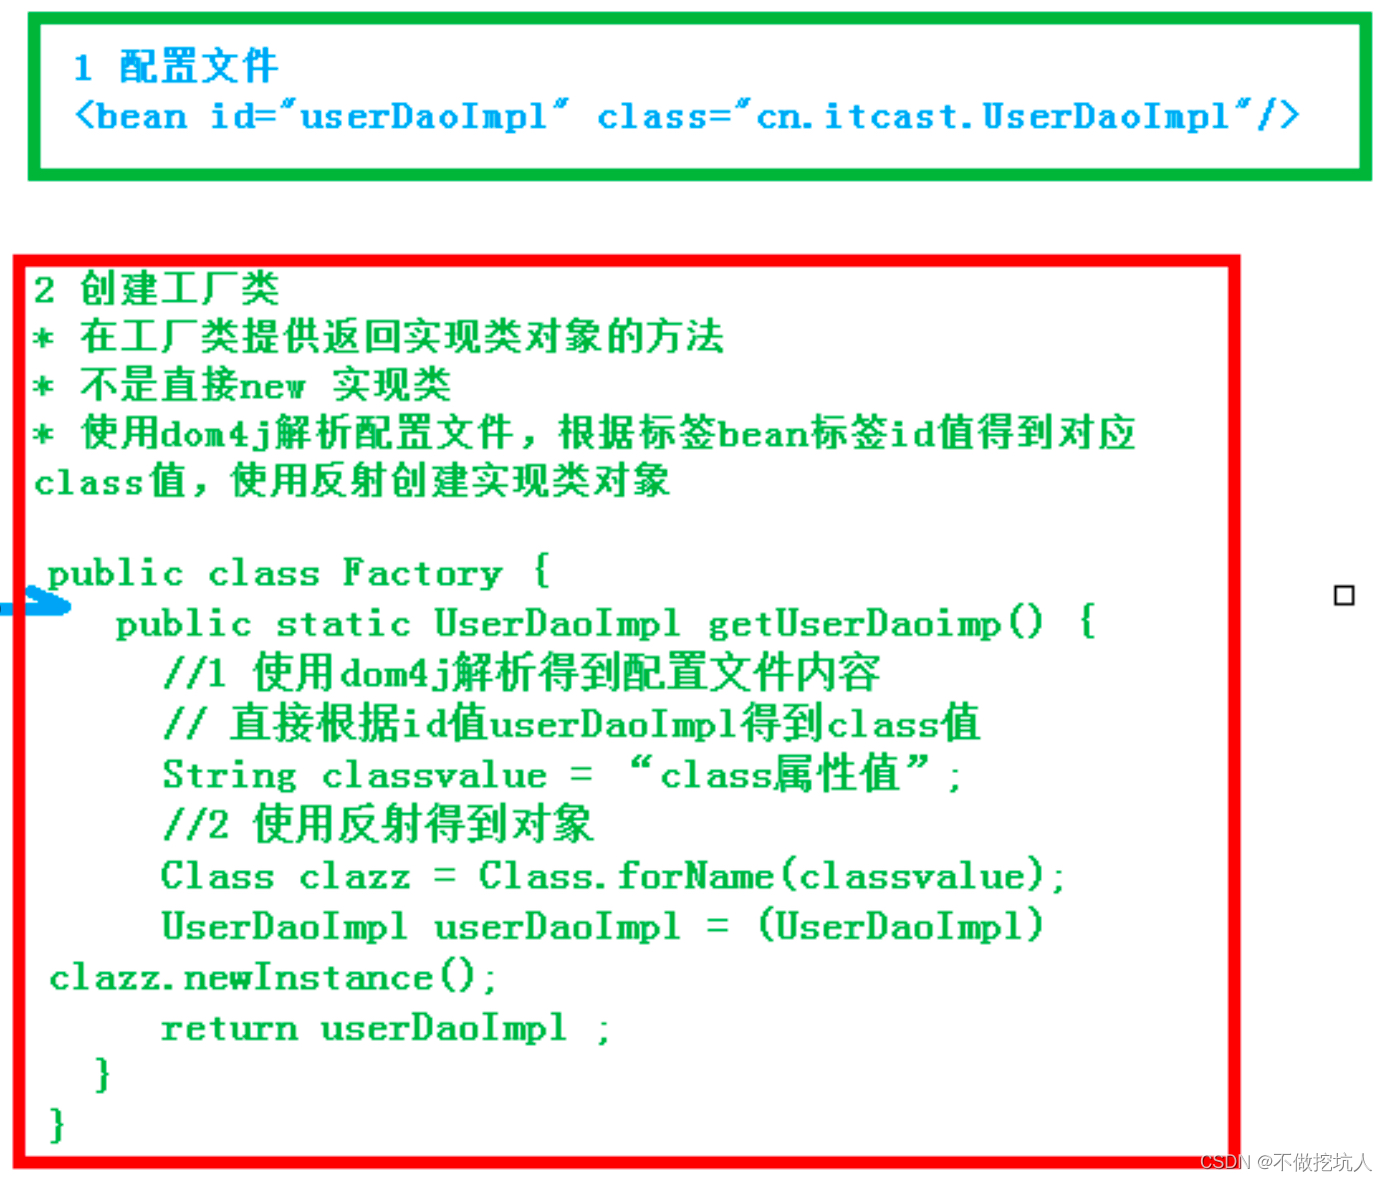
(1)、创建spring配置文件
一般建议把文件放到src下面,名称随便写建议 applicationContext.xml。如果是maven工程放在resource下面
<?xml version="1.0" encoding="UTF-8"?>
<beans xmlns="http://www.springframework.org/schema/beans"
       xmlns:xsi="http://www.w3.org/2001/XMLSchema-instance"
       xmlns:p="http://www.springframework.org/schema/p"
       xsi:schemaLocation="
        http://www.springframework.org/schema/beans http://www.springframework.org/schema/beans/spring-beans.xsd">
</beans>
(2)、接下来是三种bean装配方式
A:无参构造(常用)
解析spring配置文件得到对象,这个过程不需要写代码实现,在spring封装对象进行这些操作,这个由ApplicationContext实现
<!-- xml文件配置user对象创建,无参数构造 -->
<bean id="user" class="cn.noargstructure.User" name="设置别名,别名2,使用逗号风的多个别名" scope="singleton" >
    <description>用来描述一个Bean是干的</description>
</bean>
<!--为外部定义的bean起别名 -->
<alias name="user" alias="user6"></alias>
//测试得到配置的user对象
public static void main(String[] args) {
//1 加载spring配置文件,把文件对象创建
ClassPathXmlApplicationContext context = new ClassPathXmlApplicationContext("applicationContext.xml");
//可以加载多个xml
//ApplicationContext applicationContext = new ClassPathXmlApplicationContext("applicationContext.xml","applicationContext2.xml");
//2 根据配置文件的id值得到对象
User user = (User) context.getBean("user");
System.out.println(user);
}B:静态工厂(工厂方法设计模式)
<!-- xml配置,使用静态工厂创建对象 -->
<!-- factory-method指定了工厂类的哪个方法创建Bean-->
<bean id="staticFactory" class="cn.staticfactory.StaticFactory" factory-method="getBean1"/>
// Bean类
public class Bean1 {}
//工厂类:
public class Bean1Factory {
//静态方法直接创建对象
public static Bean1 getBean1() {
return new Bean1();
}
}@Test
public void testStaticFactory(){
ClassPathXmlApplicationContext context = new ClassPathXmlApplicationContext("static-factory.xml");
// Bean1 bean = (Bean1) context.getBean("bean1");
// 报错, Map<String, BeanDefinition> beanDefinitionMap 没有这bean1的
// 有一个叫 staticFactory
// StaticFactory staticFactory = (StaticFactory) context.getBean(StaticFactory.class);
// 报错, 没有实例化staticFactory这个Bean
Bean1 bean1 = context.getBean(Bean1.class);
Bean1 bean2 = (Bean1) context.getBean("staticFactory");
System.out.println(bean1);
System.out.println(bean2);
// 一级singletonObjects 里面存的name是staticFactory ,对象是 Bean1
}C:实例工厂
<!-- xml配置工厂Bean,这个工厂Bean是无参构造的方式由Spring创建 -->
<bean id="instanceFactory" class="cn.instancefactory.InstanceFactory"/>

<!-- 使用工厂对象创建bean2对象 -->
<!-- factory-bean指定实例工厂类 -->
<!-- factory-method指定使用实例工厂的哪个方法创建Bean2 -->
<bean id="bean2" factory-bean="instanceFactory" factory-method="getBean2"/>
public class Bean2 {}
// 实例工厂
public class InstanceFactory {
public Bean2 getBean2() {
return new Bean2();
}
}//实例工厂
@Test
public void testInstanceFactory(){
ClassPathXmlApplicationContext context = new ClassPathXmlApplicationContext("instance-factory.xml");
// 实例工厂先初始化,然后执行实例工厂的FactoryMethod方式实例化Bean2
Bean2 bean2 = (Bean2) context.getBean("bean2");
System.out.println(bean2);
InstanceFactory instanceFactory = (InstanceFactory) context.getBean("instanceFactory");
// 一级singletonObjects 里面存的name是 instanceFactory ,对象是 InstanceFactory
// 一级singletonObjects 里面存的name是 bean2 ,对象是 Bean2
}D:有参构造 -- 这里只讲用注解,不用xml
会触发参数的getBean()操作
有@Autowired
@Service
public class People1 {
    @Autowired(required = false)
    public People1(People2 people2, People3 people3) {
    }
    @Autowired(required = false)
    public People1(People2 people2) {
    }
}
无@Autowired
@Service
public class Person1 {

    public Person1(Person2 person2, Person3 person3) {
        System.out.println("person 有2参数");
    }
}
注意
1、有@Autowire的有参构造函数
1.1、 可以没有无参构造方法
1.2、required= true,只能有一个有参数构造
1.3、required= false,可以有多个有参数构造,按顺序取了第一个
2、无@Autowire的有参构造函数
1.1、有参数构造函数只有一个没问题
1.2、如果有多个有参数构造函数,必须加无参构造,等于还是无参初始化
3、1和2混合,2直接被忽略类
2、代码实现二:隐示的自动化装配机制(注解+xml)
使用Spring的注解扫描机制来实现自动化装配,底层是使用spring的aop实现的
注意:使用需要添加spring-aop.jar包,但是maven引入spring-context已经包含了spring-aop。
只演示无参数构造(实际上我们基本上都用无参构造)
1. applicationContext.xml配置注解扫描
<?xml version="1.0" encoding="UTF-8"?>
<beans xmlns="http://www.springframework.org/schema/beans"
    xmlns:xsi="http://www.w3.org/2001/XMLSchema-instance"
    xmlns:context="http://www.springframework.org/schema/context" xsi:schemaLocation="
        http://www.springframework.org/schema/beans http://www.springframework.org/schema/beans/spring-beans.xsd
        http://www.springframework.org/schema/context http://www.springframework.org/schema/context/spring-context.xsd">
    <!-- 方式一:开启注解的扫描,指定扫描路径,到配置的包里面扫描类、方法、属性上面是否有注解-->
    <context:component-scan base-package="cn.ioc.xml.noargstructure"></context:component-scan>
    <!-- 方式二: 这个开启注解扫描,只会扫描属性上面注解-->
    <!-- <context:annotation-config></context:annotation-config> -->
</beans>
2.在Bean类上添加注解@Component
@Component(value="userDao")
public class UserDaoImpl implements UserDao {
    @Override
    public void sayHello() {
        System.out.println("Hello Spring Annotation...");
    }
}
3.编写测试类
public class TestIoc {
    public static void main(String[] args) {
        ClassPathXmlApplicationContext context = new ClassPathXmlApplicationContext("applicationContext-anno.xml");
        //getBean 取的是实现类,不是接口。实现类默认Bean ID是类名第一个字母小写,或者有value配置
        UserDao userDao = (UserDao) context.getBean("userDao");
        userDao.sayHello();
    }
}
除了@Component外,Spring提供了3个基本功能和@Component等效的注解,注意不要标记到接口上,标记在类上
- @Controller 用于对Controller实现类进行标注
- @Service 用于对Service实现类进行标注
- @Repository 用于对DAO实现类进行标注
- @Component
添加value是给bean赋值一个唯一Bean Id,和xml配置装配bean的id一样。可以省略,默认名字是类名第一个字母小写。
上面的xml的bean配置和注解@Component还可以混合使用,底层都是IOC
3、代码实现三:显示的JavaConfig注解方式(基于java的容器配置)(JavaConfig+Spring注解(spring boot))
知识点链接:
基本概念: @Bean 和 @Configuration
- @Configuration 注解
绑定Java与XML配置
使用@Configuration+@ComponentScan实现无xml方式的装配,即@Configuration标注的配置类取代了XML配置文件
- @Configuration相当于之前的applicationComtext.xml配置文件的<beans></beans>
- @ComponentScan相当于当于<context:component-scan base-package="cn.service"></context:component-scan>开启注解扫描,默认扫描配置文件所在的包及其子包
//配置类
@Configuration // 就相当于创建了一个xml 文件 <beans></beans>
//@ComponentScan("cn.service") //指定路径 //<context:component-scan base-package="cn.service" >
@ComponentScan //默认扫描当前包所在的路径
public class SpringConfig {}
然后使用@Service @Component @Controller @Repository装Bean
public interface UserService {
    void method();
}

@Service
public class UserServiceImpl implements UserService {
    @Override
    public void method() {
        System.out.println("configuration create UserServiceImpl");
    }
}
//spring集成测试使用 @RunWith @ContextConfiguration
@RunWith(SpringJUnit4ClassRunner.class)
@ContextConfiguration(classes = {IocConfig.class})//加载配置类
public class Test1_Ioc {
// 注入 ApplicationContext对象,或者直接注入UserService对象
@Autowired
ApplicationContext applicationContext;
@Test
public void test() {
UserService bean = applicationContext.getBean(UserService.class);
bean.method();
}
}五、Spring创建第三方bean对象---@Bean
1、注解方式:
- @Bean 注解
@Bean是一个方法级别的注解,它与XML中的 元素类似。
注解支持 提供的一些属性,例如 * init-method * destroy-method * autowiring * name
开发者可以在@Configuration类或@Component类中使用@Bean注解。
底层:@Bean是通过实例工厂的方式实现的
BeanDefinition
// beanName就是方法的名字
// BeanDefinition没有class
// BeanDefinition FactoryBeanName 是配置类的名字
// BeanDefinition FactoryMethodName 是配置类的@Bean方法的名字
@Bean的使用
对于第三方的组件类,我们就不能使用自动化装配方案,我们可以使用xml或javaConfig,推荐使用JavaConfig
@Bean可理解为xml里面的标签,如下在配置类添加@Bean注解配置就是装配成功了,此对象就交给spring管理了
/**
     *  可以将一个类的实例(可以干预Bean实例化过程),注册为一个Bean
     *  会自动将返回值作为Bean的类型    将方法名作为bean的名字
     *  @Bean(name = "dd") 设置bean的名字及别名(替换)
     *  @Bean(initMethod = "",destroyMethod = "") =  <bean class="xx" id="xx" init-method="initByConfig" destroy-method="destroyByConfig"></bean>
     */
@Configuration
@ComponentScan
public class BeanConfig {
    @Bean
    public Apple apple(){
        return new Apple();
    }
public class Apple {
    public void say() {
        System.out.println("我是一个苹果");
    }
}
@RunWith(SpringRunner.class)
@ContextConfiguration(classes = {BeanConfig.class})
public class Test2_Bean {
@Autowired
private Apple apple;
@Test
public void test01() {
apple.say();
}
} - 怎么去自动依赖外部Bean:直接在方法里面写上需要依赖的参数即可,不需要写@Autowired
- 怎么去自动依赖配置类内部Bean:直接调用方法即可
-
- 注入内部bean依赖
@Configuration
@ComponentScan
public class BeanConfig {
    @Bean
    public Person person(){
        System.out.println(man().hi());
        return new Person("张三");
    }

    @Bean
    public Man man(){
        return new Man();
    }
}

public class Man {
    public String hi(){
        return "你好";
    }
}

public class Person {
    private String name;

    public String getName() {
        return name;
    }

    public Person(String name) {
        this.name = name;
    }

    public void sayHello(String hi) {
        System.out.println(hi + " ,我是" + getName() );
    }
}
@RunWith(SpringRunner.class)
@ContextConfiguration(classes = {BeanConfig.class})
public class Test2_Bean {
@Autowired
private Person person;
@Test
public void test02(){
person.sayHello("你好");
}
}- Bean之间的依赖 -注入外部Bean - @Import
我们可以使用方法参数来实现该依赖关系,如以下示例所示:
@Configuration
@ComponentScan // 开启注解扫描,要扫@Service标注的Banana
@Import(BeanConfig.class) //引入BeanConfig配置类,Apple在BeanConfig配置
public class Bean2Config {
    @Bean
    public Monkey monkey(Banana banana, Apple apple) {
        return new Monkey(banana.banana(),apple.apple());
    }
}
@RunWith(SpringRunner.class)
@ContextConfiguration(classes = {Bean2Config.class})
public class Test2_Bean {
@Autowired
private Monkey monkey;
@Test
public void test03(){
monkey.eat();
}
}- 接收生命周期回调 initMetohd和destroyMethod
相当于在xml的配置的init-method和destrouy-method
//init-method="initByConfig" destroy-method="destroyByConfig"
@Bean(initMethod = "initByConfig",destroyMethod = "destroyByConfig")
public PayService getPayService(){
    return new PayServiceImpl();
}

public class PayServiceImpl implements PayService {
    @Override
    public void print() {
        System.out.println("@Bean create PayServiceImpl");
    }

    @Override
    public void initByConfig() {
        System.out.println("PayService-初始化");
    }

    @Override
    public void destroyByConfig() {
        System.out.println("PayService-销毁");
}- 指定 Bean 的作用域 @Scope
@Configuration public class MyConfiguration { @Bean @Scope(ConfigurableBeanFactory.SCOPE_PROTOTYPE) public Encryptor encryptor() { // ... } } - 自定义Bean的名字
//默认情况下,配置类使用@Bean方法的名称作为结果bean的名称。
//但是,可以使用name属性覆盖此功能,如以下示例所示:
@Configuration
public class AppConfig {

    @Bean(name = "myThing")
    //多个别名:@Bean(name = { "dataSource", "subsystemA-dataSource", "subsystemB-dataSource" })
    public Thing thing() {
        return new Thing();
    }
}
2、xml方式
在Spring中,很多对象都是单实例的,在日常的开发中,我们经常需要使用某些外部的单实例对象,例如数据库连接池,下面我们来讲解下如何在spring中创建第三方bean实例。
1、导入数据库连接池的pom文件
<dependency>
   <groupId>com.alibaba</groupId>
   <artifactId>druid</artifactId>
   <version>1.1.21</version>
</dependency>
<!-- https://mvnrepository.com/artifact/mysql/mysql-connector-java -->
<dependency>
   <groupId>mysql</groupId>
   <artifactId>mysql-connector-java</artifactId>
   <version>5.1.47</version>
</dependency>
2、编写配置文件
ioc.xml
<?xml version="1.0" encoding="UTF-8"?>
<beans xmlns="http://www.springframework.org/schema/beans"
xmlns:xsi="http://www.w3.org/2001/XMLSchema-instance"
xsi:schemaLocation="http://www.springframework.org/schema/beans http://www.springframework.org/schema/beans/spring-beans.xsd">
<bean id="dataSource" class="com.alibaba.druid.pool.DruidDataSource">
<property name="username" value="root"></property>
<property name="password" value="123456"></property>
<property name="url" value="jdbc:mysql://localhost:3306/demo"></property>
<property name="driverClassName" value="com.mysql.jdbc.Driver"></property>
</bean>
</beans>3、编写测试文件
public class MyTest {
public static void main(String[] args) throws SQLException {
ApplicationContext context = new ClassPathXmlApplicationContext("ioc3.xml");
DruidDataSource dataSource = context.getBean("dataSource", DruidDataSource.class);
System.out.println(dataSource);
System.out.println(dataSource.getConnection());
}
}3、FactoryBean
public class Bnana {
}
@Service
public class BananaBean implements FactoryBean {
@Override
public Banana getObject() {
return new Banana();
}
@Override
public Class<?> getObjectType() {
return Banana.class;
}
}@Service
public class Fruit {
@Autowired
private Bnana Bnana;
}4、导入ImportSelector实现类,可以注册多个bean @Import({MyImportSelector.class})
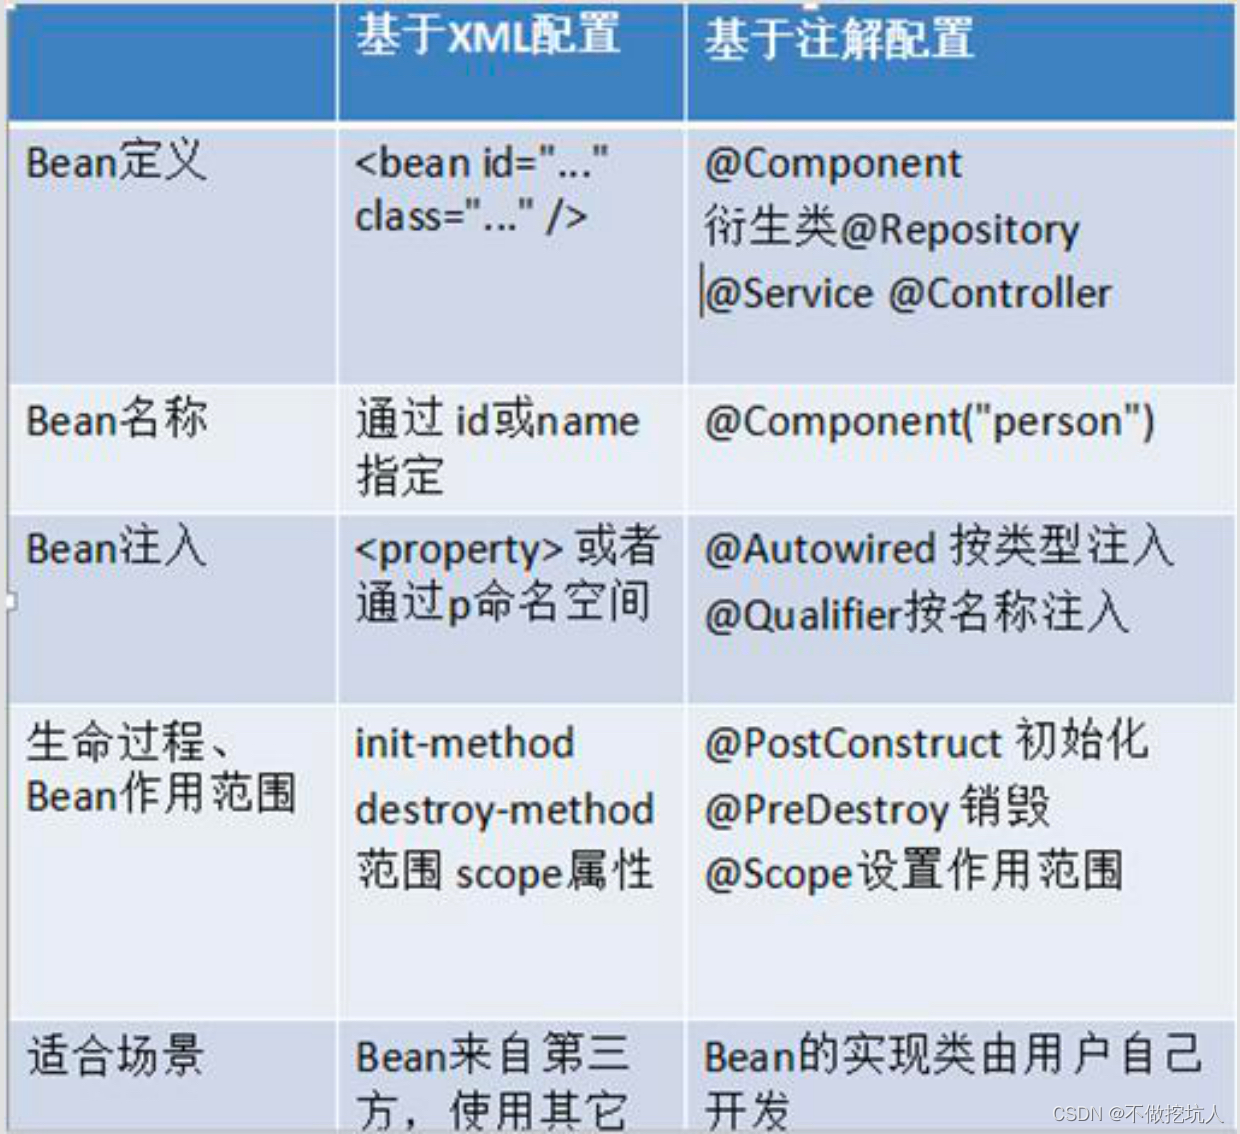
六、Spring Bean 管理的方式注解和xml的比较
七、jdk9以上就废弃了@PostConstruct,如果想继续使用@PostConstruct有两种方法:
1、引入java注解包,
2、现Spring 提供的 InitializingBean和 DisposableBean接口的效果和使用@PostConstruct和@PreDestroy 注解的效果一样。(推荐)

