前提:
可以参考如下两篇文章在window或者linux上,先部署好Apache James
Apache James邮件服务器搭建(linux)_Steven-Russell的博客-CSDN博客
Apache James邮件服务器搭建(windows)_Steven-Russell的博客-CSDN博客
修改配置文件,使得邮件服务器同时支持如下协议
| 端口 | 协议 |
| 25 | smtp |
| 587 | smtp+startTLS |
| 465 | smtps |
编辑 james-server-app-3.5.0/conf/smtpserver.xml
在smtpservers标签中,修改为如下配置,分别代表smtp、smtp+startTLS、smtps三种协议
注意:
- jmxName的名字不能重复
- 博主使用的是Apache James 3.5.0版本,下述的操作仅针对3.5.0版本,其他版本应该修改方法类似,可以对照注释进行修改
- 下述修改重点关注标红部分内容
25端口:smtp
<smtpserver enabled="true">
<jmxName>smtpserver</jmxName>
<bind>0.0.0.0:25</bind>
<connectionBacklog>200</connectionBacklog>
<tls socketTLS="false" startTLS="false">
<keystore>file://conf/keystore</keystore>
<secret>123456</secret>
<provider>org.bouncycastle.jce.provider.BouncyCastleProvider</provider>
<algorithm>SunX509</algorithm>
</tls>
<helloName autodetect="true">st.com</helloName>
<connectiontimeout>360</connectiontimeout>
<connectionLimit>0</connectionLimit>
<connectionLimitPerIP>0</connectionLimitPerIP>
<authorizedAddresses>127.0.0.0/8</authorizedAddresses>
<maxmessagesize>0</maxmessagesize>
<addressBracketsEnforcement>true</addressBracketsEnforcement>
<handlerchain>
<handler class="org.apache.james.smtpserver.fastfail.ValidRcptHandler"/>
<handler class="org.apache.james.smtpserver.CoreCmdHandlerLoader"/>
</handlerchain>
</smtpserver>
587端口:smtp+startTLS
<smtpserver enabled="true">
<jmxName>startTlsserver</jmxName>
<bind>0.0.0.0:587</bind>
<connectionBacklog>200</connectionBacklog>
<tls socketTLS="false" startTLS="true">
<keystore>file://conf/keystore</keystore>
<secret>123456</secret>
<provider>org.bouncycastle.jce.provider.BouncyCastleProvider</provider>
<algorithm>SunX509</algorithm>
</tls>
<helloName autodetect="true">st.com</helloName>
<connectiontimeout>360</connectiontimeout>
<connectionLimit>0</connectionLimit>
<connectionLimitPerIP>0</connectionLimitPerIP>
<authRequired>true</authRequired>
<authorizedAddresses>127.0.0.0/8</authorizedAddresses>
<verifyIdentity>true</verifyIdentity>
<maxmessagesize>0</maxmessagesize>
<addressBracketsEnforcement>true</addressBracketsEnforcement>
<handlerchain>
<handler class="org.apache.james.smtpserver.fastfail.ValidRcptHandler"/>
<handler class="org.apache.james.smtpserver.CoreCmdHandlerLoader"/>
</handlerchain>
</smtpserver>
465端口:smtps
<smtpserver enabled="true">
<jmxName>smtpsserver</jmxName>
<bind>0.0.0.0:465</bind>
<connectionBacklog>200</connectionBacklog>
<tls socketTLS="true" startTLS="false">
<keystore>file://conf/keystore</keystore>
<secret>123456</secret>
<provider>org.bouncycastle.jce.provider.BouncyCastleProvider</provider>
<algorithm>SunX509</algorithm>
</tls>
<helloName autodetect="true">st.com</helloName>
<connectiontimeout>360</connectiontimeout>
<connectionLimit>0</connectionLimit>
<connectionLimitPerIP>0</connectionLimitPerIP>
<authRequired>true</authRequired>
<authorizedAddresses>127.0.0.0/8</authorizedAddresses>
<verifyIdentity>true</verifyIdentity>
<maxmessagesize>0</maxmessagesize>
<addressBracketsEnforcement>true</addressBracketsEnforcement>
<handlerchain>
<handler class="org.apache.james.smtpserver.fastfail.ValidRcptHandler"/>
<handler class="org.apache.james.smtpserver.CoreCmdHandlerLoader"/>
</handlerchain>
</smtpserver>
smtpserver.xml 修改之后的总体内容如下
<?xml version="1.0"?>
<smtpservers>
<smtpserver enabled="true">
<jmxName>smtpserver</jmxName>
<bind>0.0.0.0:25</bind>
<connectionBacklog>200</connectionBacklog>
<tls socketTLS="false" startTLS="false">
<keystore>file://conf/keystore</keystore>
<secret>123456</secret>
<provider>org.bouncycastle.jce.provider.BouncyCastleProvider</provider>
<algorithm>SunX509</algorithm>
</tls>
<helloName autodetect="true">st.com</helloName>
<connectiontimeout>360</connectiontimeout>
<connectionLimit>0</connectionLimit>
<connectionLimitPerIP>0</connectionLimitPerIP>
<authorizedAddresses>127.0.0.0/8</authorizedAddresses>
<maxmessagesize>0</maxmessagesize>
<addressBracketsEnforcement>true</addressBracketsEnforcement>
<handlerchain>
<handler class="org.apache.james.smtpserver.fastfail.ValidRcptHandler"/>
<handler class="org.apache.james.smtpserver.CoreCmdHandlerLoader"/>
</handlerchain>
</smtpserver>
<smtpserver enabled="true">
<jmxName>startTlsserver</jmxName>
<bind>0.0.0.0:587</bind>
<connectionBacklog>200</connectionBacklog>
<tls socketTLS="false" startTLS="true">
<keystore>file://conf/keystore</keystore>
<secret>123456</secret>
<provider>org.bouncycastle.jce.provider.BouncyCastleProvider</provider>
<algorithm>SunX509</algorithm>
</tls>
<helloName autodetect="true">st.com</helloName>
<connectiontimeout>360</connectiontimeout>
<connectionLimit>0</connectionLimit>
<connectionLimitPerIP>0</connectionLimitPerIP>
<authRequired>true</authRequired>
<authorizedAddresses>127.0.0.0/8</authorizedAddresses>
<verifyIdentity>true</verifyIdentity>
<maxmessagesize>0</maxmessagesize>
<addressBracketsEnforcement>true</addressBracketsEnforcement>
<handlerchain>
<handler class="org.apache.james.smtpserver.fastfail.ValidRcptHandler"/>
<handler class="org.apache.james.smtpserver.CoreCmdHandlerLoader"/>
</handlerchain>
</smtpserver>
<smtpserver enabled="true">
<jmxName>smtpsserver</jmxName>
<bind>0.0.0.0:465</bind>
<connectionBacklog>200</connectionBacklog>
<tls socketTLS="true" startTLS="false">
<keystore>file://conf/keystore</keystore>
<secret>123456</secret>
<provider>org.bouncycastle.jce.provider.BouncyCastleProvider</provider>
<algorithm>SunX509</algorithm>
</tls>
<helloName autodetect="true">st.com</helloName>
<connectiontimeout>360</connectiontimeout>
<connectionLimit>0</connectionLimit>
<connectionLimitPerIP>0</connectionLimitPerIP>
<authRequired>true</authRequired>
<authorizedAddresses>127.0.0.0/8</authorizedAddresses>
<verifyIdentity>true</verifyIdentity>
<maxmessagesize>0</maxmessagesize>
<addressBracketsEnforcement>true</addressBracketsEnforcement>
<handlerchain>
<handler class="org.apache.james.smtpserver.fastfail.ValidRcptHandler"/>
<handler class="org.apache.james.smtpserver.CoreCmdHandlerLoader"/>
</handlerchain>
</smtpserver>
</smtpservers>
修改完smtpserver.xml之后,重新启动james,可以查看端口情况如下


之后便可以分别使用不同的端口发送邮件了
curl -ikv --url 'smtps://192.168.133.135:465' --mail-from 'steven@st.com' --mail-rcpt 'russell@st.com' --upload-file /root/email.txt --user 'steven@st.com:123456'
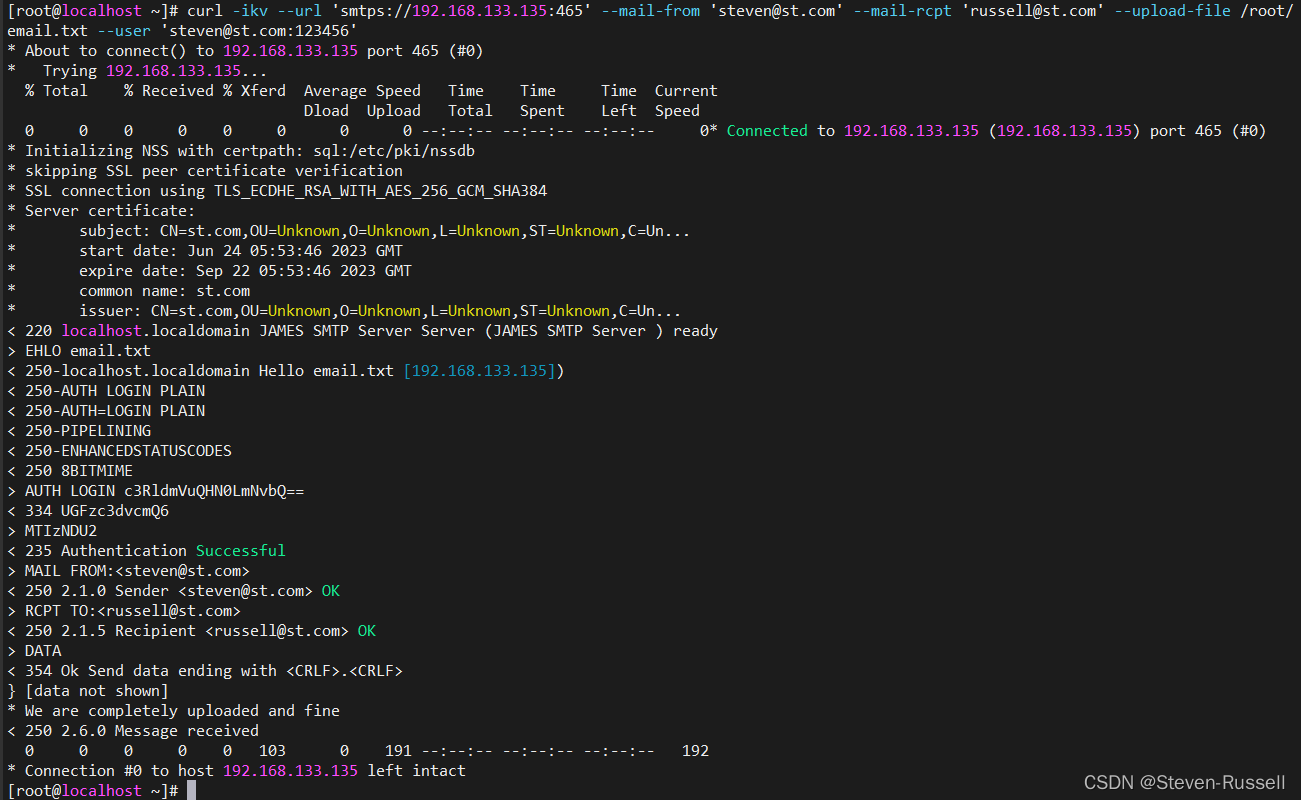
curl -ikv --url 'smtp://192.168.133.135:587' --mail-from 'steven@st.com' --mail-rcpt 'russell@st.com' --upload-file /root/email.txt --user 'steven@st.com:123456'

curl -ikv --url 'smtp://192.168.133.135:25' --mail-from 'steven@st.com' --mail-rcpt 'russell@st.com' --upload-file /root/email.txt --user 'steven@st.com:123456'

当前25端口使用curl命令会报login denied,暂未找到解决办法,但是使用java代码调用时却是没问题的,待后续研究解决
