摘要:为了更加深入的理解动态库的加载初始化过程,本文根据VCRT和Linux-CRT的代码实现详细描述了windows和linux平台下对应动态库加载时会进行哪些工作。本文重点关注全局变量的初始化时机,以及是否有其他额外的操作。
关键字:dll,so,全局变亮,vcrt,crt
读者须知:读者需要有基本的C/C++编程能力,了解C++的二进制可执行文件的生成过程以及生成文件的组成与加载流程。
可执行文件执行用户代码的入口时main函数,在CRT和glibc的实现中其具体入口各不相同。而动态库是另一种形式的可执行文件,其需要被加载到一个已经运行起来的进程的进程空间进行执行。动态库作为可执行的二进制文件其本身也存在全局变量这些需要在程序运行前初始化和程序结束后析构的工作,那么动态库是否也有入口?
本文根据CRT和llvm-cxx的实现详细解析动态库的入口和全局变量等的构造析构工作的执行时机。
1 VCRT动态库入口
1.1 DllMain
CRT的动态库即DLL,其入口为DllMain,下面是MSN上关于DllMain的描述:
DllMain:动态链接库 (DLL) 的可选入口点。 当系统启动或终止进程或线程时,它将使用进程的第一个线程为每个加载的 DLL 调用入口点函数。 使用 LoadLibrary 和 FreeLibrary 函数加载或卸载 DLL 时,系统还会调用 DLL 的入口点函数。
我们看一个简单的例子。下面是动态库的代码:
struct __declspec(dllexport) myclass {
public:
	myclass() {
		std::cout << this << std::endl;
		std::cout << "the myclass class is created" << std::endl;
	}

	~myclass() {
		std::cout << this << std::endl;
		std::cout << "the myclass class is destroyed" << std::endl;
	}
};


myclass cls{};
下面是动态加载的代码:
int main(){
	const auto handle = LoadLibrary(L"add.dll");
	if (handle) {
		std::cout << "delete dll" << std::endl;
		FreeLibrary(handle);
		std::cout << "dll has been deleted" << std::endl;
	}

	return 0;
}
执行文的输出为:
519AE138
the myclass class is created
the dll main 1
delete dll
the dll main 0
519AE138
the myclass class is destroyed
dll has been deleted
从上面的行为中我们可以看出DllMain的行为和main函数类似,全局变量的初始化和析构都是在动态库加载和卸载时发生的。
1.2 CRT Dll实现
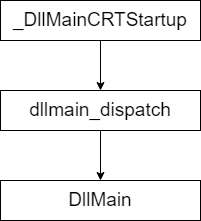
在上面的实验中我们已经理解Dll的入口和全局变量的初始化时机,我们简单看下DllMain调用之前的CRT实现,具体代码直接从VS的VCRuntime中找就可以。其大致的流程如下,_DllMainCRTStartup->dllmain_dispatch->DllMain,如论动态库的加载还是卸载都会调用该函数。
_DllMainCRTStartup
_DllMainCRTStartup本身没有什么,就是dllmain_dispatch的包装,我们具体看下dllmain_dispatch中都做了哪些工作。
前三行就是检查当前动态库已经被加载的数量,而__proc_attached是一个全局静态变量,表明当前动态库的引用计数。
下面的代码都是调用了dllmain_crt_dispatch和dllmain_raw,如果是attach二者的调用顺序为dllmain_raw->dllmain_crt_dispatch;如果为detach为dllmain_crt_dispatch->dllmain_raw。
static BOOL __cdecl dllmain_dispatch(
    HINSTANCE const instance,
    DWORD     const reason,
    LPVOID    const reserved
    )
{
    // If this is a process detach notification, check that there was a prior
    // process attach notification that was processed successfully.  This is
    // to ensure that we don't detach more times than we attach.
    if (reason == DLL_PROCESS_DETACH && __proc_attached <= 0)
    {
        return FALSE;
    }

    BOOL result = TRUE;
    __try
    {
        if (reason == DLL_PROCESS_ATTACH || reason == DLL_THREAD_ATTACH)
        {
            result = dllmain_raw(instance, reason, reserved);
            if (!result)
                __leave;

            result = dllmain_crt_dispatch(instance, reason, reserved);
            if (!result)
                __leave;
        }

        result = DllMain(instance, reason, reserved);

        // If the client DllMain routine failed, unwind the initialization:
        if (reason == DLL_PROCESS_ATTACH && !result)
        {
            DllMain(instance, DLL_PROCESS_DETACH, reserved);
            dllmain_crt_dispatch(instance, DLL_PROCESS_DETACH, reserved);
            dllmain_raw(instance, DLL_PROCESS_DETACH, reserved);
        }

        if (reason == DLL_PROCESS_DETACH || reason == DLL_THREAD_DETACH)
        {
            result = dllmain_crt_dispatch(instance, reason, reserved);
            if (!result)
                __leave;

            result = dllmain_raw(instance, reason, reserved);
            if (!result)
                __leave;
        }
    }
    __except(__scrt_dllmain_exception_filter(
        instance,
        reason,
        reserved,
        dllmain_crt_dispatch,
        GetExceptionCode(),
        GetExceptionInformation()))
    {
        result = FALSE;
    }

    return result;
}
dllmain_raw
dllmain_raw内部只调用了_pRawDllMain,这是一个外部符号,如果用户自己定义了则动态库加载前会先调用这个函数,否则什么也不做。比如:
BOOL WINAPI my_scrt_dllmain_type(HINSTANCE a , DWORD b, LPVOID c) {
	printf("the dll main my_scrt_dllmain_type\n");
	return TRUE;
}

extern "C" __scrt_dllmain_type const _pRawDllMain = my_scrt_dllmain_type;
dllmain_crt_process_attach
dllmain_crt_process_attach内部根据当前的状态不同分别调用dllmain_crt_process_attach,dllmain_crt_process_detach,__scrt_dllmain_crt_thread_attach,__scrt_dllmain_crt_thread_detach,我们主要关注前两个函数,对其他细节不必太深究。
下面的代码会用注释的方式来简单梳理下调用流程:
static BOOL __cdecl dllmain_crt_process_attach(HMODULE const instance,
    LPVOID const reserved)
{
    if (!__scrt_initialize_crt(__scrt_module_type::dll))
        return FALSE;
    //请求锁
    bool const is_nested = __scrt_acquire_startup_lock();
    bool fail = true;
    __try
    {
        if (__scrt_current_native_startup_state != __scrt_native_startup_state::uninitialized)
            __scrt_fastfail(FAST_FAIL_FATAL_APP_EXIT);

        __scrt_current_native_startup_state = __scrt_native_startup_state::initializing;
        //内部会调用_initialize_onexit_table分别初始化module_local_atexit_table和module_local_at_quick_exit_table两个DLL卸载时的函数指针表格,一般为全局变量的析构函数,用户也可以主动注册。
        if (!__scrt_dllmain_before_initialize_c())
            __leave;

        #ifdef _RTC
        _RTC_Initialize();
        #endif
        //初始化全局的typeinfo链表
        __scrt_initialize_type_info();
        //初始化标准输入输出的一些基本的选项,基本不同关心
        __scrt_initialize_default_local_stdio_options();
        //和exe相同遍历C的初始化函数指针表格,一般为全局变量的初始化函数
        if (_initterm_e(__xi_a, __xi_z) != 0)
            __leave;
        //环境变量之类的初始化
        if (!__scrt_dllmain_after_initialize_c())
            __leave;
        //遍历C++的初始化函数指针表格,一般为全局变量的构造函数之类
        _initterm(__xc_a, __xc_z);

        __scrt_current_native_startup_state = __scrt_native_startup_state::initialized;
        fail = false;
    }
    __finally
    {   //释放锁
        __scrt_release_startup_lock(is_nested);
    }
    if (fail)
        return FALSE;

    // If we have any dynamically initialized __declspec(thread) variables, we
    // invoke their initialization for the thread on which the DLL is being
    // loaded.  We cannot rely on the OS performing the initialization with the
    // DLL_PROCESS_ATTACH notification because, on Windows Server 2003 and below,
    // that call happens before the CRT is initialized.
    PIMAGE_TLS_CALLBACK const* const tls_init_callback = __scrt_get_dyn_tls_init_callback();
    if (*tls_init_callback != nullptr && __scrt_is_nonwritable_in_current_image(tls_init_callback))
    {
        (*tls_init_callback)(instance, DLL_THREAD_ATTACH, reserved);
    }
    //引用计数+1
    ++__proc_attached;
    return TRUE;
}
dllmain_crt_process_detach就和attach基本类似只不过调用顺序上相反而已。
1.3 DLL调用时序
从上面的实现中,我们简单整理下DLL加载和卸载时的调用顺序:
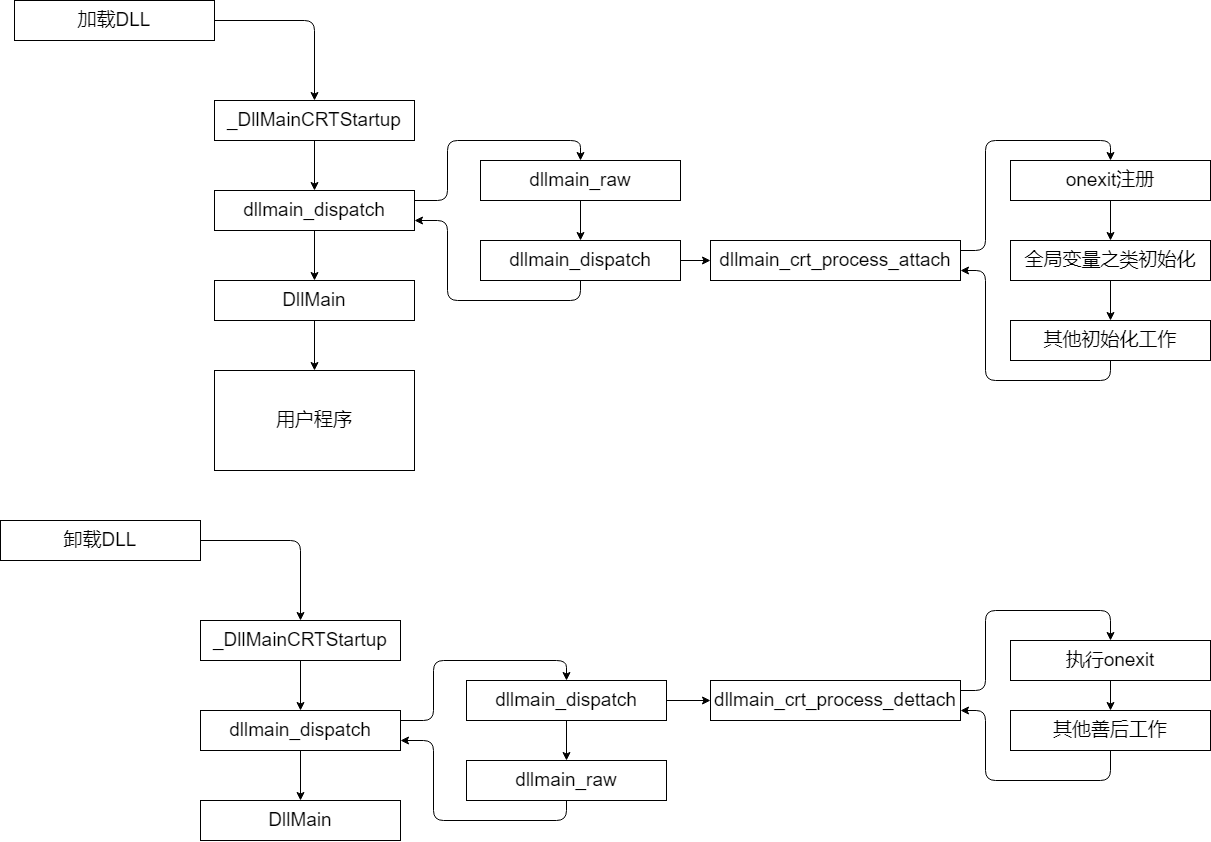
从上面的时序中可以看出我们有两个入口dllmain_raw和DllMain,前者是动态库刚进内存什么也没做,后者是已经完成初始化工作了,出口类似。
2 Linux CRT动态库入口
2.1 SO CRT入口
在详细介绍Linux CRT动态库加载的函数执行之前我们先看个例子:
//add.h
#pragma once
#include <cstdio>
class A{
public:
    A();
    ~A();
};

__attribute__((visibility ("default"))) void func();

//add.cpp
#include "add.h"
A a;
A::A(){
    printf("a class constructor function \n");
}

A::~A(){
    printf("a class destructor function\n");
}

void func(){
    printf("func\n");
}

//a.h
#pragma once
__attribute__ ((constructor)) void foo(void);
__attribute__((destructor))void after();
//a.cpp
#include "a.h"
#include <cstdio>
class B{
    public:
        B(){
            printf("B is contructor");
        }
};

B b;
void foo(void){
        printf("foo is running and printf is available at this point\n");
}

void after(){
     printf("this is my custome after destructor\n");
}
//main.cpp
#include <stdlib.h>
#include <dlfcn.h>
#include <stdio.h>

typedef void (*func)();

int main(int argc, char **argv){
    const char *f = "./libadd.so";
    auto p = dlopen(f, RTLD_NOW);
    printf("load library %p \n%s\n", p, dlerror());
    dlclose(p);
    printf("the lib is unload\n");
    return 0;
}
四个文件链接为一个动态库然后动态加载执行的结果:
a class constructor function
foo is running and printf is available at this point
B is contructorload library
this is my custome after destructor
a class destructor function
the lib is unload
动态库文件的反汇编这里就不贴了太长了,基本结构和可执行文件差不多。然后我们在类B的构造函数处断点下看看堆栈:
#0  B::B (this=0x7ffff7fc805a <b>) at a.cpp:6
#1  0x00007ffff7fc50f0 in __cxx_global_var_init () at a.cpp:10
#2  0x00007ffff7fc5109 in _GLOBAL__sub_I_a.cpp () from ./libadd.so
#3  0x00007ffff7fe0b9a in call_init (l=<optimized out>, argc=argc@entry=1, argv=argv@entry=0x7fffffffe258, env=env@entry=0x7fffffffe268) at dl-init.c:72
#4  0x00007ffff7fe0ca1 in call_init (env=0x7fffffffe268, argv=0x7fffffffe258, argc=1, l=<optimized out>) at dl-init.c:30
#5  _dl_init (main_map=0x416ed0, argc=1, argv=0x7fffffffe258, env=0x7fffffffe268) at dl-init.c:119
#6  0x00007ffff7bd1985 in __GI__dl_catch_exception (exception=<optimized out>, operate=<optimized out>, args=<optimized out>) at dl-error-skeleton.c:182
#7  0x00007ffff7fe50cf in dl_open_worker (a=a@entry=0x7fffffffded0) at dl-open.c:758
#8  0x00007ffff7bd1928 in __GI__dl_catch_exception (exception=<optimized out>, operate=<optimized out>, args=<optimized out>) at dl-error-skeleton.c:208
#9  0x00007ffff7fe460a in _dl_open (file=0x402004 "./libadd.so", mode=-2147483646, caller_dlopen=<optimized out>, nsid=-2, argc=1, argv=0x7fffffffe258, env=0x7fffffffe268) at dl-open.c:837
#10 0x00007ffff7fb034c in dlopen_doit (a=a@entry=0x7fffffffe0f0) at dlopen.c:66
#11 0x00007ffff7bd1928 in __GI__dl_catch_exception (exception=exception@entry=0x7fffffffe090, operate=<optimized out>, args=<optimized out>) at dl-error-skeleton.c:208
#12 0x00007ffff7bd19f3 in __GI__dl_catch_error (objname=0x7ffff7fb40f0 <last_result+16>, errstring=0x7ffff7fb40f8 <last_result+24>, mallocedp=0x7ffff7fb40e8 <last_result+8>, operate=<optimized out>, args=<optimized out>) at dl-error-skeleton.c:227
#13 0x00007ffff7fb0b59 in _dlerror_run (operate=operate@entry=0x7ffff7fb02f0 <dlopen_doit>, args=args@entry=0x7fffffffe0f0) at dlerror.c:170
#14 0x00007ffff7fb03da in __dlopen (file=<optimized out>, mode=<optimized out>) at dlopen.c:87
#15 0x0000000000401192 in main (argc=1, argv=0x7fffffffe258) at main.cpp:9
从上面的堆栈我们能够清晰的看到初始化函数的调用实际以及反汇编中看到析构函数的注册实际和构造函数调用时机相同。
#0  A::~A (this=0x7ffff7fc8059 <a>) at add.cpp:9
#1  0x00007ffff7ab7fde in __cxa_finalize (d=0x7ffff7fc8048) at cxa_finalize.c:83
#2  0x00007ffff7fc51a7 in __do_global_dtors_aux () from ./libadd.so
#3  0x00007ffff7fc7dc8 in __frame_dummy_init_array_entry () from ./libadd.so
#4  0x00007ffff7fe5952 in call_destructors (closure=closure@entry=0x416ed0) at dl-close.c:125
#5  0x00007ffff7bd1985 in __GI__dl_catch_exception (exception=<optimized out>, operate=<optimized out>, args=<optimized out>) at dl-error-skeleton.c:182
#6  0x00007ffff7fe5f36 in _dl_close_worker (map=map@entry=0x416ed0, force=force@entry=false) at dl-close.c:297
#7  0x00007ffff7fe6f05 in _dl_close_worker (force=false, map=0x416ed0) at dl-close.c:145
#8  _dl_close (_map=0x416ed0) at dl-close.c:859
#9  0x00007ffff7bd1928 in __GI__dl_catch_exception (exception=exception@entry=0x7fffffffe0c0, operate=<optimized out>, args=<optimized out>) at dl-error-skeleton.c:208
#10 0x00007ffff7bd19f3 in __GI__dl_catch_error (objname=0x7ffff7fb40f0 <last_result+16>, errstring=0x7ffff7fb40f8 <last_result+24>, mallocedp=0x7ffff7fb40e8 <last_result+8>, operate=<optimized out>, args=<optimized out>) at dl-error-skeleton.c:227
#11 0x00007ffff7fb0b59 in _dlerror_run (operate=operate@entry=0x7ffff7fb0420 <dlclose_doit>, args=0x416ed0) at dlerror.c:170
#12 0x00007ffff7fb0468 in __dlclose (handle=<optimized out>) at dlclose.c:46
#13 0x00000000004011c4 in main (argc=1, argv=0x7fffffffe258) at main.cpp:11
2.2 so加载实现
dlopen的时候会遍历每个section的初始化段,然后在call_init中遍历初始化函数,比如全局变量的构造函数。从上面的反汇编可以看到编译器为每个编译单元都生成了对应的seciton其名字为_GLOBAL__sub_I_***.cpp,dlopen时需要遍历每个编译单元然后依次调用每个编译单元中的对应的构造函数和标记为需要在load时运行的函数。
void
_dl_init (struct link_map *main_map, int argc, char **argv, char **env)
{
  ElfW(Dyn) *preinit_array = main_map->l_info[DT_PREINIT_ARRAY];
  ElfW(Dyn) *preinit_array_size = main_map->l_info[DT_PREINIT_ARRAYSZ];
  unsigned int i;

  if (__glibc_unlikely (GL(dl_initfirst) != NULL))
    {
      call_init (GL(dl_initfirst), argc, argv, env);
      GL(dl_initfirst) = NULL;
    }

  /* Don't do anything if there is no preinit array.  */
  if (__builtin_expect (preinit_array != NULL, 0)
      && preinit_array_size != NULL
      && (i = preinit_array_size->d_un.d_val / sizeof (ElfW(Addr))) > 0)
    {
      ElfW(Addr) *addrs;
      unsigned int cnt;

      if (__glibc_unlikely (GLRO(dl_debug_mask) & DL_DEBUG_IMPCALLS))
	_dl_debug_printf ("\ncalling preinit: %s\n\n",
			  DSO_FILENAME (main_map->l_name));

      addrs = (ElfW(Addr) *) (preinit_array->d_un.d_ptr + main_map->l_addr);
      for (cnt = 0; cnt < i; ++cnt)
	((init_t) addrs[cnt]) (argc, argv, env);
    }

  /* Stupid users forced the ELF specification to be changed.  It now
     says that the dynamic loader is responsible for determining the
     order in which the constructors have to run.  The constructors
     for all dependencies of an object must run before the constructor
     for the object itself.  Circular dependencies are left unspecified.

     This is highly questionable since it puts the burden on the dynamic
     loader which has to find the dependencies at runtime instead of
     letting the user do it right.  Stupidity rules!  */

  i = main_map->l_searchlist.r_nlist;
  while (i-- > 0)
    call_init (main_map->l_initfini[i], argc, argv, env);

#ifndef HAVE_INLINED_SYSCALLS
  /* Finished starting up.  */
  _dl_starting_up = 0;
#endif
}
dlclose时类似:
static void
call_destructors (void *closure)
{
  struct link_map *map = closure;

  if (map->l_info[DT_FINI_ARRAY] != NULL)
    {
      ElfW(Addr) *array =
	(ElfW(Addr) *) (map->l_addr
			+ map->l_info[DT_FINI_ARRAY]->d_un.d_ptr);
      unsigned int sz = (map->l_info[DT_FINI_ARRAYSZ]->d_un.d_val
			 / sizeof (ElfW(Addr)));

      while (sz-- > 0)
	((fini_t) array[sz]) ();
    }

  /* Next try the old-style destructor.  */
  if (map->l_info[DT_FINI] != NULL)
    DL_CALL_DT_FINI (map, ((void *) map->l_addr
			   + map->l_info[DT_FINI]->d_un.d_ptr));
}
参考文献
- DllMain
- quick-exit