文章目录
- 网络知识点
- IP地址
- IPv4和IPv6
- 端口号(协议端口)
- 端口分类
- UDP端口和TCP端口
- network
- pro文件
- .h文件
- .cpp文件
- UDP连接
- 绑定端口
- 绑定成功后等待对方进行连接
- 点击发送
- 源码
- 扩展: nodejs-udp服务端(用于跟QT程序进行通信)
- 现象
网络知识点
IP地址
192.168.127.170(√)
192.168.330.170(×)
IP地址的范围在
0~255
IPv4和IPv6
IPv4:32位(4个字节)
IPv6: 128位(16个字节)。新技术是漫游IP(就是多个局域网进行切换的时候,保持同一个IP地址不变),IPv6解决了IPv4面临枯竭的问题
v4和v6都是IP的版本的意思
端口号(协议端口)
16位(2个字节 short 1~65535)
端口分类
- 通用端口: 1~1023(一般由系统来维护)
- 注册端口: 1024~49151(应用,开发者来申请,建议使用5000以上端口号)
- 临时端口: 49152~65535(通用和注册端口号都是给服务端的,这个临时端口号是给客户端的)
UDP端口和TCP端口
network
pro文件
QT += network
我写在了``中
.h文件
#ifndef MAINWINDOW_H
#define MAINWINDOW_H

#include <QMainWindow>
#include <timeclock.h>
#include <QtNetwork>
#include <QNetworkRequest>
#include <QNetworkReply>
#include <QNetworkAccessManager>

namespace Ui {
class MainWindow;
}

class MainWindow : public QMainWindow
{
    Q_OBJECT

public:
    explicit MainWindow(QWidget *parent = 0);
    ~MainWindow();
private:
    QUrl url;
    QNetworkRequest req;
    QNetworkReply *reply;
    QNetworkAccessManager *manager;
private:
    Ui::MainWindow *ui;
    void startRequest(const QUrl &requestedUrl);
    void replyFinished();
};

#endif // MAINWINDOW_H
.cpp文件
void MainWindow::startRequest(const QUrl &requestedUrl){
    url = requestedUrl;
    manager = new QNetworkAccessManager(this);
    req.setUrl(url);
    req.setRawHeader("Accept","text/html,application/xhtml+xml,application/xml;q=0.9,image/avif,image/webp,image/apng,*/*;q=0.8,application/signed-exchange;v=b3;q=0.9");
    req.setRawHeader("User-Agent","Mozilla/5.0 (Windows NT 10.0) AppleWebKit/537.36 (KHTML, like Gecko) Chrome/86.0.4240.198 Safari/537.36");
    reply = manager->get(req);
    connect(reply,&QNetworkReply::finished,this,&MainWindow::replyFinished);
}

void MainWindow::replyFinished(){

    // <1>判断有没有错误
    if (reply->error()){
        qDebug()<<reply->errorString();
        reply->deleteLater();
        return;
    }

    // <2>检测状态码
    int statusCode  = reply->attribute(QNetworkRequest::HttpStatusCodeAttribute).toInt();
    qDebug() << "statusCode:" << statusCode;

    // <3>判断是否需要重定向
    if (statusCode >= 200 && statusCode <300){
        // ok

        // 准备读数据
        QTextCodec *codec = QTextCodec::codecForName("utf8");
        QString all = codec->toUnicode(reply->readAll());
        qDebug() << all;


        // 保存HTTP响应内容
        // 组装保存的文件名 文件名格式: 路径/年_月_日 小时_分_秒 httpfile.html
        QDateTime current_date_time =QDateTime::currentDateTime();
        QString current_date =current_date_time.toString("yyyy_MM_dd hh_mm_ss");
        QString filePath = "D:/Qt/QTtest/qt4/myHTTP/doc";
        QString fileName = filePath + '/' + current_date + " httpfile" + ".html";

        QFile file(fileName);
        if (!file.open(QIODevice::ReadWrite | QIODevice::Text)){
            qDebug() << "file open error!";
            return ;
        }
        QTextStream out(&file);
        out.setCodec("UTF-8");
        out<<all << endl;
        file.close();


        // 数据读取完成之后,清除reply
        reply->deleteLater();
        reply = nullptr;

    } else if (statusCode >=300 && statusCode <400){
        // redirect

        // 获取重定向信息
        const QVariant redirectionTarget = reply->attribute(QNetworkRequest::RedirectionTargetAttribute);
        // 检测是否需要重定向,如果不需要则读数据
        if (!redirectionTarget.isNull()) {
            const QUrl redirectedUrl = url.resolved(redirectionTarget.toUrl());

            reply->deleteLater();
            reply = nullptr;

            startRequest(redirectedUrl);
            qDebug()<< "http redirect to " << redirectedUrl.toString();
            return;
        }


    }

}
设置连接的URL
startRequest(QUrl(link));
UDP连接
绑定端口
udpSocket = new QUdpSocket(this);

/*
bind:绑定端口
QHostAddress::Any : 本机下所有的端口
udpSocket->bind(address,port);
*/
udpSocket->bind(QHostAddress::Any,9000);
绑定成功后等待对方进行连接
connect(udpSocket,&QUdpSocket::readyRead,this,&MainWindow::dealMsg);

void MainWindow::dealMsg(){
    //接收信息
    char buf[1024] = {0};
    QHostAddress ip;
    quint16 port;
    //readDatagram(数据缓存地址,缓存的数据大小,对方ip,对方端口)
    quint16 len = udpSocket->readDatagram(buf,sizeof(buf),&ip,&port);
    if(len > 0){
        //说明有接收,小于0是出错
        //显示
        QString str = QString("[%1:%2] %3")
                .arg(ip.toString())
                .arg(port)
                .arg(buf);

        ui->textEdit->append(str);
    }
}
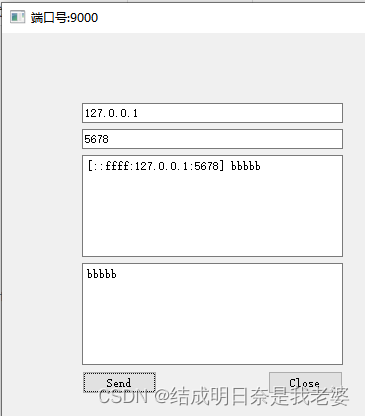
点击发送
void MainWindow::on_buttonSend_clicked(){
  if(ui->lineEditIP == nullptr|| ui->lineEditPort == nullptr){
    return;
  }
  QString ip = ui->lineEditIP->text();
  quint16 port = ui->lineEditPort->text().toInt();
  //读取编辑区内容
  if(ui->textEditWrite == nullptr){
      return;
  }
  QString str = ui->textEditWrite->toPlainText();
  //写入套接字
  udpSocket->writeDatagram(str.toUtf8(),QHostAddress(ip),port);
  qDebug() << "send ip:" << ip;
  qDebug() << "send port:" << port;

}
源码
#include "mainwindow.h"
#include "ui_mainwindow.h"
#include <QDebug>

MainWindow::MainWindow(QWidget *parent)
    : QMainWindow(parent)
    , ui(new Ui::MainWindow)
{

    ui->setupUi(this);
    ui->textEdit->setReadOnly(true);//设置为只读

    setWindowTitle("端口号:9000");
    udpSocket = new QUdpSocket(this);

    /*
    bind:绑定端口
    QHostAddress::Any : 本机下所有的端口
    udpSocket->bind(address,port);
    */
    udpSocket->bind(QHostAddress::Any,9000);

    connect(udpSocket,&QUdpSocket::readyRead,this,&MainWindow::dealMsg);
    connect(ui->send,&QPushButton::clicked,this,&MainWindow::on_buttonSend_clicked);
}

MainWindow::~MainWindow()
{
    delete ui;
}

void MainWindow::dealMsg(){
    //接收信息
    char buf[1024] = {0};
    QHostAddress ip;
    quint16 port;
    //readDatagram(数据缓存地址,缓存的数据大小,对方ip,对方端口)
    quint16 len = udpSocket->readDatagram(buf,sizeof(buf),&ip,&port);
    if(len > 0){
        //说明有接收,小于0是出错
        //显示
        QString str = QString("[%1:%2] %3")
                .arg(ip.toString())
                .arg(port)
                .arg(buf);

        qDebug() << "ip:" << ip;
        qDebug() << "port:" << port;

        ui->textEdit->append(str);
    }
}

void MainWindow::on_buttonSend_clicked(){
  if(ui->lineEditIP == nullptr|| ui->lineEditPort == nullptr){
    return;
  }
  QString ip = ui->lineEditIP->text();
  quint16 port = ui->lineEditPort->text().toInt();
  //读取编辑区内容
  if(ui->textEditWrite == nullptr){
      return;
  }
  QString str = ui->textEditWrite->toPlainText();
  //写入套接字
  udpSocket->writeDatagram(str.toUtf8(),QHostAddress(ip),port);
  qDebug() << "send ip:" << ip;
  qDebug() << "send port:" << port;

}

void MainWindow::on_buttonClose_clicked(){

}
#ifndef MAINWINDOW_H
#define MAINWINDOW_H

#include <QMainWindow>
#include <QUdpSocket>
#include <QHostAddress>
#include <QLabel>
#include <QPushButton>

QT_BEGIN_NAMESPACE
namespace Ui { class MainWindow; }
QT_END_NAMESPACE

class MainWindow : public QMainWindow
{
    Q_OBJECT

public:
    MainWindow(QWidget *parent = nullptr);
    ~MainWindow();

private:
    Ui::MainWindow *ui;
    QUdpSocket *udpSocket;
    void on_buttonSend_clicked();
    void on_buttonClose_clicked();
private slots:
    void dealMsg();
};
#endif // MAINWINDOW_H
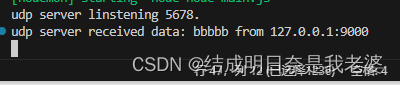
扩展: nodejs-udp服务端(用于跟QT程序进行通信)
npm i express
//服务端
const dgram = require('dgram');
//创建udp server
let udp_server = dgram.createSocket('udp4');
udp_server.bind(5678);//绑定端口

//监听端口
udp_server.on('listening',function(){
    console.log('udp server linstening 5678.');
})

//接收消息
udp_server.on('message', function (msg, rinfo) {
    strmsg = msg.toString();
    udp_server.send(strmsg, 0, strmsg.length, rinfo.port, rinfo.address); //将接收到的消息返回给客户端
    console.log(`udp server received data: ${strmsg} from ${rinfo.address}:${rinfo.port}`)
})
//错误处理
udp_server.on('error', function (err) {
    console.log('some error on udp server.')
    udp_server.close();
})

//客户端
/* var dgram = require('dgram');
var udp_client = dgram.createSocket('udp4');

udp_client.on('close',function(){
    console.log('udp client closed.')
})

//错误处理
udp_client.on('error', function () {
    console.log('some error on udp client.')
})

// 接收消息
udp_client.on('message', function (msg,rinfo) {
    console.log(`receive message from ${rinfo.address}:${rinfo.port}:${msg}`);
})

//定时向服务器发送消息
setInterval(function(){
    var SendBuff = 'hello 123.';
    var SendLen = SendBuff.length;
    udp_client.send(SendBuff, 0, SendLen, 5678, '172.30.20.10');
},3000); */
npm run start
现象