a computer vision-powered document scanner
计算机视觉驱动的文档扫描仪,三个步骤:
- 边缘检测edges
- 通过边缘,找到代表待扫描纸张的轮廓contour
- 应用透视转换(a perspective transform)获得文档自上而下的视图
How to Build a Kick-Ass Mobile Document Scanner
如何构建Kick Ass移动文档扫描仪
# import the necessary packages
from transform import four_point_transform #具体函数代码见结尾
from skimage.filters import threshold_local #帮助获得扫描图像的"黑白"的感觉
import numpy as np
import argparse
import cv2
import imutils
# construct the argument parser and parse the arguments
ap = argparse.ArgumentParser()
ap.add_argument("-i", "--image", required = True,
	help = "Path to the image to be scanned")
args = vars(ap.parse_args())
step1:edge detection
# 1.边缘检测
# load the image and compute the ratio of the old height to the new height,
# clone it, and resize it
image = cv2.imread(args["image"])
ratio = image.shape[0] / 500.0
#image.shape[0]返回图像高度,500是新高度,ratio是新旧高度的比率
orig = image.copy()
image = imutils.resize(image, height = 500)
#保留横纵比 aspect ratio 的缩放
#缩放是为了加快图像处理速度,并使边缘检测步骤更加准确

# convert the image to grayscale, blur it,
# and find edges in the image
gray = cv2.cvtColor(image, cv2.COLOR_BGR2GRAY)
gray = cv2.GaussianBlur(gray, (5, 5), 0)# 高斯模糊,减少图像中的噪声和细节
edged = cv2.Canny(gray, 75, 200)# 边缘检测,指定阈值,

# show the original image and the edge detected image
print("STEP 1: Edge Detection")
cv2.imshow("Image", image)
cv2.imshow("Edged", edged)
cv2.waitKey(0)
cv2.destroyAllWindows()
2. Finding Contours
文档扫描只需要扫描一张纸,假设纸是一个矩形,矩形有四个边。
因此可以创建一个启发式方法帮助构建:假设图像中正好有四个点的最大轮廓是我们要扫描的一张纸,这是一个相当安全的假设–该程序至少假设你想扫描的文档是图像的主要焦点,假设这张纸有四个边缘是安全的。
#2. 寻找轮廓
# find the contours in the edged image, keeping only the
# largest ones, and initialize the screen contour
# 在边缘图像中找轮廓(只保留最大的),并初始化屏幕轮廓
cnts = cv2.findContours(edged.copy(), cv2.RETR_LIST, cv2.CHAIN_APPROX_SIMPLE)
# 找边缘图像 edged 的轮廓,cv2.RETR_LIST 表示检测所有轮廓,并将它们存储在列表中
# cv2.CHAIN_APPROX_SIMPLE 表示使用简化的轮廓表示方式来节省内存空间
cnts = imutils.grab_contours(cnts)	# 从轮廓结果中提取实际的轮廓
cnts = sorted(cnts, key = cv2.contourArea, reverse = True)[:5]
# 对轮廓进行排序,按照轮廓的面积从大到小进行排序。
# cv2.contourArea 计算轮廓的面积的函数
# reverse=True 表示降序排序,[:5] 表示仅保留排序后的前五个轮廓

# loop over the contours
# 对每个轮廓,逼近轮廓形状并判断是否为一个矩形
for c in cnts:
	# approximate the contour 近似轮廓
	peri = cv2.arcLength(c, True)	#计算轮廓周长,True表示轮廓闭合
	approx = cv2.approxPolyDP(c, 0.02 * peri, True)
	# cv2.approxPolyDP 函数对轮廓 c 进行多边形逼近
	# 0.02 * peri 是逼近精度的参数,它乘以周长,表示逼近的最大误差容限。
	# True 表示逼近的多边形是闭合的

	# if our approximated contour has four points, 有四个顶点
	# then we can assume that we have found our screen 即找到
	if len(approx) == 4:
		screenCnt = approx	#轮廓保存
		break
# show the contour (outline) of the piece of paper
print("STEP 2: Find contours of paper")
cv2.drawContours(image, [screenCnt], -1, (0, 255, 0), 2)
# 在图像中绘制轮廓,[screenCnt]轮廓列表,轮廓索引-1表示绘制所有,“(0, 255, 0), 2”颜色和厚度
cv2.imshow("Outline", image)
cv2.waitKey(0)
cv2.destroyAllWindows()
3. Apply a Perspective Transform & Threshold
# 3. 应用透视变换和阈值
# 获得鸟瞰图
# apply the four point transform 通过2得到的矩形四个点
# to obtain a top-down view of the original image 获得原始图像的视图
warped = four_point_transform(orig, screenCnt.reshape(4, 2) * ratio)
# screenCnt.reshape(4, 2) 将矩形轮廓的形状变换为 (4, 2) 的数组
# 其中每一行表示一个顶点的 x 和 y 坐标。
# 每个顶点的坐标值乘以比例因子 ratio,用于根据之前计算的缩放比例将顶点坐标进行缩放
# 传入:原始图像和轮廓

# convert the warped image to grayscale, then threshold it
# to give it that 'black and white' paper effect
warped = cv2.cvtColor(warped, cv2.COLOR_BGR2GRAY)	# 转灰度
T = threshold_local(warped, 11, offset = 10, method = "gaussian")	#设置阈值,展示“黑白”的效果
warped = (warped > T).astype("uint8") * 255
# show the original and scanned images
print("STEP 3: Apply perspective transform")
cv2.imshow("Original", imutils.resize(orig, height = 650))
cv2.imshow("Scanned", imutils.resize(warped, height = 650))
cv2.waitKey(0)


# python scan.py --image 2.jpeg
注:图像透视函数four_point_transform
图像透视是一种图像处理技术,用于将一个平面上的图像转换为另一个平面上的图像,以使得在透视变换后的图像中,原本在不同深度或角度上的物体能够以更合适的形状和位置呈现。
透视变换通常用于校正或纠正透视失真,即当相机以不同角度拍摄或观察物体时,由于透视效应,物体在图像中呈现出畸变的形状。透视失真常见于建筑物或场景的图像中,其中平行线在现实世界中是平行的,但在图像中却呈现为相交或发散的形式。
通过应用透视变换,可以将图像中的平行线重新变为平行,并恢复物体的真实形状。透视变换基于多个关键点或参考点的位置来计算变换矩阵,以便在变换后的图像中校正透视失真。
透视解释引用:https://zhuanlan.zhihu.com/p/381225693
透视,是用于表现真实环境中三维立体以及空间距离关系的概念。关于这个概念有两个最重要的知识点,近大远小和空间纵深。
-
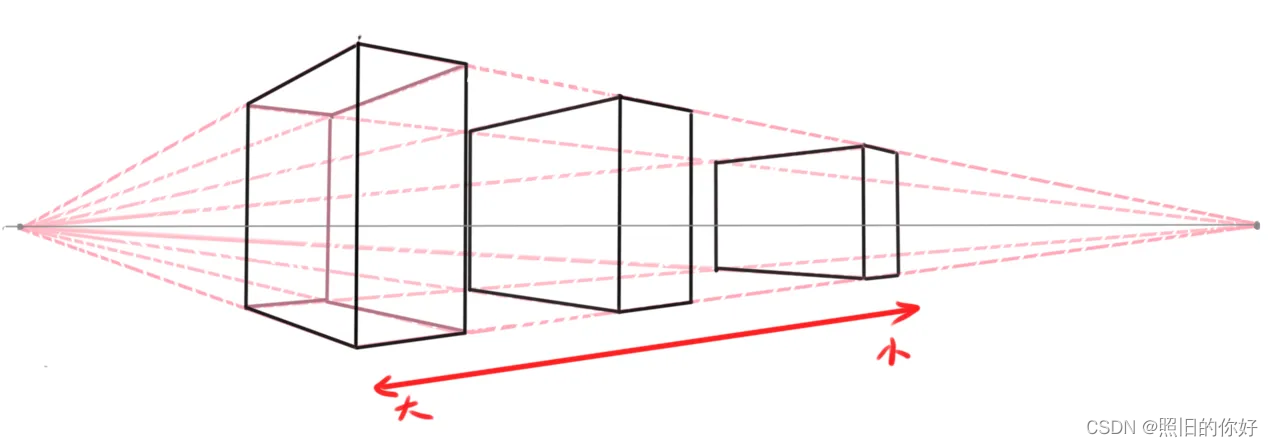
近大远小:在相同空间下,相同物体之间产生的视觉近大远小的变化现象。即近景物体比例真实,远景物体产生视觉缩小的现象。
-
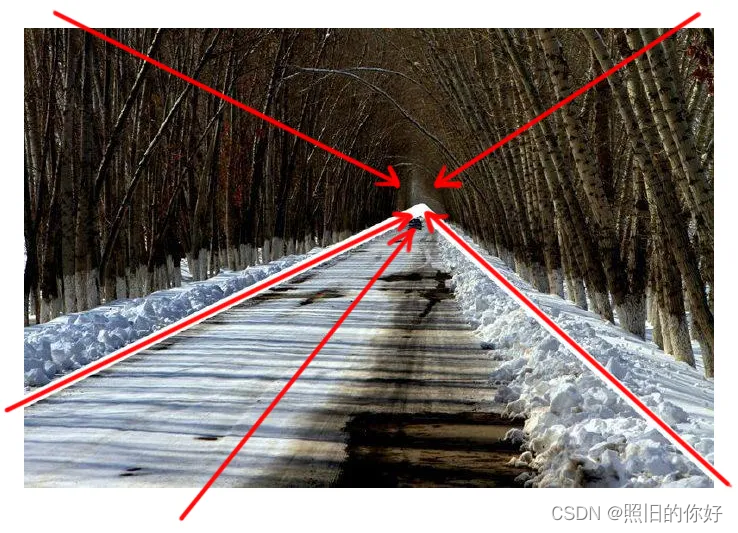
空间纵深:人在一副画面中感觉到的强烈的远近对比。物体在空间距离下,产生的视觉焦点,并导致所有物体围绕这个焦点聚拢的聚焦方式,即为纵深。
视角:
- 俯视:地平线高于视平线,地平线越高则视角越俯视
- 仰视:地平线低于视平线,地平线越低则视角越仰视
- 视中线:在画面中心左右对称的垂直线
- 消失点/灭点:在透视中,当物体像某个方向产生焦距纵深时,物体就会越靠越拢,最终集合成为一个点,这个点就称为消失点/灭点。(消失点包含四种:主点、余点、天点、地点)
- 主点:当面对正前方、正面的方向时,此时地平线和视中线十字交叉的点即为主点
要将倾斜图像转换为正常图像,可以使用透视变换。透视变换通过指定源图像中的四个顶点和对应的目标图像中的四个顶点来实现。
在透视变换中,源图像(即要进行变换的图像)中的四个顶点表示原始图像中的一个矩形或四边形的四个顶点。这些顶点的坐标需要按照特定顺序进行排序,例如按照左上、右上、右下和左下的顺序排序。
对应的目标图像中的四个顶点表示希望将源图像中的矩形或四边形变换为的形状和位置。这些顶点的坐标也需要按照相同的顺序进行排序,以确保正确的映射关系。
通过指定这两组顶点坐标,可以计算出透视变换矩阵,将源图像中的点映射到目标图像中的对应点。透视变换矩阵定义了源图像与目标图像之间的映射关系,可以用来将整个源图像进行透视变换。
透视变换后的图像将具有正常的形状和位置,使得原本倾斜或透视变形的物体在变换后的图像中呈现出正确的形状和位置关系。
# import the necessary packages
import numpy as np
import cv2

# 获得鸟瞰图的代码

# “保持点的一致顺序”很重要
def order_points(pts):  #参数:由四个点组成的列表
	# initialzie a list of coordinates that will be ordered
	# such that the first entry in the list is the top-left,
	# the second entry is the top-right, the third is the
	# bottom-right, and the fourth is the bottom-left
    # 初始化一个即将被排序的坐标列表,使得列表中的第一个条目是左上角
    # 第二个是右上角,第三个是右下角,第四个是左下角
	rect = np.zeros((4, 2), dtype = "float32")  # 四个有序点分配内存

	# the top-left point will have the smallest sum, whereas
	# the bottom-right point will have the largest sum
    # 左上角的和最小,而右下角的和最大
	s = pts.sum(axis = 1)
	rect[0] = pts[np.argmin(s)] #将找到左上角的点,它将具有最小的x+y和
	rect[2] = pts[np.argmax(s)] #右下角的点将具有最大的x+y和

	# now, compute the difference between the points, the
	# top-right point will have the smallest difference,
	# whereas the bottom-left will have the largest difference
    # 计算这些点之间的差异,右上角的差异最小,而左下角的差异最大
	diff = np.diff(pts, axis = 1)   #右上和左下 计算点之间的差
	rect[1] = pts[np.argmin(diff)]  #与最小差值相关的坐标将是右上角的点
	rect[3] = pts[np.argmax(diff)]  #有最大差值的坐标将为左下角的点
	# return the ordered coordinates
	return rect #将有序函数返回


# 输入图像和四个点
def four_point_transform(image, pts):
	# obtain a consistent order of the points and unpack them
	# individually
	rect = order_points(pts)    # 坐标有序
	(tl, tr, br, bl) = rect     # 解坐标

# 下面需要确定新扭曲的图像尺寸

	# compute the width of the new image, which will be the
	# maximum distance between bottom-right and bottom-left
	# x-coordiates or the top-right and top-left x-coordinates
	widthA = np.sqrt(((br[0] - bl[0]) ** 2) + ((br[1] - bl[1]) ** 2))
	widthB = np.sqrt(((tr[0] - tl[0]) ** 2) + ((tr[1] - tl[1]) ** 2))
	maxWidth = max(int(widthA), int(widthB))
	# 计算新图像宽度,"右下角到左下角x坐标"和"右上角到左上角x坐标"中的最大值

	# compute the height of the new image, which will be the
	# maximum distance between the top-right and bottom-right
	# y-coordinates or the top-left and bottom-left y-coordinates
	heightA = np.sqrt(((tr[0] - br[0]) ** 2) + ((tr[1] - br[1]) ** 2))
	heightB = np.sqrt(((tl[0] - bl[0]) ** 2) + ((tl[1] - bl[1]) ** 2))
	maxHeight = max(int(heightA), int(heightB))
	# 计算高度

	# now that we have the dimensions of the new image, construct
	# the set of destination points to obtain a "birds eye view",
	# (i.e. top-down view) of the image, again specifying points
	# in the top-left, top-right, bottom-right, and bottom-left
	# order
	dst = np.array([
		[0, 0],
		[maxWidth - 1, 0],
		[maxWidth - 1, maxHeight - 1],
		[0, maxHeight - 1]], dtype = "float32")
	# 构建一组目的点,以获得图像的“鸟瞰图”(即自上而下的视图)
    # 顺序:左上、右上、右下、左下

	# compute the perspective transform matrix and then apply it
	M = cv2.getPerspectiveTransform(rect, dst)	#将源图像中的任意点映射到目标图像中的对应点
	# 将输入坐标 rect 映射到目标坐标 dst
	# rect源图像中的四个坐标点;dst目标图像中的四个坐标点,用于指定透视变换后矩形在目标图像中的位置和形状

	warped = cv2.warpPerspective(image, M, (maxWidth, maxHeight))#将源图像进行透视变换
	# 计算透视变换矩阵并应用得到扭曲图像
	# return the warped image
	return warped

# https://pyimagesearch.com/2014/08/25/4-point-opencv-getperspective-transform-example/
def four_point_transform(image, pts):

	rect = order_points(pts)    # 坐标有序
	(tl, tr, br, bl) = rect     # 解坐标

	widthA = np.sqrt(((br[0] - bl[0]) ** 2) + ((br[1] - bl[1]) ** 2))
	widthB = np.sqrt(((tr[0] - tl[0]) ** 2) + ((tr[1] - tl[1]) ** 2))
	maxWidth = max(int(widthA), int(widthB))

	heightA = np.sqrt(((tr[0] - br[0]) ** 2) + ((tr[1] - br[1]) ** 2))
	heightB = np.sqrt(((tl[0] - bl[0]) ** 2) + ((tl[1] - bl[1]) ** 2))
	maxHeight = max(int(heightA), int(heightB))

	dst = np.array([
		[0, 0],
		[maxWidth - 1, 0],
		[maxWidth - 1, maxHeight - 1],
		[0, maxHeight - 1]], dtype = "float32")

	M = cv2.getPerspectiveTransform(rect, dst)
	warped = cv2.warpPerspective(image, M, (maxWidth, maxHeight))

	return warped

