目录
- 前言
- 总体设计
- 系统整体结构图
- 请求流程图
- 系统流程图
- 运行环境
- Python 环境
- jieba分词库
- Scikit-learn 库
- nginx
- php
- 模块实现
- 1. 前端模块
- 2. 后端模块
- 系统测试
- 1. 测试结果
- 2. 结果对比
- 3. 可视化部分
- 工程源代码下载
- 其它资料下载

前言
本项目以Python为基础,旨在开发一款垃圾短信识别程序。我们将采用KNN、逻辑回归、随机森林、决策树和朴素贝叶斯等多种算法进行融合,以提高识别准确率,并进行测试和应用。
小伙伴们可以通过二次开发,将它应用来处理实际场景中的短信数据。这项技术可以应用于移动通信网络、社交媒体平台等领域,帮助用户自动过滤和识别垃圾短信,提升通信效率和用户体验。
总体设计
本部分包括系统整体结构图和系统流程图。
系统整体结构图
系统整体结构如图所示。
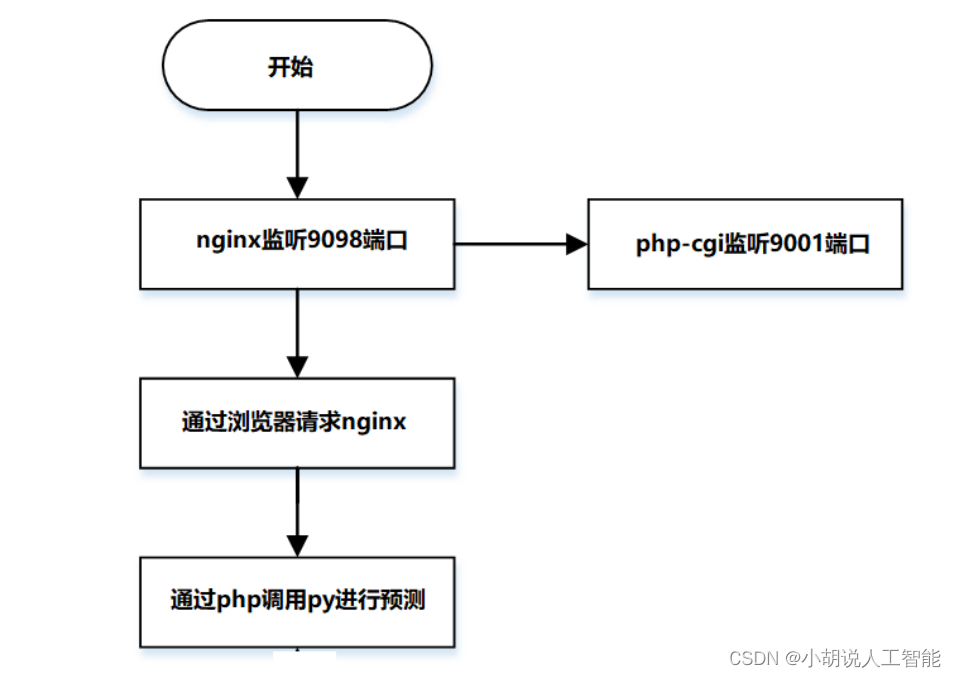
请求流程图
请求流程如图所示。
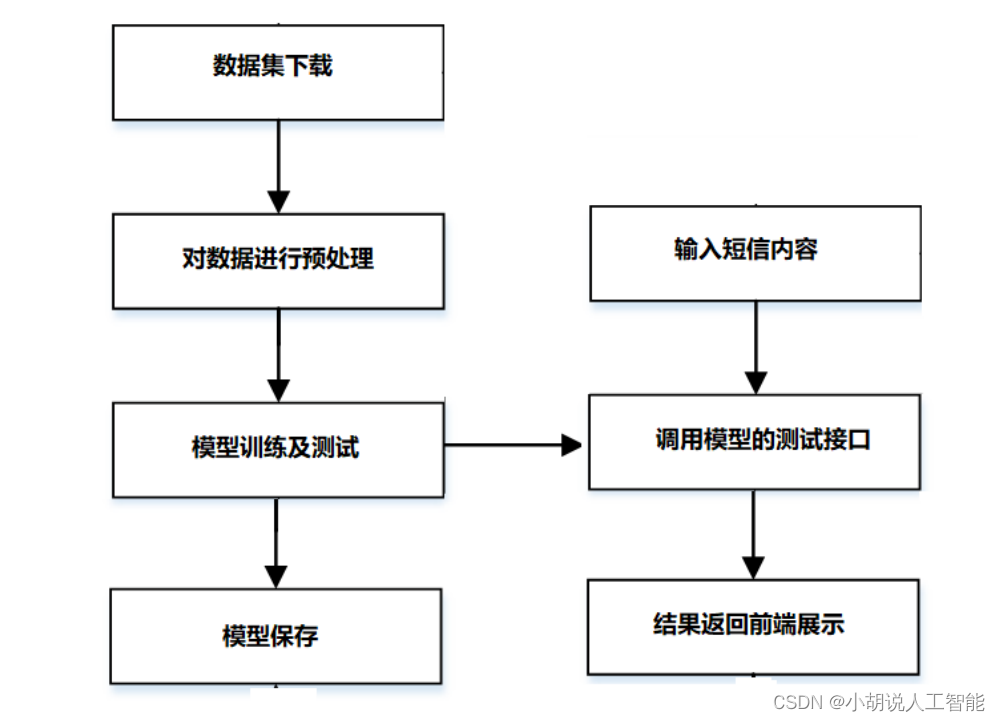
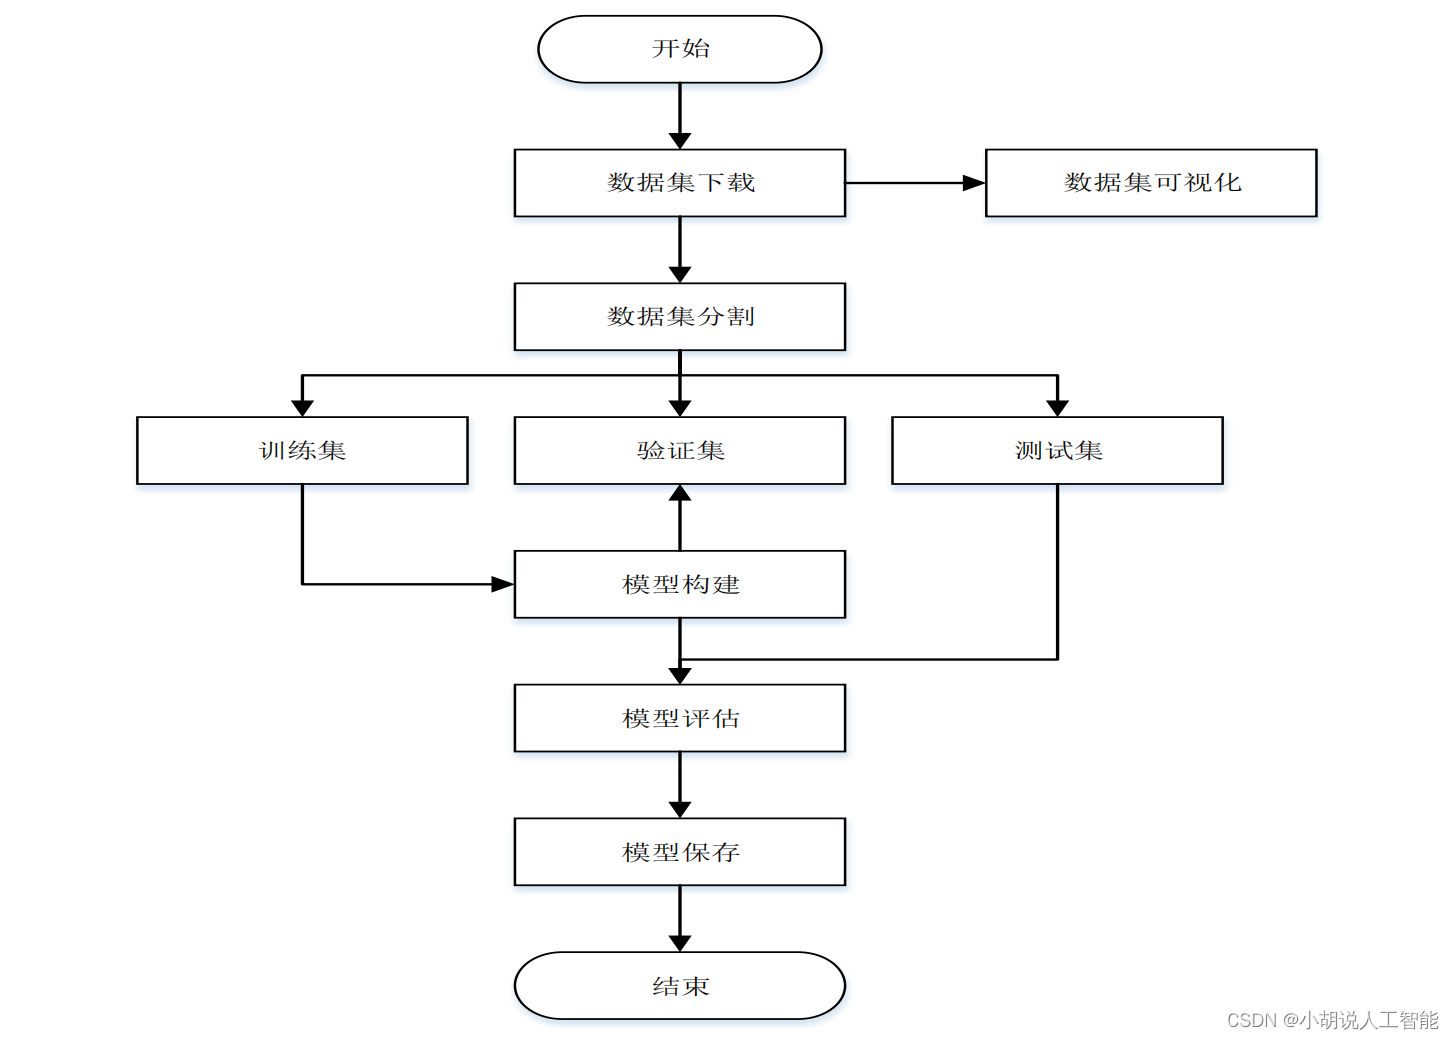
系统流程图
系统流程如图所示。
运行环境
本部分包括 Python 环境、jieba 分词库、Scikit-learn 库、nginx 和php。
Python 环境
需要 Python 2.7 环境,在 Windows 环境下载 Anaconda ,完成Python 所需的配置,下载地址:https://www.anaconda.com/,也可以下载虚拟机在 Linux 环境下运行代码。
jieba分词库
使用 pip install jieba 命令进行安装。
Scikit-learn 库
使用 pip install sklearn 命令进行安装。
nginx
nginx下载地址:http://nginx.org/en/download.html。
php
进入 php 安装地址 http://windows.php.net/download 下载最新线程安全版 php.zip 压缩包。
模块实现
本项目包括 2 个模块:前端模块和后端模块,下面分别给出各模块的功能介绍及相关代码。
1. 前端模块
1) 短信输入页面
相关代码如下:
index.php
<html>
<?php
#程序简介
#Spam Message Classifiers
?>
<head>
    <title>垃圾短信识别</title>
    <meta http-equiv="Content-Type" content="text/html; charset=gb2312">
    <meta name="viewport" content="width=device-width, initial-scale=1" />
    <style type="text/css">
        body {background:#eee;}
        ul {padding:0; margin:0;}
        li {list-style:none;}
        #container {margin: 0 auto; width: 80%;}
        #title {color:#146fdf;font-size:25px; text-align:center; font-family:"YouYuan"; font-weight:bold;margin-top:40px;}
        a {color:#146fdf; text-decoration: none}
        a:hover {color: black; text-decoration: underline}
        #g_list {margin-top:60px; background:#fff;border-radius:4px}
        #g_u,#g_p {position:relative}
        #g_u {border-bottom:1px solid #eaeaea}
        .inputstyle {text-align:center;-webkit-tap-highlight-color:rgba(255,255,255,0); width:100%; height:144px;color:#000;border:0; background:0; font-size:16px;-webkit-appearance:none;line-height:normal; /* for non-ie */}
        #cjsubmit {margin-top:40px; width:100%; height:44px; color:#146fdf}
        .button {border:0px; width:100%; height:100%;color:white; background:#146fdf; border-radius:4px; font-size:16px;}
        #notice {text-align:center; margin-top:60px; color:#246183; line-height:14px; font-size:14px; padding:15px 10px}
    </style>
</head>
<body>
    <div id="container">
        <div id="title">垃圾短信识别</div>
            <form method=post name="cf" target="_blank" onSubmit=javascript:chkfs()>
                <ul  id="g_list">
                    <li  id="g_u">
                        <div  id="del_touch"  class="del_touch">
                            <span  id="del_u"  class="del_u"  style="display: none;"></span>
                        </div>
                        <textarea  id="u"  class="inputstyle"  name="pmessage"  autocomplete="off" ></textarea>
                    </li>
                </ul>
            <div id="cjsubmit"><input type=submit value=识别 class="button"></div>
            <script language=javascript>
                function chkfs(){
                var frm = document.forms['cf'];
                frm.action="result.php";
                return true;
                }
            </script>
        </form>
        <div id="notice">
            支持多种分类器:KNN, LR, RF, DT, GBDT, SVM, MultinomialNB, BernoulliNB<BR>
        <p align=center>
            Powered by <a href=http://JackieLiu.win>Jackie Liu</a>
        </div>
    </div>
</body>
</html>
2)短信输出页面
相关代码如下:
result.php
<html>
<?php
#程序简介#
#Spam Message Classifiers
$nomessage = "<font size=4 color=red>请输入短信内容!</font>";//输入错误时的信息
?>
<head>
    <title>垃圾短信识别</title>
    <meta http-equiv="Content-Type" content="text/html; charset=gb2312">
    <meta name="viewport" content="width=device-width, initial-scale=1" />
    <style type="text/css">
    #title {color:#146fdf;font-size:25px; text-align:center; font-family:"YouYuan"; font-weight:bold;margin-top:40px;margin-bottom:30px;}
    body {background:#eee;}
    #container {margin:0 auto; width: 80%;}
    a {color:#146fdf; text-decoration: none}
    a:hover {color: black; text-decoration: underline}
    .button {border:0px;width:100%; height:100%; color:white; background:#146fdf; border-radius:4px; font-size:16px;}
    #closewindos {margin-top:60px; width:30%; height:30px; color:#146fdf}
    #notice {text-align:center; margin-top:60px; color:#246183; line-height:14px; font-size:14px; padding:15px 10px}
    table {border:1px solid #eaeaed;}
    td {font-size:20px;border-bottom:1px solid #eaeaed; color:#246183}
    </style>
</head>
<body>
    <div id="container">
        <center>
        <div id="title">垃圾短信识别</div>
        <?php
        error_reporting(0);  //禁用错误报告
        #var_dump($_POST);
        if($_POST[pmessage]=="") echo $nomessage;
        else{
            $output = shell_exec('python /Users/liu/Sites/Model/demoAPI.py'.' '.$_POST[pmessage]);
            echo"<font color=#246183>各分类器检测结果如下</font> </br></br></br>";
            #返回结果形如:LR:[u'1'],RF:[u'1']
            $array = explode(',', $output);
            echo"<table>";
            for ($i=0;$i<count($array)-1;$i++) {
                $result = explode(':', $array[$i]);
                echo"<tr><td><font color=red>$result[0]</font></td>
                         <td>----------</td>
                         <td>$result[1]</td></tr>";
            }
            echo"</table>";
        }
                ?>
        <div id="closewindos"><input type="button" value="关闭此页" class="button" onClick="javascript:window.close()"></div>
        </center>
        <div id="notice">
            支持多种分类器:KNN, LR, RF, DT, GBDT, SVM, MultinomialNB, BernoulliNB<BR>
        <p align=center>
            Powered by <a href=http://JackieLiu.win>Jackie Liu</a>
        </div>
    </div>
</body>
</html>
2. 后端模块
本部分包括数据预处理、模型训练和 nginx 配置。
1)数据预处理
使用 GitHub 的开源数据集,下载地址 https://github.com/mJackie/SpamMessage,分为标签域与文本域,标签域为 1 或 0,分别代表垃圾短信与正常短信,文本域为短信内容。对数据进行预处理,用 jieba 分词器对文本域进行分词处理,利用数据降维对分词后的文本进行操作,创建词袋。相关代码如下:
DataPreprocess.py
# -*- coding: utf-8 -*-
import json
import jieba
import jieba.posseg as pseg
import sklearn.feature_extraction.text
from sklearn.decomposition import NMF
from sklearn.decomposition import PCA
from scipy import sparse, io
from time import time
#使用TF-IDF产生词向量
class TfidfVectorizer(sklearn.feature_extraction.text.TfidfVectorizer):
    def build_analyzer(self):
        def analyzer(doc):
            words = pseg.cut(doc)
            new_doc = ''.join(w.word for w in words if w.flag != 'x')
            words = jieba.cut(new_doc)
            return words
        return analyzer
#PCA或者NMF降维
def dimensionality_reduction(x, type='pca'):
    if type == 'pca':
        n_components = 500   #降低到n_components
        t0 = time()
        pca = PCA(n_components=n_components)
        print ("pca-----fit begin")
        pca.fit(x)
        print ("pca-----fit ok")
        x_transform = sparse.csr_matrix(pca.transform(x))
        print ("pca-----x ok")
        print("PCA reduction done in %0.3fs" % (time() - t0))
                return x_transform
    if type == 'nmf':
        n_components = 500
        t1 = time()
        nmf = NMF(n_components=n_components)
        print ("nmf-----fit begin")
        nmf.fit(x)
        print ("nmf-----fit ok")
        x_transform = sparse.csr_matrix(nmf.transform(x))
        print ("nmf-----x ok")
        print("NMF reduction done in %0.3fs" % (time() - t1))
             return x_transform
if '__main__' == __name__:
    print ('******************* data preprocessing ********************')
    t0 = time()
    data_lines = 50000
    data_type = "raw"
    x = []
    y = []
    lines =[]
    #加载数据
    with open('message.txt') as fr:
        for i in range(data_lines):
            line = fr.readline()
            message = line.split('\t')
            y.append(message[0])
            x.append(message[1])
    #存储y到y.json
    with open('raw50000/y.json', 'w') as f:
        json.dump(y, f)
    print ("save y successfully!")
    vec_tfidf = TfidfVectorizer()   #if df<2 discard it, max_df>0.8 discard as well
    data_tfidf = vec_tfidf.fit_transform(x)
    #写入文件,后续调用
    #pickle.dump(vec_tfidf, open("vec_tfidf", 'wb'))
    if data_type == 'raw':
        io.mmwrite('raw50000/raw', data_tfidf)
    '''
    name_tfidf_feature = vec_tfidf.get_feature_names()#将特征名写入feature.json
    with open('feature.json', 'w') as f:
        json.dump(name_tfidf_feature, f)
    print "save feature successfully!"
    '''
    if data_type == 'nmf' or data_type == 'pca&nmf':
        nmf = dimensionality_reduction(data_tfidf.todense(), type='nmf')
        io.mmwrite('nmf', nmf)	#把nmf写入nmf.mtx
        print ("save nmf successfully!")
    if data_type == 'pca' or data_type == 'pca&nmf':
        pca = dimensionality_reduction(data_tfidf.todense(), type='pca')
        io.mmwrite('pca', pca)	#把pca写入pca.mtx
        print ("save pca successfully!")
    print("******* %s lines data preprocessing done in %0.3fs *******" % (data_lines,(time() - t0)))
2)模型训练
相关代码如下:
Classifiers.py
#!usr/bin/env python
#-*- coding: utf-8 -*-
import sys
import os
import time
import json
from sklearn import metrics
from sklearn.naive_bayes import BernoulliNB
from sklearn.model_selection import train_test_split
import numpy as np
from scipy import sparse, io
import cPickle as pickle
reload(sys)
sys.setdefaultencoding('utf8')
#KNN分类
def knn_classifier(train_x, train_y):
    from sklearn.neighbors import KNeighborsClassifier
    model = KNeighborsClassifier(n_neighbors = 5, algorithm = 'kd_tree')
    model.fit(train_x, train_y)
    return model
#逻辑回归分类
def logistic_regression_classifier(train_x, train_y):
    from sklearn.linear_model import LogisticRegression
    model = LogisticRegression(penalty='l2')
    model.fit(train_x, train_y)
    return model
#随机森林分类
def random_forest_classifier(train_x, train_y):
    from sklearn.ensemble import RandomForestClassifier
    model = RandomForestClassifier(n_estimators=8)
    model.fit(train_x, train_y)
    return model
#决策树分类
def decision_tree_classifier(train_x, train_y):
    from sklearn import tree
    model = tree.DecisionTreeClassifier()
    model.fit(train_x, train_y)
    return model
#GBDT(Gradient Boosting Decision Tree)分类
def gradient_boosting_classifier(train_x, train_y):
    from sklearn.ensemble import GradientBoostingClassifier
    model = GradientBoostingClassifier(n_estimators=200)
    model.fit(train_x, train_y)
    return model
#SVM分类
def svm_classifier(train_x, train_y):
  from sklearn.svm import SVC
  model = SVC(kernel='rbf', probability=True)
  model.fit(train_x, train_y)
  return model
#分类器用fit()函数训练,用predict()函数预测结果
#使用交叉验证SVM分类
def svm_cross_validation(train_x, train_y):
    #from sklearn.grid_search import GridSearchCV
    from sklearn.model_selection import GridSearchCV
    from sklearn.svm import SVC
    model = SVC(kernel='rbf', probability=True)
    param_grid = {'C': [1e-3, 1e-2, 1e-1, 1, 10, 100, 1000], 'gamma': [0.001, 0.0001]}
    grid_search = GridSearchCV(model, param_grid, n_jobs = 1, verbose=1)
    grid_search.fit(train_x, train_y)
    best_parameters = grid_search.best_estimator_.get_params()
    for para, val in best_parameters.items():
        print para, val
    model = SVC(kernel='rbf', C=best_parameters['C'], gamma=best_parameters['gamma'], probability=True)
    model.fit(train_x, train_y)
    return model
#多项式朴素贝叶斯分类
def multinomial_naive_bayes_classifier(train_x, train_y):
    from sklearn.naive_bayes import MultinomialNB
    model = MultinomialNB(alpha=0.01)
    model.fit(train_x, train_y)
    return model
#贝努力朴素贝叶斯分类
def bernoulli_naive_bayes_classifier(train_x, train_y):
    from sklearn.naive_bayes import MultinomialNB
    model = BernoulliNB(alpha=0.01)
    model.fit(train_x, train_y)
    return model
#确定训练集和测试集
def select_data(x, y, takeup):
    train_x, test_x, train_y, test_y = train_test_split(
        x, y, test_size=takeup, random_state=20)
    return train_x, test_x, train_y, test_y
if '__main__' == __name__:
    #0.1表示测试集占10%
    takeup = 0.02   #KNN要改成0.02才能成功,其他可以是0.1
    x = io.mmread('DataPreprocess/raw50000/raw.mtx')
    with open('DataPreprocess/raw50000/y.json', 'r') as f:
        y = json.load(f)
        train_x, test_x, train_y, test_y = select_data(x, y, takeup)
    #test_classifiers = ['LR', 'RF', 'DT',  'MultinomialNB','BernoulliNB','SVM','GBDT', 'KNN']
    #test_classifiers = [ 'KNN','LR', 'RF', 'DT', 'SVM', 'MultinomialNB','BernoulliNB']
    test_classifiers = ['KNN']
    #test_classifiers = ['MultinomialNB','BernoulliNB',]
    classifiers = {
                    'KNN':knn_classifier,
                    'LR':logistic_regression_classifier,
                    'RF':random_forest_classifier,
                    'DT':decision_tree_classifier,
                    'GBDT':gradient_boosting_classifier,
                    'SVM':svm_classifier,
                    'MultinomialNB':multinomial_naive_bayes_classifier,
                    'BernoulliNB':bernoulli_naive_bayes_classifier
    }
    model_save = {}
    for classifier in test_classifiers:
        print '******************* %s ********************' % classifier
        start_time = time.time()
        print classifiers[classifier]
        model = classifiers[classifier](train_x, train_y)
        print 'training took %fs!' % (time.time() - start_time)
        pickle.dump(model, open('model/'+classifier, 'wb'))
        #预测test_x
        predict = model.predict(test_x)
        #测量
        precision = metrics.precision_score(test_y, predict, pos_label= u'1') #string u'1'
        recall = metrics.recall_score(test_y, predict, pos_label= u'1')
        print 'precision: %.2f%%, recall: %.2f%%' % (100 * precision, 100 * recall)
        accuracy = metrics.accuracy_score(test_y, predict)
        print 'accuracy: %.2f%%' % (100 * accuracy)
        print('RESULT')
        print(metrics.classification_report(test_y, predict))
3)nginx配置
相关代码如下:
nginx.conf
#user  nobody;
worker_processes  1;
error_log  logs/error.log;
error_log  logs/error.log  notice;
error_log  logs/error.log  info;
pid        logs/nginx.pid;
events {
    worker_connections  1024;
}
http {
    include       mime.types;
    default_type  application/octet-stream;
    #设置日志输出格式和位置
    log_format  main  '$remote_addr - $remote_user [$time_local] "$request" '
                      '$status $body_bytes_sent "$http_referer" '
                      '"$http_user_agent" "$http_x_forwarded_for"';
    access_log  logs/access.log  main;
    sendfile        on;
    #tcp_nopush     on;
    #keepalive_timeout  0;
    keepalive_timeout  65;
    #gzip  on;
    server {
        listen       9098;
        server_name  localhost;
        #charset koi8-r;
        #access_log  logs/host.access.log  main;
        location / {
            root   html;
            index  index.php;
        }
        location /Sites {
            root   py;
            index  index.php;
        }
        location /a {
            root   html1;
            index  index.html index.htm;
        }
        #error_page  404              /404.html;
        error_page   500 502 503 504  /50x.html;
        location = /50x.html {
            root   html;
        }
        #PHP脚本请求全部转发到FastCGI处理,使用FastCGI协议默认配置
            location ~ \.php$ {
            root           py;
            fastcgi_pass   127.0.0.1:9001;
            fastcgi_index  index.php;
#设置脚本文件请求的路径,与fastgi_params配置文件中后面添加的一样,include,可以不要
            #fastcgi_param   SCRIPT_FILENAME  /html1/scripts$fastcgi_script_name;
            include        fastcgi_params;
        }
    }
}
系统测试
本部分测试结果、结果对比及可视化部分。
1. 测试结果
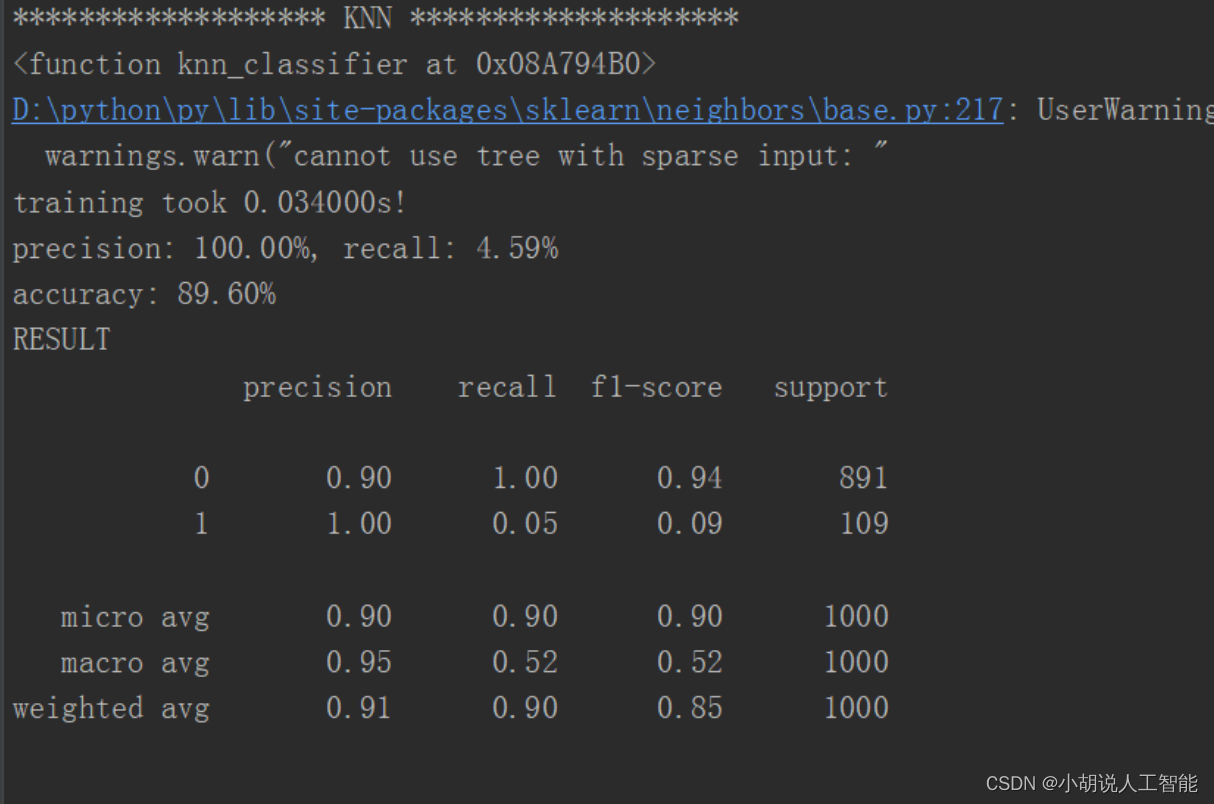
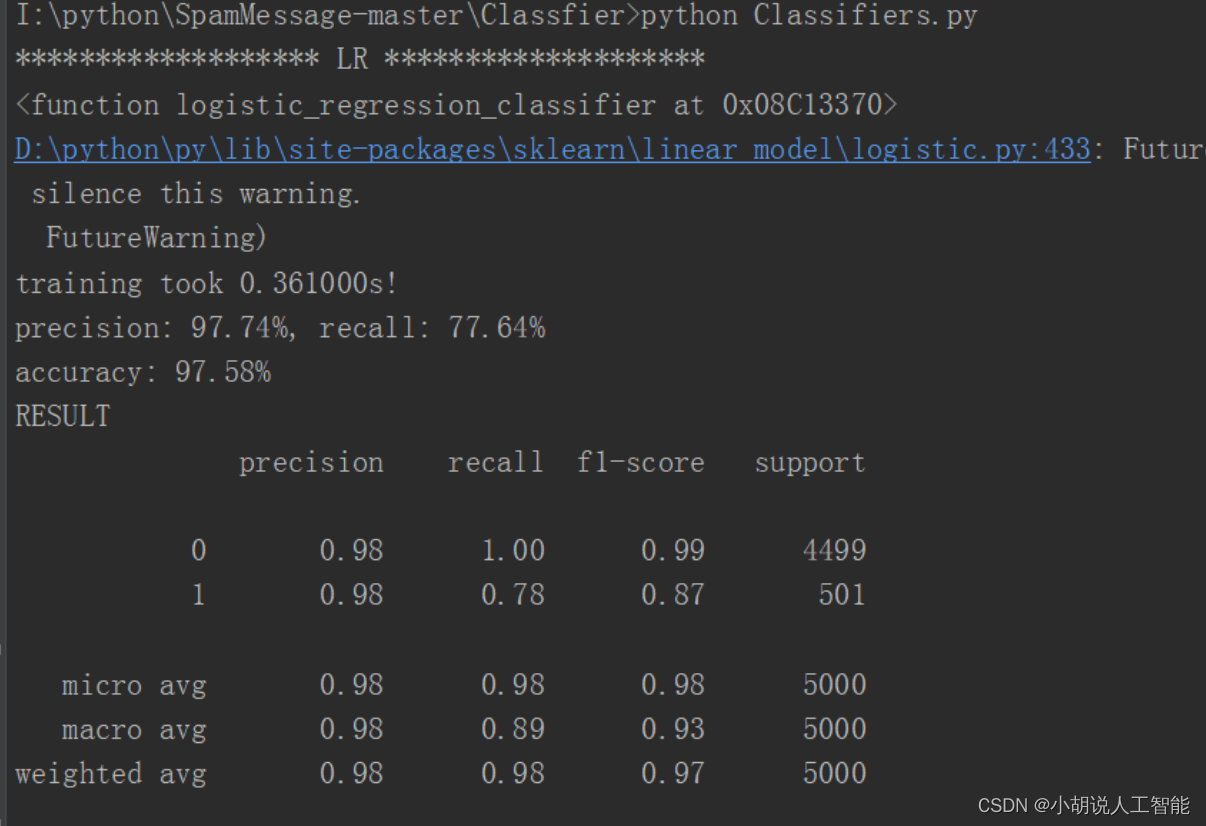
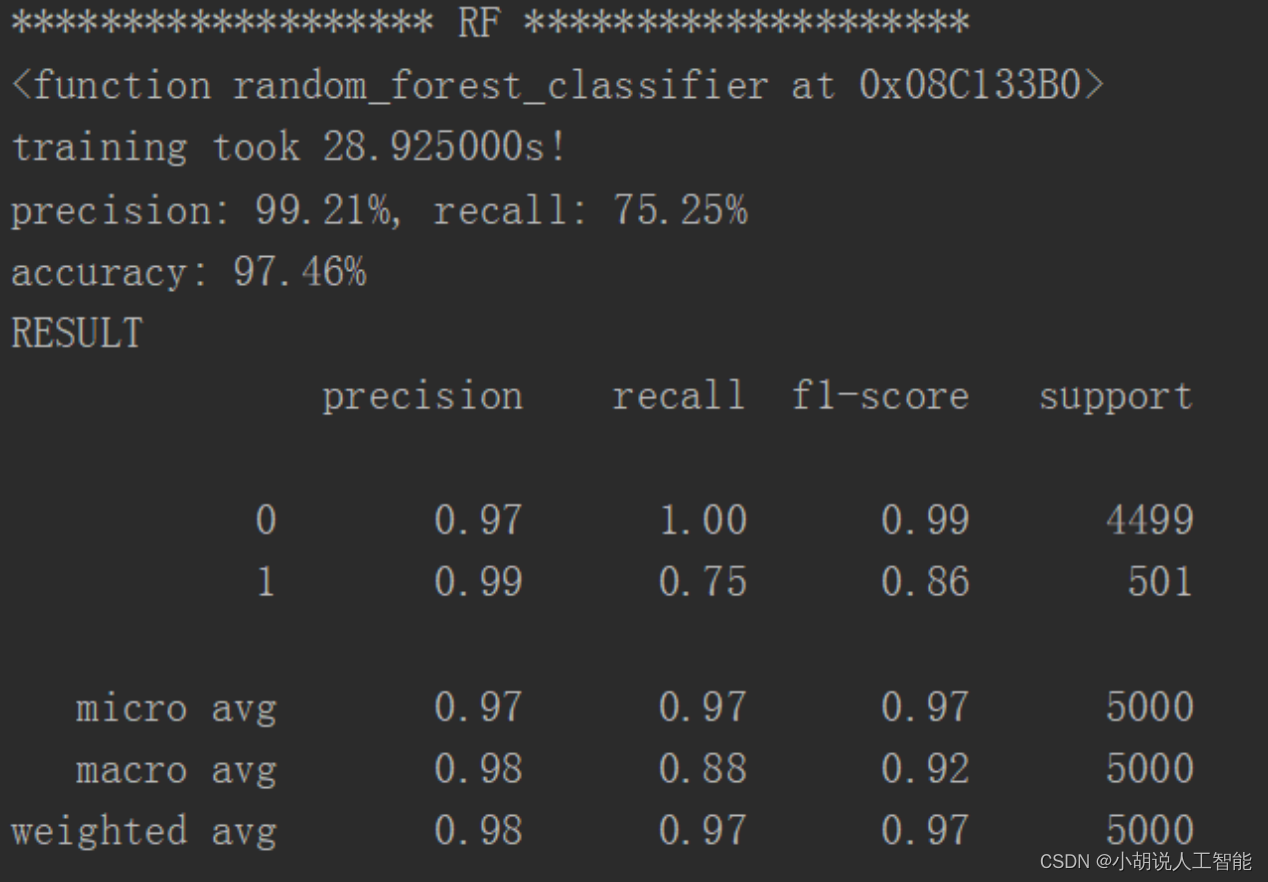
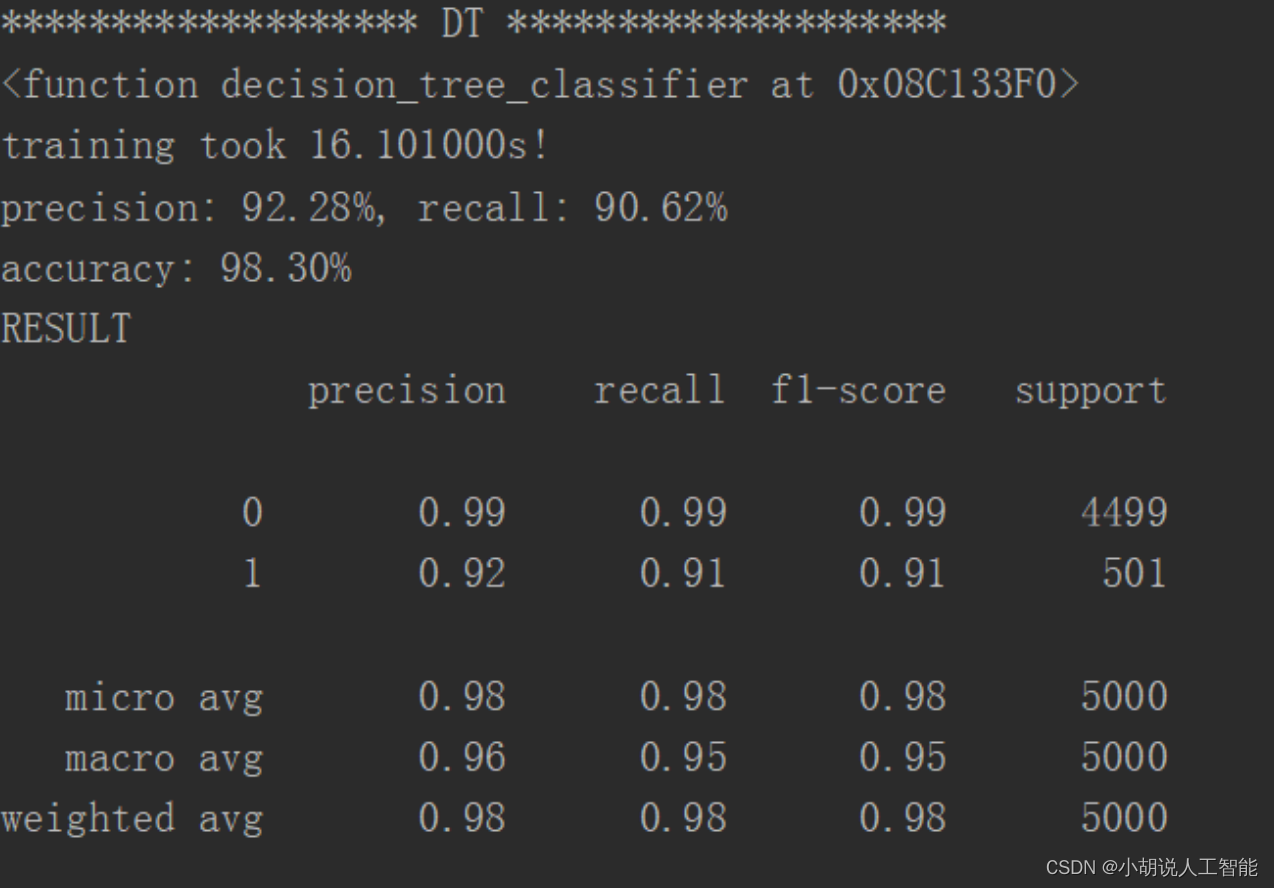
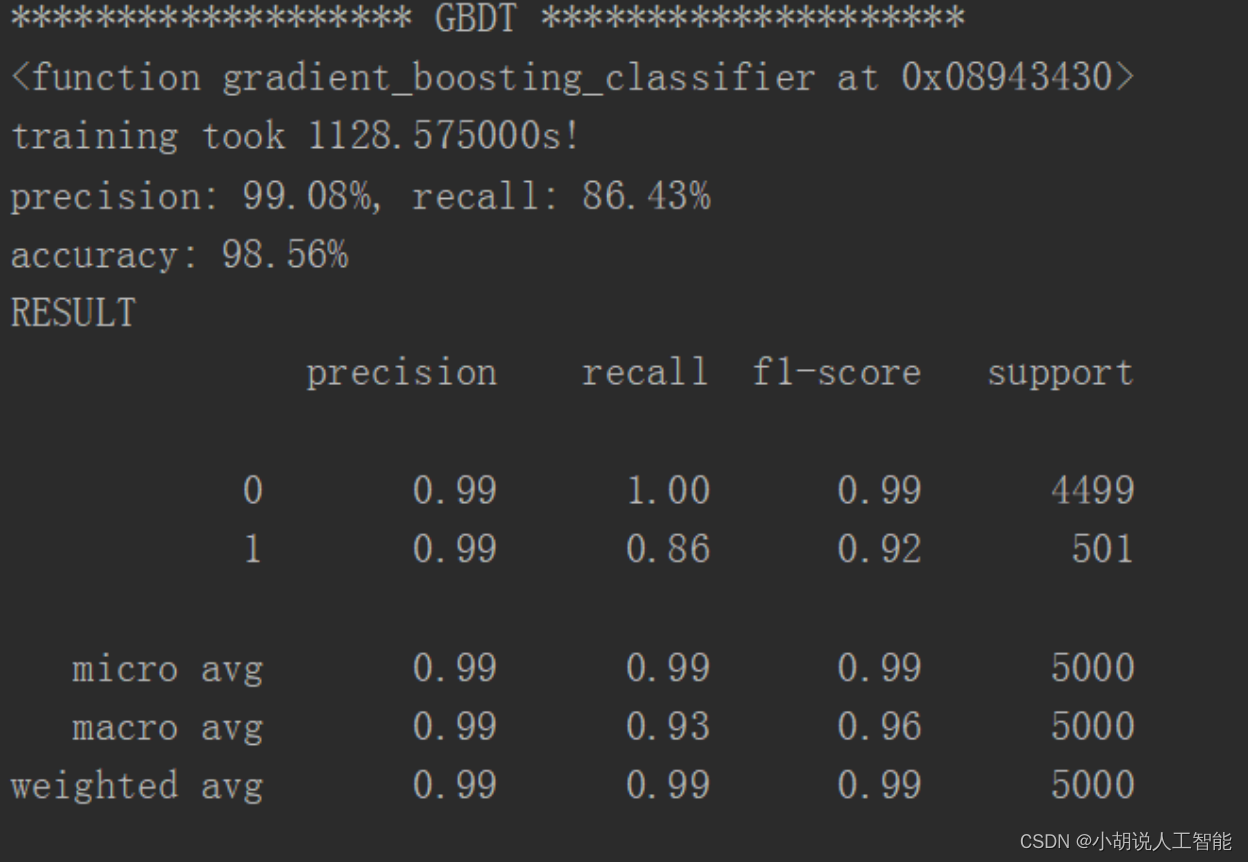
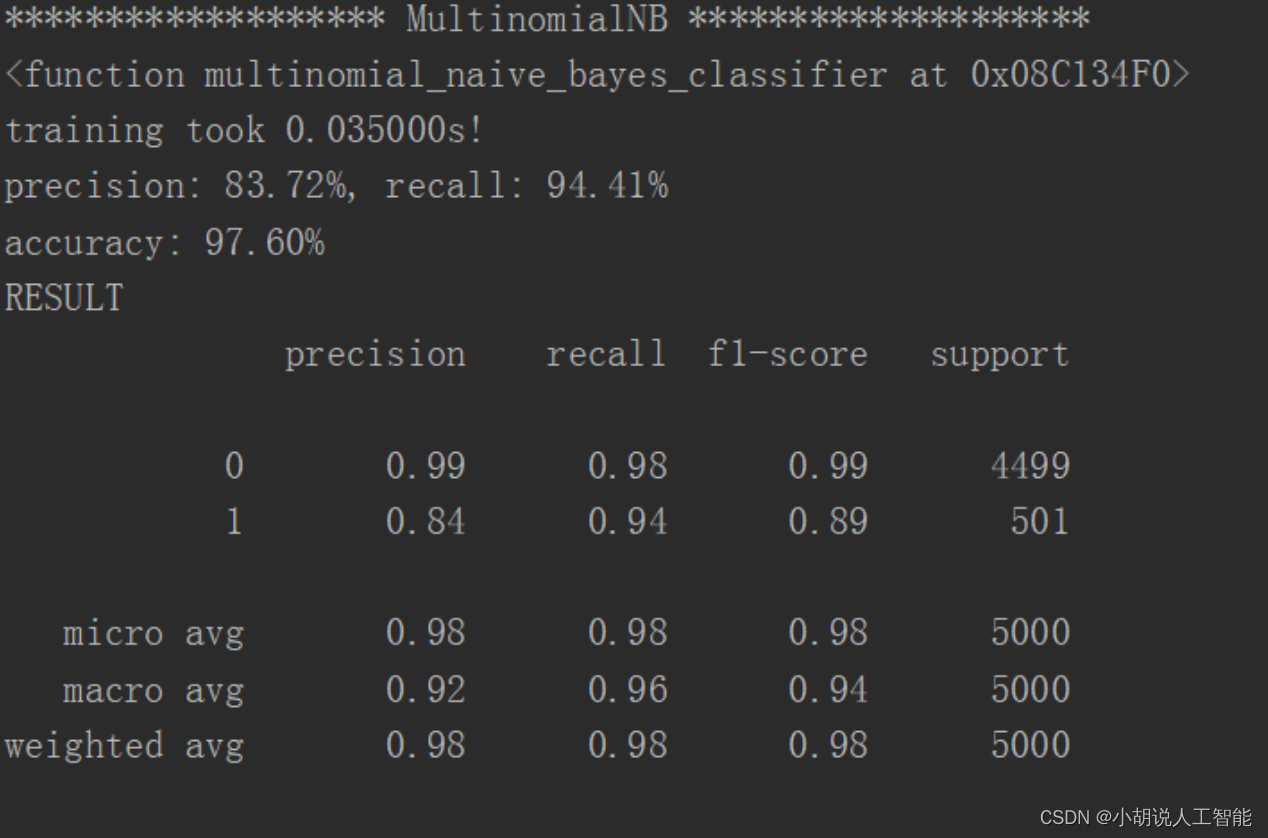
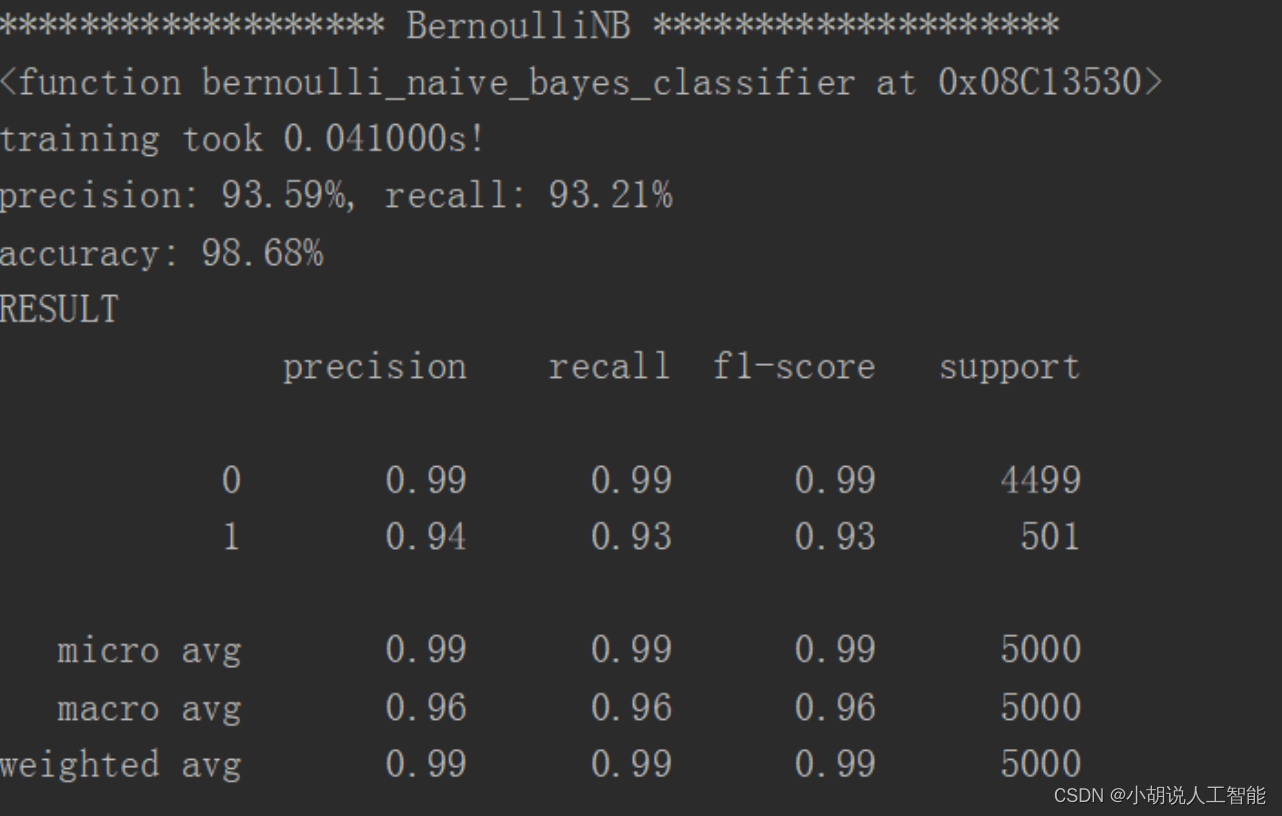
KNN 临近算法如图1所示,逻辑回归算法如图2所示,随机森林算法如图3所示,决策树算法如图4所示,梯度提升迭代决策树算法如图 5所示,多项式分布朴素贝叶斯算法如图6所示,伯努利分布朴素贝叶斯算法如图 7所示。
2. 结果对比
KNN 临近、逻辑回归、随机森林、决策树、梯度提升迭代决策树、多项式分布朴素贝叶斯、伯努利分布朴素贝叶斯对比结果如下表所示。
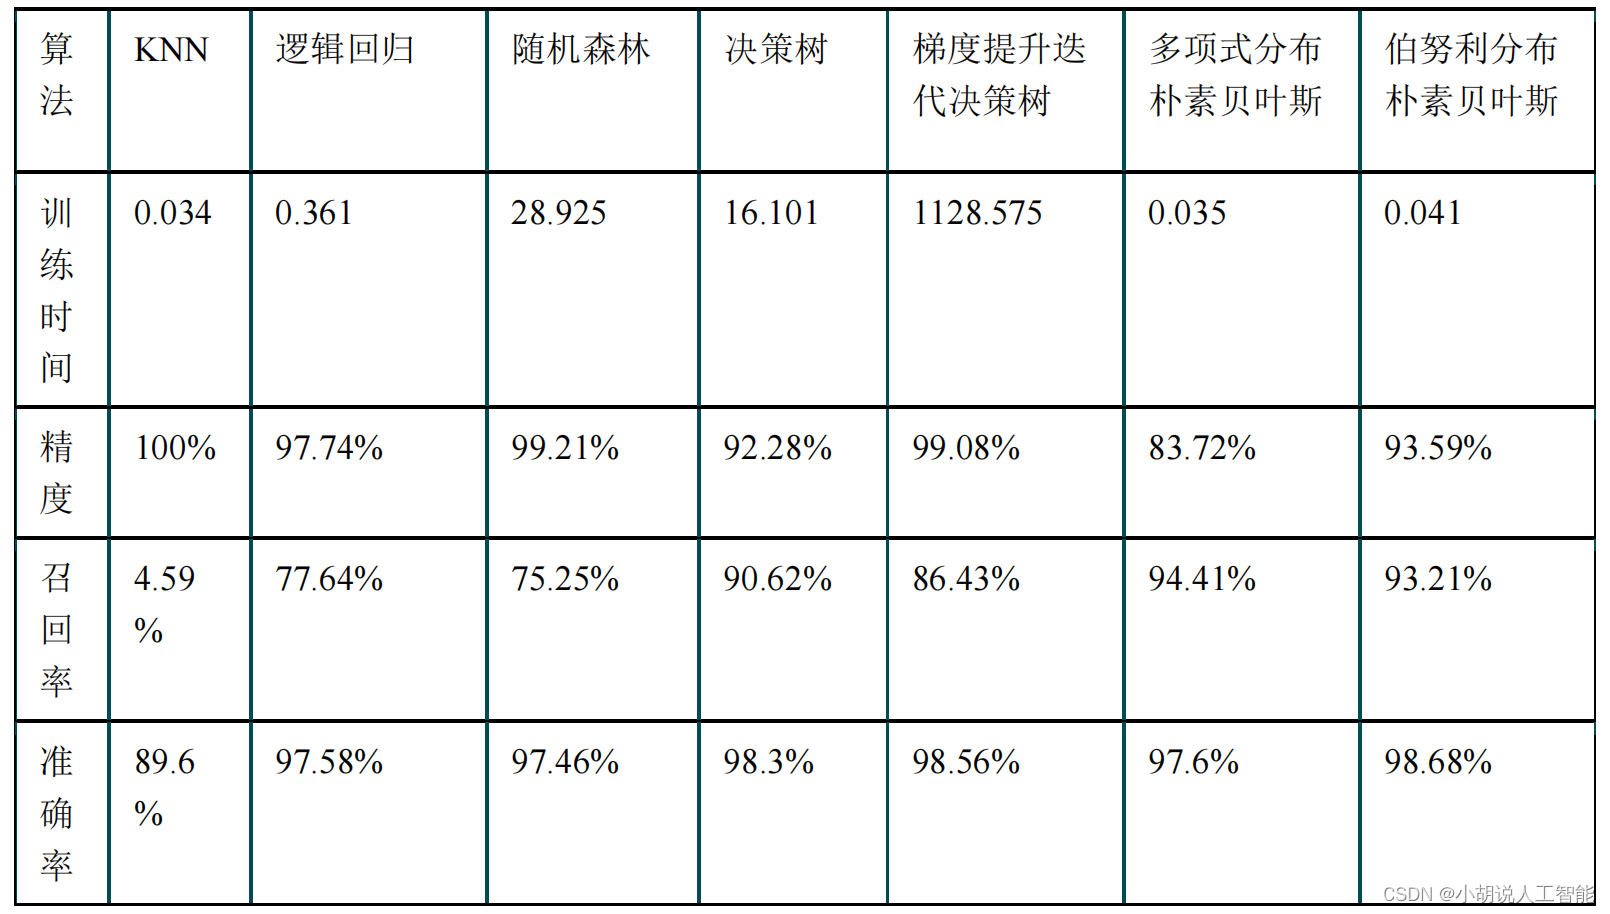
通过对比,可以看出 KNN 邻近算法拥有 100%的正确率,召回率只有 4.59%,即 KNN临近算法只将测试集中 4.59%的垃圾短信标记出来。KNN、逻辑回归、朴素贝叶斯的速度很快、随机森林和决策树运行比较慢,梯度提升迭代决策树由于需要对残差进行不断的迭代,速度非常慢。综合召回率与准确率,两种朴素贝叶斯的结果比较理想。
3. 可视化部分
垃圾短信识别如下图所示。

工程源代码下载
详见本人博客资源下载页
其它资料下载
如果大家想继续了解人工智能相关学习路线和知识体系,欢迎大家翻阅我的另外一篇博客《重磅 | 完备的人工智能AI 学习——基础知识学习路线,所有资料免关注免套路直接网盘下载》
这篇博客参考了Github知名开源平台,AI技术平台以及相关领域专家:Datawhale,ApacheCN,AI有道和黄海广博士等约有近100G相关资料,希望能帮助到所有小伙伴们。
