提示:文章写完后,目录可以自动生成,如何生成可参考右边的帮助文档
文章目录
- 前言
- 一、pandas是什么?
- 二、使用步骤
- 1.引入库
- 2.读入数据
- 总结
前言
混用UITabBar与UINavigation做app,tab和nav,有时候显示有时候需要隐藏,记录目前使用的解决方案。
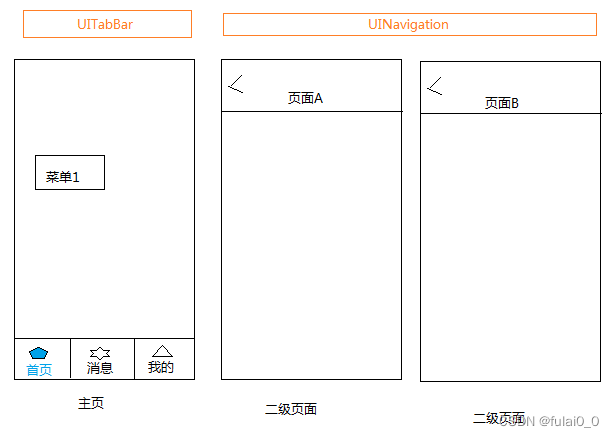
一、效果
1、主页使用UITabBar管理,有三个tab分页
2、在tab分页的根视图时显示tab,隐藏nav。
3、二级页面全部用UINavigationController管理。
4、使用pushViewController打开页面时,隐藏tab,显示nav;
5、导航栏的文字显示黑色
6、导航栏的返回按钮不显示中文
二、实现
1.AppDelegate.m
代码如下:
- (BOOL)application:(UIApplication *)application didFinishLaunchingWithOptions:(NSDictionary *)launchOptions {

    self.window = [[UIWindow alloc] initWithFrame:[UIScreen mainScreen].bounds];
    self.window.backgroundColor = [UIColor whiteColor];
    [self.window makeKeyAndVisible];
    self.window.rootViewController = [[MainTabBarController alloc] init];

    // 设置导航栏的文字为黑色
    // 满足5【导航栏的文字显示黑色】
    [[UINavigationBar appearance] setTintColor: [UIColor blackColor]];

    return YES;
}

// 其他代码.....
在AppDelegate.m中,设置rootViewController为【MainTabBarController】
2.MainTabBarController.m
代码如下:
- (void)viewDidLoad {
    [super viewDidLoad];
    [self createBottomMenuIconButton];
    // 其他代码....
}

-(void)createBottomMenuIconButton{
    NSMutableArray *bottomViewCtrls  = [NSMutableArray arrayWithCapacity:0];

    NSArray* bottomMenus = [self getLocalBottomMenu];
    for (NSDictionary *bottomMenu in bottomMenus) {
        NSString *name =  [bottomMenu objectForKey: @"name"];
        NSString *normal =  [bottomMenu objectForKey: @"normal"];
        NSString *highlighted =  [bottomMenu objectForKey: @"highlighted"];

        //结合 xx.class 对象,动态创建UIViewController
        UIViewController *vc = [[[bottomMenu objectForKey: @"vcclass"] alloc] init];
        // 满足3【二级页面全部用UINavigationController管理】
        UINavigationController *nav = [self createBottomMenu:vc menuName:name normal: normal highlighted: highlighted];
        [self.bottomViewCtrls addObject:nav];
    }

    //有底部导航菜单
    // 满足1【使用UITabBar管理,有三个tab分页】
    if(bottomViewCtrls.count > 0){
        self.viewControllers= bottomViewCtrls;
    }
}

- (UINavigationController*) createBottomMenu: (UIViewController*) vc
                                    menuName: (NSString*) menuName
                                      normal: (NSString*) normal
                                 highlighted: (NSString*) highlighted{
    vc.tabBarItem.title = menuName;

    UIImage* imageNormal = [UIImage imageNamed: normal];
    vc.tabBarItem.image = imageNormal;
    UIImage* imagePressed = [UIImage imageNamed: highlighted];
    vc.tabBarItem.selectedImage = [imagePressed imageWithRenderingMode:UIImageRenderingModeAlwaysOriginal];

    //将分页设置成UINavigationController的根视图。
    //这样包装之后,才能正常使用pushViewController打开页面
    UINavigationController* nav = [[UINavigationController alloc]initWithRootViewController:vc];
    return nav;
}

-(NSArray *)getLocalBottomMenu{
    NSArray *bottomMenus = @[
        @{@"id":@"home",@"name":@"首页",@"normal":@"tab_home",@"highlighted":@"tab_home_active",@"vcclass":TabItemHome.class},
        @{@"id":@"message",@"name":@"消息",@"normal":@"tab_message",@"highlighted":@"tab_message_active",@"vcclass":TabItemMessage.class},
        @{@"id":@"profile",@"name":@"我的",@"normal":@"tab_profile",@"highlighted":@"tab_profile_active",@"vcclass":TabItemProfile.class}
    ];
    return bottomMenus;
}
(1)通过【self.viewControllers= bottomViewCtrls】设置tab的分页。
(2)如果创建tab分页的时候,不用UINavigationController包装一下,在页面中使用pushViewController,就会报错,提示当前视图不支持UINavigationController。
(3)结合xx.class和[[[bottomMenu objectForKey: @"vcclass"] alloc] init],动态创建UIViewController。
(4)tab分页需要增删改时,修改【getLocalBottomMenu】的代码,即可。
2.tab分页的基类BaseTabViewController
代码如下:
//BaseTabViewController.h
-(void) setTitle:(nonnull NSString*) title;
-(void)openPage:(UIViewController*)page;


//BaseTabViewController.m
- (void)viewDidLoad {
    [super viewDidLoad];
    // 满足6【导航栏的返回按钮不显示中文】
    [self setNavSetting];
    // 其他代码...
}

// 满足2【在tab分页的根视图时显示tab,隐藏nav】
- (void)viewWillAppear:(BOOL)animated {
    [super viewWillAppear:animated];
    // 隐藏导航
    [self.navigationController setNavigationBarHidden:YES animated:animated];
    // 其他代码...
}

// 满足4【使用pushViewController打开页面时,隐藏tab,显示nav】
- (void)viewWillDisappear:(BOOL)animated{
    [super viewWillDisappear:animated];
    // 显示导航
    [self.navigationController setNavigationBarHidden:NO animated:animated];
    // 其他代码...
}

-(void) setTitle:(nonnull NSString*) title{
    self.navigationItem.title = title;
}
-(void)setNavSetting {
    // 设置导航栏的返回按钮没有中文,对下一个打开的页面起效
    UIBarButtonItem* backBtn = [[UIBarButtonItem alloc] initWithTitle:@"" style:UIBarButtonItemStylePlain target:nil action:nil];
    self.navigationItem.backBarButtonItem = backBtn;

}

-(void)openPage:(UIViewController*)page {
    // 隐藏下面的tab
    page.hidesBottomBarWhenPushed = YES;

    //通过nav打开页面
    [self.navigationController pushViewController:page animated:YES];

}
(1)通过【page.hidesBottomBarWhenPushed = YES】隐藏tabbar;
(2)导航栏的返回按钮,总是要父页设置的。所以,在当前页,需要设置返回按钮,去掉它自带的文字;
(3)【viewWillAppear】当页面要展示的时候,隐藏导航;【viewWillDisappear】当页面要隐藏时,显示导航。
3.HomeTab.m
代码如下:
//HomeTab.h
@interface HomeTab : BaseTabViewController
// 其他代码.....


//HomeTab.m

// 在要打开页面的方法中,调用openPage打开PageA页面
[self openPage: [[PageA alloc] init]];
在h文件中,将HomeTab类设置成继承BaseTabViewController,所以在要打开页面的方法中,可以直接调用openPage打开PageA页面。
以上,就是tab相关的设置
4.二级页面的基类BasePageViewController
代码如下:
- (void)viewDidLoad {
    [super viewDidLoad];
    // 满足6【导航栏的返回按钮不显示中文】
    [self setNavSetting];
    // 其他代码...
}

-(void)setNavSetting {
    // 设置导航栏的返回按钮没有中文,对下一个打开的页面起效
    UIBarButtonItem* backBtn = [[UIBarButtonItem alloc] initWithTitle:@"" style:UIBarButtonItemStylePlain target:nil action:nil];
    self.navigationItem.backBarButtonItem = backBtn;

}

-(void) setTitle:(nonnull NSString*) title {
    self.navigationItem.title = title;
}
将复用的内容,做到基类中。
5.二级页面pageA
代码如下:
//PageA.h
@interface PageA : BasePageViewController


//PageA.m

//调用pushViewController打开页面
[self.navigationController pushViewController:page animated:YES];
在h文件中,将PageA类设置成继承BasePageViewController。
总结
以上是我目前使用的一种UITabBar与UINavigation混用方案,基本满足了我的需求。
