Android进阶 四大组件的工作工程(四):ContentProvider的工作过程
导语
本篇是介绍四大组件的最后一篇文章,前三篇文章里我们已经介绍了Activity,Service以及Broadcast的工作流程,那么这篇文章我们就来介绍内容提供器ContentProvider的工作流程。
前几篇文章:
- Android进阶 四大组件的工作过程(一):Activity的工作过程
- Android进阶 四大组件的工作过程(二):Service的工作过程
- Android进阶 四大组件的工作过程(三):广播的注册,发送和接收过程
ContextImpl到AMS的调用
内容提供者ContentProvider一般是用于跨进程间的通信的,目前我使用的话一般是会配合Room数据库进行使用。
一般来说我们在使用ContentProvider是这样的:
binding.btAdd.setOnClickListener(new View.OnClickListener() {
            @Override
            public void onClick(View v) {
                String name = binding.edName.getText().toString();
                Book book = new Book(Uid,name);
                User user = new User(Uid,name,true);
                Uid++;
                ContentValues values = new ContentValues();
                values.put("book_id",book.uid);
                values.put("book_name",book.name);
                values.put("user_id",user.uid);
                values.put("user_name",user.name);
                values.put("user_isMale",user.isMaile);
                getContentResolver().insert(BookProvider.USER_CONTENT_URI,values);
                getContentResolver().insert(BookProvider.BOOK_CONTENT_URI,values);


            }
        });
可以看到我们需要先调用getContentResolver来获取内容解析器,然后用内容解析器来插入数据,那我们就从这里入手,看getContentResolver方法:
    public ContentResolver getContentResolver() {
        return mBase.getContentResolver();
    }
可以看到这里还是和之前的三大组件一样,会调用到ContentWrapper的ContextImpl的getContentResolver方法,所以我们接下来看ContextImpl的getContentResolver方法:
	private final ApplicationContentResolver mContentResolver;
	.......
    public ContentResolver getContentResolver() {
        return mContentResolver;
    }
可以看到,这里是会返回ContextImpl的成员变量,类型为ApplicationContentResolver,这个类型也是ContextImpl的内部类,它继承于ContentResolver内容解析器:
private static final class ApplicationContentResolver extends ContentResolver
那最后回到方法的调用,也就是说我们最后调用insert或者query等方法是会调用ApplicationContentResolver的对应方法的,这里我们以query方法为例,先来看它的query,是在
它的父类ContentResolver中实现的:
public final @Nullable Cursor query(final @RequiresPermission.Read @NonNull Uri uri,
            @Nullable String[] projection, @Nullable Bundle queryArgs,
            @Nullable CancellationSignal cancellationSignal) {
        Objects.requireNonNull(uri, "uri");

        try {
            if (mWrapped != null) { //1---------1
                return mWrapped.query(uri, projection, queryArgs, cancellationSignal);
            }
        } catch (RemoteException e) {
            return null;
        }

        IContentProvider unstableProvider = acquireUnstableProvider(uri);//2------2
        if (unstableProvider == null) {
            return null;
        }
        IContentProvider stableProvider = null;
        Cursor qCursor = null;
        try {
            ......
            try {
                qCursor = unstableProvider.query(mContext.getAttributionSource(), uri, projection,queryArgs, remoteCancellationSignal);//3----------3
            } catch (DeadObjectException e) {
                // The remote process has died...  but we only hold an unstable
                // reference though, so we might recover!!!  Let's try!!!!
                // This is exciting!!1!!1!!!!1
                unstableProviderDied(unstableProvider);
                stableProvider = acquireProvider(uri);
                if (stableProvider == null) {
                    return null;
                }
                qCursor = stableProvider.query(mContext.getAttributionSource(), uri, projection,
                        queryArgs, remoteCancellationSignal);
            }
           .............
    }
这里在注释一处会先判断是否有装饰类,这个装饰类实际上是我们可以自定义创建的,它是在ContentProvider的构造方法中被初始化的,这里我们一般也不传自定义的装饰类;所以接下来就会来到注释二处,这里调用了acquireUnstableProvider来获得内容提供者对象;然后在注释三处调用了获得的内容提供者的query方法;
我们先来看注释二处它是怎么获得内容提供者的,这里会最终调用到ApplicationContentResolver的acquireUnstableProvider方法:
protected IContentProvider acquireUnstableProvider(Context c, String auth) {
            return mMainThread.acquireProvider(c,
                    ContentProvider.getAuthorityWithoutUserId(auth),
                    resolveUserIdFromAuthority(auth), false);
        }
这里调用到了自身对应进程的ActivityThread的acquireProvider方法:
public final IContentProvider acquireProvider(
            Context c, String auth, int userId, boolean stable) {
        final IContentProvider provider = acquireExistingProvider(c, auth, userId, stable);//1----------1
        if (provider != null) {
            return provider;
        }
        ContentProviderHolder holder = null;
        final ProviderKey key = getGetProviderKey(auth, userId);
        try {
            synchronized (key) {
                holder = ActivityManager.getService().getContentProvider(//2------2
                        getApplicationThread(), c.getOpPackageName(), auth, userId, stable);
                if (holder != null && holder.provider == null && !holder.mLocal) {
                    synchronized (key.mLock) {
                        if (key.mHolder != null) {
                            if (DEBUG_PROVIDER) {
                                Slog.i(TAG, "already received provider: " + auth);
                            }
                        } else {                            key.mLock.wait(ContentResolver.CONTENT_PROVIDER_READY_TIMEOUT_MILLIS);
                        }
                        holder = key.mHolder;
                    }
                    if (holder != null && holder.provider == null) {
                        // probably timed out
                        holder = null;
                    }
                }
            }
        }
 		.........
        holder = installProvider(c, holder, holder.info,
                true /*noisy*/, holder.noReleaseNeeded, stable);//3------3
        return holder.provider;
    }
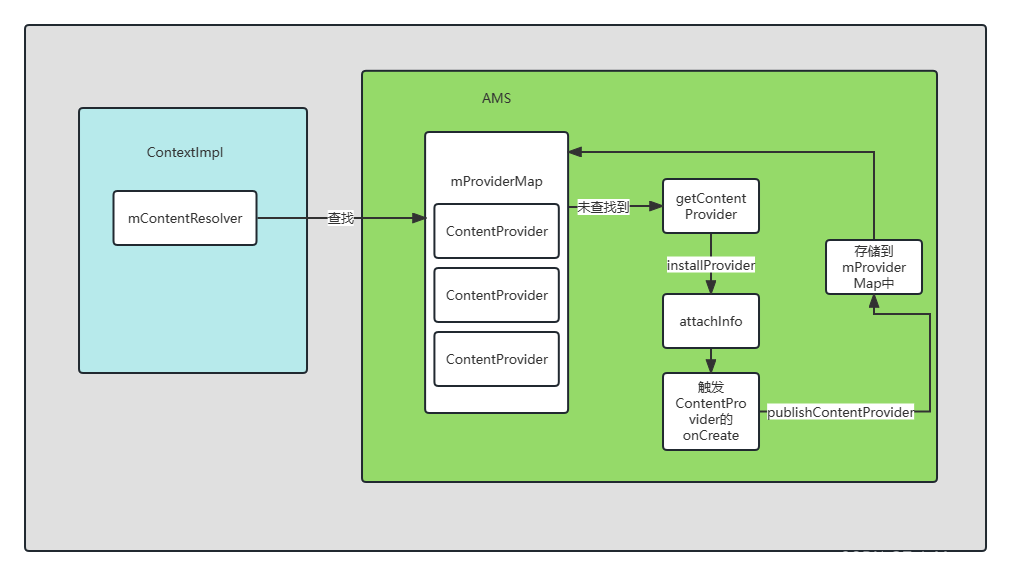
这里在注释一处会调用自身ActivityThread的acquireExistingProvider方法,从自身的mProviderMap成员变量中查找有没有目标ContentProvider,这个mProviderMap变量是一个ArrayMap,键为ProviderKey,值为ProviderClientRecord,显然是用于存储(缓存)ContentProvider的一个容器。
如果没有找到目标的ContentProvider,接下来就会调用注释二处的AMS的getContentProvider方法来获取holder,然后注释三处调用installProvider来安装Provider,最后返回holder的provider。
那么接下来就跳转到了注释二处AMS的getContentProvider方法,进入第二阶段。
AMS到ContentProvider的启动
上一节说到了现在跳转到了AMS的getContentProvider方法,我们先来看这个方法:
    public final ContentProviderHolder getContentProvider(
            IApplicationThread caller, String callingPackage, String name, int userId,
            boolean stable) {
        traceBegin(Trace.TRACE_TAG_ACTIVITY_MANAGER, "getContentProvider: ", name);
        try {
            return mCpHelper.getContentProvider(caller, callingPackage, name, userId, stable);
        } finally {
            Trace.traceEnd(Trace.TRACE_TAG_ACTIVITY_MANAGER);
        }
    }
这里调转到了中间帮助类的getContentProvider方法:
ContentProviderHolder getContentProvider(IApplicationThread caller, String callingPackage,
            String name, int userId, boolean stable) {
        mService.enforceNotIsolatedCaller("getContentProvider");
		..............
        final int callingUid = Binder.getCallingUid();
		..............
        return getContentProviderImpl(caller, name, null, callingUid, callingPackage,
                null, stable, userId);
    }
这里继续跳转到了ContentProviderHolder的getContentProviderImpl方法:
private ContentProviderHolder getContentProviderImpl(IApplicationThread caller,
            String name, IBinder token, int callingUid, String callingPackage, String callingTag,
            boolean stable, int userId) {
			............
                synchronized (this) {
                    if (!mSystemProvidersInstalled && cpi.applicationInfo.isSystemApp()
                            && "system".equals(cpi.processName)) {
                        throw new IllegalStateException("Cannot access system provider: '"
                                + cpi.authority + "' before system providers are installed!");
                    }
                }
				...........
                        ProcessRecord proc = mService.getProcessRecordLocked(
                                cpi.processName, cpr.appInfo.uid);//1-------1
                        IApplicationThread thread;
                        if (proc != null && (thread = proc.getThread()) != null
                                && !proc.isKilled()) {
                            if (ActivityManagerDebugConfig.DEBUG_PROVIDER) {
                                Slog.d(TAG, "Installing in existing process " + proc);
                            }
                            final ProcessProviderRecord pr = proc.mProviders;
                            if (!pr.hasProvider(cpi.name)) {
                                checkTime(startTime, "getContentProviderImpl: scheduling install");
                                pr.installProvider(cpi.name, cpr);//2------2
                                try {
                                    thread.scheduleInstallProvider(cpi);//3------3
                                } catch (RemoteException e) {
                                }
                            }
                        } else {
                            checkTime(startTime, "getContentProviderImpl: before start process");
                            proc = mService.startProcessLocked(//4-------4
                                    cpi.processName, cpr.appInfo, false, 0,
                                    new HostingRecord(HostingRecord.HOSTING_TYPE_CONTENT_PROVIDER,
                                        new ComponentName(
                                                cpi.applicationInfo.packageName, cpi.name)),
                                    Process.ZYGOTE_POLICY_FLAG_EMPTY, false, false);
                            checkTime(startTime, "getContentProviderImpl: after start process");
                            if (proc == null) {
                                Slog.w(TAG, "Unable to launch app "
                                        + cpi.applicationInfo.packageName + "/"
                                        + cpi.applicationInfo.uid + " for provider " + name
                                        + ": process is bad");
                                return null;
                            }
                        }
                        cpr.launchingApp = proc;
                        mLaunchingProviders.add(cpr);
                    } finally {
                        Binder.restoreCallingIdentity(origId);
                    }
                }

                ...........
        }
        return cpr.newHolder(conn, false);
    }
这个方法比较长,我们就只截取它比较重要的部分。在注释一处,获得了内容调用者的指定进程,如果这个进程存在且应用程序线程对象thread不为null,并且进程记录对象proc没有被杀死(isKilled()返回false),则会调用注释二处的代码安装Provider并且调用注释三的ActivityThread的scheduleInstallProvider方法;如果不存在的话则会调用注释四处的startProcessLocked方法启动所需要的进程,这个过程在应用进程的启动过程中介绍过了,不过这里还是假设应用程序进程不存在,我们接下来看注释四处的方法,它最终会调用到ActivityThread的main方法,具体可以看我的这一篇文章:
Android应用程序进程的启动过程
这里也贴出流程图:
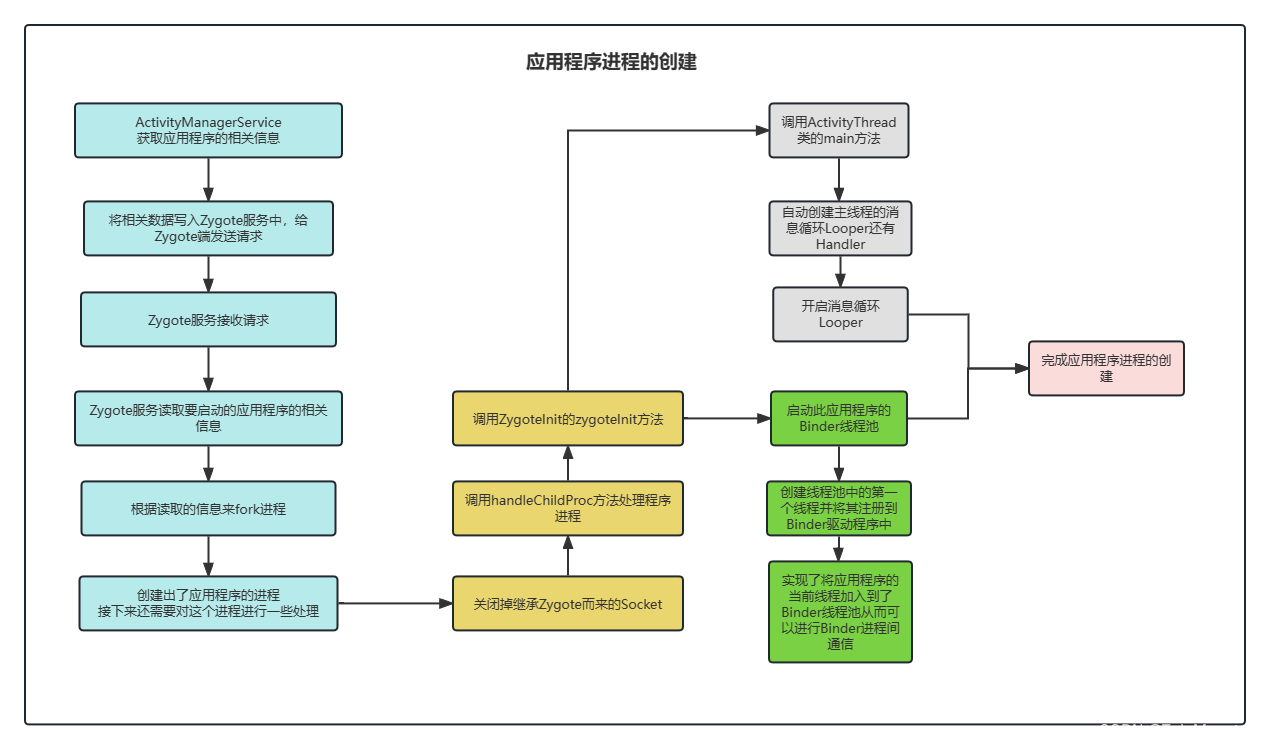
总之最后调用到了ActivityThread的main方法:
    public static void main(String[] args) {
        Trace.traceBegin(Trace.TRACE_TAG_ACTIVITY_MANAGER, "ActivityThreadMain");

        // Install selective syscall interception
        AndroidOs.install();

        // CloseGuard defaults to true and can be quite spammy.  We
        // disable it here, but selectively enable it later (via
        // StrictMode) on debug builds, but using DropBox, not logs.
        CloseGuard.setEnabled(false);

        Environment.initForCurrentUser();

        // Make sure TrustedCertificateStore looks in the right place for CA certificates
        final File configDir = Environment.getUserConfigDirectory(UserHandle.myUserId());
        TrustedCertificateStore.setDefaultUserDirectory(configDir);

        // Call per-process mainline module initialization.
        initializeMainlineModules();

        Process.setArgV0("<pre-initialized>");

        Looper.prepareMainLooper();//1----1
        long startSeq = 0;
        if (args != null) {
            for (int i = args.length - 1; i >= 0; --i) {
                if (args[i] != null && args[i].startsWith(PROC_START_SEQ_IDENT)) {
                    startSeq = Long.parseLong(
                            args[i].substring(PROC_START_SEQ_IDENT.length()));
                }
            }
        }
        ActivityThread thread = new ActivityThread();//2----2
        thread.attach(false, startSeq);//3----3

        if (sMainThreadHandler == null) {
            sMainThreadHandler = thread.getHandler();
        }
		.........
        Looper.loop();

        throw new RuntimeException("Main thread loop unexpectedly exited");
    }
这里在注释一处会先创建一个消息队列管理者Looper,然后在注释二处创建ActivityThread对象,最后在注释三处调用attach方法进行一些参数的配置,我们主要就来看这个attach方法:
    private void attach(boolean system, long startSeq) {
		.........
        mSystemThread = system;
        if (!system) {
         	...........
            final IActivityManager mgr = ActivityManager.getService();//1------1
            try {
                mgr.attachApplication(mAppThread, startSeq);//2------2
            } catch (RemoteException ex) {
                throw ex.rethrowFromSystemServer();
            }
            // Watch for getting close to heap limit.
            BinderInternal.addGcWatcher(new Runnable() {
                @Override public void run() {
                    if (!mSomeActivitiesChanged) {
                        return;
                    }
 					.........
                    if (dalvikUsed > ((3*dalvikMax)/4)) {
                      ...........
        } else {
					...........
            try {
                mInstrumentation = new Instrumentation();
                mInstrumentation.basicInit(this);
                ContextImpl context = ContextImpl.createAppContext(
                        this, getSystemContext().mPackageInfo);//3------3
                mInitialApplication = context.mPackageInfo.makeApplicationInner(true, null);//4-------4
                mInitialApplication.onCreate();
            } catch (Exception e) {
                throw new RuntimeException(
                        "Unable to instantiate Application():" + e.toString(), e);
            }
        }
        ...........
    }
这里在注释一处获得了AMS,并且在注释二中调用到了AMS的attachApplication方法,注释三处创建出了ContextImpl方法,注释四处创建了Application对象;这里我们主要看注释二处的方法,这个方法最后会调用attachApplicationLocked方法:
private boolean attachApplicationLocked(@NonNull IApplicationThread thread,
            int pid, int callingUid, long startSeq) {
		.........
                thread.bindApplication(processName, appInfo,//1-------1
                        app.sdkSandboxClientAppVolumeUuid, app.sdkSandboxClientAppPackage,
                        providerList,
                        instr2.mClass,
                        profilerInfo, instr2.mArguments,
                        instr2.mWatcher,
                        instr2.mUiAutomationConnection, testMode,
                        mBinderTransactionTrackingEnabled, enableTrackAllocation,
                        isRestrictedBackupMode || !normalMode, app.isPersistent(),
                        new Configuration(app.getWindowProcessController().getConfiguration()),
                        app.getCompat(), getCommonServicesLocked(app.isolated),
                        mCoreSettingsObserver.getCoreSettingsLocked(),
                        buildSerial, autofillOptions, contentCaptureOptions,
                        app.getDisabledCompatChanges(), serializedSystemFontMap,
                        app.getStartElapsedTime(), app.getStartUptime());
		.........
        return true;
    }
这里只要看注释一处的方法,会调用到ActivityThread的bindApplication方法:
        public final void bindApplication(String processName, ApplicationInfo appInfo,
                String sdkSandboxClientAppVolumeUuid, String sdkSandboxClientAppPackage,
                ProviderInfoList providerList, ComponentName instrumentationName,
                ProfilerInfo profilerInfo, Bundle instrumentationArgs,
                IInstrumentationWatcher instrumentationWatcher,
                IUiAutomationConnection instrumentationUiConnection, int debugMode,
                boolean enableBinderTracking, boolean trackAllocation,
                boolean isRestrictedBackupMode, boolean persistent, Configuration config,
                CompatibilityInfo compatInfo, Map services, Bundle coreSettings,
                String buildSerial, AutofillOptions autofillOptions,
                ContentCaptureOptions contentCaptureOptions, long[] disabledCompatChanges,
                SharedMemory serializedSystemFontMap,
                long startRequestedElapsedTime, long startRequestedUptime) {
			...........
            data.initProfilerInfo = profilerInfo;
            data.buildSerial = buildSerial;
            data.autofillOptions = autofillOptions;
            data.contentCaptureOptions = contentCaptureOptions;
            data.disabledCompatChanges = disabledCompatChanges;
            data.mSerializedSystemFontMap = serializedSystemFontMap;
            data.startRequestedElapsedTime = startRequestedElapsedTime;
            data.startRequestedUptime = startRequestedUptime;
            sendMessage(H.BIND_APPLICATION, data);//1------1
        }
这里给自身的Handler发送了H.BIND_APPLICATION标志,用Handler来处理,最后会触发handleBindApplication方法:
    private void handleBindApplication(AppBindData data) {
       .........
        final InstrumentationInfo ii;
        if (data.instrumentationName != null) {
            ii = prepareInstrumentation(data);
        } else {
            ii = null;
        }

        final ContextImpl appContext = ContextImpl.createAppContext(this, data.info);//1---
        mConfigurationController.updateLocaleListFromAppContext(appContext);

  		..........
        Application app;
        final StrictMode.ThreadPolicy savedPolicy = StrictMode.allowThreadDiskWrites();
        final StrictMode.ThreadPolicy writesAllowedPolicy = StrictMode.getThreadPolicy();
        try {
            // If the app is being launched for full backup or restore, bring it up in
            // a restricted environment with the base application class.
            app = data.info.makeApplicationInner(data.restrictedBackupMode, null);//2----

            // Propagate autofill compat state
            app.setAutofillOptions(data.autofillOptions);

            // Propagate Content Capture options
            app.setContentCaptureOptions(data.contentCaptureOptions);
            sendMessage(H.SET_CONTENT_CAPTURE_OPTIONS_CALLBACK, data.appInfo.packageName);

            mInitialApplication = app;
			............
            if (!data.restrictedBackupMode) {
                if (!ArrayUtils.isEmpty(data.providers)) {
                    installContentProviders(app, data.providers);//3-------3
                }
            }
           ...........
        }
    }
在注释一处创建出了ContextImpl对象,继续再注释二处创建出了Application对象,最后在注释三处调用installContentProvider方法来安装内容提供器,所以我们看注释三处的方法:
private void installContentProviders(
            Context context, List<ProviderInfo> providers) {
        final ArrayList<ContentProviderHolder> results = new ArrayList<>();

        for (ProviderInfo cpi : providers) {
            ........
            ContentProviderHolder cph = installProvider(context, null, cpi,//1-----1
                    false /*noisy*/, true /*noReleaseNeeded*/, true /*stable*/);
            if (cph != null) {
                cph.noReleaseNeeded = true;
                results.add(cph);
            }
        }

        try {
            ActivityManager.getService().publishContentProviders(
                getApplicationThread(), results);//2--------2
        } catch (RemoteException ex) {
            throw ex.rethrowFromSystemServer();
        }
    }
在注释一处遍历当前应用进程的ProviderInfo列表,得到每个Content Provider的ProviderInfo信息,并调用installProvider方法来启动Content Provider,在注释三处又会将这些Content Provider存储在AMS的mProviderMap中,以便后续调用。接下来看注释一处的方法:
private ContentProviderHolder installProvider(Context context,
            ContentProviderHolder holder, ProviderInfo info,
            boolean noisy, boolean noReleaseNeeded, boolean stable) {
        ContentProvider localProvider = null;
        IContentProvider provider;
        .............
            try {
                final java.lang.ClassLoader cl = c.getClassLoader();
                LoadedApk packageInfo = peekPackageInfo(ai.packageName, true);
                if (packageInfo == null) {
                    // System startup case.
                    packageInfo = getSystemContext().mPackageInfo;
                }
                localProvider = packageInfo.getAppFactory()
                        .instantiateProvider(cl, info.name);//1-------1
                provider = localProvider.getIContentProvider();
               ..........
                localProvider.attachInfo(c, info);//2-------2
            } catch (java.lang.Exception e) {
                if (!mInstrumentation.onException(null, e)) {
                    throw new RuntimeException(
                            "Unable to get provider " + info.name
                            + ": " + e.toString(), e);
                }
                return null;
            }
        } else {
            provider = holder.provider;
            if (DEBUG_PROVIDER) Slog.v(TAG, "Installing external provider " + info.authority + ": "
                    + info.name);
        }

        ContentProviderHolder retHolder;
        ..............
        return retHolder;
    }
在注释一处,用ClassLoader实例化了一个localProvider,接着在注释二处进行参数的配置:
    private void attachInfo(Context context, ProviderInfo info, boolean testing) {
			..........
            ContentProvider.this.onCreate();
        }
    }
这个方法最后就会调用onCreate回调方法完成内容提供者的创建。
总结
总的来说还是ContextImpl到AMS的路数,不过这次ActivityThread的戏份比较少。

![[C++11] 智能指针](https://img-blog.csdnimg.cn/a2ac6f2755f94b25b3b5af100288851a.png)


