Vue3中我们会遇到自由拖拽宽度和高度的页面需求,查看很多方法都无法满足当前需求。下面是我们Vue3版本的代码,非常简单主要构想说粗发拖拽方法,把所需要的div的高宽进行拖拽位置进行监听来加减自身div的px值。直接复制粘贴就可以实现效果。根据自己需求更改即可投入使用,非常方便快捷。(本人文章全都是免费开源,拒绝收费。构建果然免费共享技术环境)
<template>
  <div class="Drag2">
    <div class="box" ref="box">
      <div class="left">
        <!--左侧div内容-->
      </div>
      <div class="resize" title="左右侧边栏">⋮</div>
      <div class="mid">
        <!--右侧div内容-->

        <div class="topBox">
          <!--右上div内容-->
        </div>
        <div title="上下侧边栏" class="move">⋯</div>
        <div class="downBox">
          <!--右下div内容-->
        </div>
      </div>
    </div>
  </div>
</template>


<script setup lang="ts">
import { onMounted, ref } from "vue";

onMounted(() => {
  dragControllerLR();
  dragControllerUD();
});
// 左右拖动事件
function dragControllerLR() {
  var resize = document.getElementsByClassName("resize");
  var left = document.getElementsByClassName("left");
  var mid = document.getElementsByClassName("mid");
  var box = document.getElementsByClassName("box");
  console.log(document.getElementsByClassName("resize"));
  for (let i = 0; i < resize.length; i++) {
    // 鼠标按下事件
    resize[i].onmousedown = function (e) {
      //颜色改变提醒
      resize[i].style.background = "#818181";
      var startX = e.clientX;
      resize[i].left = resize[i].offsetLeft;
      // 鼠标拖动事件
      document.onmousemove = function (e) {
        var endX = e.clientX;
        var moveLen = resize[i].left + (endX - startX); // (endx-startx)=移动的距离。resize[i].left+移动的距离=左边区域最后的宽度
        var maxT = box[i].clientWidth - resize[i].offsetWidth; // 容器宽度 - 左边区域的宽度 = 右边区域的宽度

        if (moveLen < 50) moveLen = 50; // 左边区域的最小宽度为50px
        if (moveLen > maxT - 150) moveLen = maxT - 150; //右边区域最小宽度为150px

        resize[i].style.left = moveLen; // 设置左侧区域的宽度

        for (let j = 0; j < left.length; j++) {
          left[j].style.width = moveLen + "px";
          mid[j].style.width = box[i].clientWidth - moveLen - 10 + "px";
        }
      };
      // 鼠标松开事件
      // eslint-disable-next-line no-unused-vars
      document.onmouseup = function (evt) {
        //颜色恢复
        resize[i].style.background = "#d6d6d6";
        document.onmousemove = null;
        document.onmouseup = null;
        resize[i].releaseCapture && resize[i].releaseCapture(); //当你不在需要继续获得鼠标消息就要应该调用ReleaseCapture()释放掉
      };
      resize[i].setCapture && resize[i].setCapture(); //该函数在属于当前线程的指定窗口里设置鼠标捕获
      return false;
    };
  }
}
// 上下拖动事件
function dragControllerUD() {
  var resize = document.getElementsByClassName("move");
  var topBox = document.getElementsByClassName("topBox");
  var downBox = document.getElementsByClassName("downBox");
  var box = document.getElementsByClassName("mid");
  console.log(document.getElementsByClassName("move"));
  for (let i = 0; i < resize.length; i++) {
    // 鼠标按下事件
    resize[i].onmousedown = function (e) {
      console.log(resize[i].top);
      //颜色改变提醒
      resize[i].style.background = "#818181";
      var startY = e.clientY;
      resize[i].top = resize[i].offsetTop;
      // 鼠标拖动事件
      document.onmousemove = function (e) {
        var endY = e.clientY;
        var moveLen = resize[i].top + (endY - startY); // (endY - startY)=移动的距离。resize[i].top+移动的距离=上边区域最后的高度
        var maxT = box[i].clientHeight - resize[i].offsetHeight; // 容器高度 - 上边区域的高度 = 下边区域的高度

        if (moveLen < 50) moveLen = 50; // 上边区域的最小高度为50px
        if (moveLen > maxT - 150) moveLen = maxT - 150; //下边区域最小高度为150px

        resize[i].style.top = moveLen; // 设置上边区域的高度

        for (let j = 0; j < topBox.length; j++) {
          topBox[j].style.height = moveLen + "px";
          downBox[j].style.height = box[i].clientHeight - moveLen - 10 + "px";
        }
      };
      // 鼠标松开事件
      document.onmouseup = function () {
        //颜色恢复
        resize[i].style.background = "#d6d6d6";
        document.onmousemove = null;
        document.onmouseup = null;
        resize[i].releaseCapture && resize[i].releaseCapture(); //当你不在需要继续获得鼠标消息就要应该调用ReleaseCapture()释放掉
      };
      resize[i].setCapture && resize[i].setCapture(); //该函数在属于当前线程的指定窗口里设置鼠标捕获
      return false;
    };
  }
}
</script>
<style>
/* 拖拽相关样式 */

/*包围div样式*/
.box {
  width: 100vh;
  height: calc(98vh - 10px);
  margin: 1% 0px;
  overflow: hidden;
  box-shadow: -1px 9px 10px 3px rgba(0, 0, 0, 0.11);
}
/*左侧div样式*/
.left {
  width: calc(32% - 10px); /*左侧初始化宽度*/
  height: 100%;
  background: #71ad88;
  float: left;
}
/* 拖拽区div样式 */
.resize {
  cursor: w-resize;
  float: left;
  position: relative;
  top: 45%;
  background-color: #d6d6d6;
  border-radius: 5px;
  margin-top: -10px;
  width: 10px;
  height: 50px;
  background-size: cover;
  background-position: center;
  /*z-index: 99999;*/
  font-size: 32px;
  color: white;
}

/*拖拽区鼠标悬停样式*/
.move:hover {
  color: #444444;
}
/*右侧div'样式*/
.mid {
  float: left;
  width: 68%; /*右侧初始化宽度*/
  height: 100%;
  background: #f3f3f3;
  box-shadow: -1px 4px 5px 3px rgba(0, 0, 0, 0.11);
  /*上方div'样式*/
  .topBox {
    height: 60%;
    background-color: #3ff53f;
    display: flex;
  }
  /*下方div'样式*/
  .downBox {
    height: calc(40% - 10px);
    background-color: #f0fd35;
    display: flex;
  }
  /* 拖拽区div样式 */
  .move {
    cursor: s-resize;
    width: 50px;
    height: 10px;
    background-color: #d6d6d6;
    margin: 0 auto;
    border-radius: 5px;
    text-align: center;
    line-height: 3px;
    font-size: 32px;
    color: white;
  }
  /*拖拽区鼠标悬停样式*/
  .move:hover {
    color: #444444;
  }
}
</style>
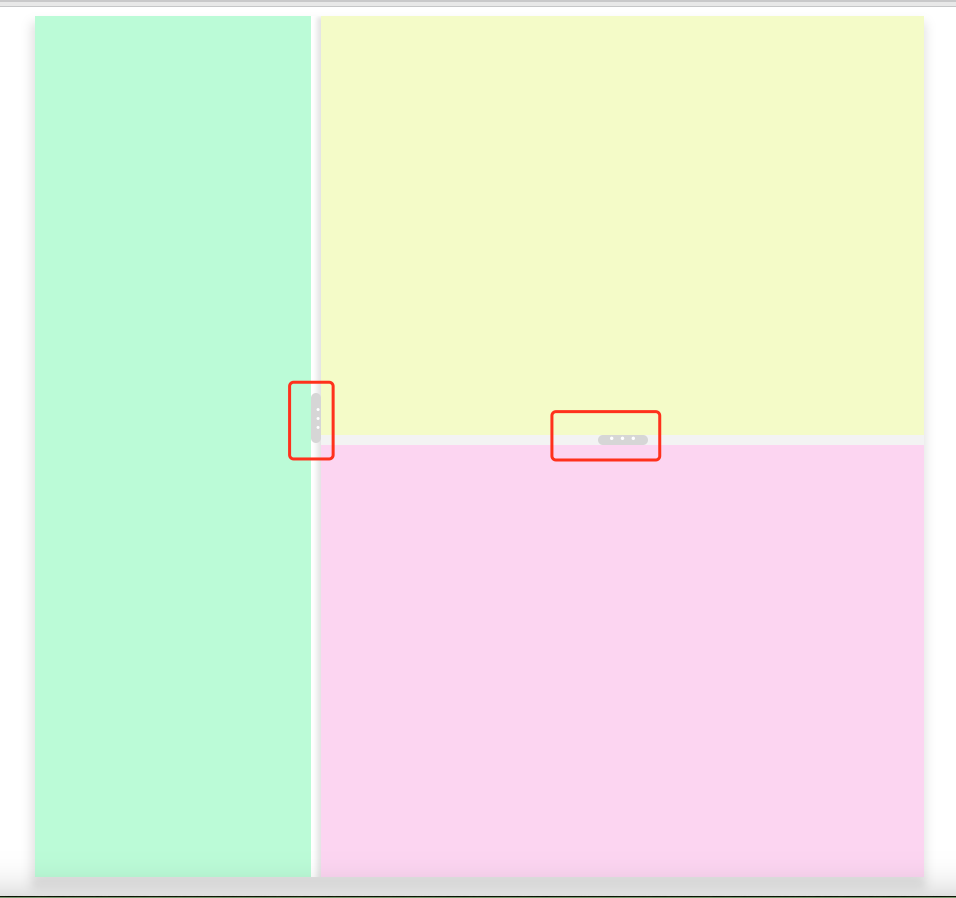
效果图如下:
下面希望各位大哥支持一下我开发的小程序,萘兔小程序用户始终坚持免费提供用户使用的一个小程序,提成程序免费便利于群众,服务群众的宗旨。同时不断提高自身的能力和了解用户需求,开拓自身的程序视野,快速提高自我技术,未编程共享继续提供更多的免费代码交流环境。点击一下增加一下我的用户量。如有建议可以私信我非常感激。

Vue3介绍(不用理会)
vue3.0带来了什么
1.性能的提升
打包大小减少41%
初次渲染快55%,更新渲染块133%
内存减少54%
........
2.源码的升级
使用Proxy代替defineProperty实现响应式
重写虚拟DOM的实现和Tree-Sharking
......
3.拥抱TypeScript
vue3.0更好的支持TypeScript
4.新的特性
Composition API(组合api)
。 setup配置
。ref与reactive
。watch与watchEffect
。 provide和inject
。 .......
新的内置组件
。 Fragment
。Teleport
。Suspense
其他改变
。新的生命周期钩子
。data选项应始终被声明为一个函数
。移除keyCode支持作为v-on的修饰符



![C国演义 [第三章]](https://img-blog.csdnimg.cn/48fe918b9d0c4f47a9e5a56a7a3aa117.png)
