一、OKHttp的缓存逻辑
OKHttp 把重复请求的数据缓存在本地,并设置超时时间,在规定时间内,客户端不再向远程请求数据,而是直接从本地缓存中取数据。
- 一来提高了响应速度,
- 二来节省了网络带宽(也就是节省了钱)
二、Http协议的缓存机制
HTTP缓存机制是Web浏览器、代理服务器和Web服务器之间的协议,用于提高Web性能并减少网络带宽的使用。缓存机制能够在再次请求相同资源时,避免网络数据的重复传输,从而提高网络效率和响应速度。
1.1.HTTP缓存机制主要分为两类:
客户端缓存和服务器缓存。
- 客户端缓存是指在Web浏览器中缓存常用资源,如图片、JavaScript文件和样式表等。
- 服务器缓存是指在代理服务器或Web服务器上缓存动态生成的页面或页面元素。
1.2.HTTP缓存机制中有两个重要的概念:
缓存有效期和缓存验证。
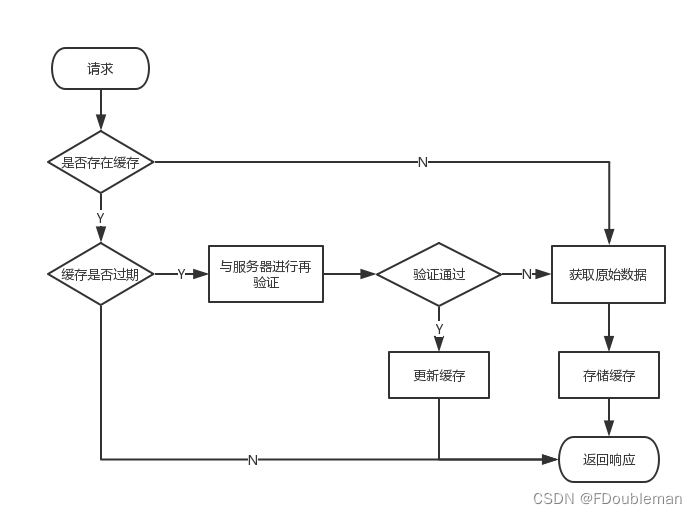
- 缓存有效期是指缓存的资源能够被使用的时间长度。如果在有效期内再次请求相同的资源,缓存就会直接使用缓存中的数据,而不必再向服务器请求数据。
- 缓存验证是指在缓存过期之后,如果缓存仍然需要使用,就必须向服务器发送一个请求,询问服务器是否有更新的数据。
1.3.HTTP缓存机制可以通过HTTP头部信息来控制缓存的行为。
常用的HTTP头部信息有:
- Cache-Control:用于控制缓存的行为,包括缓存有效期、缓存验证和缓存控制等。
- Expires:缓存资源的过期时间,是一个固定的时间点,一旦超过这个时间点就认为缓存已经过期。
- Last-Modified:资源的最后修改时间,用于判断资源是否有更新。
- ETag:一个标识符,用于判断资源是否有更新。
1.4.Http缓存相关控制的请求头
1.4.1.Cache-Control
- no-cache:不做缓存
- max-age:这个参数告诉浏览器将页面缓存多长时间,超过这个时间后才再次向服务器发起请求检查页面是否有更新。对于静态的页面,比如图片、CSS、Javascript,一般都不大变更,因此通常我们将存储这些内容的时间设置为较长的时间,这样浏览器会不会向浏览器反复发起请求,也不会去检查是否更新了。
- no-store:数据不在硬盘中临时保存,这对需要保密的内容比较重要。
- max-stale:指示客户机可以接收超出超时期间的响应消息。如果指定- max-stale消息的值,那么客户机可以接收超出超时期指定值之内的响应消息。
1.4.2.Expires
- Expires指定响应过期的日期和时间,其格式为GMT格式的字符串,例如:
Expires: Wed, 21 Oct 2023 07:28:00 GMT
该响应告知客户端,在过期日期之后,该响应将被视为过时,需要重新请求。过期日期应为服务器当前时间和数据生命周期之和。
Expires头的主要缺点在于,它需要客户端和服务器之间的时间同步。如果两者的时间不同步,就可能导致缓存行为不正确。
通常,更推荐使用Cache-Control头来控制响应的缓存行为,因为它提供了更多的灵活性和精度。在Cache-Control和Expires同时存在的情况下,Cache-Control优先级更高。
1.4.3.Last-Modified/If-Modified-Since
HTTP响应头Last-Modified指示资源的最后修改时间。需要配合Cache-Control使用:
- Last-Modified:标示这个响应资源的最后修改时间。web服务器在响应请求时,告诉浏览器资源的最后修改时间。
- If-Modified-Since:当资源过期时(使用Cache-Control标识的max-age),发现资源具有Last-Modified声明,则再次向web服务器请求时带上头 If-Modified-Since,表示请求时间。
web服务器收到请求后发现有头If-Modified-Since 则与被请求资源的最后修改时间进行比对。
若最后修改时间较新,说明资源又被改动过,则响应整片资源内容(写在响应消息包体内),HTTP 200;
若最后修改时间较旧,说明资源无新修改,则响应HTTP 304 (无需包体,节省浏览),告知浏览器继续使用所保存的cache。
Last-Modified: Fri, 29 Oct 2021 08:50:00 GMT
这表示资源在GMT时间2021年10月29日08:50:00进行了最后修改。
1.4.4.Etag/If-None-Match
这个也需要配合Cache-Control使用
-
Etag对应请求的资源在服务器中的唯一标识(具体规则由服务器决定),比如一张图片,它在服务器中的标识为ETag: W/”ACXbWXd1n0CGMtAd65PcoA==”。
-
If-None-Match 如果浏览器在Cache-Control:max-age=60设置的时间超时后,发现消息头中还设置了Etag值。然后,浏览器会再次向服务器请求数据并添加In-None-Match消息头,它的值就是之前Etag值。服务器通过Etag来定位资源文件,根据它是否更新的情况给浏览器返回200或者是304。
Etag机制比Last-Modified精确度更高,如果两者同时设置的话,Etag优先级更高。
1.4.5.Pragma
Pragma头域用来包含实现特定的指令,最常用的是Pragma:no-cache。
在HTTP/1.1协议中,它的含义和Cache- Control:no-cache相同。
三、Http缓存机制流程图
四、OKHttp设置缓存
参考官方文档
五、CacheInterceptor源码分析
CacheInterceptor 用于处理缓存逻辑。它的主要功能是根据缓存策略决定是否使用缓存的响应,以及是否将新的响应存储到缓存中。
-
检查是否有缓存:CacheInterceptor首先会检查是否存在与当前请求匹配的缓存响应。如果存在缓存响应并且未过期,将直接返回缓存响应,而不会发送请求到服务器。
-
发送网络请求:如果没有可用的缓存响应或缓存响应已过期,CacheInterceptor会继续将请求传递给下一个拦截器,发送网络请求到服务器获取新的响应。
-
处理服务器返回的响应:当服务器返回响应后,CacheInterceptor会根据缓存策略决定是否将该响应存储到缓存中。如果响应满足缓存条件,CacheInterceptor会将其存储到缓存中,以便后续请求可以使用缓存响应。
// 通过构造方法将 Okhttp设置 cache传递到 CacheInterceptor 中
class CacheInterceptor(internal val cache: Cache?) : Interceptor {

  @Throws(IOException::class)
  override fun intercept(chain: Interceptor.Chain): Response {
    val call = chain.call()
      // 1、获取缓存候选者。如何获取???待分析
    val cacheCandidate = cache?.get(chain.request())

    val now = System.currentTimeMillis()
    // 按道理讲,接下来应该判断 是否命中缓存,从而决定是直接请求网络数据还是判断缓存是否过期,
    // 但 CacheInterceptor 中并没有这么做,而是构建了一个 CacheStrategy,实际上它是将缓存的合法性、
   // 缓存是否过期等判断全部放到 CacheStrategy 的构建过程中来做了。
   // // 2、根据 当前时间、请求request、以及缓存候选者 获取策略
    val strategy = CacheStrategy.Factory(now, chain.request(), cacheCandidate).compute()
    // 3、获取网络请求Request 和缓存Response
    val networkRequest = strategy.networkRequest
    val cacheResponse = strategy.cacheResponse

    cache?.trackResponse(strategy)
    val listener = (call as? RealCall)?.eventListener ?: EventListener.NONE
    // 4、缓存候选不适用。关闭它。
    if (cacheCandidate != null && cacheResponse == null) {
      cacheCandidate.body?.closeQuietly()
    }

    // 5、如果我们被禁止使用网络,但缓存并不存在时,构造一个 504 错误。
    if (networkRequest == null && cacheResponse == null) {
      return Response.Builder()
          .request(chain.request())
          .protocol(Protocol.HTTP_1_1)
          .code(HTTP_GATEWAY_TIMEOUT)
          .message("Unsatisfiable Request (only-if-cached)")
          .body(EMPTY_RESPONSE)
          .sentRequestAtMillis(-1L)
          .receivedResponseAtMillis(System.currentTimeMillis())
          .build().also {
            listener.satisfactionFailure(call, it)
          }
    }

    // 6、缓存任然未过期,不需要使用网络请求,直接返回缓存。
    if (networkRequest == null) {
      return cacheResponse!!.newBuilder()
          .cacheResponse(stripBody(cacheResponse))
          .build().also {
            listener.cacheHit(call, it)
          }
    }
   // 当程序运行到这里时,有两种可能:
   // 一是直接发起网络请求,获取原始数据(networkRequest != null && cacheResponse == null);
   // 二是需要进行条件验证(networkRequest != null && cacheResponse != null)。
    if (cacheResponse != null) {
      listener.cacheConditionalHit(call, cacheResponse)
    } else if (cache != null) {
      listener.cacheMiss(call)
    }

    var networkResponse: Response? = null
    try {
      // 7、至此需要发起真正的网络请求:即 networkRequset !=null
      networkResponse = chain.proceed(networkRequest)
    } finally {
      // If we're crashing on I/O or otherwise, don't leak the cache body.
      if (networkResponse == null && cacheCandidate != null) {
        cacheCandidate.body?.closeQuietly()
      }
    }

    // 8、发起网络请求后,即 networkRequset !=null 而且  cacheResponse != null
    // 如果服务器返回 304 Not Modified,则表示缓存未修改,任然可用,更新缓存的 header;
    // 否则表示缓存过期,服务器会直接返回原始数据
    if (cacheResponse != null) {
        //  8.1、判断网络请求的响应码是否是304?
      if (networkResponse?.code == HTTP_NOT_MODIFIED) {
          // 8.1.1、如果响应码是 304 ,则 可以使用缓存
        val response = cacheResponse.newBuilder()
            .headers(combine(cacheResponse.headers, networkResponse.headers))
            .sentRequestAtMillis(networkResponse.sentRequestAtMillis)
            .receivedResponseAtMillis(networkResponse.receivedResponseAtMillis)
            .cacheResponse(stripBody(cacheResponse))
            .networkResponse(stripBody(networkResponse))
            .build()

        networkResponse.body!!.close()

        // Update the cache after combining headers but before stripping the
        // Content-Encoding header (as performed by initContentStream()).
        cache!!.trackConditionalCacheHit()
        // 8.1.1.1、更新缓存
        cache.update(cacheResponse, response)
        return response.also {
          listener.cacheHit(call, it)
        }
      } else {
          // 8.1.2、如果响应码不是 304,则关闭缓存
        cacheResponse.body?.closeQuietly()
      }
    }
    // 9、构建网络响应response
    val response = networkResponse!!.newBuilder()
        .cacheResponse(stripBody(cacheResponse))
        .networkResponse(stripBody(networkResponse))
        .build()

    if (cache != null) {
        // 10、如果响应可以被缓存的话,保存缓存。
        // 而且 网络响码符合规则
        // 而且 response 、和networkRequest是 可以缓存的
      if (response.promisesBody() && CacheStrategy.isCacheable(response, networkRequest)) {
        // 10.1、保存、设置、put新的缓存
        val cacheRequest = cache.put(response)
        // 10.2 、写入缓存,并返回 response
        return cacheWritingResponse(cacheRequest, response).also {
          if (cacheResponse != null) {
            // This will log a conditional cache miss only.
            listener.cacheMiss(call)
          }
        }
      }
        // 11、判断请求方法是否是遗弃缓存???
        // invalidatesCache(method: String): Boolean = (method == "POST" || method == "PATCH"
        // || method == "PUT" || method == "DELETE" ||    method == "MOVE")
      if (HttpMethod.invalidatesCache(networkRequest.method)) {
        try {
            // 这些请求方法 则移除缓存
          cache.remove(networkRequest)
        } catch (_: IOException) {
          // The cache cannot be written.
        }
      }
    }
    // 12 、返回response
    return response
  }
通过对CacheInterceptor的流程梳理,有几个问题需要再次深入研究分析一下:
- 缓存的获取逻辑
- 缓存策略构建缓存的过程
- 缓存更新过程
- 缓存添加过程
- 缓存写入过程
5.1.缓存的获取逻辑
val cacheCandidate = cache?.get(chain.request())分析:
Cache - get()方法源码:
internal fun get(request: Request): Response? {
    // 分析一
  val key = key(request.url)
  // 分析二
  // 表示一个缓存快照,即表示一个缓存条目的快照状态。
    // 在OkHttp的缓存系统中,当从缓存中获取数据时,会返回一个Snapshot对象。
    // Snapshot对象提供了对缓存数据的访问和操作方法,
    // 包括读取缓存数据、获取缓存数据的输入流、获取缓存数据的大小等。
  val snapshot: DiskLruCache.Snapshot = try {
    cache[key] ?: return null
  } catch (_: IOException) {
    return null // Give up because the cache cannot be read.
  }
    // 分析三
  val entry: Entry = try {
    Entry(snapshot.getSource(ENTRY_METADATA))
  } catch (_: IOException) {
    snapshot.closeQuietly()
    return null
  }
    // 分析四:
  val response = entry.response(snapshot)
  if (!entry.matches(request, response)) {
    response.body?.closeQuietly()
    return null
  }

  return response
}
分析一、通过请求url获取 存储的key
key = url.toString().encodeUtf8().md5().hex()
分析二、通过key从OkHttp自定义的DiskLruCache获取snapshot:快照
val snapshot: DiskLruCache.Snapshot = try {
cache[key] ?: return null
operator fun get(key: String): Snapshot? {
	//  2.1 初始化日志文件,主要是从journal文件中读取内容 分装到 Entry(对象中)
	//  并将其添加到 lruEntries
    initialize()
	// 2.2 验证key是否符合规范:regex [a-z0-9_-]{1,120}
    validateKey(key)
    // 从lruEntries 对象中读取指定的 entry
    val entry = lruEntries[key] ?: return null
    // 2.4 用于获取缓存条目的快照。
    // 快照是缓存条目的一个副本,它允许我们读取缓存的数据而不影响原始缓存条目。
    val snapshot = entry.snapshot() ?: return null

    redundantOpCount++
    // 2.5 在日志文件中写入,读取的记录
    journalWriter!!.writeUtf8(READ)
        .writeByte(' '.toInt())
        .writeUtf8(key)
        .writeByte('\n'.toInt())
    if (journalRebuildRequired()) {
      cleanupQueue.schedule(cleanupTask)
    }
    return snapshot
  }
分析2.1 initialize
fun initialize() {
    this.assertThreadHoldsLock()
	// 已经初始化 ,则return
    if (initialized) {
      return // Already initialized.
    }
	//2.1.1 备份文件存在就使用
    if (fileSystem.exists(journalFileBackup)) {
      // 如果日志文件也存在,则删除备份文件
      if (fileSystem.exists(journalFile)) {
       // 日志文件存在 删除备份文件
        fileSystem.delete(journalFileBackup)
      } else {
      	//  日志文件不存在,将备份文件命名为日志文件。
        fileSystem.rename(journalFileBackup, journalFile)
      }
    }

    civilizedFileSystem = fileSystem.isCivilized(journalFileBackup)

    // 2.1.2 判断日志文件是否存在
    if (fileSystem.exists(journalFile)) {
      try {
         // 2.1.2.1、读取日志文件, 并将 读取的内容封装到 Entry()对象中
         // 并添加到 存放到 lruEntries中
        readJournal()
        // 2.1.2.2、作为打开缓存的一部分,计算初始大小并收集垃圾。
        // 脏条目被认为是不一致的,将被删除。
        processJournal()
        initialized = true
        return
      } catch (journalIsCorrupt: IOException) {
        Platform.get().log(
            "DiskLruCache $directory is corrupt: ${journalIsCorrupt.message}, removing",
            WARN,
            journalIsCorrupt)
      }
      try {
      // 2.1.3 日志文件不存在,或者发生异常
	 // 缓存已经损坏、尝试删除该目录内容。可以抛出异常,因为存在严重的文件系统问题
        delete()
      } finally {
        closed = false
      }
    }
	// 创建新的日志,如果当前的日志文件不存在 ,则替换
    rebuildJournal()

    initialized = true
  }
分析 2.1.2.1 readJournal
  private fun readJournal() {
    fileSystem.source(journalFile).buffer().use { source ->
        // 读取日志文件的头部信息
        val magic = source.readUtf8LineStrict() // 魔数
        val version = source.readUtf8LineStrict() // 版本号
        val appVersionString = source.readUtf8LineStrict() // 应用程序版本号
        val valueCountString = source.readUtf8LineStrict() // 键值对数量
        val blank = source.readUtf8LineStrict() // 空行

        // 检查日志文件头部的有效性
        if (MAGIC != magic ||
            VERSION_1 != version ||
            appVersion.toString() != appVersionString ||
            valueCount.toString() != valueCountString ||
            blank.isNotEmpty()) {
            throw IOException("日志文件头部异常: [$magic, $version, $valueCountString, $blank]")
        }

        var lineCount = 0
        // 逐行读取日志文件的内容
        while (true) {
            try {
                // 用于解析并处理日志文件中的一行内容。
                // 在DiskLruCache中,日志文件用于记录缓存条目的状态和操作。
                readJournalLine(source.readUtf8LineStrict())
                lineCount++
            } catch (_: EOFException) {
                break // 日志文件结束
            }
        }

        // 计算日志文件中冗余操作的数量
        redundantOpCount = lineCount - lruEntries.size

        // 如果源文件未读取完整,说明最后一行被截断,需要在追加内容之前重新构建日志文件
        if (!source.exhausted()) {
            rebuildJournal()
        } else {
            // 创建一个新的日志文件写入器,用于后续写入操作
            journalWriter = newJournalWriter()
        }
    }
}
分析 2.1.2.2 的方法 processJournal
/**
 * 处理日志文件,清理无效的缓存条目。
 */
private fun processJournal() {
    // 删除临时的日志文件
    fileSystem.delete(journalFileTmp)

    // 遍历缓存条目,清理无效的条目并计算缓存大小
    val iterator = lruEntries.values.iterator()
    while (iterator.hasNext()) {
        val entry = iterator.next()

        // 如果当前缓存条目没有正在进行的编辑操作,则计算其大小
        if (entry.currentEditor == null) {
            for (t in 0 until valueCount) {
                size += entry.lengths[t]
            }
        } else {
            // 如果当前缓存条目有正在进行的编辑操作,则清理相关文件并移除条目
            entry.currentEditor = null
            for (t in 0 until valueCount) {
                fileSystem.delete(entry.cleanFiles[t])
                fileSystem.delete(entry.dirtyFiles[t])
            }
            iterator.remove()
        }
    }
}
分析三、从缓存快照中取出第一个Source,并构建 Cache.Entry
// 读取:url 、requestMethod、varyHeaders、protocol、code、message、sentRequestMillis、receivedResponseMillis 、responseHeaders 、https的相关信息 …
// 就是读取请求信息
val entry: Entry = try {
Entry(snapshot.getSource(ENTRY_METADATA))
 val source = rawSource.buffer()
 url = source.readUtf8LineStrict()
 requestMethod = source.readUtf8LineStrict()
 ...
分析四、通过entry的值构建 response
-> val response = entry.response(snapshot)
fun response(snapshot: DiskLruCache.Snapshot): Response {
      val contentType = responseHeaders["Content-Type"]
      val contentLength = responseHeaders["Content-Length"]
      val cacheRequest = Request.Builder()
          .url(url)
          .method(requestMethod, null)
          .headers(varyHeaders)
          .build()
      return Response.Builder()
          .request(cacheRequest)
          .protocol(protocol)
          .code(code)
          .message(message)
          .headers(responseHeaders)
          .body(CacheResponseBody(snapshot, contentType, contentLength))
          .handshake(handshake)
          .sentRequestAtMillis(sentRequestMillis)
          .receivedResponseAtMillis(receivedResponseMillis)
          .build()
    }
// 获取构建缓存响应body
-> CacheResponseBody(snapshot, contentType, contentLength)
     // 获得缓存快照source中的第二的文件流
     -> val source = snapshot.getSource(ENTRY_BODY)
六、缓存策略的计算过程
val strategy = CacheStrategy.Factory(now, chain.request(), cacheCandidate).compute()
-> CacheStrategy.Factory()
// 1、通过读取缓存中的 heads 设置成员变量:
//    Date、expires、lastModified、etag、ageSeconds
	-> init()
	// 2、使用cacherresponse返回一个策略来满足请求。
	-> compute()
		// 2.1
		-> val candidate = computeCandidate()
		// 2.1.1、没有缓存响应
		-> if (cacheResponse == null)
			-> return CacheStrategy(request, null)
		// 2.1.2、如果缺少必要的握手,则删除缓存的响应。
		-> if (request.isHttps && cacheResponse.handshake == null)
			-> return CacheStrategy(request, null)
		// 2.1.3、如果不应该存储此响应,则永远不应该将其用作响应源。
		// 只要持久性存储运行良好且规则不变,这种检查就应该是多余的。
		-> if (!isCacheable(cacheResponse, request))
			// 如果响应可以存储以供以后服务另一个请求,则返回true。
			-> isCacheable()
				// 通过缓存的响应码判断是否能缓存
				-> when (response.code)
					-> return true/false
				// 其次通过 请求的 和缓存的 cacheControl noStore 字段判断
				-> return !response.cacheControl.noStore && !request.cacheControl.noStore
			// 不满足受用缓存的条件
			-> return CacheStrategy(request, null)
			// 2.1.4、判断 请求的 和缓存的 cacheControl noStore 字段判断
			-> if (requestCaching.noCache || hasConditions(request))
				-> return CacheStrategy(request, null)
			// 2.1.5、超时判断
			-> if (!responseCaching.noCache && ageMillis + minFreshMillis < freshMillis + maxStaleMillis)
				-> return CacheStrategy(null, builder.build())
			// 2.1.6、找到要添加到请求的条件。如果满足条件,则不会传输响应体。
			// 即将符合条件的请求头添加到请求中
			-> etag != null -> {conditionName = "If-None-Match"  conditionValue = etag }
			-> val conditionalRequest = request.newBuilder().headers(conditionalRequestHeaders.build()).build()
			-> return CacheStrategy(conditionalRequest, cacheResponse)

		// 2.2、我们被禁止使用网络,缓存不足。
		-> if (candidate.networkRequest != null && request.cacheControl.onlyIfCached)
		// 2.3、返回计算出来的CacheStrategy
		-> return candidate
七、缓存更新过程
cache.update(cacheResponse, response)
internal fun update(cached: Response, network: Response) {
	// 分析一
    val entry = Entry(network)
    // 分析二
    val snapshot = (cached.body as CacheResponseBody).snapshot
    var editor: DiskLruCache.Editor? = null
    try {
    // 分析三
      editor = snapshot.edit() ?: return // edit() returns null if snapshot is not current.
      entry.writeTo(editor)
      editor.commit()
    } catch (_: IOException) {
      abortQuietly(editor)
    }
  }
分析1、通过网络请求结果 构建, 初始化Entry 成员变量 url、headers、Method、code、message…
-> val entry = Cache.Entry(network)
分析2、获得 缓存body的快照
-> val snapshot = (cached.body as CacheResponseBody).snapshot
分析3、返回此快照条目的编辑器,如果自此快照创建以来条目发生了更改或正在进行另一项编辑,则返回null。
-> editor = snapshot.edit()
	// 3.1  key:string加密值  ,sequenceNumber:最近提交到此条目的编辑的序列号。
	-> this@DiskLruCache.edit(key, sequenceNumber)
		//  已分析过。
		-> initialize()
		// 3.1.1、获取key对应的文件 .0 .1结尾
		-> var entry: Entry? = lruEntries[key]
		// 3.1.2、快照过期
		-> if (expectedSequenceNumber != ANY_SEQUENCE_NUMBER &&
        (entry == null || entry.sequenceNumber != expectedSequenceNumber))
			-> return null
		// 3.1.3、另一项编辑正在进行中。
		-> if (entry?.currentEditor != null)
			-> return null
		// 3.1.4、我们无法写入该文件,因为阅读器仍在读取它。
		-> if (entry != null && entry.lockingSourceCount != 0)
			->  return null
		// 3.1.5、如果 日志重建失败,日志写入器将不再活动,这意味着我们将不再活动 能够记录编辑,导致文件泄漏。在这
		// 两种情况下,我们都希望重试清理 这样我们就能摆脱这种状态了!
		-> if (mostRecentTrimFailed || mostRecentRebuildFailed)
			-> cleanupQueue.schedule(cleanupTask)
			-> return null
		// 3.1.6、在创建文件之前刷新日志,以防止文件泄漏。
		-> journalWriter.writeUtf8(DIRTY)
		-> journalWriter.flush()
		// 3.1.7、创建缓存文件entry
		-> if (entry == null)
			//  创建包含 缓存文件信息 的 DiskLruCache.Entry
			-> entry = Entry(key)
			-> lruEntries[key] = entry
		// 3.1.8、构建editor
		-> val editor = Editor(entry)
		-> entry.currentEditor = editor
		-> return editor
4、将请求头的信息 METADATA 写入文件 .0文件
-> entry.writeTo(editor)
5、提交此编辑,以便读者可以看到。这将释放编辑锁,以便对同一密钥启动另一个编辑。
-> editor.commit()
八、缓存put存放的过程
 val cacheRequest = cache.put(response)
// 1、通过Http请求方式,验证是否支持缓存
// post、patch、put、move
-> if (HttpMethod.invalidatesCache(response.request.method))
	-> remove(response.request) // 下面分析
// 2、不要缓存非get响应。
// 技术上我们允许缓存HEAD请求和一些POST请求,但是这样做的复杂性很高,好处很低。
-> if (requestMethod != "GET")
	-> return null
// 3、如果Vary标头包含星号,则返回true。这样的响应不能被缓存。
-> if (response.hasVaryAll())
	->  return null
// 4、构造Cache.Entry
-> val entry = Entry(response)
-> editor = cache.edit(key(response.request.url)) ?: return null
	-> DiskLruCache.edit()
		// 初始化 缓存的 Journal 文件,并创建 journalWriter 。一分析过
		-> initialize()
		-> var entry: Entry? = lruEntries[key]
		// 在创建文件之前刷新日志,以防止文件泄漏。记录操作日志
		-> val journalWriter = this.journalWriter!!
		-> journalWriter.writeUtf8(DIRTY)...
		// 创建DiskLruCache.Entry
		-> if (entry == null)
			-> entry = DiskLruCache.Entry(key)
				-> init()
					// valueCount 为2 ,固定值。即创建以kay.0  key.1的两个缓存文件
					-> val fileBuilder = StringBuilder(key).append('.')
						-> for (i in 0 until valueCount)
								-> fileBuilder.append(i)
								->  cleanFiles += File(directory, fileBuilder.toString())
			// 存放 DiskLruCache.Entry
			-> lruEntries[key] = entry
			// 创建Editor
			-> val editor = Editor(entry)
			// 将 DiskLruCache.Entry 和 editor 绑定
			-> entry.currentEditor = editor
// 5、将 写入请求Header等信息
-> entry.writeTo(editor)
	-> editor.newSink(ENTRY_METADATA)
		// 获取 以key.0结尾的缓存文件
		-> val dirtyFile = entry.dirtyFiles[index]
		-> sink = fileSystem.sink(dirtyFile)
	// 写入头信息
	-> sink.writeUtf8(url).writeByte('\n'.toInt())
->
// 6、返回 保存的结果信息
-> return RealCacheRequest(editor)
	// 获取 以key.1结尾的缓存文件
	-> val cacheOut: Sink = editor.newSink(ENTRY_BODY)
	// 关联Body 流
	-> RealCacheRequest.body = ForwardingSink(cacheOut)