文章目录
- 引言
- 主要流程
- 启动类剖析
- 启动类示例
- SpringApplication.run()方法
- 创建SpringApplication对象过程
- 创建对象源码流程整体分析
- 不服就debug
- 创建对象核心过程分解
- 流程1:deduceFromClasspath()获取主程序类和应用类型
- 流程2: setInitializers()设置初始化器
- 流程3: setListeners()设置监听器
- 流程4:deduceMainApplicationClass()获取主程序类Class
- getSpringFactoriesInstances()方法分析
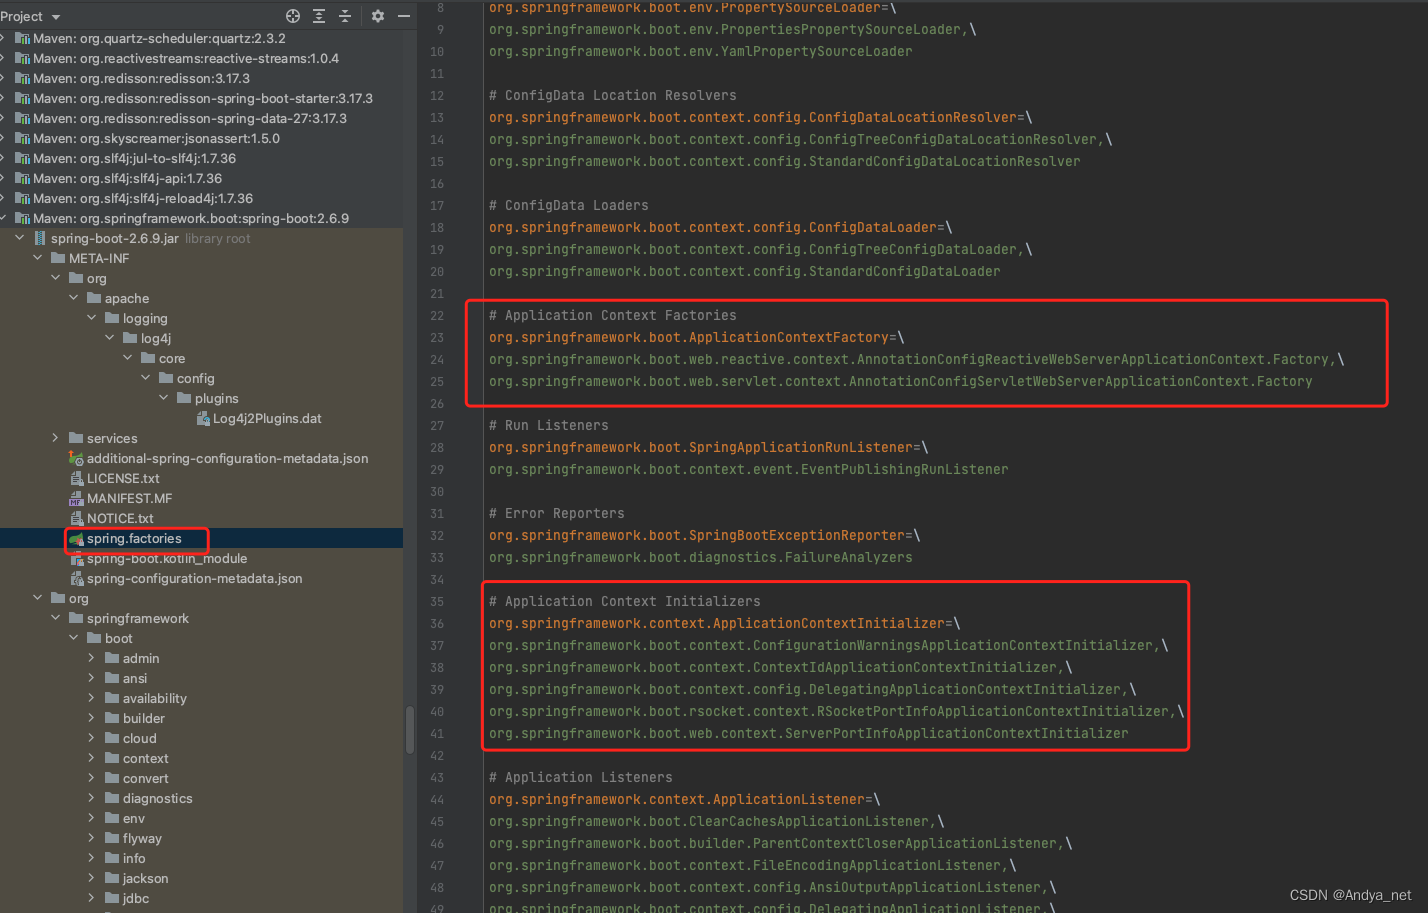
- spring.factories文件
- getSpringFactoriesInstances()核心源码
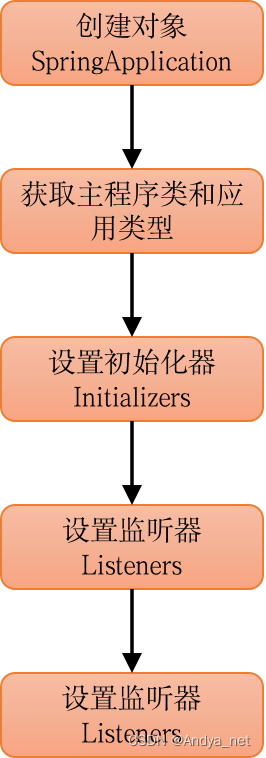
- 创建对象主流程总结
- 执行SpringApplication.run()方法过程
- 执行run()方法源码过程整体分析
- 不服就debug
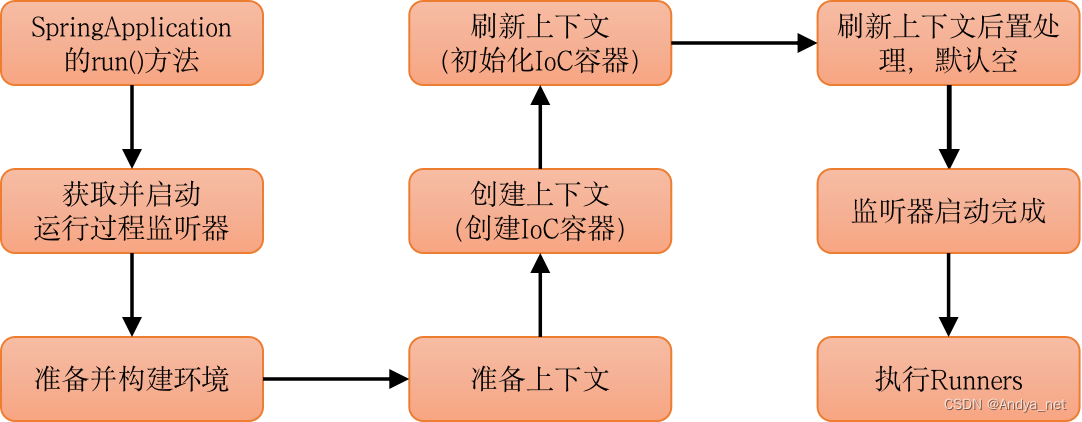
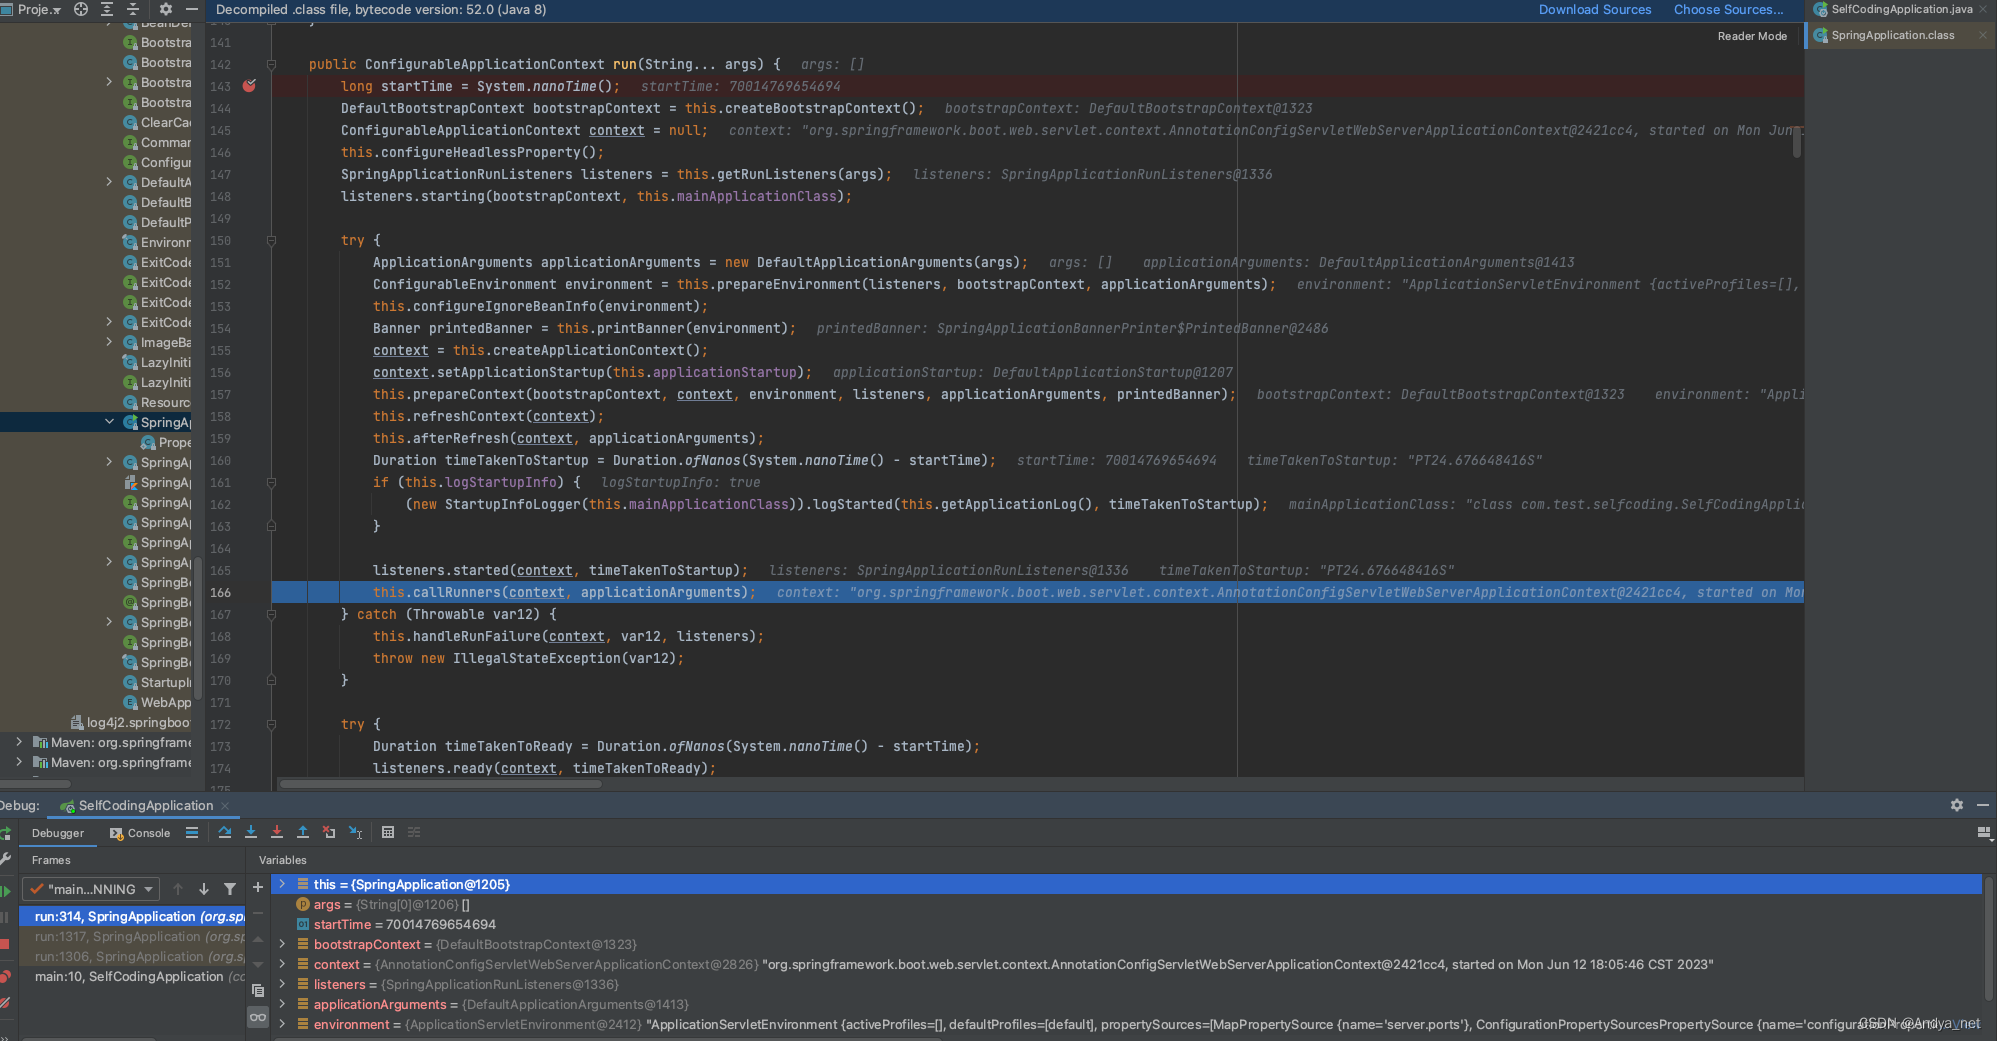
- run()方法核心过程分解
- 流程1:获取并启动运行过程监听器
- 流程2:准备并构建环境
- 流程3:IoC容器创建,即创建应用程序上下文
- 流程4:IoC容器的前置处理
- 流程5: IoC容器的刷新,即刷新应用程序上下文
- 流程6: IoC容器的后置处理
- 流程7: 监听器启动完成
- 流程8:执行Runners
- 执行run()方法主流程总结
引言
用了这么久Spring Boot框架,这次决定对Spring Boot的启动过程一探究竟!卷一波源码!
主要流程
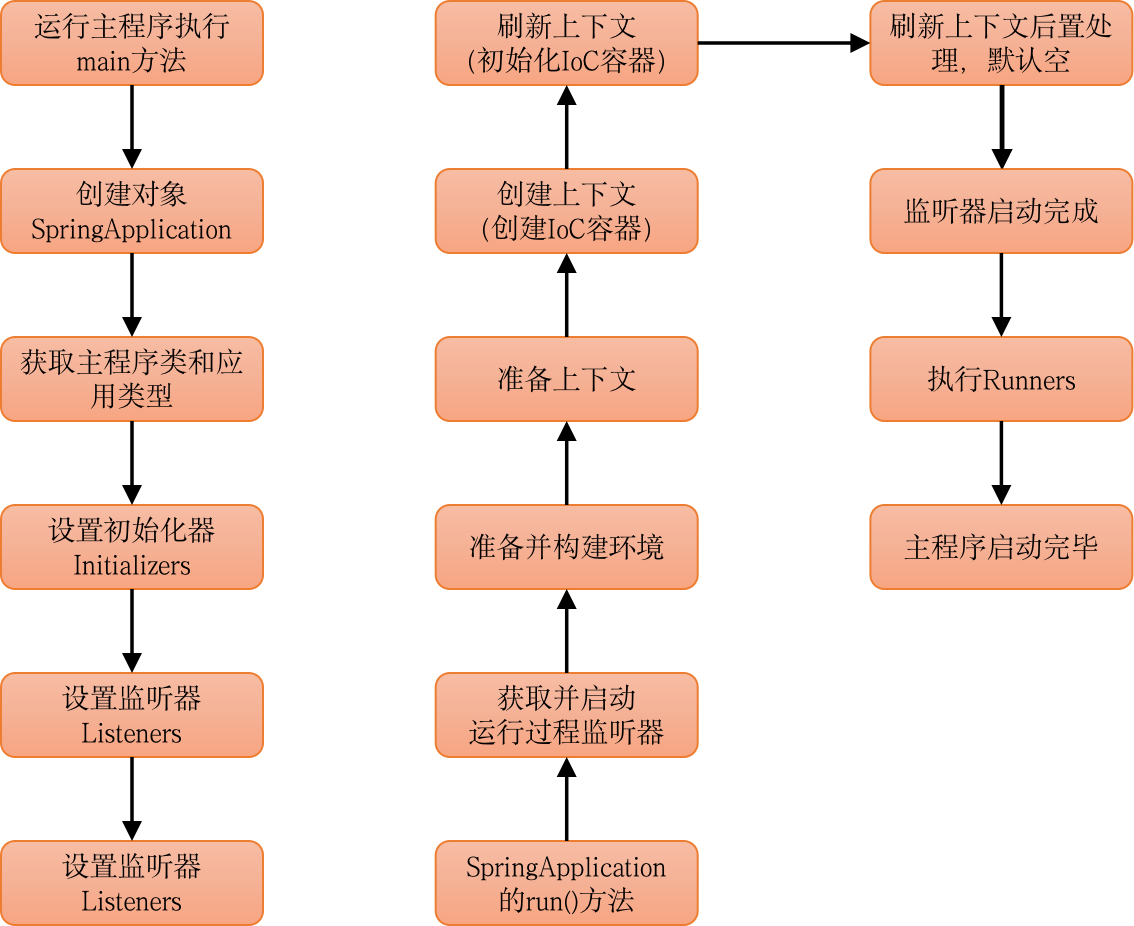
话不多说,直接上主流程总结!
一、创建SpringApplication对象
- 获取主程序类和应用类型
- 设置初始化器Initializers
- 设置监听器Listeners
- 获取主程序类Class
二、执行run()方法 - 初始化环境配置
- 创建容器,即创建上下文
- 容器前置处理
- 刷新容器,即刷新上下文(springboot启动核心)
- 容器后置处理
- 通知监听者,执行Runners,程序启动完成
启动类剖析
启动类示例
首先,我们先要有一个正确的打开姿势:启动类入口
import org.springframework.boot.SpringApplication;
import org.springframework.boot.autoconfigure.SpringBootApplication;

@SpringBootApplication
public class SelfCodingApplication {
    public static void main(String[] args) {
        SpringApplication.run(SelfCodingApplication.class, args);
    }
}
启动类在运行静态run()方法时,是先创建一个SpringApplication对象,再运行对象的run方法,工厂初始配置在构造函数中完成,而run方法定义程序启动总流程。
SpringApplication.run()方法
从启动类中的main()静态方法中点入SpringApplication.run()源码中,可以看到
    public static ConfigurableApplicationContext run(Class<?> primarySource, String... args) {
        return run(new Class[]{primarySource}, args);
    }

    public static ConfigurableApplicationContext run(Class<?>[] primarySources, String[] args) {
    //1. new SpringApplication
    //2. 执行run()方法
        return (new SpringApplication(primarySources)).run(args);
    }
主要涉及到创建SpringApplication对象以及执行run()方法两个过程。
创建SpringApplication对象过程
创建对象源码流程整体分析
    public SpringApplication(Class<?>... primarySources) {
        this((ResourceLoader)null, primarySources);
    }
    //构造对象
    public SpringApplication(ResourceLoader resourceLoader, Class<?>... primarySources) {
        this.sources = new LinkedHashSet();
        //打印springboot启动时的图标
        this.bannerMode = Mode.CONSOLE;
        //true的话,打印jvm的启动和运行信息,如启动类、java版本、pid等
        this.logStartupInfo = true;
        //允许通过命令行参数向application.properties中添加属性配置,如--spring.profiles.active=dev
        this.addCommandLineProperties = true;
        //加载默认的类型转换和格式化类 (ApplicationConversionService)
        this.addConversionService = true;
        //开启java的headless模式,此模式允许java服务器可能缺少显示设备、键盘、鼠标等外设的情况下可以使用这种模式
        this.headless = true;
        //注册一个Shutdown Hook,创建线程,该线程用来在java程序关闭后释放资源
        this.registerShutdownHook = true;
        //默认空,读取“dev”、“test”等不同环境的配置
        this.additionalProfiles = Collections.emptySet();
        //会实例化一个环境转换器
        this.isCustomEnvironment = false;
        //是否懒初始化
        this.lazyInitialization = false;
        //默认的ApplicationContextFactory实现,它将为WebApplicationType创建一个适当的上下文。
        this.applicationContextFactory = ApplicationContextFactory.DEFAULT;
        //默认的ApplicationStartup实现,设置DefaultApplicationStartup
        this.applicationStartup = ApplicationStartup.DEFAULT;
        //设置resourceLoader,获取资源,默认null
        this.resourceLoader = resourceLoader;
        //primarySources主启动类判空
        Assert.notNull(primarySources, "PrimarySources must not be null");
        //将主启动类设置到LinkedHashSet集合中存储起来
        this.primarySources = new LinkedHashSet(Arrays.asList(primarySources));
        //设置web应用类型为:NONE/SERVLET/REACTIVE
        this.webApplicationType = WebApplicationType.deduceFromClasspath();
        //从 META-INF/spring.factories 文件中得到 key 为 org.springframework.boot.BootstrapRegistryInitializer 的全类名集合,进行实例化,然后注入 bootstrapRegistryInitializers 属性
        this.bootstrapRegistryInitializers = new ArrayList(this.getSpringFactoriesInstances(BootstrapRegistryInitializer.class));
        //配置应用程序启动前的初始化对象,从 META-INF/spring.factories 文件中得到初始化器集合,并注入
        this.setInitializers(this.getSpringFactoriesInstances(ApplicationContextInitializer.class));
        //配置应用程序启动前的监听器,从 META-INF/spring.factories 文件中得到监听器实例的集合,并注入
        this.setListeners(this.getSpringFactoriesInstances(ApplicationListener.class));
        //获取当前运行的 main 方法所在的类,即主类
        this.mainApplicationClass = this.deduceMainApplicationClass();
    }
不服就debug
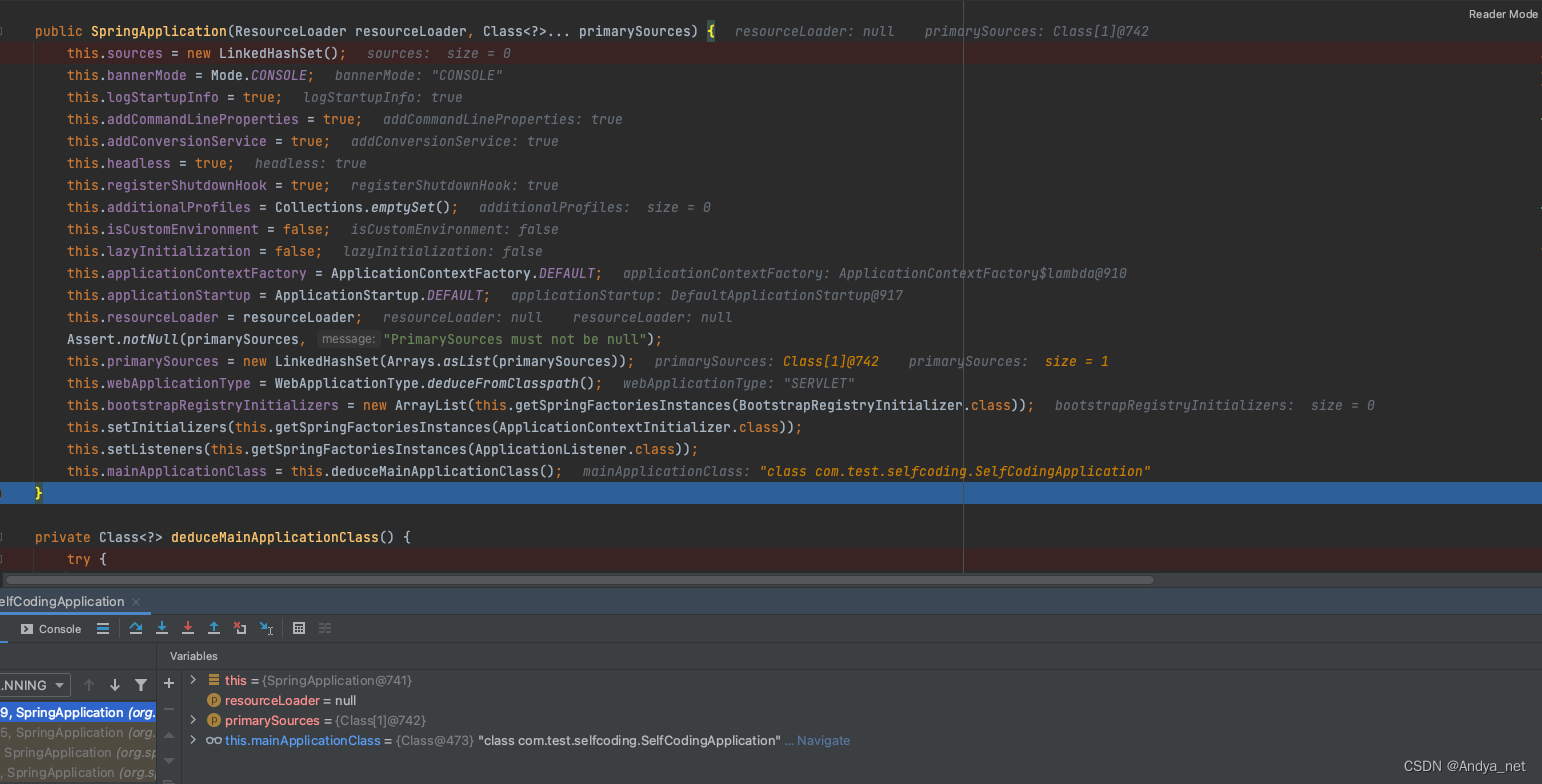
创建对象核心过程分解
流程1:deduceFromClasspath()获取主程序类和应用类型
    static WebApplicationType deduceFromClasspath() {
        if (ClassUtils.isPresent("org.springframework.web.reactive.DispatcherHandler", (ClassLoader)null) && !ClassUtils.isPresent("org.springframework.web.servlet.DispatcherServlet", (ClassLoader)null) && !ClassUtils.isPresent("org.glassfish.jersey.servlet.ServletContainer", (ClassLoader)null)) {
            return REACTIVE;
        } else {
            String[] var0 = SERVLET_INDICATOR_CLASSES;
            int var1 = var0.length;

            for(int var2 = 0; var2 < var1; ++var2) {
                String className = var0[var2];
                if (!ClassUtils.isPresent(className, (ClassLoader)null)) {
                    return NONE;
                }
            }

            return SERVLET;
        }
    }
其中,WebApplicationType枚举类
public enum WebApplicationType {
    NONE,
    SERVLET,
    REACTIVE;
    ... ...
- NONE:啥也没有,即程序不额外的启动web容器。
- SERVLET:基于servlet的web程序,需启动内嵌的servlet web容器,如Tomcat。
- REACTIVE:基于reactive的web程序,需启动内嵌reactive web容器,如webflux。
流程2: setInitializers()设置初始化器
this.setInitializers(this.getSpringFactoriesInstances(ApplicationContextInitializer.class));
主要设置初始化器ApplicationContextInitializer
    public void setInitializers(Collection<? extends ApplicationContextInitializer<?>> initializers) {
        this.initializers = new ArrayList(initializers);
    }
流程3: setListeners()设置监听器
this.setListeners(this.getSpringFactoriesInstances(ApplicationListener.class));
主要设置监听器ApplicationListener
    public void setListeners(Collection<? extends ApplicationListener<?>> listeners) {
        this.listeners = new ArrayList(listeners);
    }
流程4:deduceMainApplicationClass()获取主程序类Class
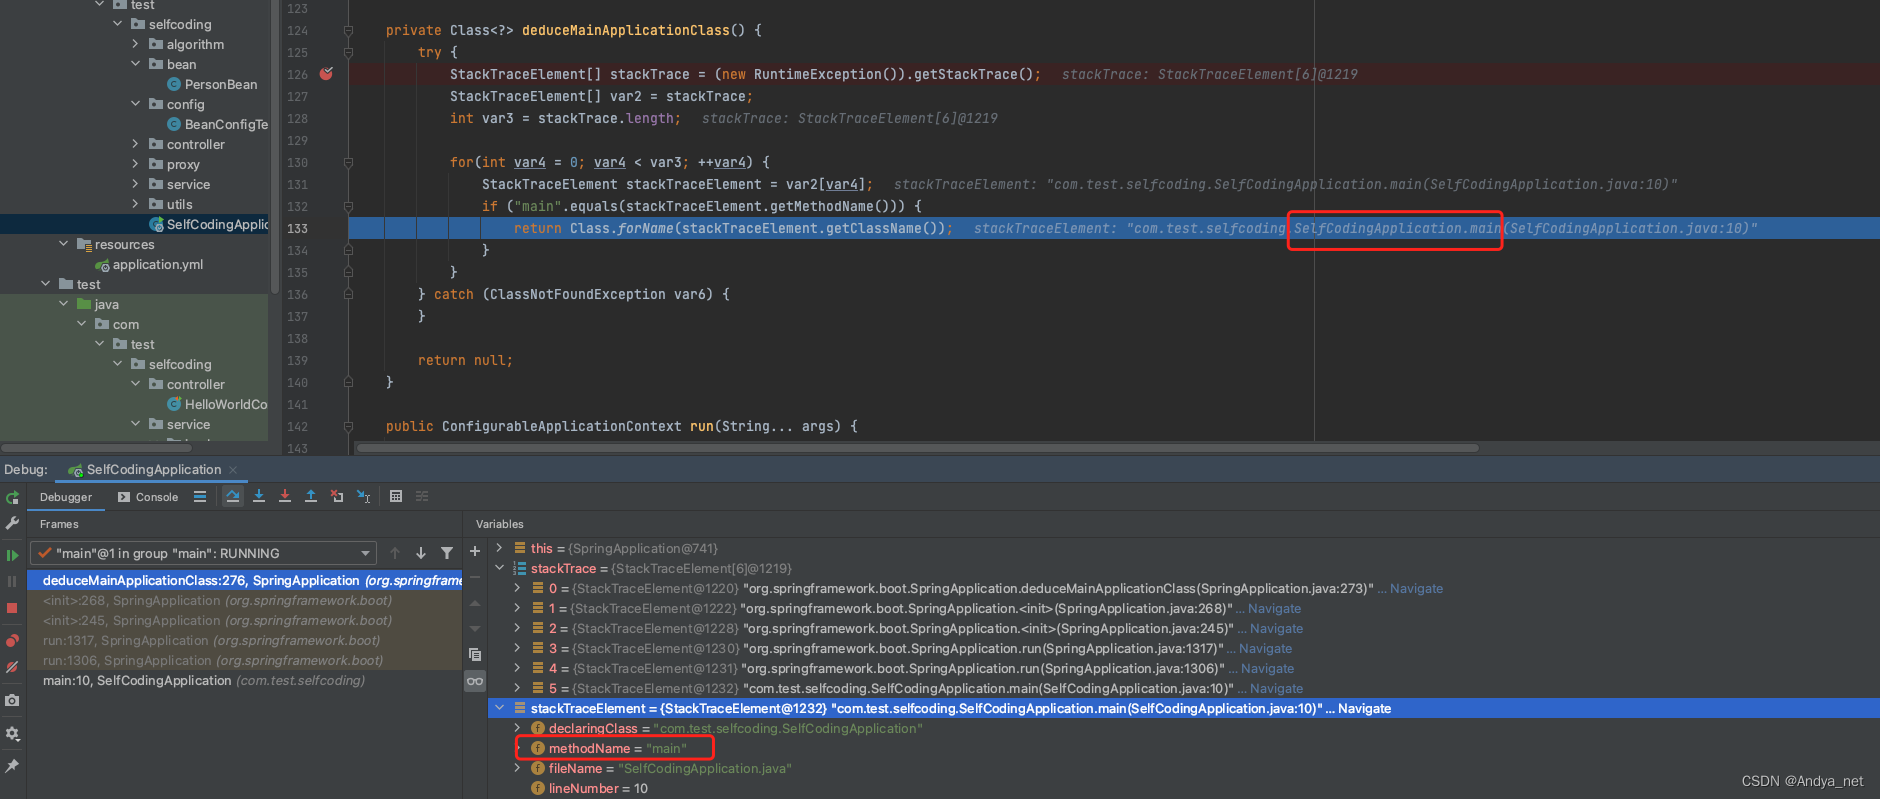
    private Class<?> deduceMainApplicationClass() {
        try {
            StackTraceElement[] stackTrace = (new RuntimeException()).getStackTrace();
            StackTraceElement[] var2 = stackTrace;
            int var3 = stackTrace.length;

            for(int var4 = 0; var4 < var3; ++var4) {
                StackTraceElement stackTraceElement = var2[var4];
                //找到主类的main方法
                if ("main".equals(stackTraceElement.getMethodName())) {
                    return Class.forName(stackTraceElement.getClassName());
                }
            }
        } catch (ClassNotFoundException var6) {
        }

        return null;
    }
getSpringFactoriesInstances()方法分析
spring.factories文件
getSpringFactoriesInstances()核心源码
    private <T> Collection<T> getSpringFactoriesInstances(Class<T> type) {
    	//获取spring 工厂实例
        return this.getSpringFactoriesInstances(type, new Class[0]);
    }

    private <T> Collection<T> getSpringFactoriesInstances(Class<T> type, Class<?>[] parameterTypes, Object... args) {
        ClassLoader classLoader = this.getClassLoader();
        // 获取初始化类的类名
        Set<String> names = new LinkedHashSet(SpringFactoriesLoader.loadFactoryNames(type, classLoader));
        // 在通过类名实例化对象
        List<T> instances = this.createSpringFactoriesInstances(type, parameterTypes, classLoader, args, names);
        AnnotationAwareOrderComparator.sort(instances);
        return instances;
    }

    public static List<String> loadFactoryNames(Class<?> factoryType, @Nullable ClassLoader classLoader) {
        ClassLoader classLoaderToUse = classLoader;
        if (classLoader == null) {
            classLoaderToUse = SpringFactoriesLoader.class.getClassLoader();
        }

        String factoryTypeName = factoryType.getName();
        //加载spring工厂,读取运行环境中所有META-INF/spring.factories配置
        return (List)loadSpringFactories(classLoaderToUse).getOrDefault(factoryTypeName, Collections.emptyList());
    }

    private static Map<String, List<String>> loadSpringFactories(ClassLoader classLoader) {
        Map<String, List<String>> result = (Map)cache.get(classLoader);
        if (result != null) {
            return result;
        } else {
            HashMap result = new HashMap();

            try {
                //从META-INF/spring.factories中加载资源
                Enumeration urls = classLoader.getResources("META-INF/spring.factories");

                while(urls.hasMoreElements()) {
                    URL url = (URL)urls.nextElement();
                    UrlResource resource = new UrlResource(url);
                    Properties properties = PropertiesLoaderUtils.loadProperties(resource);
                    Iterator var6 = properties.entrySet().iterator();

                    while(var6.hasNext()) {
                        Entry<?, ?> entry = (Entry)var6.next();
                        String factoryTypeName = ((String)entry.getKey()).trim();
                        String[] factoryImplementationNames = StringUtils.commaDelimitedListToStringArray((String)entry.getValue());
                        String[] var10 = factoryImplementationNames;
                        int var11 = factoryImplementationNames.length;

                        for(int var12 = 0; var12 < var11; ++var12) {
                            String factoryImplementationName = var10[var12];
                            ((List)result.computeIfAbsent(factoryTypeName, (key) -> {
                                return new ArrayList();
                            })).add(factoryImplementationName.trim());
                        }
                    }
                }

                result.replaceAll((factoryType, implementations) -> {
                    return (List)implementations.stream().distinct().collect(Collectors.collectingAndThen(Collectors.toList(), Collections::unmodifiableList));
                });
                cache.put(classLoader, result);
                return result;
            } catch (IOException var14) {
                throw new IllegalArgumentException("Unable to load factories from location [META-INF/spring.factories]", var14);
            }
        }
    }
创建对象主流程总结
- 获取主程序类和应用类型
- 设置初始化器Initializers
- 设置监听器Listeners
- 获取主程序类Class
执行SpringApplication.run()方法过程
执行run()方法源码过程整体分析
	//run方法 开始启动程序
    public ConfigurableApplicationContext run(String... args) {
    	//记录开始时间戳
        long startTime = System.nanoTime();
        //添加默认的Bootstrap上下文DefaultBootstrapContext实例
        DefaultBootstrapContext bootstrapContext = this.createBootstrapContext();
        ConfigurableApplicationContext context = null;
        //配置headless属性
        this.configureHeadlessProperty();
        //获取RunListeners监听器集合,得到EventPublishingRunListener监听器
        SpringApplicationRunListeners listeners = this.getRunListeners(args);
        //循环启动监听器,通知监听者启动开始
        listeners.starting(bootstrapContext, this.mainApplicationClass);

        try {
        	//封装参数
            ApplicationArguments applicationArguments = new DefaultApplicationArguments(args);
            //创建并配置环境,读取配置文件,如application.properties、application.yml
            ConfigurableEnvironment environment = this.prepareEnvironment(listeners, bootstrapContext, applicationArguments);
            //配置忽略bean信息
            this.configureIgnoreBeanInfo(environment);
            //打印 Banner
            Banner printedBanner = this.printBanner(environment);
            //创建IoC容器,即实例化上下文对象
            context = this.createApplicationContext();
            //设置上下文启动
            context.setApplicationStartup(this.applicationStartup);
            //前置处理IoC容器,即准备上下文
            this.prepareContext(bootstrapContext, context, environment, listeners, applicationArguments, printedBanner);
            //刷新IoC容器刷新,即刷新上下文
            this.refreshContext(context);
            //后置处理IoC容器
            this.afterRefresh(context, applicationArguments);
            //计算启动时长
            Duration timeTakenToStartup = Duration.ofNanos(System.nanoTime() - startTime);
            if (this.logStartupInfo) {
                (new StartupInfoLogger(this.mainApplicationClass)).logStarted(this.getApplicationLog(), timeTakenToStartup);
            }
			//监听器执行 started 方法,表示启动成功
            listeners.started(context, timeTakenToStartup);
            //执行Runners:CommandLineRunner和ApplicationRunner
            this.callRunners(context, applicationArguments);
        } catch (Throwable var12) {
            this.handleRunFailure(context, var12, listeners);
            throw new IllegalStateException(var12);
        }

        try {
            Duration timeTakenToReady = Duration.ofNanos(System.nanoTime() - startTime);
            //监听器执行 ready 方法
            listeners.ready(context, timeTakenToReady);
            return context;
        } catch (Throwable var11) {
            this.handleRunFailure(context, var11, (SpringApplicationRunListeners)null);
            throw new IllegalStateException(var11);
        }
    }
不服就debug
run()方法核心过程分解
流程1:获取并启动运行过程监听器
SpringApplicationRunListeners listeners = this.getRunListeners(args);
listeners.starting(bootstrapContext, this.mainApplicationClass);
- 获取监听器
    private SpringApplicationRunListeners getRunListeners(String[] args) {
        Class<?>[] types = new Class[]{SpringApplication.class, String[].class};
		//调用getSpringFactoriesInstances()方法
        return new SpringApplicationRunListeners(logger, this.getSpringFactoriesInstances(SpringApplicationRunListener.class, types, this, args), this.applicationStartup);
    }
    private <T> Collection<T> getSpringFactoriesInstances(Class<T> type, Class<?>[] parameterTypes, Object... args) {
        ClassLoader classLoader = this.getClassLoader();
        //调用loadFactoryNames从spring.factories文件中获取类全名
        Set<String> names = new LinkedHashSet(SpringFactoriesLoader.loadFactoryNames(type, classLoader));
        //创建实例
        List<T> instances = this.createSpringFactoriesInstances(type, parameterTypes, classLoader, args, names);
        AnnotationAwareOrderComparator.sort(instances);
        return instances;
    }
- 启动监听器
    void starting(ConfigurableBootstrapContext bootstrapContext, Class<?> mainApplicationClass) {
    	//启动监听器,通知所有的监听器
        this.doWithListeners("spring.boot.application.starting", (listener) -> {
            listener.starting(bootstrapContext);
        }, (step) -> {
            if (mainApplicationClass != null) {
                step.tag("mainApplicationClass", mainApplicationClass.getName());
            }

        });
    }

    private void doWithListeners(String stepName, Consumer<SpringApplicationRunListener> listenerAction, Consumer<StartupStep> stepAction) {
    	//创建新步骤并标记其开始
        StartupStep step = this.applicationStartup.start(stepName);
        //通知所有的事件监听者
        this.listeners.forEach(listenerAction);
        //标识
        if (stepAction != null) {
            stepAction.accept(step);
        }
		//标记该步骤结束,且不能修改该步骤的状态
        step.end();
    }
流程2:准备并构建环境
ApplicationArguments applicationArguments = new DefaultApplicationArguments(args);
            ConfigurableEnvironment environment = this.prepareEnvironment(listeners, bootstrapContext, applicationArguments);
构建环境流程prepareEnvironment()方法详解
    private ConfigurableEnvironment prepareEnvironment(SpringApplicationRunListeners listeners, DefaultBootstrapContext bootstrapContext, ApplicationArguments applicationArguments) {
    	//获取并创建对应的环境:SERVLET/REACTIVE或默认
        ConfigurableEnvironment environment = this.getOrCreateEnvironment();
        //加载系统属性配置
        this.configureEnvironment((ConfigurableEnvironment)environment, applicationArguments.getSourceArgs());
        ConfigurationPropertySources.attach((Environment)environment);
        //加载用户自定义application.yml或application.properties,触发监听器,装备好广播环境
        listeners.environmentPrepared(bootstrapContext, (ConfigurableEnvironment)environment);
        DefaultPropertiesPropertySource.moveToEnd((ConfigurableEnvironment)environment);
        Assert.state(!((ConfigurableEnvironment)environment).containsProperty("spring.main.environment-prefix"), "Environment prefix cannot be set via properties.");
        //为当前应用绑定环境
        this.bindToSpringApplication((ConfigurableEnvironment)environment);
        if (!this.isCustomEnvironment) {
            environment = this.convertEnvironment((ConfigurableEnvironment)environment);
        }

        ConfigurationPropertySources.attach((Environment)environment);
        return (ConfigurableEnvironment)environment;
    }
    //构建并返回对应环境
    private ConfigurableEnvironment getOrCreateEnvironment() {
        if (this.environment != null) {
            return this.environment;
        } else {
            switch(this.webApplicationType) {
            case SERVLET:
                return new ApplicationServletEnvironment();
            case REACTIVE:
                return new ApplicationReactiveWebEnvironment();
            default:
                return new ApplicationEnvironment();
            }
        }
    }
流程3:IoC容器创建,即创建应用程序上下文
context = this.createApplicationContext();
context.setApplicationStartup(this.applicationStartup);
创建上下文createApplicationContext()方法调用链
    protected ConfigurableApplicationContext createApplicationContext() {
        return this.applicationContextFactory.create(this.webApplicationType);
    }
    ... ...
    //主要是ApplicationContextFactory接口
    ApplicationContextFactory DEFAULT = (webApplicationType) -> {
        try {
            Iterator var1 = SpringFactoriesLoader.loadFactories(ApplicationContextFactory.class, ApplicationContextFactory.class.getClassLoader()).iterator();

            ConfigurableApplicationContext context;
            do {
                if (!var1.hasNext()) {
                    return new AnnotationConfigApplicationContext();
                }

                ApplicationContextFactory candidate = (ApplicationContextFactory)var1.next();
                context = candidate.create(webApplicationType);
            } while(context == null);

            return context;
        } catch (Exception var4) {
            throw new IllegalStateException("Unable create a default ApplicationContext instance, you may need a custom ApplicationContextFactory", var4);
        }
    };
    //接口
    ConfigurableApplicationContext create(WebApplicationType webApplicationType);
    //SERVLET实现
    static class Factory implements ApplicationContextFactory {
        Factory() {
        }

        public ConfigurableApplicationContext create(WebApplicationType webApplicationType) {
            return webApplicationType != WebApplicationType.SERVLET ? null : new AnnotationConfigServletWebServerApplicationContext();
        }
    }
    //REACTIVE实现
    static class Factory implements ApplicationContextFactory {
        Factory() {
        }

        public ConfigurableApplicationContext create(WebApplicationType webApplicationType) {
            return webApplicationType != WebApplicationType.REACTIVE ? null : new AnnotationConfigReactiveWebServerApplicationContext();
        }
    }

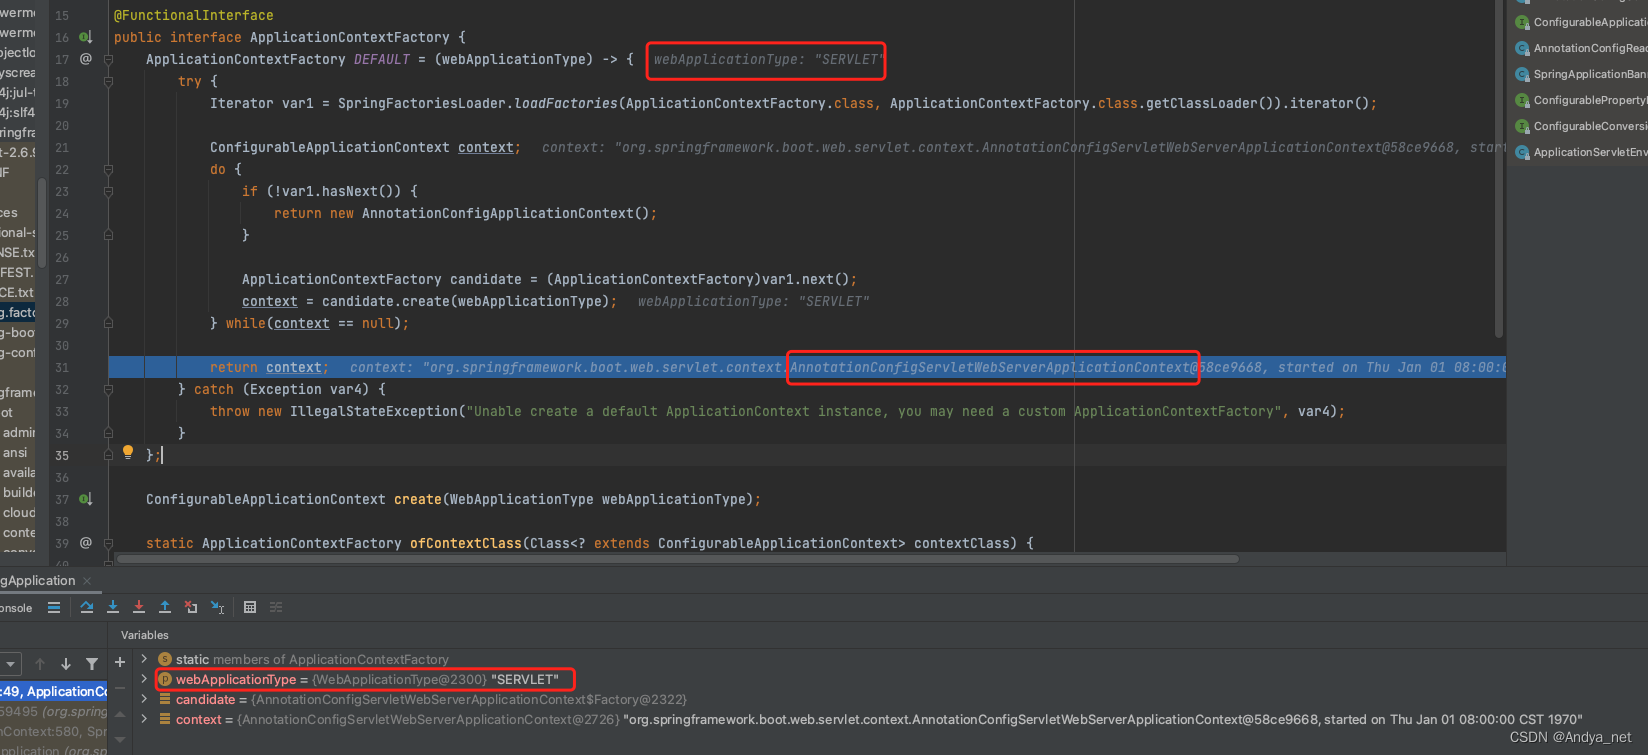
根据webApplicationType决定创建上下文的类型是AnnotationConfigServletWebServerApplicationContext还是AnnotationConfigReactiveWebServerApplicationContext
流程4:IoC容器的前置处理
this.prepareContext(bootstrapContext, context, environment, listeners, applicationArguments, printedBanner);
prepareContext方法详解
    private void prepareContext(DefaultBootstrapContext bootstrapContext, ConfigurableApplicationContext context, ConfigurableEnvironment environment, SpringApplicationRunListeners listeners, ApplicationArguments applicationArguments, Banner printedBanner) {
    	//设置容器环境,如自定义配置、系统环境配置
        context.setEnvironment(environment);
        //执行后置处理
        this.postProcessApplicationContext(context);
        //执行初始化器
        this.applyInitializers(context);
        //广播容器准备完成事件,触发监听器
        listeners.contextPrepared(context);
        bootstrapContext.close(context);
        if (this.logStartupInfo) {
        	//打印启动信息
            this.logStartupInfo(context.getParent() == null);
            //打印profile信息
            this.logStartupProfileInfo(context);
        }
		//注册启动参数Bean,将容器的参数封装成Bean,注入容器
        ConfigurableListableBeanFactory beanFactory = context.getBeanFactory();
        //将springApplicationArguments注册到容器中
        beanFactory.registerSingleton("springApplicationArguments", applicationArguments);
        if (printedBanner != null) {
        	//注册springBootBanner
            beanFactory.registerSingleton("springBootBanner", printedBanner);
        }

        if (beanFactory instanceof AbstractAutowireCapableBeanFactory) {
        //不允许重复注册BeanDefinition
            ((AbstractAutowireCapableBeanFactory)beanFactory).setAllowCircularReferences(this.allowCircularReferences);
            if (beanFactory instanceof DefaultListableBeanFactory) {
                ((DefaultListableBeanFactory)beanFactory).setAllowBeanDefinitionOverriding(this.allowBeanDefinitionOverriding);
            }
        }
		//若为懒加载,添加懒加载后置处理器
        if (this.lazyInitialization) {
            context.addBeanFactoryPostProcessor(new LazyInitializationBeanFactoryPostProcessor());
        }

        context.addBeanFactoryPostProcessor(new SpringApplication.PropertySourceOrderingBeanFactoryPostProcessor(context));
        //获取启动类指定的参数
        Set<Object> sources = this.getAllSources();
        Assert.notEmpty(sources, "Sources must not be empty");
        //加载启动类,并注入容器
        this.load(context, sources.toArray(new Object[0]));
        //发布容器已加载事件,触发监听器
        listeners.contextLoaded(context);
    }
     //执行后置处理
    protected void postProcessApplicationContext(ConfigurableApplicationContext context) {
        if (this.beanNameGenerator != null) {
            context.getBeanFactory().registerSingleton("org.springframework.context.annotation.internalConfigurationBeanNameGenerator", this.beanNameGenerator);
        }

        if (this.resourceLoader != null) {
            if (context instanceof GenericApplicationContext) {
                ((GenericApplicationContext)context).setResourceLoader(this.resourceLoader);
            }

            if (context instanceof DefaultResourceLoader) {
                ((DefaultResourceLoader)context).setClassLoader(this.resourceLoader.getClassLoader());
            }
        }

        if (this.addConversionService) {
            context.getBeanFactory().setConversionService(context.getEnvironment().getConversionService());
        }

    }
- postProcessApplicationContext()进行后置处理
    protected void postProcessApplicationContext(ConfigurableApplicationContext context) {
    	//BeanFactory中注册BeanNameGenerator
        if (this.beanNameGenerator != null) {
            context.getBeanFactory().registerSingleton("org.springframework.context.annotation.internalConfigurationBeanNameGenerator", this.beanNameGenerator);
        }

        if (this.resourceLoader != null) {
            if (context instanceof GenericApplicationContext) {
                ((GenericApplicationContext)context).setResourceLoader(this.resourceLoader);
            }

            if (context instanceof DefaultResourceLoader) {
                ((DefaultResourceLoader)context).setClassLoader(this.resourceLoader.getClassLoader());
            }
        }
		//BeanFactory中注册ConversionService
        if (this.addConversionService) {
            context.getBeanFactory().setConversionService(context.getEnvironment().getConversionService());
        }

    }
- applyInitializers()执行初始化器
    protected void applyInitializers(ConfigurableApplicationContext context) {
        Iterator var2 = this.getInitializers().iterator();
		//SpringApplication构造器中初始化了各种ApplicationContextInitializer
        while(var2.hasNext()) {
            ApplicationContextInitializer initializer = (ApplicationContextInitializer)var2.next();
            Class<?> requiredType = GenericTypeResolver.resolveTypeArgument(initializer.getClass(), ApplicationContextInitializer.class);
            Assert.isInstanceOf(requiredType, context, "Unable to call initializer.");
            initializer.initialize(context);
        }

    }
- getAllSources()和load()加载启动类并注入容器
    public Set<Object> getAllSources() {
        Set<Object> allSources = new LinkedHashSet();
        if (!CollectionUtils.isEmpty(this.primarySources)) {
        	//获取启动类
            allSources.addAll(this.primarySources);
        }

        if (!CollectionUtils.isEmpty(this.sources)) {
            allSources.addAll(this.sources);
        }

        return Collections.unmodifiableSet(allSources);
    }
    //启动类加入IoC容器中
    protected void load(ApplicationContext context, Object[] sources) {
        if (logger.isDebugEnabled()) {
            logger.debug("Loading source " + StringUtils.arrayToCommaDelimitedString(sources));
        }

        BeanDefinitionLoader loader = this.createBeanDefinitionLoader(this.getBeanDefinitionRegistry(context), sources);
        //设置BeanNameGenerator
        if (this.beanNameGenerator != null) {
            loader.setBeanNameGenerator(this.beanNameGenerator);
        }
		//设置ResourceLoader
        if (this.resourceLoader != null) {
            loader.setResourceLoader(this.resourceLoader);
        }
		//设置Environment
        if (this.environment != null) {
            loader.setEnvironment(this.environment);
        }
		//加载
        loader.load();
    }
- contextLoaded()广播事件
    void contextLoaded(ConfigurableApplicationContext context) {
        this.doWithListeners("spring.boot.application.context-loaded", (listener) -> {
            listener.contextLoaded(context);
        });
    }
    //触发监听者
    private void doWithListeners(String stepName, Consumer<SpringApplicationRunListener> listenerAction) {
        this.doWithListeners(stepName, listenerAction, (Consumer)null);
    }
    //触发监听者
    private void doWithListeners(String stepName, Consumer<SpringApplicationRunListener> listenerAction, Consumer<StartupStep> stepAction) {
        StartupStep step = this.applicationStartup.start(stepName);
        this.listeners.forEach(listenerAction);
        if (stepAction != null) {
            stepAction.accept(step);
        }

        step.end();
    }
    //广播事件
    public void contextLoaded(ConfigurableApplicationContext context) {
        ApplicationListener listener;
        for(Iterator var2 = this.application.getListeners().iterator(); var2.hasNext(); context.addApplicationListener(listener)) {
            listener = (ApplicationListener)var2.next();
            if (listener instanceof ApplicationContextAware) {
                ((ApplicationContextAware)listener).setApplicationContext(context);
            }
        }

        this.initialMulticaster.multicastEvent(new ApplicationPreparedEvent(this.application, this.args, context));
    }
流程5: IoC容器的刷新,即刷新应用程序上下文
    private void refreshContext(ConfigurableApplicationContext context) {
        if (this.registerShutdownHook) {
            shutdownHook.registerApplicationContext(context);
        }

        this.refresh(context);
    }

    public void refresh() throws BeansException, IllegalStateException {
        synchronized(this.startupShutdownMonitor) {
            StartupStep contextRefresh = this.applicationStartup.start("spring.context.refresh");
            //刷新上下文
            this.prepareRefresh();
            //初始化BeanFactory,解析XML
            ConfigurableListableBeanFactory beanFactory = this.obtainFreshBeanFactory();
            //为上下文准备BeanFactory,即对BeanFactory的各种功能进行填充,如常用的注解@Autowired
            this.prepareBeanFactory(beanFactory);

            try {
            	//提供子类覆盖的额外处理,即子类处理自定义的BeanFactoryPostProcess
                this.postProcessBeanFactory(beanFactory);
                StartupStep beanPostProcess = this.applicationStartup.start("spring.context.beans.post-process");
                //激活各种BeanFactory处理器
                this.invokeBeanFactoryPostProcessors(beanFactory);
                //注册拦截Bean创建的Bean处理器
                this.registerBeanPostProcessors(beanFactory);
                beanPostProcess.end();
                //初始化上下文中的资源文件
                this.initMessageSource();
                //初始化上下文事件广播器
                this.initApplicationEventMulticaster();
                //给子类扩展初始化其他Bean
                this.onRefresh();
                //注册到广播器
                this.registerListeners();
                //设置转换器setConversionService,注册默认解析器addEmbeddedValueResolver,初始化非延迟加载的bean
                this.finishBeanFactoryInitialization(beanFactory);
                //通过spring的事件发布机制发布ContextRefreshedEvent事件
                this.finishRefresh();
            } catch (BeansException var10) {
                if (this.logger.isWarnEnabled()) {
                    this.logger.warn("Exception encountered during context initialization - cancelling refresh attempt: " + var10);
                }

                this.destroyBeans();
                this.cancelRefresh(var10);
                throw var10;
            } finally {
                this.resetCommonCaches();
                contextRefresh.end();
            }

        }
    }
流程6: IoC容器的后置处理
	//默认空,可以自定义
    protected void afterRefresh(ConfigurableApplicationContext context, ApplicationArguments args) {
    }
流程7: 监听器启动完成
listeners.started(context, timeTakenToStartup);
流程8:执行Runners
    private void callRunners(ApplicationContext context, ApplicationArguments args) {
        List<Object> runners = new ArrayList();
        runners.addAll(context.getBeansOfType(ApplicationRunner.class).values());
        runners.addAll(context.getBeansOfType(CommandLineRunner.class).values());
        AnnotationAwareOrderComparator.sort(runners);
        Iterator var4 = (new LinkedHashSet(runners)).iterator();

        while(var4.hasNext()) {
            Object runner = var4.next();
            //ApplicationRunner
            if (runner instanceof ApplicationRunner) {
                this.callRunner((ApplicationRunner)runner, args);
            }
			//CommandLineRunner
            if (runner instanceof CommandLineRunner) {
                this.callRunner((CommandLineRunner)runner, args);
            }
        }

    }
执行run()方法主流程总结
- 获取并启动运行过程监听器。
- 准备并构建环境。
- IoC容器的创建,即创建应用程序上下文。
- IoC容器的前置处理,即准备上下文。
- IoC容器的刷新,即刷新应用程序上下文。
- IoC容器的后置处理。
- 监听器启动完成。
- 执行Runners。
