参考文章链接:http://static.kancloud.cn/curder/linux/78148
在上述参考文章中,对与主从同步部署过程做了详细的操作解释,但对于三台服务器如何互相同步(即三个都是master),本文针对三台master相互同步进行配置。
1. 实现思想
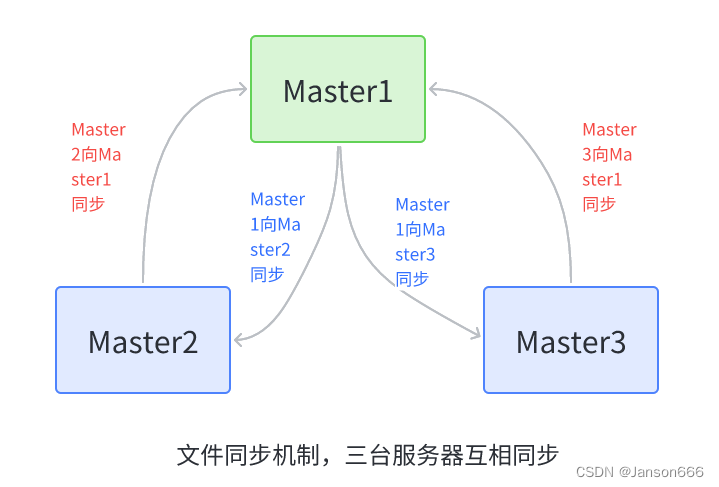
三台服务器均为master,手写设定master1可以同步到master2和master3,然后设定master2和master3分别往master1同步,以此成功实现三台服务器同步机制。
2. 配置步骤
直接参考2.3.3 master上配置rsync客户端部分,分别为三台服务器配置,配置文件参考2.3.1.2 部署rsync服务 (Slave服务器上相关操作)。
注意,参考文章中的slave和master节点密码文件不一致,master是rsync.password,slave是 rsyncd.password,最好统一使用rsync.password。
2.1 三个master的rsyncd.conf文件
-
三个master节点ip
- master1 : 192.168.0.196
- master2 : 192.168.0.143
- master3 : 192.168.0.150
-
以下是我的Master1配置文件
# Minimal configuration file for rsync daemon
#See rsync(1) and rsyncd.conf(5) man pages for help
# This line is required by the /etc/init.d/rsyncd script
# GLOBAL OPTIONS
uid = root
gid = root
use chroot = no
read only = false
#limit access to private LANs
# 192.168.0.143———master2的IP,192.168.0.150 ——master3的ip
hosts allow=192.168.0.143/24,192.168.0.150/24
hosts deny=*
ignore errors
max connections = 2000
pid file = /var/run/rsyncd.pid
auth users = rsync_backup
secrets file = /etc/rsyncd.password
#lock file = /var/run/rsync.lock
motd file = /etc/rsyncd/rsyncd.motd
#This will give you a separate log file
log file = /data/log/rsync.log
#This will log every file transferred - up to 85,000+ per user, per sync
transfer logging = yes
log format = %t %a %m %f %b
syslog facility = local3
timeout = 300
# MODULE OPTIONS
[master1]  /当前节点名称
comment = synchronize data
# /data/ouna/upload/firmware同步的文件路径
path = /data/ouna/upload/firmware
- 以下是我的Master2配置文件
# Minimal configuration file for rsync daemon
#See rsync(1) and rsyncd.conf(5) man pages for help
# This line is required by the /etc/init.d/rsyncd script
# GLOBAL OPTIONS
uid = root
gid = root
use chroot = no
read only = false
#limit access to private LANs
# 192.168.0.196———master1的IP
hosts allow=192.168.0.196/24
hosts deny=*
ignore errors
max connections = 2000
pid file = /var/run/rsyncd.pid
auth users = rsync_backup
secrets file = /etc/rsyncd.password
#lock file = /var/run/rsync.lock
motd file = /etc/rsyncd/rsyncd.motd
#This will give you a separate log file
log file = /data/log/rsync.log
#This will log every file transferred - up to 85,000+ per user, per sync
transfer logging = yes
log format = %t %a %m %f %b
syslog facility = local3
timeout = 300
# MODULE OPTIONS
[master2]  /当前节点名称
comment = synchronize data
# /data/ouna/upload/firmware同步的文件路径
path = /data/ouna/upload/firmware
- 以下是我的Master3配置文件
# Minimal configuration file for rsync daemon
#See rsync(1) and rsyncd.conf(5) man pages for help
# This line is required by the /etc/init.d/rsyncd script
# GLOBAL OPTIONS
uid = root
gid = root
use chroot = no
read only = false
#limit access to private LANs
# 192.168.0.196———master1的IP
hosts allow=192.168.0.196/24
hosts deny=*
ignore errors
max connections = 2000
pid file = /var/run/rsyncd.pid
auth users = rsync_backup
secrets file = /etc/rsyncd.password
#lock file = /var/run/rsync.lock
motd file = /etc/rsyncd/rsyncd.motd
#This will give you a separate log file
log file = /data/log/rsync.log
#This will log every file transferred - up to 85,000+ per user, per sync
transfer logging = yes
log format = %t %a %m %f %b
syslog facility = local3
timeout = 300
# MODULE OPTIONS
[master3]  /当前节点名称
comment = synchronize data
# /data/ouna/upload/firmware同步的文件路径
path = /data/ouna/upload/firmware
2.2 三台master的sersync配置文件 confxml.xml
主要修改的地方

sersync阿里云资源:https://www.aliyundrive.com/s/Cpy6z2KigKm
- master1 confxml.xml
    <?xml version="1.0" encoding="ISO-8859-1"?>
    <head version="2.5">
        <host hostip="localhost" port="8008"></host>
        <debug start="false"/>
        <fileSystem xfs="false"/>
        <filter start="false">
    	<exclude expression="(.*)\.svn"></exclude>
    	<exclude expression="(.*)\.gz"></exclude>
    	<exclude expression="^info/*"></exclude>
    	<exclude expression="^static/*"></exclude>
        </filter>
        <inotify>
    	<delete start="true"/>
    	<createFolder start="true"/>
    	<createFile start="false"/>
    	<closeWrite start="true"/>
    	<moveFrom start="true"/>
    	<moveTo start="true"/>
    	<attrib start="false"/>
    	<modify start="false"/>
        </inotify>

        <sersync>
		<!-- 监听文件路径-->
    	<localpath watch="/data/ouna/upload/firmware">
			<!-- master2的ip master2名称-->
    		<remote ip="192.168.0.143" name="master2"/>
			<!-- master3的ip master3名称-->
    		<remote ip="192.168.0.150" name="master3"/>
    	</localpath>

    	<rsync>
    	    <commonParams params="-artuz"/>
			<!-- rsync.password密码授权,如果你创建的是rsyncd.password,则用rsyncd.password-->
    	    <auth start="true" users="rsync_backup" passwordfile="/etc/rsync.password"/>
    	    <userDefinedPort start="false" port="873"/><!-- port=873 -->
    	    <timeout start="true" time="100"/><!-- timeout=100 -->
    	    <ssh start="false"/>
    	</rsync>
    	<failLog path="/usr/local/sersync/logs/rsync_fail_log.sh" timeToExecute="60"/><!--default every 60mins execute once-->
    	<crontab start="false" schedule="600"><!--600mins-->
    	    <crontabfilter start="false">
    		<exclude expression="*.php"></exclude>
    		<exclude expression="info/*"></exclude>
    	    </crontabfilter>
    	</crontab>
    	<plugin start="false" name="command"/>
        </sersync>

        <plugin name="command">
    	<param prefix="/bin/sh" suffix="" ignoreError="true"/>	<!--prefix /opt/tongbu/mmm.sh suffix-->
    	<filter start="false">
    	    <include expression="(.*)\.php"/>
    	    <include expression="(.*)\.sh"/>
    	</filter>
        </plugin>

        <plugin name="socket">
    	<localpath watch="/opt/tongbu">
    	    <deshost ip="192.168.138.20" port="8009"/>
    	</localpath>
        </plugin>
        <plugin name="refreshCDN">
    	<localpath watch="/data0/htdocs/cms.xoyo.com/site/">
    	    <cdninfo domainname="ccms.chinacache.com" port="80" username="xxxx" passwd="xxxx"/>
    	    <sendurl base="http://pic.xoyo.com/cms"/>
    	    <regexurl regex="false" match="cms.xoyo.com/site([/a-zA-Z0-9]*).xoyo.com/images"/>
    	</localpath>
        </plugin>
    </head>
- master2的配置文件 confxml.xml
    <?xml version="1.0" encoding="ISO-8859-1"?>
    <head version="2.5">
        <host hostip="localhost" port="8008"></host>
        <debug start="false"/>
        <fileSystem xfs="false"/>
        <filter start="false">
    	<exclude expression="(.*)\.svn"></exclude>
    	<exclude expression="(.*)\.gz"></exclude>
    	<exclude expression="^info/*"></exclude>
    	<exclude expression="^static/*"></exclude>
        </filter>
        <inotify>
    	<delete start="true"/>
    	<createFolder start="true"/>
    	<createFile start="false"/>
    	<closeWrite start="true"/>
    	<moveFrom start="true"/>
    	<moveTo start="true"/>
    	<attrib start="false"/>
    	<modify start="false"/>
        </inotify>

        <sersync>
		<!-- 监听文件路径-->
    	<localpath watch="/data/ouna/upload/firmware">
			<!-- master1的ip master1名称-->
    		<remote ip="192.168.0.196" name="master1"/>
    	</localpath>

    	<rsync>
    	    <commonParams params="-artuz"/>
			<!-- rsync.password密码授权,如果你创建的是rsyncd.password,则用rsyncd.password-->
    	    <auth start="true" users="rsync_backup" passwordfile="/etc/rsync.password"/>
    	    <userDefinedPort start="false" port="873"/><!-- port=873 -->
    	    <timeout start="true" time="100"/><!-- timeout=100 -->
    	    <ssh start="false"/>
    	</rsync>
    	<failLog path="/usr/local/sersync/logs/rsync_fail_log.sh" timeToExecute="60"/><!--default every 60mins execute once-->
    	<crontab start="false" schedule="600"><!--600mins-->
    	    <crontabfilter start="false">
    		<exclude expression="*.php"></exclude>
    		<exclude expression="info/*"></exclude>
    	    </crontabfilter>
    	</crontab>
    	<plugin start="false" name="command"/>
        </sersync>

        <plugin name="command">
    	<param prefix="/bin/sh" suffix="" ignoreError="true"/>	<!--prefix /opt/tongbu/mmm.sh suffix-->
    	<filter start="false">
    	    <include expression="(.*)\.php"/>
    	    <include expression="(.*)\.sh"/>
    	</filter>
        </plugin>

        <plugin name="socket">
    	<localpath watch="/opt/tongbu">
    	    <deshost ip="192.168.138.20" port="8009"/>
    	</localpath>
        </plugin>
        <plugin name="refreshCDN">
    	<localpath watch="/data0/htdocs/cms.xoyo.com/site/">
    	    <cdninfo domainname="ccms.chinacache.com" port="80" username="xxxx" passwd="xxxx"/>
    	    <sendurl base="http://pic.xoyo.com/cms"/>
    	    <regexurl regex="false" match="cms.xoyo.com/site([/a-zA-Z0-9]*).xoyo.com/images"/>
    	</localpath>
        </plugin>
    </head>
- master3配置confxml.xml
    <?xml version="1.0" encoding="ISO-8859-1"?>
    <head version="2.5">
        <host hostip="localhost" port="8008"></host>
        <debug start="false"/>
        <fileSystem xfs="false"/>
        <filter start="false">
    	<exclude expression="(.*)\.svn"></exclude>
    	<exclude expression="(.*)\.gz"></exclude>
    	<exclude expression="^info/*"></exclude>
    	<exclude expression="^static/*"></exclude>
        </filter>
        <inotify>
    	<delete start="true"/>
    	<createFolder start="true"/>
    	<createFile start="false"/>
    	<closeWrite start="true"/>
    	<moveFrom start="true"/>
    	<moveTo start="true"/>
    	<attrib start="false"/>
    	<modify start="false"/>
        </inotify>

        <sersync>
		<!-- 监听文件路径-->
    	<localpath watch="/data/ouna/upload/firmware">
			<!-- master1的ip master1名称-->
    		<remote ip="192.168.0.196" name="master1"/>
    	</localpath>

    	<rsync>
    	    <commonParams params="-artuz"/>
			<!-- rsync.password密码授权,如果你创建的是rsyncd.password,则用rsyncd.password-->
    	    <auth start="true" users="rsync_backup" passwordfile="/etc/rsync.password"/>
    	    <userDefinedPort start="false" port="873"/><!-- port=873 -->
    	    <timeout start="true" time="100"/><!-- timeout=100 -->
    	    <ssh start="false"/>
    	</rsync>
    	<failLog path="/usr/local/sersync/logs/rsync_fail_log.sh" timeToExecute="60"/><!--default every 60mins execute once-->
    	<crontab start="false" schedule="600"><!--600mins-->
    	    <crontabfilter start="false">
    		<exclude expression="*.php"></exclude>
    		<exclude expression="info/*"></exclude>
    	    </crontabfilter>
    	</crontab>
    	<plugin start="false" name="command"/>
        </sersync>

        <plugin name="command">
    	<param prefix="/bin/sh" suffix="" ignoreError="true"/>	<!--prefix /opt/tongbu/mmm.sh suffix-->
    	<filter start="false">
    	    <include expression="(.*)\.php"/>
    	    <include expression="(.*)\.sh"/>
    	</filter>
        </plugin>

        <plugin name="socket">
    	<localpath watch="/opt/tongbu">
    	    <deshost ip="192.168.138.20" port="8009"/>
    	</localpath>
        </plugin>
        <plugin name="refreshCDN">
    	<localpath watch="/data0/htdocs/cms.xoyo.com/site/">
    	    <cdninfo domainname="ccms.chinacache.com" port="80" username="xxxx" passwd="xxxx"/>
    	    <sendurl base="http://pic.xoyo.com/cms"/>
    	    <regexurl regex="false" match="cms.xoyo.com/site([/a-zA-Z0-9]*).xoyo.com/images"/>
    	</localpath>
        </plugin>
    </head>
3. 修改完成后,启动即可,
sersync -r -d -o /usr/local/sersync/conf/confxml.xml
其他详细的信息可以参考本文开头链接文章,本文不在进行详细叙述。



![[论文笔记] Atos: A Task-Parallel GPU Scheduler for Graph Analytics](https://img-blog.csdnimg.cn/68206d5564ea415f8f1b2cbd07d2f33d.png)
