1、Windows 上安装 MySQL
便于测试,笔者在 windows 上安装 MySQL,如有现成Linux下的MySQL和Python环境,也可直接使用。
MySQL的官网下载链接
安装步骤
1)下载后的mysql-5.7.23-winx64.zip安装包解压至某一位置,在mysql-5.7.23-winx64.zip根目录下创建my.ini文件添加以下内容:
my.ini
[mysql]
default-character-set=utf8
[mysqld]
port = 3306
basedir=E:\mysql-5.7.23-winx64
datadir=E:\mysql-5.7.23-winx64\data
max_connections=200
character-set-server=utf8
default-storage-engine=INNODB
2)打开cmd进入mysql的bin目录,初始化数据库文件
mysqld --initialize
初始化成功后会在my.ini配置文件的datadir的目录下生成一些文件,其中xxx.err(xxx是电脑用户名称)文件里说明了root账户的临时密码。例子:4wd+LqNgyoiQ就是root账户的临时密码
A temporary password is generated for root@localhost: 4wd+LqNgyoiQ
#注册mysql服务
mysqld -install MySQL
#启动mysql服务
net start MySQL
#使用root账号登录
mysql -u root -p4wd+LqNgyoiQ
#修改root密码
ALTER USER 'root'@'localhost' IDENTIFIED BY 'new_password';
如下是完整操作过程
1)、编辑E:\mysql-5.7.23-winx64\my.ini
[mysql]
# 设置mysql客户端默认字符集
default-character-set=utf8
[mysqld]
# 设置3306端口
port = 3306
# 设置mysql的安装目录
basedir=E:\mysql-5.7.23-winx64
# 设置 mysql数据库的数据的存放目录,MySQL 8+ 不需要以下配置,系统自行生成,否则有可能报错
# datadir=E:\mysql-5.7.23-winx64\data
# 允许最大连接数
max_connections=200
# 服务端使用的字符集默认为8比特编码的latin1字符集
character-set-server=utf8
# 创建新表时将使用的默认存储引擎
default-storage-engine=INNODB
2)、cmd进入MySQL解压路径安装
I:\python>e:
E:\>cd E:\mysql-5.7.23-winx64
E:\mysql-5.7.23-winx64>cd bin
E:\mysql-5.7.23-winx64\bin>mysqld --initialize
E:\mysql-5.7.23-winx64\bin>mysqld -install MySQL
Service successfully installed.
E:\mysql-5.7.23-winx64\bin>
E:\mysql-5.7.23-winx64\bin>net start MySQL
MySQL 服务正在启动 .
MySQL 服务已经启动成功。
E:\mysql-5.7.23-winx64\bin>mysql -u root -p
Enter password: ************
Welcome to the MySQL monitor.  Commands end with ; or \g.
Your MySQL connection id is 2
Server version: 5.7.23

Copyright (c) 2000, 2018, Oracle and/or its affiliates. All rights reserved.

Oracle is a registered trademark of Oracle Corporation and/or its
affiliates. Other names may be trademarks of their respective
owners.

Type 'help;' or '\h' for help. Type '\c' to clear the current input statement.

mysql> ALTER USER 'root'@localhost IDENtified by '123456';
Query OK, 0 rows affected (0.00 sec)

mysql> use mysql;
Database changed
mysql>
3)、添加Windows环境变量
此电脑右键 属性-->高级系统设置-->高级-->环境变量-->系统变量-->点击Path-->编辑-->新建-->输入 E:\mysql-5.7.23-winx64\bin-->一直确定
2、安装Python的mysqldb模块
2.1、安装pip
下载并解压 pip-20.1.1.tar.gz ,本文解压路径E:\python-2.7.18>
E:\>cd python-2.7.18\pip-20.1.1\pip-20.1.1
E:\python-2.7.18\pip-20.1.1\pip-20.1.1>
执行 python setup.py install  安装pip
E:\python-2.7.18\pip-20.1.1\pip-20.1.1>python setup.py install
安装完成后添加pip环境变量
确认是否安装成功
C:\Users\Administrator>pip
Usage:
  pip <command> [options]

Commands:
  install                     Install packages.
  download                    Download packages.
  uninstall                   Uninstall packages.
  freeze                      Output installed packages in requirements format.
  list                        List installed packages.
  show                        Show information about installed packages.
  check                       Verify installed packages have compatible dependencies.
  config                      Manage local and global configuration.
  search                      Search PyPI for packages.
  cache                       Inspect and manage pip's wheel cache.
2.2、安装MySQLDB模块
MySQL_python文件包下载地址
下载 MySQL_python-1.2.5-cp27-none-win_amd64.whl
执行 pip install MySQL_python-1.2.5-cp27-none-win_amd64.whl 安装
E:\mysql-5.7.23-winx64>pip install MySQL_python-1.2.5-cp27-none-win_amd64.whl
DEPRECATION: Python 2.7 reached the end of its life on January 1st, 2020. Please upgrade your Python as Python 2.7 is no longer maintained. pip 21.0 will drop support for Python 2.7 in January 2021. More details about Python 2 support in pip, can be found at https://pip.pypa.io/en/latest/development/release-process/#python-2-support
Processing e:\mysql-5.7.23-winx64\mysql_python-1.2.5-cp27-none-win_amd64.whl
Installing collected packages: MySQL-python
Successfully installed MySQL-python-1.2.5
E:\mysql-5.7.23-winx64>
#验证
I:\python>python
Python 2.7.18 (v2.7.18:8d21aa21f2, Apr 20 2020, 13:25:05) [MSC v.1500 64 bit (AMD64)] on win32
Type "help", "copyright", "credits" or "license" for more information.
>>> import MySQLdb
>>>
3、Python操作MySQL数据库
Python操作MySQL数据库基本步骤为 导入模块-->连接数据库-->获取游标-->执行SQL-->获取执行结果-->关闭游标-->关闭连接
有直连和连接池两种连接方式。
3.1 Python操作MySQL基本步骤
1) 直连方式
import MySQLdb
#导入MySQLdb模块
conn= MySQLdb.connect(host='localhost',user='root',passwd='pwd',db='myDB',port=3306)
#创建连接
cur=conn.cursor()
#创建游标
SQL="select * from table1"
r=cur.execute(SQL)
#执行SQL
r=cur.fetchall()
#获取所有执行结果
r=cur.fetchone()
#获取第一条执行结果
SQL1="INSERT INTO xx VALUES('','','','','')"%
cursor.execute(SQL1)
connect.commit()
# 提交到数据库执行,DML需要提交操作
cur.close()
#关闭游标
conn.close()
#关闭连接
2) 连接池方式
import MySQLdb
#导入MySQLdb模块
from DBUtils.PooledDB import PooledDB
#导入连接池
pool = PooledDB(MySQLdb,5,host='localhost',user='root',passwd='pwd',db='myDB',port=3306)
#创建连接池,5为连接池里的最少连接数
conn = pool.connection()
#需要数据库连接就是用connection()函数获取连接
cur=conn.cursor()
#创建游标
SQL="select * from table1"
r=cur.execute(SQL)
#执行SQL
r=cur.fetchall()
#获取所有执行结果
cur.close()
#关闭游标
conn.close()
#关闭连接
3.2、Python操作MySQL数据库表
基本的操作方式已经整合成脚本,生产环境实际使用适当调整即可
1)创建数据库
#usr/bin/python
#-*- coding:utf-8 -*-
#author:Fieldyang
#description :Python操作mysql建库
import MySQLdb
import os

os.environ['NLS_LANG'] = "AMERICAN_AMERICA.ZHS16GBK"

def cre_db(connect,name):
	try:
		cursor=connect.cursor()
		cursor.execute('show databases')
		rows = cursor.fetchall()
		for row in rows:
			dbname = "%s" % row
			# 判断数据库是否存在
			if name == dbname:
				cursor.execute('drop database if exists ' + name)
				print "drop database %s successfully!" %name
		cursor.execute('create database if not exists ' + name)
		# 提交到数据库执行
		connect.commit()
	except MySQLdb.Error, e:
		print "Mysql Error %d: %s" % (e.args[0], e.args[1])
	finally:
	# 关闭数据库连接
		cursor.execute('show databases')
		rows = cursor.fetchall()
		for row in rows:
			dbname = "%s" % row
			print dbname
		cursor.close()
if __name__ == '__main__':
    conn = MySQLdb.connect(host="localhost",  user="root",  passwd="123456",db="mysql")
    cre_db(conn,'mydb')
    conn.close()
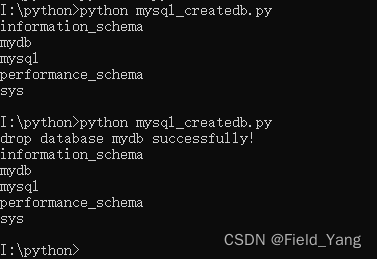
执行脚本
2)Python导出MySQL表数据
#usr/bin/python
#-*- coding:GBK -*-
#author:Fieldyang
#description :Python操作mysql导出数据
import io
import os
import MySQLdb
import time

os.environ['NLS_LANG'] = "AMERICAN_AMERICA.ZHS16GBK"

def loaddb1(cursor,file,sql):
	wfp = io.open(file,"wb+")
	cursor.execute(sql)
	rows = cursor.fetchall()
	for row in rows:
		for i in row:
			if i:
				wfp.write(str(i)+"|")
				print str(i)+"|"
			else:
				pass
		wfp.write("\n")
        wfp.close()

if __name__ == '__main__':
	try:
		yesdate = str(time.strftime("%Y-%m-%d", time.localtime(time.time()-86400)))
		Date = str(time.strftime("%Y%m%d-%H:%M:%S", time.localtime()))
		dir='I:\\python\\'
		show="mark"
		file=("%smysqldata.txt" %dir)
		logfile=("%slog.txt" %dir)
		sql1="select Host,User,Select_priv,Insert_priv,plugin,password_lifetime  from user"
		conn = MySQLdb.connect(host="localhost",  user="root", passwd="123456",db="mysql")
		cur = conn.cursor()
		wfp = io.open(logfile,"ab+")
		if int(len(show)) > 0:
			loaddb1(cur,file,sql1)
			wfp.write("[INFO:%s] Load 1 data...\n"%(Date))
			wfp.close()
		else:
			wfp.write("[INFO:%s] SLEEP 1 MINUTE...\n"%(Date))
			wfp.close()
		cur.close();
		conn.close();
	except KeyboardInterrupt:
		print "\n谢谢~~"
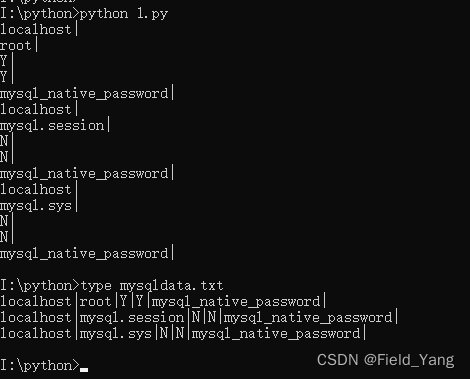
执行脚本
3)Python操作mysql数据库建库、建表、插入数据、导出数据
#usr/bin/python
#-*- coding:utf-8 -*-
#author:Fieldyang
#description :Python操作mysql数据库建库、建表、插入数据、导出数据
import io
import os
import MySQLdb
import time
os.environ['NLS_LANG'] = "AMERICAN_AMERICA.ZHS16GBK"

#创建数据库
def cre_db(connect,name):
	try:
		cursor=connect.cursor()
		cursor.execute('show databases')
		rows = cursor.fetchall()
		for row in rows:
			dbname = "%s" % row
			# 判断数据库是否存在
			if name == dbname:
				cursor.execute('drop database if exists ' + name)
				print "drop database %s successfully!" %name
		cursor.execute('create database if not exists ' + name)
		# 提交到数据库执行
		connect.commit()
	except MySQLdb.Error, e:
		print "Mysql Error %d: %s" % (e.args[0], e.args[1])
	finally:
	# 关闭数据库连接
		#cursor.execute('show databases')
		#rows = cursor.fetchall()
		#for row in rows:
			#dbname = "%s" % row
			#print dbname
		print "create database %s successfully!" %name
		cursor.close()

# 建库和建表(字段)
def cre_tb(connect,dbname,sql):
	try:
		exe_list = []
		exe_list.append("use mydb")
		exe_list.append("show tables")
		cursor=connect.cursor()
		for i in exe_list:
			cursor.execute(i)
			rows = cursor.fetchall()
		#print rows
		sql_list = sql.split()
		cre_tb = sql_list[2]
		for row in rows:
			tbname = "%s" % row
			# 判断数据库是否存在
			if tbname.upper() == cre_tb.upper():
				cursor.execute('drop table ' + cre_tb)
				print "drop table %s successfully!" %cre_tb
		cursor.execute(sql)
		# 提交到数据库执行
		connect.commit()
	except MySQLdb.Error, e:
		print "Mysql Error %d: %s" % (e.args[0], e.args[1])
	finally:
	# 关闭数据库连接
		cursor.execute('desc ' + cre_tb)
		rows = cursor.fetchall()
		print "desc %s" %cre_tb
		for row in rows:
			print row
		cursor.close()

#插入数据
def cre_inst_tb(connect,dbname,sql):
	try:
		cursor=connect.cursor()
		sql_list = sql.split()
		cre_tb = sql_list[2]
		cursor.execute('use '+dbname )
		cursor.execute('select count(1) from ' + cre_tb)
		rows = cursor.fetchone()
		print "Table %s have %s lines." %(cre_tb,rows[0])
		cursor.execute(sql)
		# 提交到数据库执行
		connect.commit()
	except MySQLdb.Error, e:
		print "Mysql Error %d: %s" % (e.args[0], e.args[1])
	finally:
	# 关闭数据库连接
		cursor.execute('select count(1) from ' + cre_tb)
		rows = cursor.fetchone()
		print "Table now %s have %s lines." %(cre_tb,rows[0])
		cursor.close()

#导出数据
def loaddb1(connect,file,sql):
	cursor=connect.cursor()
	wfp = io.open(file,"wb+")
	cursor.execute(sql)
	rows = cursor.fetchall()
	for row in rows:
		for i in row:
			if i:
				wfp.write(str(i)+"|")
			else:
				pass
		wfp.write("\n")
        wfp.close()

if __name__ == '__main__':
	try:
		conn = MySQLdb.connect(host="localhost",  user="root", passwd="123456",db="mysql")
		cre_db(conn,'mydb')
		sql1="CREATE TABLE address (`house_id`          INT(20)  NOT NULL ,`province_name`     varchar(50) NOT NULL,`city_name`         varchar(50) NOT NULL,`area`              varchar(50) NOT NULL,`address`           varchar(255)  NULL,PRIMARY KEY ( `house_id` ))ENGINE=InnoDB "
		cre_tb(conn,'mydb',sql1)
		#cre_tb(conn,'mydb',sql2)
		for i in range(5):
			sql3="INSERT INTO address VALUES('1002%s','广东省','广州市','天河区','中山大道西0001号')"%i
			cre_inst_tb(conn,'mydb',sql3)
		dir='I:\\python\\'
		file=("%smysqldata.txt" %dir)
		sql1="select house_id,province_name,city_name,area,address  from address"
		loaddb1(conn,file,sql1)
		conn.close()
		file1=os.popen("type %s" %file).read().decode("utf-8")
		print file1
	except KeyboardInterrupt:
		print "\n谢谢~~"
执行脚本并观察
I:\python>python mysql_createdb.py
drop database mydb successfully!
create database mydb successfully!
desc address
('house_id', 'int(20)', 'NO', 'PRI', None, '')
('province_name', 'varchar(50)', 'NO', '', None, '')
('city_name', 'varchar(50)', 'NO', '', None, '')
('area', 'varchar(50)', 'NO', '', None, '')
('address', 'varchar(255)', 'YES', '', None, '')
Table address have 0 lines.
Table now address have 1 lines.
Table address have 1 lines.
Table now address have 2 lines.
Table address have 2 lines.
Table now address have 3 lines.
Table address have 3 lines.
Table now address have 4 lines.
Table address have 4 lines.
Table now address have 5 lines.
10020|广东省|广州市|天河区|中山大道西0001号|
10021|广东省|广州市|天河区|中山大道西0001号|
10022|广东省|广州市|天河区|中山大道西0001号|
10023|广东省|广州市|天河区|中山大道西0001号|
10024|广东省|广州市|天河区|中山大道西0001号|4)整合Redis和数据库表生成redis hash
#usr/bin/python
#-*- coding:utf-8 -*-
#author Fieldyang
#description :Python从MySQL取数,导出数据,刷入Redis缓存
import io
import os
import MySQLdb
import redis
import time
import collections
os.environ['NLS_LANG'] = "AMERICAN_AMERICA.ZHS16GBK"
Date = str(time.strftime("%Y%m%d-%H:%M:%S", time.localtime()))
dir='I:\\python\\'
file=("%smysqldata.txt" %dir)
r = redis.Redis(host='127.0.0.1',port=6379,db=0,password='123456')
conn = MySQLdb.connect(host="localhost",  user="root", passwd="123456",db="mysql")
cur = conn.cursor()
list1=['Host','User','Select_priv','Insert_priv','Update_priv','Delete_priv','Create_priv','Drop_priv','Reload_priv','Shutdown_priv','Process_priv','File_priv','Grant_priv','References_priv','Index_priv','password_expired','plugin','password_lifetime']
hash=collections.OrderedDict()
#collections.OrderedDict()标准的字典是无序的。而collections.OrderedDict()是一种特殊字典,能够按照键的插入顺序保留键值对在字典的次序。
sql="select  Host,User,Select_priv,Insert_priv,Update_priv,Delete_priv,Create_priv,Drop_priv,Reload_priv,Shutdown_priv,Process_priv,File_priv,Grant_priv,References_priv,Index_priv,password_expired,plugin,password_lifetime  from user"

cur.execute(sql)
rows = cur.fetchall()
wfp = io.open(file,"wb+")
wfp.write("[INFO:%s] Load 1 data...\n"%(Date))
b=1
for row in rows:
        wfp.write('---------------------------------------------recode %s----------'%b)
        print '---------------------------------------------recode %s----------'%b
        for i in range(len(list1)):
                hash[list1[i]]=str(list(row)[i]).encode('gbk')
        for k,v in hash.items():
                print ("%15s:%s" %(k,v))
                wfp.write("%15s:%s" %(k,v))
        if r.exists("user_"+hash['User']):
                r.delete("user_"+hash['User'])
        r.hmset("user_"+hash['User'],hash)
        hashdata=r.hgetall("user_"+hash['User'])
        print hashdata
        b+=1
        wfp.write("\n")
print '----------------------------------------------End-----------'

for i in r.keys("*"):
	if r.type(i)=="hash":
		print i+":"
		print r.hkeys("user_"+hash['User'])
		print r.hvals("user_"+hash['User'])
	else:
		print i+":"+r.type(i)

wfp.close()
cur.close();
conn.close();
r.close();
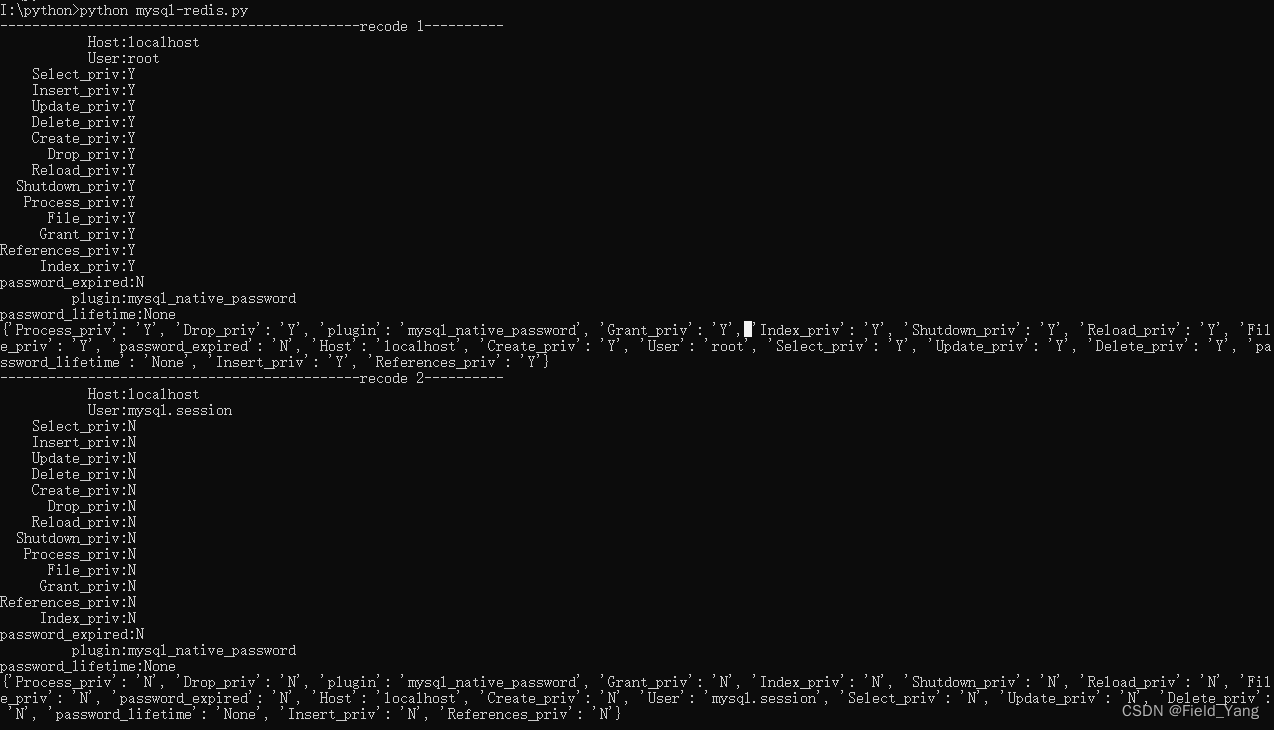
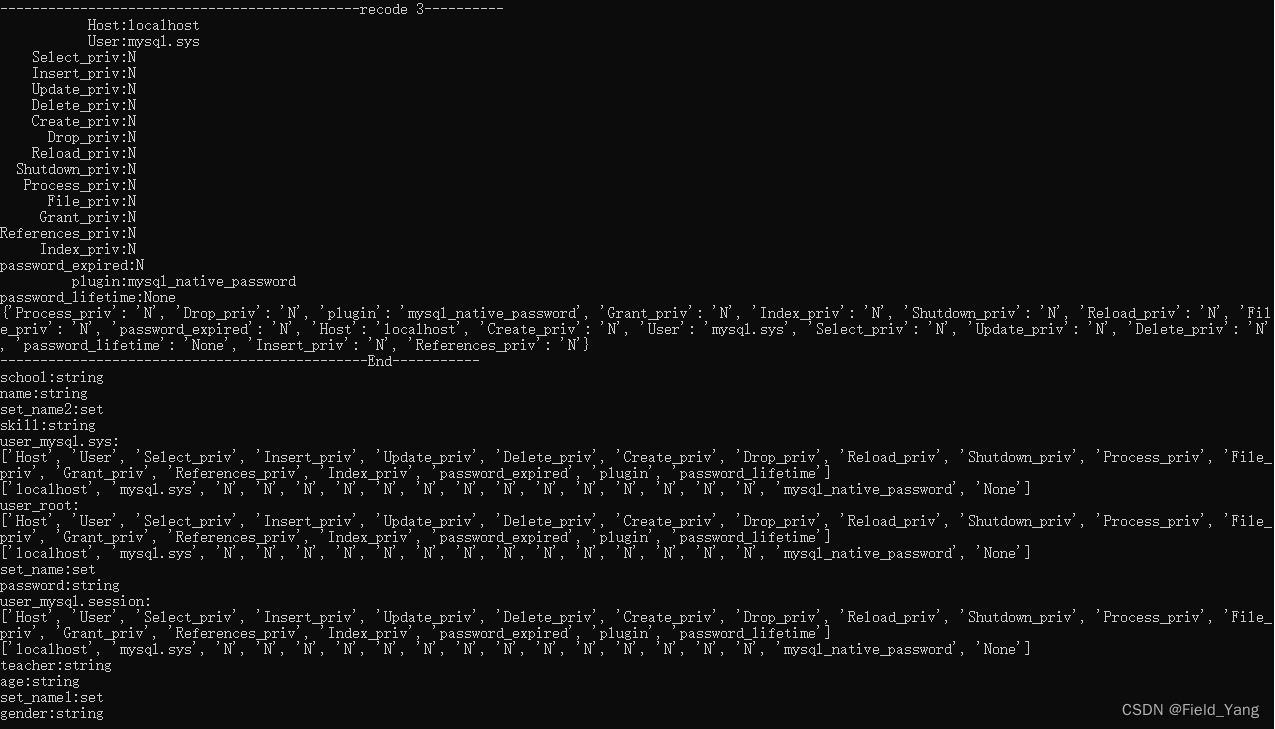
脚本执行结果如下:
