   还记得在前公司与同事共同开发一个在页面上统一管理定时提醒任务的功能,实际业务可能会复杂一些,它需要结合小程序或公众号平台对各个用户进行周期性(按季度、按月、按日等)的消息推送。由于我当时负责的是小程序和公众号平台方面的接口对接到系统使用,因此想总结有关动态创建定时任务的思路,下面通过一个简单例子(定时提醒功能)进行说明:
   其中项目的pom文件依赖信息如下:
<dependency>
	<groupId>org.springframework.boot</groupId>
	<artifactId>spring-boot-starter</artifactId>
</dependency>
<dependency>
	<groupId>org.springframework.boot</groupId>
	<artifactId>spring-boot-starter-test</artifactId>
	<scope>test</scope>
</dependency>
<dependency>
	<groupId>org.springframework.boot</groupId>
	<artifactId>spring-boot-starter-web</artifactId>
</dependency>
<!-- mysql依赖配置 -->
<dependency>
    <groupId>mysql</groupId>
    <artifactId>mysql-connector-java</artifactId>
    <scope>runtime</scope>
</dependency>

<!-- mybatis-plus依赖配置 -->
<dependency>
    <groupId>com.baomidou</groupId>
    <artifactId>mybatis-plus-boot-starter</artifactId>
    <version>3.3.2</version>
</dependency>
<dependency>
    <groupId>com.alibaba</groupId>
    <artifactId>fastjson</artifactId>
    <version>1.2.44</version>
</dependency>
(一)创建业务实体
import org.springframework.data.annotation.Id;

import com.baomidou.mybatisplus.annotation.TableName;

/**
 * @description 提醒基础信息类
 * 用于封装提醒内容的基本信息,因为必须得有一个数据库表保存所有定时任务的信息,并且从中进行操作
 * */
@TableName("remind_info")
public class RemindInfo {

	/**
	 * 主键
	 * */
	@Id
	private String id ;

	/**
	 * 提醒类型
	 * */
	private String remindType;

	/**
	 * 提醒内容内容
	 * */
	private String remindContent;

	/**
	 * 时间表达式,格式:0 * * * * ?  (每分钟的00秒)
	 * */
	private String cron;

	/**
	 * 启用状态,0-关闭,1-启动
	 * */
	private int status;

	public String getId() {
		return id;
	}

	public void setId(String id) {
		this.id = id;
	}

	public String getRemindType() {
		return remindType;
	}

	public void setRemindType(String remindType) {
		this.remindType = remindType;
	}

	public String getRemindContent() {
		return remindContent;
	}

	public void setRemindContent(String remindContent) {
		this.remindContent = remindContent;
	}

	public String getCron() {
		return cron;
	}

	public void setCron(String cron) {
		this.cron = cron;
	}

	public int getStatus() {
		return status;
	}

	public void setStatus(int status) {
		this.status = status;
	}
}
(二)创建业务的service和mapper层
RemindInfoMapper代码如下:
import org.apache.ibatis.annotations.Mapper;
import org.apache.ibatis.annotations.Param;
import org.apache.ibatis.annotations.Update;

import com.baomidou.mybatisplus.core.mapper.BaseMapper;
import com.testProject.taskScheduler.entity.RemindInfo;

@Mapper
public interface RemindInfoMapper extends BaseMapper<RemindInfo>{

	@Update("update remind_info set status = #{status} where id = #{id}")
	public int updateStatusById(@Param("id") String id ,@Param("status") int status);
}
RemindInfoService的代码如下:
import java.util.List;
import java.util.Map;

import org.apache.commons.lang3.StringUtils;
import org.springframework.beans.factory.annotation.Autowired;
import org.springframework.stereotype.Service;

import com.baomidou.mybatisplus.core.conditions.query.LambdaQueryWrapper;
//import com.baomidou.mybatisplus.extension.service.impl.ServiceImpl;
import com.testProject.taskScheduler.entity.RemindInfo;
import com.testProject.taskScheduler.mapper.RemindInfoMapper;

/**
 * @description 提醒信息业务逻辑层
 *
 * 注:mybatis-plus可以 extends ServiceImpl<RemindInfoMapper, RemindInfo>,然后使用service层相关的单表增删查改方法
 * */
@Service
public class RemindInfoService  {

	@Autowired
	private RemindInfoMapper remindInfoMapper;

	/**
	 * @apiNote
	 * */
	public RemindInfo getById(String id) {
		return remindInfoMapper.selectById(id);
	}

	/**
	 * @apiNote 保存和更新调用同一个接口
	 * */
	public int save(RemindInfo remindInfo) {
		if(this.check(remindInfo.getId())) {
			return remindInfoMapper.updateById(remindInfo);
		}else {
			return remindInfoMapper.insert(remindInfo);
		}
	}

	/**
	 * @apiNote 条件获取列表
	 * */
	public List<RemindInfo> getList(Map<String,Object> param) {
		/**
		 * @apiNote
		 * 注:本项目为使用mybatis-plus,使用lambda条件构造器
		 * */
		LambdaQueryWrapper<RemindInfo> queryWrapper = new LambdaQueryWrapper<>();
		queryWrapper.eq(StringUtils.isNotBlank((String)param.get("remindType")),RemindInfo::getRemindType,param.get("remindType"));
		queryWrapper.eq(StringUtils.isNotBlank(param.get("status")+""),RemindInfo::getStatus,param.get("status"));
		return remindInfoMapper.selectList(queryWrapper);
	}

	/**
	 * @apiNote 用于检查当前主键是否存在记录,存在则返回true,否则返回false
	 * */
	private boolean check(String id) {
		if(remindInfoMapper.selectById(id) == null) {
			return false;
		}
		return true;
	}

	/**
	 * @apiNote 通过id更新状态
	 * @param id     ——  主键
	 * 		  status ——  只能传0(关闭)或1(启动)
	 * */
	public int updateStatusById(String id ,int status) {
		return remindInfoMapper.updateStatusById(id, status);
	}
}
(三)实现任务定时器
第一步,首先定义一个线程类,用于实现定时任务具体执行的操作逻辑,代码如下:
import org.slf4j.Logger;
import org.slf4j.LoggerFactory;

import com.alibaba.fastjson.JSONArray;
import com.testProject.SpringContextUtils;
import com.testProject.taskScheduler.service.RemindInfoService;

/**
 * @description 任务定时程序线程类
 * 用于实现线程的执行逻辑
 * */
public class TaskScheduledThread implements Runnable{

	private static final Logger LOGGER = LoggerFactory.getLogger(TaskScheduledThread.class);

	/**
	 * 由于该类并没有交由spring进行管理,通过@Autowired标注时会出错,因此通过上下文工具对象来获取对应的实例对象
	 * */
	public static final RemindInfoService remindInfoService = SpringContextUtils.getBean(RemindInfoService.class);

	/* 任务主键 */
	private String taskId;

	/* 任务内容 */
	private String taskContent;

	/* 任务类型 */
	private String taskTyle;

	public String getTaskContent() {
		return taskContent;
	}

	public void setTaskContnt(String taskContent) {
		this.taskContent = taskContent;
	}

	public String getTaskTyle() {
		return taskTyle;
	}

	public void setTaskTyle(String taskTyle) {
		this.taskTyle = taskTyle;
	}

	public String getTaskId() {
		return taskId;
	}

	public void setTaskId(String taskId) {
		this.taskId = taskId;
	}

	@Override
	public void run() {
		//判断当前线程对象的类型
		//此处逻辑原来是提醒业务相关的,现在统一修改为控制台打印信息
		switch (this.taskTyle) {
		//根据不同的操作类型,实现不同的操作逻辑
		case "类型1":
			//执行相关逻辑1
			LOGGER.info("当前定时任务为:{}任务 , 调度内容为:{}",this.taskTyle,this.taskContent);
			break;
		case "类型2":
			//执行相关逻辑2
			LOGGER.info("当前定时任务为:{}任务 , 调度内容为:{}",this.taskTyle,this.taskContent);
			break;
		/*	。。。。。。。*/
		default:
			LOGGER.info("当前定时任务类型为异常:{},请联系管理员",this.taskTyle);
			break;
		}
		LOGGER.info("remindInfoService对象地址为:{}", JSONArray.toJSON(remindInfoService.getById(this.taskId)));
	}
}
   上述代码中的switch结构与remind_info数据库表中remind_type字段的内容一致,本文在编写前就先自定义好两条数据测试用,如下图:


   数据库代码如下:(注:此处使用Mysql8)
-- ----------------------------
-- Table structure for remind_info
-- ----------------------------
DROP TABLE IF EXISTS `remind_info`;
CREATE TABLE `remind_info`  (
  `id` varchar(64) CHARACTER SET utf8 COLLATE utf8_general_ci NOT NULL COMMENT '主键',
  `remind_type` varchar(64) CHARACTER SET utf8 COLLATE utf8_general_ci NULL DEFAULT NULL COMMENT '提醒类型',
  `remind_content` text CHARACTER SET utf8 COLLATE utf8_general_ci NULL COMMENT '提醒内容',
  `cron` varchar(100) CHARACTER SET utf8 COLLATE utf8_general_ci NULL DEFAULT NULL COMMENT '时间表达式',
  `status` tinyint(0) NULL DEFAULT NULL COMMENT '启用状态',
  PRIMARY KEY (`id`) USING BTREE
) ENGINE = InnoDB CHARACTER SET = utf8 COLLATE = utf8_general_ci ROW_FORMAT = Dynamic;

-- ----------------------------
-- Records of remind_info
-- ----------------------------
INSERT INTO `remind_info` VALUES ('1', '类型1', '提醒内容1', '0 * * * * ?', 1);
INSERT INTO `remind_info` VALUES ('2', '类型2', '提醒内容2', '0 * * * * ?', 1);

SET FOREIGN_KEY_CHECKS = 1;
另外补充一下SpringContextUtils上下文对象获取工具类,代码如下:
package com.testProject;

import org.springframework.beans.BeansException;
import org.springframework.context.ApplicationContext;
import org.springframework.context.ApplicationContextAware;
import org.springframework.stereotype.Component;

/**
 * @description 用于获取上文实例对象
 * 该工具在项目中是用于在多线程中获取spring中相关的bean对象来调用对应的方法
 * @Date
 * */
@Component
public class SpringContextUtils implements ApplicationContextAware {


    private static ApplicationContext context;

    private static ApplicationContext applicationContext = null;

    /**
     * 实现ApplicationContextAware接口, 注入Context到静态变量中.
     */
    @Override
    public void setApplicationContext(ApplicationContext applicationContext) throws BeansException {
    	SpringContextUtils.applicationContext = applicationContext;
    }

    /**
     * 获取静态变量中的ApplicationContext.
     */
    public static ApplicationContext getApplicationContext() {
        return applicationContext;
    }

    /**
     * 从静态变量applicationContext中得到Bean, 自动转型为所赋值对象的类型.
     */
    @SuppressWarnings("unchecked")
    public static <T> T getBean(String name) {
        return (T) applicationContext.getBean(name);
    }

    /**
     * 从静态变量applicationContext中得到Bean, 自动转型为所赋值对象的类型.
     */
    public static <T> T getBean(Class<T> requiredType) {
        return applicationContext.getBean(requiredType);
    }


}
第二步,实现动态创建定时任务相关逻辑,代码如下:
import java.util.Date;
import java.util.List;
import java.util.Map;
import java.util.concurrent.ConcurrentHashMap;
import java.util.concurrent.ScheduledFuture;
import java.util.concurrent.locks.ReentrantLock;

import org.slf4j.Logger;
import org.slf4j.LoggerFactory;
import org.springframework.beans.factory.annotation.Autowired;
import org.springframework.scheduling.Trigger;
import org.springframework.scheduling.TriggerContext;
import org.springframework.scheduling.concurrent.ThreadPoolTaskScheduler;
import org.springframework.scheduling.support.CronTrigger;
import org.springframework.stereotype.Service;
import org.springframework.util.CollectionUtils;


import com.testProject.taskScheduler.entity.RemindInfo;
import com.testProject.taskScheduler.thread.TaskScheduledThread;

/**
 * @description 定时任务业务逻辑层
 * */
@Service
public class TaskScheduledService {

	/**
     * 日志
     */
    private static final Logger LOGGER = LoggerFactory.getLogger(TaskScheduledService.class);

    /**
     * 可重入锁
     */
    private ReentrantLock lock = new ReentrantLock();

    /**
     * @description 定时任务线程池
     */
    @Autowired
    private ThreadPoolTaskScheduler threadPoolTaskScheduler;

    /**
     * @description 存放已经启动的任务map,此处使用ConcurrentHashMap进行存储,确保在不同线程下启动任务存放值时产生线程不安全的问题
     * 存放形式:K-任务id ,V- ScheduledFuture对象
     * 作用:统一管理整个系统的定时任务,可以根据任务id来获取定时任务对象,从而进行检查、启动和关闭等操作
     */
    private Map<String, ScheduledFuture> scheduledFutureMap = new ConcurrentHashMap<>();


    @Autowired
    private RemindInfoService remindInfoService;

    /**
     * @apiNote 根据任务id 启动定时任务(对外开放的启动接口,可以通过对象进行访问)
     *
     */
    public void start(String id) {
    	LOGGER.info("准备启动任务:{}", id);
        /**
         * 此处添加锁,为了确保只有一个线程在执行以下逻辑,防止多人启动多次
         * */
        lock.lock();
        try {
        	RemindInfo remindInfo = remindInfoService.getById(id);

            //校验是否已经启动
        	if (this.isStart(id)) {
                LOGGER.info("当前任务已在启动列表,请不要重复启动!");
            }else{
            	//启动任务
            	this.doStart(remindInfo);
            }
        }catch (Exception e) {
        	e.printStackTrace();
		} finally {
            // 释放锁
            lock.unlock();
        }
    }

    /**
     * 根据任务id 判断定时任务是否启动
     */
    public Boolean isStart(String id) {
    	//首先检查scheduledFutureMap是否存在该任务,如果不存在,则确定当前任务并没有启动
        if (scheduledFutureMap.containsKey(id)) {
        	//当该任务存在时,需要检查scheduledFuture对象是否被取消,如果为false,说明当前线程在启动,否则当前线程处于关闭状态
            if (!scheduledFutureMap.get(id).isCancelled()) {
                return true;
            }
        }
        return false;
    }

    /**
     * 根据任务id 停止定时任务
     * 该方法加锁,避免
     */
    public void stop(String id) {
    	LOGGER.info("进入关闭定时任务 :{}", id);

        //首先检查当前任务实例是否存在
        if (scheduledFutureMap.containsKey(id)) {
        	/**
	         * 此处添加锁,为了确保只有一个线程在执行以下逻辑,防止多人停止多次
	         * */
	        lock.lock();
            try {
            	//获取任务实例
                ScheduledFuture scheduledFuture = scheduledFutureMap.get(id);
                //关闭定时任务
                scheduledFuture.cancel(true);
                //避免内存泄露
    			//scheduledFutureMap.remove(id);
                LOGGER.info("任务{}已成功关闭", id);
            }catch (Exception e) {
	        	e.printStackTrace();
			}finally {
	            // 释放锁
	            lock.unlock();
	        }
        }else {
        	LOGGER.info("当前任务{}不存在,请重试!", id);
        }
    }

    public void init(List<RemindInfo> remindInfoList){
    	LOGGER.info("定时任务开始初始化 ,总共:size={}个", remindInfoList.size());
    	//如果集合为空,则直接退出当前方法
    	if (CollectionUtils.isEmpty(remindInfoList)) {
            return;
        }

    	//遍历所有提醒基础信息列表
    	for(RemindInfo remindInfo : remindInfoList) {

    		//将提醒信息的主键作为线程唯一标识
            String id = remindInfo.getId();

            //首先检查当前定时任务是否已经启动,如果已经启动,则跳出当次循环,继续检查下一个定时任务
            if (this.isStart(id)) {
                continue;
            }
            //启动定时任务
            this.doStart(remindInfo);
    	}
    }

    /**
     * 启动定时任务(该方法设置为私有方法,不开放给对象直接调用)
     */
    private void doStart(RemindInfo remindInfo) {

    	/**
    	 * 通过自动注入,生成一个被spring统一管理的实例对象taskScheduledThread
    	 * 此处相当于创建一个定时任务,因为是实现Runable接口,还没开始创建线程
    	 * */
    	TaskScheduledThread scheduledThread = new TaskScheduledThread();

    	/**
    	 * 此处相当于构造定时任务的基础信息
    	 * */
    	scheduledThread.setTaskId(remindInfo.getId());
    	scheduledThread.setTaskTyle(remindInfo.getRemindType());
    	scheduledThread.setTaskContnt(remindInfo.getRemindContent());

    	LOGGER.info("正在启动任务类型:{} ,内容:{},时间表达式:{}", remindInfo.getRemindType(), remindInfo.getRemindContent(),remindInfo.getCron());

    	/**
    	 * 此处使用ThreadPoolTaskScheduler的schedule方法创建一个周期性执行的任务
    	 *
    	 * */
    	ScheduledFuture<?> scheduledFuture = threadPoolTaskScheduler.schedule(scheduledThread,
	        new Trigger() {
	            @Override
	            public Date nextExecutionTime(TriggerContext triggerContext) {
	                CronTrigger cronTrigger = new CronTrigger(remindInfo.getCron());
	                return cronTrigger.nextExecutionTime(triggerContext);
            }
        });

    	//将已经启动的定时任务实例放入scheduledFutureMap进行统一管理
        scheduledFutureMap.put(remindInfo.getId(), scheduledFuture);

		LOGGER.info("启动任务:{} 成功!",remindInfo.getId());
    }
}
第三步,创建定时任务启动类。此处主要是重写ApplicationRunner接口的run方法,就可以做到在项目启动时自动创建与启动定时任务,代码如下:
import java.util.HashMap;
import java.util.List;
import java.util.Map;

import org.slf4j.Logger;
import org.slf4j.LoggerFactory;
import org.springframework.beans.factory.annotation.Autowired;
import org.springframework.boot.ApplicationArguments;
import org.springframework.boot.ApplicationRunner;
import org.springframework.stereotype.Component;

import com.testProject.taskScheduler.entity.RemindInfo;
import com.testProject.taskScheduler.service.RemindInfoService;
import com.testProject.taskScheduler.service.TaskScheduledService;


/**
 * @description 定时任务启动类型
 * 通过重写ApplicationRunner接口的run方法,实现项目在启动完毕时自动开启需要启动的定时任务(重启系统时会关闭所有定时任务)
 * */
//@Order(value = 1)//该注解用于标识当前作用范围的执行优先级别, 默认是最低优先级,值越小优先级越高
@Component
public class TaskScheduledRunner implements ApplicationRunner {

	/**
     * 日志
     */
    private static final Logger LOGGER = LoggerFactory.getLogger(TaskScheduledRunner.class);

    @Autowired
    private RemindInfoService remindInfoService;

    @Autowired
    private TaskScheduledService taskScheduledService;

    /**
     * 系统在重启完成后,自动初始化当前系统中所有定时任务程序
     */
    @Override
    public void run(ApplicationArguments applicationArguments) throws Exception {
        LOGGER.info("系统重启中,正在重新启动定时任务程序!");
        //查询状态为“启动”的提醒任务列表
        Map<String,Object> param = new HashMap<String, Object>();
        param.put("status", 1);
        //此处没有分页结构,一旦数据比较多时,有可能会造成内存溢出
        List<RemindInfo> remindInfoList = remindInfoService.getList(param);

        //初始化任务调度程序,重新启动所有任务调度程序
        taskScheduledService.init(remindInfoList);
        LOGGER.info("定时任务程序启动完成!");
    }
}
(四)实现controller接口
具体代码如下:
import org.springframework.beans.factory.annotation.Autowired;
import org.springframework.web.bind.annotation.PathVariable;
import org.springframework.web.bind.annotation.RequestMapping;
import org.springframework.web.bind.annotation.RestController;
import org.springframework.transaction.annotation.Transactional;
import org.springframework.transaction.interceptor.TransactionAspectSupport;

import com.testProject.taskScheduler.service.RemindInfoService;
import com.testProject.taskScheduler.service.TaskScheduledService;

@RequestMapping("remindInfo")
@RestController
public class RemindInfoController {

	@Autowired
	private RemindInfoService remindInfoService;

	@Autowired
	private TaskScheduledService raskScheduledService;

	/**
	 * @apiNote 通过id启动定时任务
	 * @Transactional ——启用事务回滚,避免在发生异常时产生脏数据或错误的数据操作。注:需要在application中启动事务管理,即添加@EnableTransactionManagement注解
	 * */
	@RequestMapping("/start/{id}")
	@Transactional
	public String start(@PathVariable String id) {
		try {
			/**
			 * 首先更新提醒任务表中的任务状态
			 * 此处的状态0或1可以用枚举类进行替代或者说明
			 * */
			int i = remindInfoService.updateStatusById(id, 1);
			//当提醒任务信息存在时,再来创建定时任务
			if(i != 0) {
				raskScheduledService.start(id);
				//return ResponseMessage.isOk("启动成功");
				return "启动成功";
			}else {
				//return ResponseMessage.isError("当前任务不存在");
				return "当前任务不存在";
			}
		} catch (Exception e) {
			//主动回滚事务,因为在检查型异常中,事务回滚不生效
	        TransactionAspectSupport.currentTransactionStatus().setRollbackOnly();
			e.printStackTrace();
		}
		//return ResponseMessage.isError("启动异常,请联系管理员进行处理");
		return "启动异常,请联系管理员进行处理";
	}

	/**
	 * @apiNote 通过id关闭定时任务
	 * */
	@RequestMapping("/stop/{id}")
	@Transactional
	public String stop(@PathVariable String id) {
		try {
			/**
			 * 首先更新提醒任务表中的任务状态
			 * 此处的状态0或1可以用枚举类进行替代或者说明
			 * */
			int i = remindInfoService.updateStatusById(id, 0);
			//当提醒任务信息存在时,再来创建定时任务
			if(i != 0) {
				raskScheduledService.stop(id);
				//return ResponseMessage.isOk("停止成功");
				return "停止成功";
			}else {
				//return ResponseMessage.isError("当前任务不存在");
				return "当前任务不存在";
			}
		} catch (Exception e) {
			//主动回滚事务,因为在检查型异常中,事务回滚不生效
	        TransactionAspectSupport.currentTransactionStatus().setRollbackOnly();
			e.printStackTrace();
		}
		//return ResponseMessage.isError("停止异常,请联系管理员进行处理");
		return "停止失败,请联系管理员";
	}
}
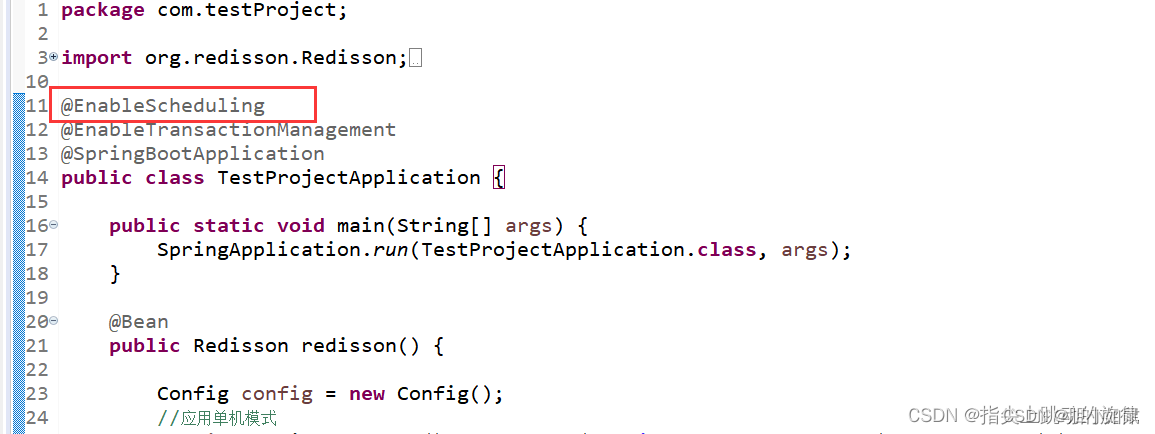
同时,记得在Application类上添加@EnableScheduling注解,启用定时器,如下图所示:
(五)启动项目
启动或重启项目时会在控制台看到以下信息,说明启动正常:
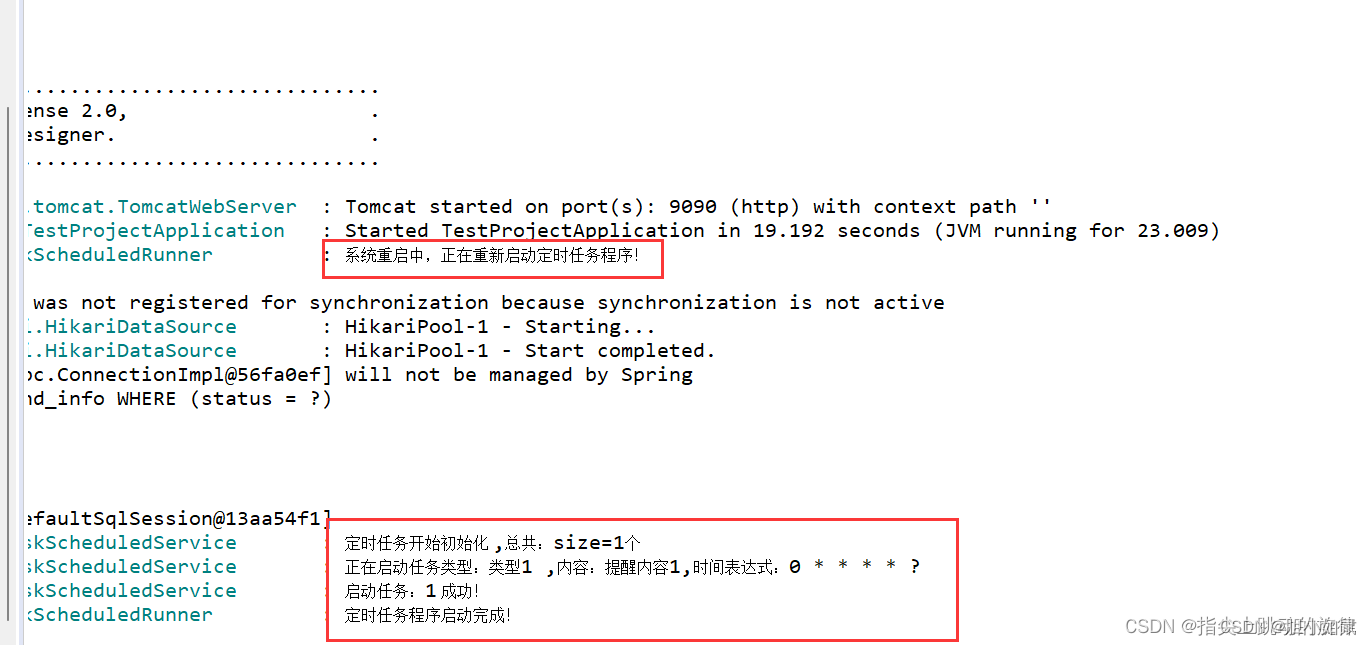
此时每次到指定时间时,都会在控制台中打印相关日志信息,如下:
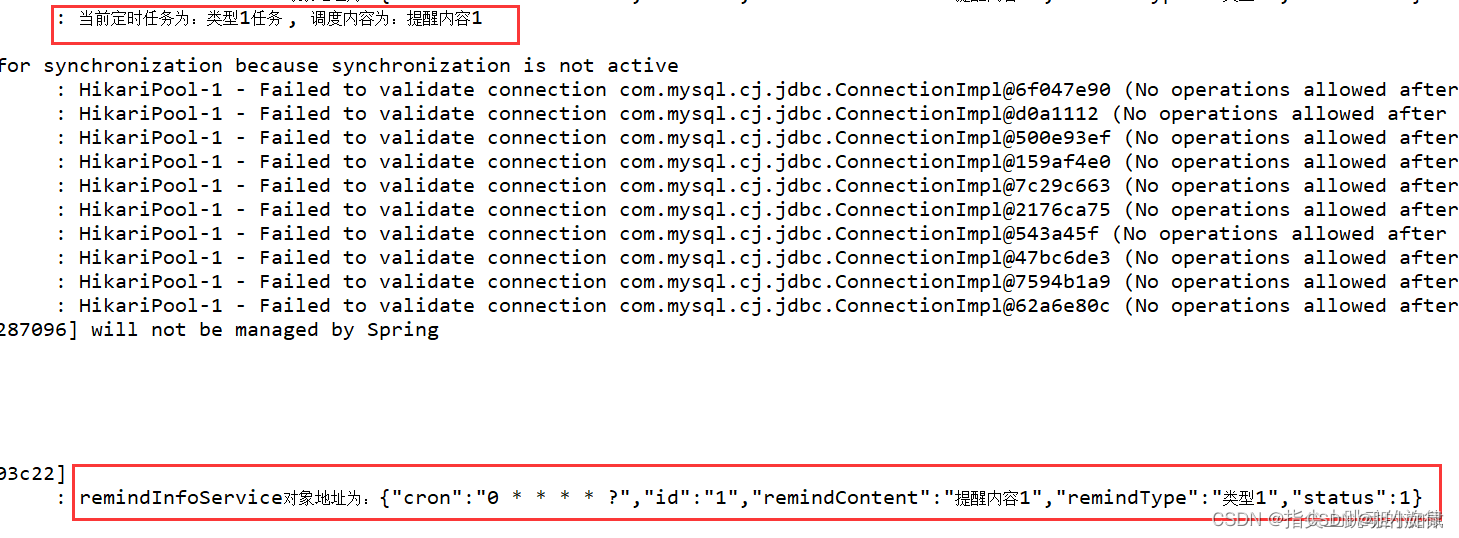
然后我们可以测试start接口把id为2的任务启动(此处的id为2是事先手动插入好的数据),在浏览器上访问:http://localhost:[xxxx]/remindInfo/start/2,如下所示:
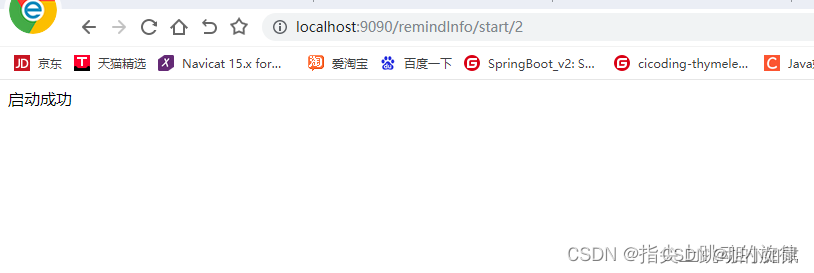
控制台也会打印出相关信息,并且在指定时间内打印出任务2的信息(相当于执行任务2的逻辑)。
启动任务时的截图:

定时任务执行时的截图:

同理,也可以在浏览器上访问停止任务接口:http://localhost:[xxxx]/remindInfo/stop/2,同样也会在控制台中打印关闭的信息,并且该任务不会执行。
(六)拓展
做到这里,就说明我们可以设计一个管理界面,把remind_info表中的数据展现在列表中,然后对列表的数据进行增删查改的同时,实现动态管理定时任务功能;需要的注意的点是,如果有对某个提醒业务信息进行修改,都要把原来的定时任务给关闭,再启动新的定时任务。思路比较简单,此处不做过多说明,有需要了解的可以私聊。
另外,该案例仅适用单体机,如果要应用在**多体机(集群)**上,网上是有相关的解决方法,可以按照这篇文章的描述试一下:https://segmentfault.com/a/1190000039713469?sort=votes。


