PyTorch 编程基础
文章目录
- PyTorch 编程基础
- 1. backword 求梯度
- 2. 常用的激活函数
- 2.1 Sigmoid 函数
- 2.2 ReLu 激活函数
- 2.3 Leakly ReLu 激活函数
- 2. 常用损失函数
- 2.1 均方误差损失函数
- 2.2 L1范数误差损失函数
- 2.3 交叉熵损失函数
- 3. 优化器
1. backword 求梯度
import torch

w = torch.tensor([1.], requires_grad=True)
x = torch.tensor([2.], requires_grad=True)
a = torch.add(x, w)
b = torch.add(w, 1)
y = torch.mul(a, b) # y=(x+w)(w+1)
y.backward() # 分别求出两个自变量的导数

print(w.grad) # (w+1)+ (x+w) = x+2w+1 = 5
print(x.grad) # w+1 = 2
tensor([5.])
import torch

w = torch.tensor([1.], requires_grad=True)
x = torch.tensor([2.], requires_grad=True)
for i in range(3):
    a = torch.add(x, w)
    b = torch.add(w, 1)
    y = torch.mul(a, b) # y=(x+w)(w+1)
    y.backward() # (w+1)+(x+w) = x+2w+1 = 5
    print(w.grad) # 梯度在循环过程中进行了累加
tensor([5.])
tensor([10.])
tensor([15.])
2. 常用的激活函数
最常见的神经网络连接是全连接,这种连接是一种线性加权求和形式的线性运算。当没有激活函数的情况下,随着神经网络层数的增加,这种多层的线性运算和单层的线性运算在本质上没有任何差别。因此,激活函数无论从计算还是从生物解释上都非常重要。以下是几种常用的激活函数:
2.1 Sigmoid 函数
sigmoid是激活函数的一种,它会将样本值映射到0到1之间。sigmoid的公式如下:
y = 1 1 + e − input y=\frac{1}{1+e^{-\text{input}}} y=1+e−input1
import numpy as np
import matplotlib.pyplot as plt

def sigmoid(x):
    return 1. / (1. + np.exp(-x))

def plot_sigmoid():
    x = np.arange(-10, 10, 0.1)
    y = sigmoid(x)
    plt.plot(x, y)
    plt.show()

if __name__ == '__main__':
    plot_sigmoid()
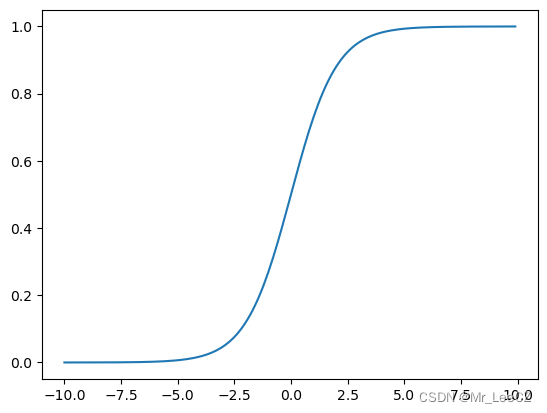
可以直接使用 PyTorch 自带的 Sigmoid 函数
import torch.nn as nn
import torch

#取一组满足标准正态分布的随机数构成3*3的张量
t1 = torch.randn(3,3)
m = nn.Sigmoid()
t2 = m(t1)
print(t1)
print(t2)
tensor([[-1.1227, 0.8743, 0.7674],
[ 0.9877, 0.1209, 1.0413],
[ 0.2607, 0.6298, -0.1863]])
tensor([[0.2455, 0.7056, 0.6830],
[0.7286, 0.5302, 0.7391],
[0.5648, 0.6524, 0.4536]])
优点:
(1)便于求导的平滑函数
(2)能压缩数据,保证数据幅度不会有问题
(3)适合用于前向传播
缺点:
(1)容易出现梯度消失(gradient vanishing)的现象:当激活函数接近饱和区时,变化太缓慢,导数接近0,根据后向传递的数学依据是微积分求导的链式法则,当前导数需要之前各层导数的乘积,几个比较小的数相乘,导数结果很接近0,从而无法完成深层网络的训练。
(2)Sigmoid的输出不是0均值的:这会导致后层的神经元的输入是非0均值的信号,这会对梯度产生影响。以 f=sigmoid(wx+b)为例, 假设输入均为正数(或负数),那么对w的导数总是正数(或负数),这样在反向传播过程中要么都往正方向更新,要么都往负方向更新,导致有一种捆绑效果,使得收敛缓慢。
(3)幂运算相对耗时
2.2 ReLu 激活函数
卷积神经网络 CNN 中常用的激活函数是 ReLu,其数学表达式为:
ReLu ( x ) = max { 0 , x } \text{ReLu}(x)=\max\{0,x\} ReLu(x)=max{0,x}
import numpy as np
import matplotlib.pyplot as plt

def relu(x):
    return np.maximum(0,x)

def plot_relu():
    x=np.arange(-10,10,0.1)
    y=relu(x)
    plt.plot(x,y)
    plt.show()

if __name__ == '__main__':
    plot_relu()
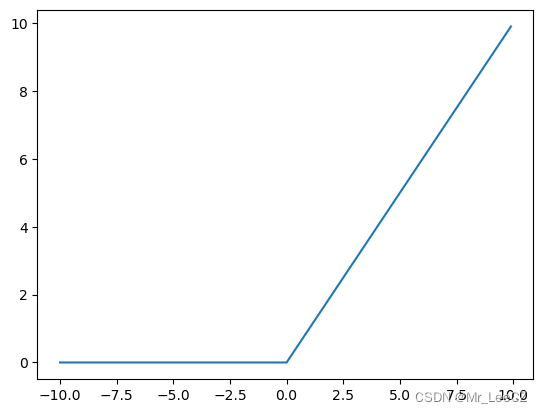
调用 PyTorch 自带的函数
import torch.nn as nn

m = nn.ReLU()
input = torch.randn(2)
output = m(input)
print(input)
print(output)
tensor([-0.8167, 1.2363])
tensor([0.0000, 1.2363])
优点:
(1)收敛速度比 sigmoid 和 tanh 快;(梯度不会饱和,解决了梯度消失问题)
(2)计算复杂度低,不需要进行指数运算
缺点:
(1)ReLu的输出不是zero-centered;
(2)Dead ReLU Problem(神经元坏死现象):某些神经元可能永远不会被激活,导致相应参数不会被更新(在负数部分,梯度为0)。产生这种现象的两个原因:参数初始化问题;learning rate太高导致在训练过程中参数更新太大。解决办法:采用Xavier初始化方法;以及避免将learning rate设置太大或使用adagrad等自动调节learning rate的算法。
(3)ReLu不会对数据做幅度压缩,所以数据的幅度会随着模型层数的增加不断扩张。
2.3 Leakly ReLu 激活函数
当 ReLu 输入值为负数的时候,输出值始终为 0 0 0,其一阶导数也始终为 0 0 0,这将会导致神经元不能更新参数,也就是神经元不学习了,这种现象叫“神经元坏死”,
为了解决 ReLu 函数的这个缺点,在 ReLu 函数的负半区间引入一个泄漏(leakly)值,称为 Leakly ReLu 函数,其数学表达式为:
ReLu ( x ) = max { α x , x } \text{ReLu}(x)=\max\{\alpha x,x\} ReLu(x)=max{αx,x}
import numpy as np
import matplotlib.pyplot as plt

def leakly_relu(x):
   return np.array([i if i > 0 else 0.05*i for i in x ])

def lea_relu_diff(x):
    return np.where(x > 0, 1, 0.01)

x = np.arange(-10, 10, step=0.01)
y_sigma = leakly_relu(x)
y_sigma_diff = lea_relu_diff(x)
axes = plt.subplot(111)
axes.plot(x, y_sigma, label='leakly_relu')
axes.legend()
plt.show()
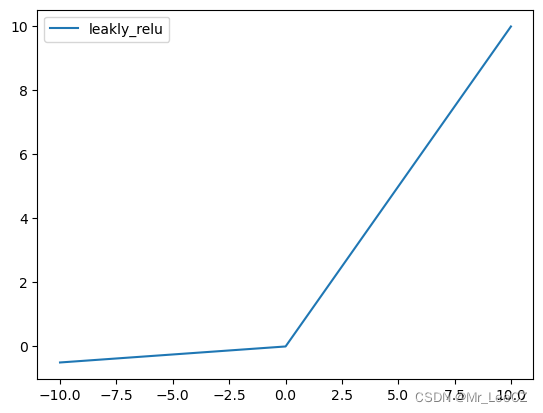
import torch.nn as nn
import torch

LeakyReLU = nn.LeakyReLU(negative_slope=5e-2)
x = torch.randn(10)
value = LeakyReLU(x)
print(x)
print(value)
tensor([ 1.3149, 0.0643, 0.5569, -0.4575, 1.6295, -0.2836, -0.8015, 1.0364,
0.3108, 0.8266])
tensor([ 1.3149, 0.0643, 0.5569, -0.0229, 1.6295, -0.0142, -0.0401, 1.0364,
0.3108, 0.8266])
Leaky ReLU函数的特点:
- Leaky ReLU函数通过把 x x x的非常小的线性分量给予负输入 0.01 x 0.01x 0.01x来调整负值的零梯度问题。
- Leaky有助于扩大ReLU函数的范围,通常 α \alpha α的值为0.01左右。
- Leaky ReLU的函数范围是负无穷到正无穷。
2. 常用损失函数
2.1 均方误差损失函数
loss ( x , y ) = 1 n ∥ x − y ∥ 2 2 = 1 n ∑ i = 1 n ( x i − y i ) 2 \text{loss}(\boldsymbol{x},\boldsymbol{y})=\frac{1}{n}\Vert\boldsymbol{x}-\boldsymbol{y}\Vert_2^2=\frac{1}{n}\sum_{i=1}^n(x_i-y_i)^2 loss(x,y)=n1∥x−y∥22=n1i=1∑n(xi−yi)2
import torch

input = torch.tensor([1.0, 2.0, 3.0, 4.0])
target = torch.tensor([4.0, 5.0, 6.0, 7.0])

loss_fn = torch.nn.MSELoss(reduction='mean')
loss = loss_fn(input, target)
print(loss)
tensor(9.)
2.2 L1范数误差损失函数
loss ( x , y ) = 1 n ∥ x − y ∥ 1 = 1 n ∑ i = 1 n ∣ x i − y i ∣ \text{loss}(\boldsymbol{x},\boldsymbol{y})=\frac{1}{n}\Vert\boldsymbol{x}-\boldsymbol{y}\Vert_1=\frac{1}{n}\sum_{i=1}^n\vert x_i-y_i\vert loss(x,y)=n1∥x−y∥1=n1i=1∑n∣xi−yi∣
import torch

loss = torch.nn.L1Loss(reduction='mean')
input = torch.tensor([1.0, 2.0, 3.0, 4.0])
target = torch.tensor([4.0, 5.0, 6.0, 7.0])
output = loss(input, target)
print(output)
tensor(3.)
2.3 交叉熵损失函数
h ( p , q ) = − ∑ x n p ( x ) ∗ log q ( x ) h(p,q)=-\sum_{x}^np( x)*\log q(x) h(p,q)=−x∑np(x)∗logq(x)
import torch

entroy = torch.nn.CrossEntropyLoss()
input = torch.Tensor([[-0.1181, -0.3682, -0.2209]])
target = torch.tensor([0])

output = entroy(input, target)
print(output)
tensor(0.9862)
3. 优化器
import torch
import torch.nn
import torch.utils.data as Data
import matplotlib
import matplotlib.pyplot as plt
import os
os.environ["KMP_DUPLICATE_LIB_OK"] = "TRUE"

matplotlib.rcParams['font.sans-serif'] = ['SimHei']

#准备建模数据
x = torch.unsqueeze(torch.linspace(-1, 1, 500), dim=1)
y = x.pow(3)

#设置超参数
LR = 0.01
batch_size = 15
epoches = 5
torch.manual_seed(10)

#设置数据加载器
dataset = Data.TensorDataset(x, y)
loader = Data.DataLoader(
    dataset=dataset,
    batch_size=batch_size,
    shuffle=True,
    num_workers=2)

#搭建神经网络
class Net(torch.nn.Module):
    def __init__(self, n_input, n_hidden, n_output):
        super(Net, self).__init__()
        self.hidden_layer = torch.nn.Linear(n_input, n_hidden)
        self.output_layer = torch.nn.Linear(n_hidden, n_output)

    def forward(self, input):
        x = torch.relu(self.hidden_layer(input))
        output = self.output_layer(x)
        return output

#训练模型并输出折线图
def train():
    net_SGD = Net(1, 10, 1)
    net_Momentum = Net(1, 10, 1)
    net_AdaGrad = Net(1, 10, 1)
    net_RMSprop = Net(1, 10, 1)
    net_Adam = Net(1, 10, 1)
    nets = [net_SGD, net_Momentum, net_AdaGrad, net_RMSprop, net_Adam]

    #定义优化器
    optimizer_SGD = torch.optim.SGD(net_SGD.parameters(), lr=LR)
    optimizer_Momentum = torch.optim.SGD(net_Momentum.parameters(), lr=LR, momentum=0.6)
    optimizer_AdaGrad = torch.optim.Adagrad(net_AdaGrad.parameters(), lr=LR, lr_decay=0)
    optimizer_RMSprop = torch.optim.RMSprop(net_RMSprop.parameters(), lr=LR, alpha=0.9)
    optimizer_Adam = torch.optim.Adam(net_Adam.parameters(), lr=LR, betas=(0.9, 0.99))
    optimizers = [optimizer_SGD, optimizer_Momentum, optimizer_AdaGrad, optimizer_RMSprop, optimizer_Adam]

    #定义损失函数
    loss_function = torch.nn.MSELoss()
    losses = [[], [], [], [], []]

    for epoch in range(epoches):
        for step, (batch_x, batch_y) in enumerate(loader):
            for net, optimizer, loss_list in zip(nets, optimizers, losses):
                pred_y = net(batch_x)
                loss = loss_function(pred_y, batch_y)
                optimizer.zero_grad()
                loss.backward()
                optimizer.step()
                loss_list.append(loss.data.numpy())

    plt.figure(figsize=(12,7))
    labels = ['SGD', 'Momentum', 'AdaGrad', 'RMSprop', 'Adam']
    for i, loss in enumerate(losses):
        plt.plot(loss, label=labels[i])
    plt.legend(loc='upper right',fontsize=15)
    plt.tick_params(labelsize=13)
    plt.xlabel('Train Step',size=15)
    plt.ylabel('Loss',size=15)
    plt.ylim((0, 0.3))
    plt.show()

if __name__ == "__main__":
    train()


