重点:不借助任何外部资料就能掌握,考试面试大概率涉及。
掌握:不借助任何外部资料就能掌握,考试面试有可能涉及。
熟悉:可以适当参考资料掌握,考试面试有可能涉及。
了解:可是参考资料掌握,考试几乎不考,面试如果涉及简单聊聊即可。
一、C++简介
1. 为什么要学习C++?
理由一
C++是面向对象编程最有代表性的语言之一,可以通过C++课程学习新的编程思想。
理由二
之前编程都是没有界面的,Qt是嵌入式中常用的图形用户界面编程框架,而Qt是基于C++的。
理由三
C++与Qt方向与之前的课程关联度相对较低,并且可以单独形成就业方向。
2. C++课程的定位
C++课程偏向于理论,要求学习语法,不要想为什么。Qt是C++的实践课,你的为什么都会得到解答。
3. C++的发展(了解)
1983年,贝尔实验室(Bell Labs)的Bjarne Stroustrup发明了C++。 C++在C语言的基础上进行了扩充和完善,是一种面向对象程序设计(OOP)语言。
Stroustrup说:“这个名字象征着源自于C语言变化的自然演进”。还处于发展完善阶段时被称为“new C”,之后被称为“C with Class”。C++被视为C语言的上层结构,1983年Rick Mascitti建议使用C++这个名字,就是源于C语言中的“++”操作符(变量自增)。而且在共同的命名约定中,使用“+”以表示增强的程序。
常用于系统开发,引擎开发、嵌入式开发等应用领域, 至今仍然是最受广大程序员喜爱的编程语言之一。
4. C++的特点(熟悉)
•在支持C的基础上,全面支持面向对象编程
•编程领域广泛,功能强大(最强大的编程语言,没有之一)
•标准保持更新,目前常用的基础标准为ISO C++98标准、ISO C++11标准等
•为数不多的支持底层操作的面向对象语言
•在面向对象的语言中执行效率极高

5. 面向对象编程的概念(掌握)
面向对象的思想是需要在学习的过程中逐步参透的,面向对象有三大核心的特点:
封装 → 继承 → 多态
面向对象还有两个最基础的概念:
类、对象
【例子】如果要把大象装进冰箱,应该怎么办?
面向过程的编程思想:
1. (我)把冰箱门打开
2. (我)把大象装进去
3. (我)把冰箱门关上
面向对象的编程思想:
1. (我)把大象和冰箱叫过来
2. (我)给大象和冰箱下达任务
3. 大象和冰箱自行组装

面向过程的语言,它关注的重点是“算法”,可以认为“算法”是一系列有序的步骤,只要按照步骤去做,就可以的得到预计的结果。所以面向过程的编程编写的程序通常是一系列有序的语句,这种方式更符合计算机执行命令的本质。特点是开发效率低,运行效率高。
面向对象的语言,它关注的重点是“管理”,程序员需要在程序中管理各种对象,对象可以认为是一系列由于某种联系而聚焦在一起数据。可以认为,面向对象的语言,程序员关注的是管理数据之间的关系,这种方式更接近于人类社会的思考方式。特点是开发效率高,运行效率低。
C++兼容面向过程与面向对象,但是以面向对象为主。
6. 环境安装
C++编程可以使用很多集成开发环境(IDE),本次课程没有固定要求,但是考虑到后面的Qt课程,所以推荐直接使用Qt的集成开发环境:Qt Creator

本次教学使用的版本是5.2.1,不是最新版本。
此版本环境安装步骤非常简单,一直下一步即可,但是需要注意,任何路径和文件名不得包含中文字符。
为了使Qt Creator支持C++的中文输出,安装完成后先修改文件编码,如下所示。
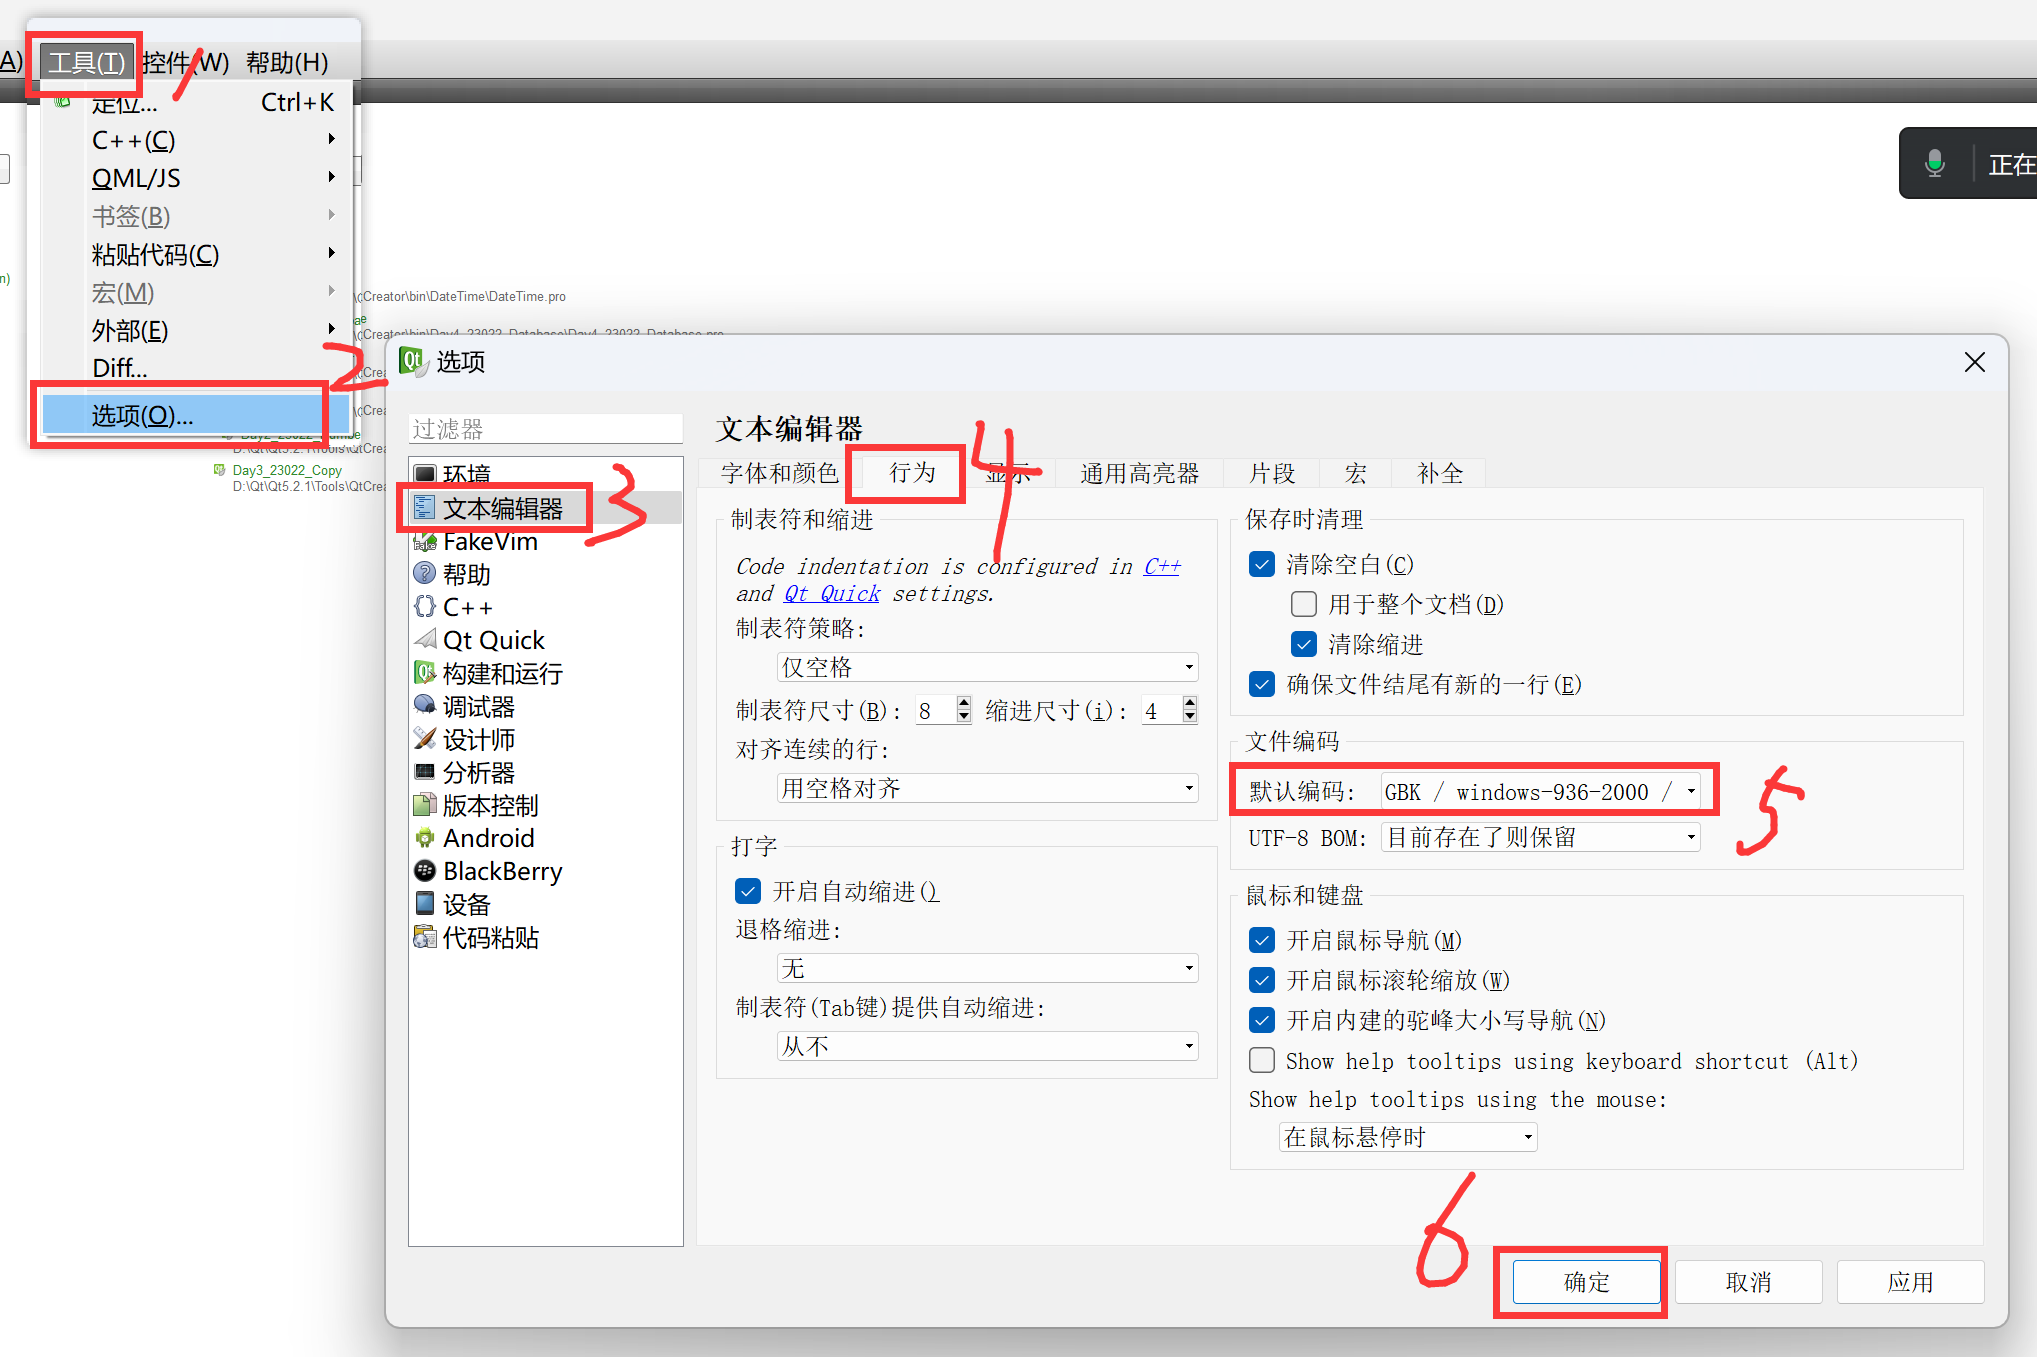
修改完成后,为了稳妥起见,建议关闭Qt Creator后,重新打开。
7. 第一个C++程序
创建并运行一个C++项目的操作步骤如下所示。
1. 启动Qt Creator后,点击

2. 在弹出的窗口中,按照下图所示进行操作。
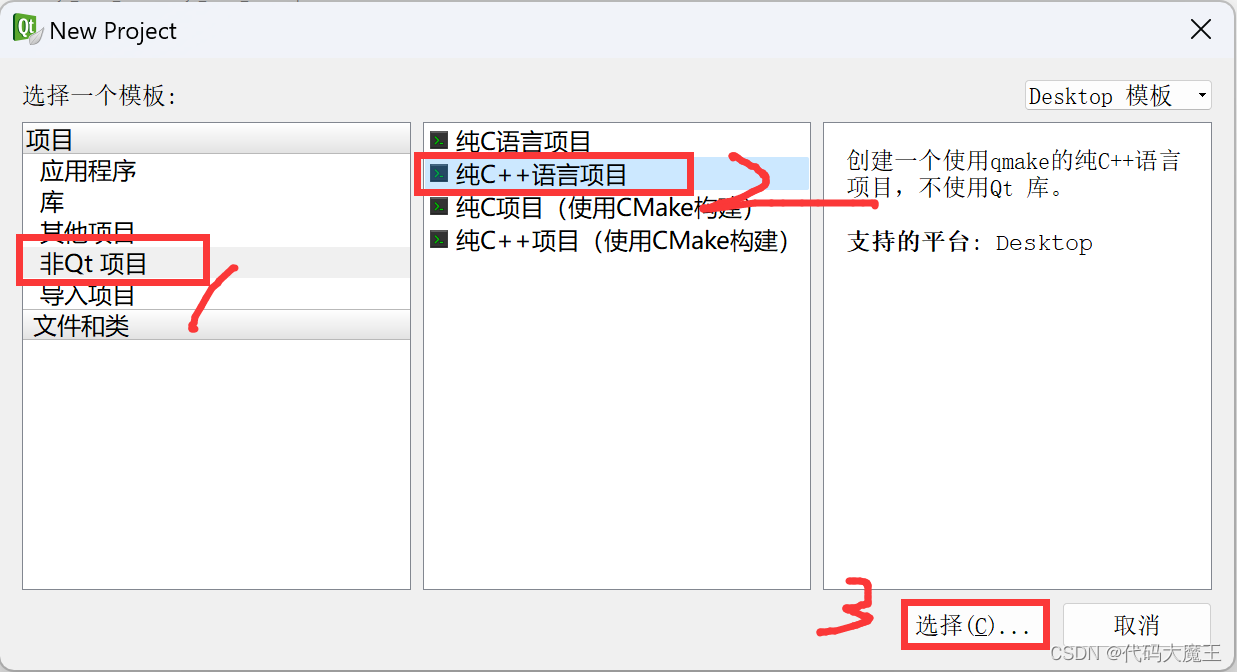
3. 在弹出的窗口中输入项目名称并设置工作目录的路径后,点击“下一步”。
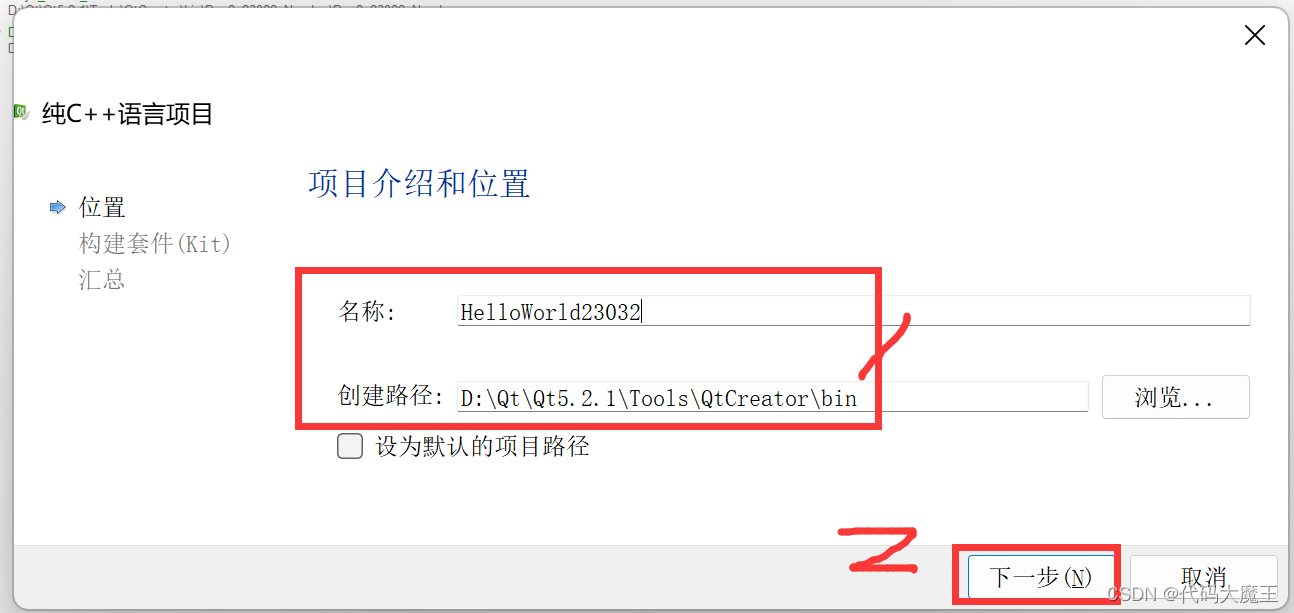
4. 在弹出的窗口中直接点击“下一步”。
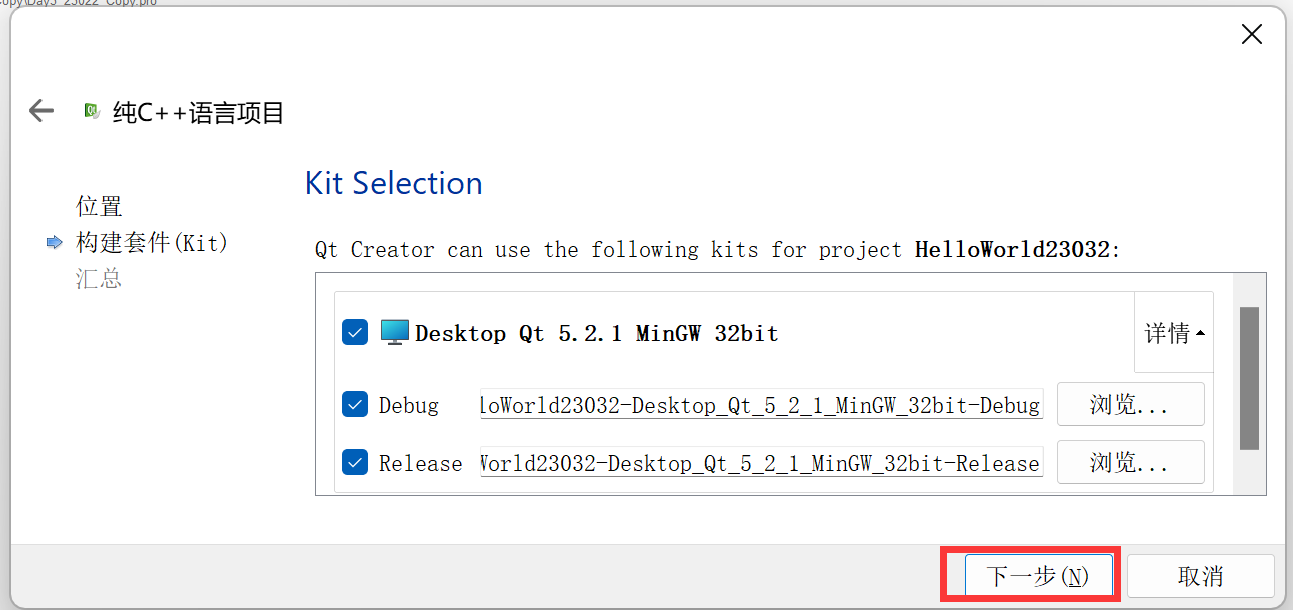
5. 在项目管理界面,直接点击完成。
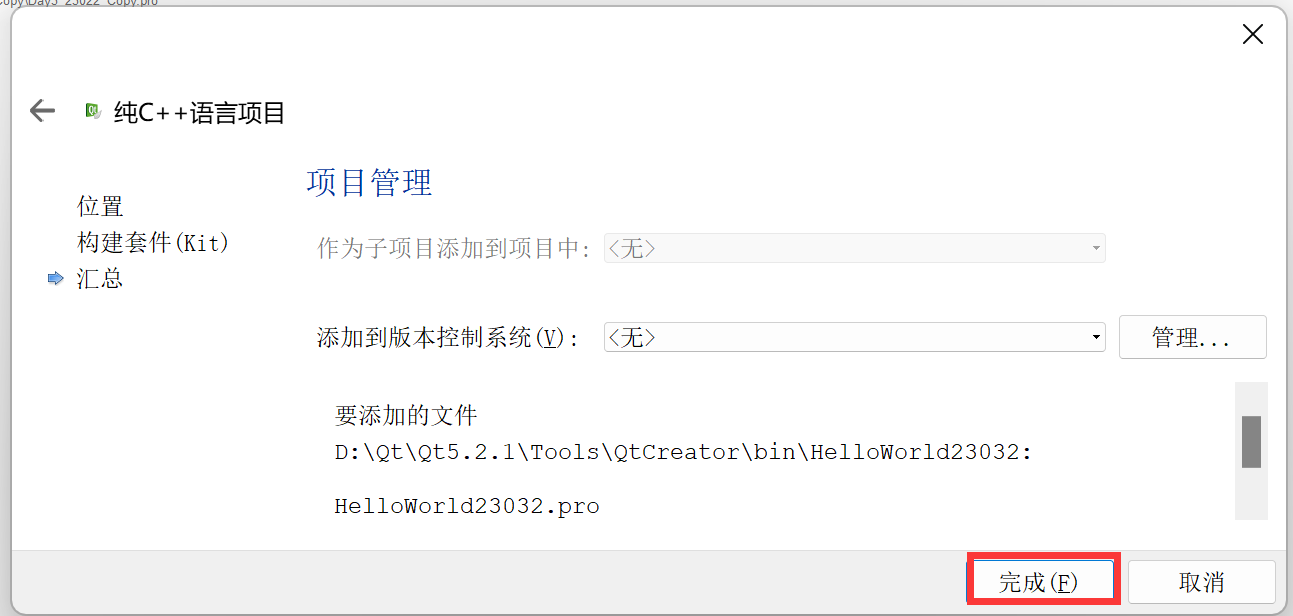
6. 可以看到项目创建完成,自带一个C++源代码文件,点击可以运行项目。
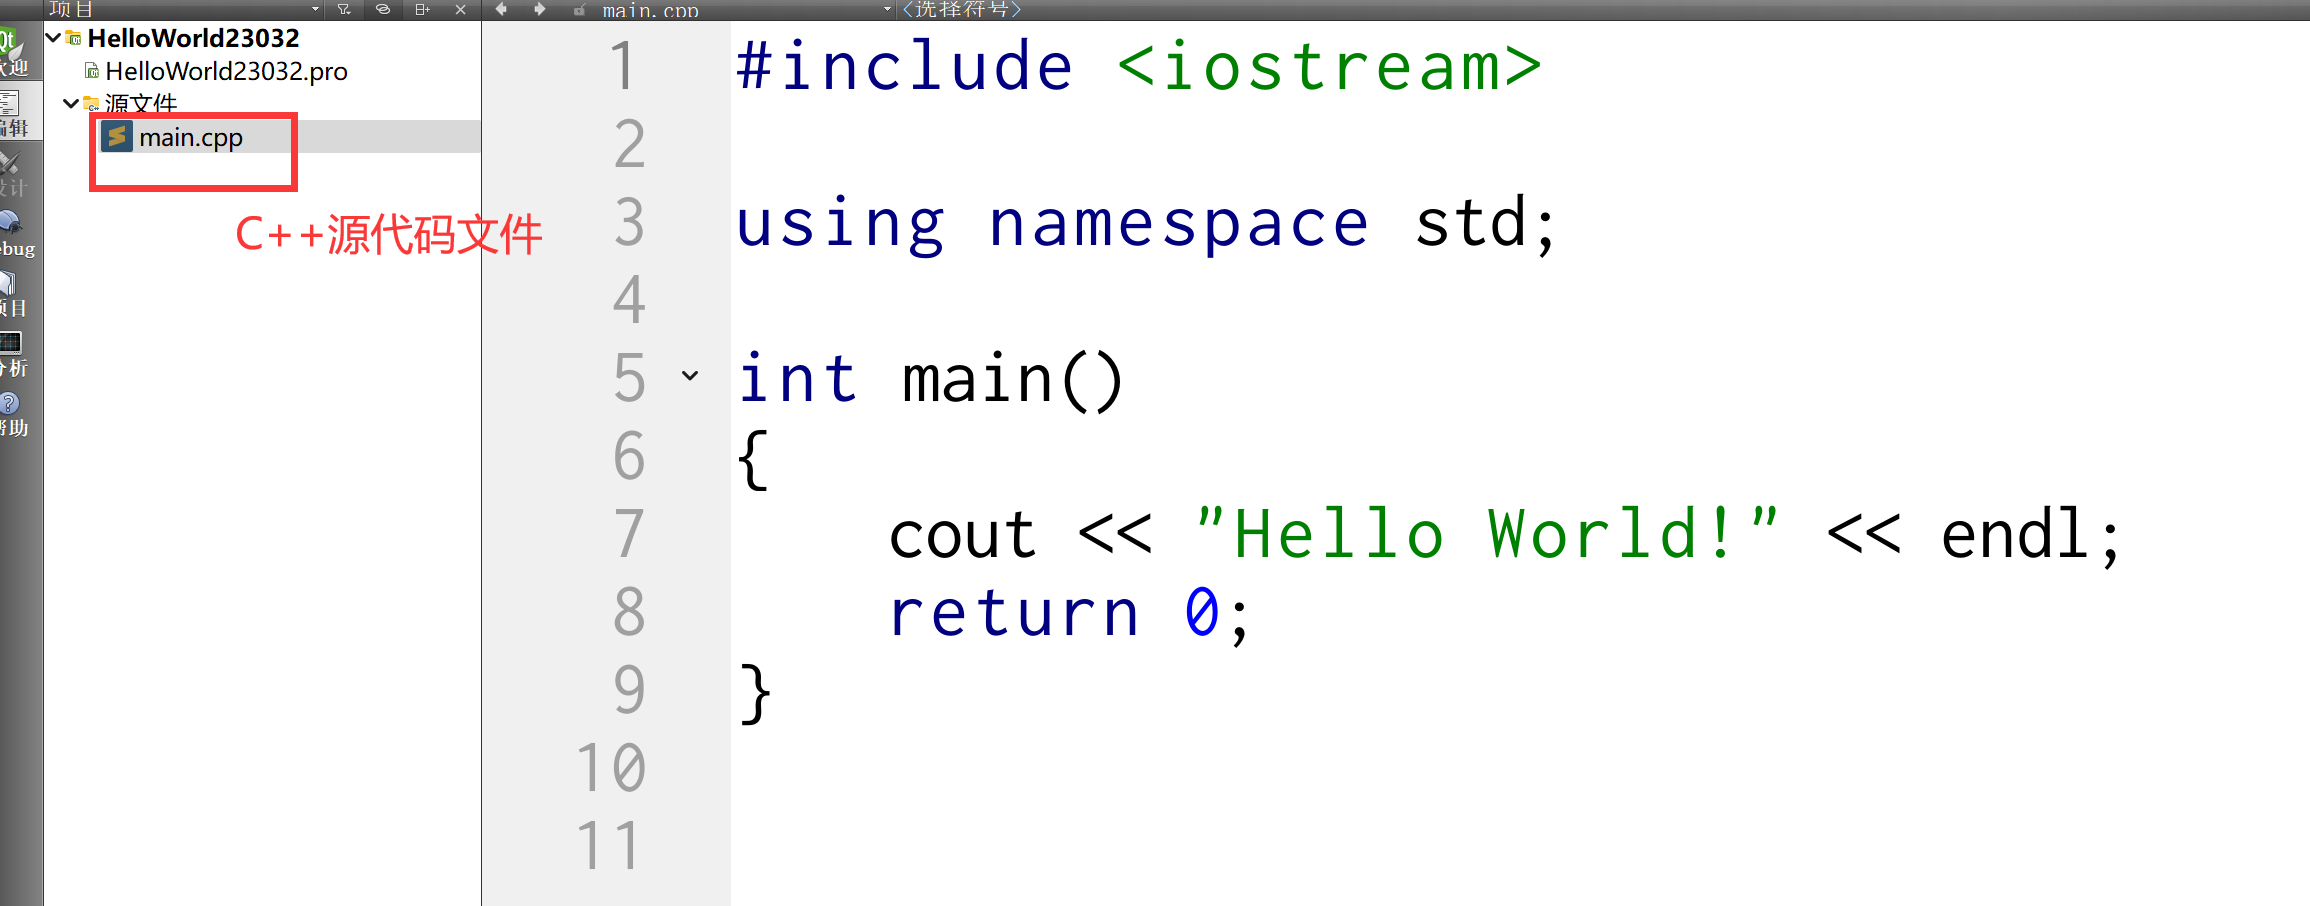

main.cpp
// 标准输入输出流头文件,C++自带的头文件使用尖括号,不写.h
#include <iostream>

// 使用std名字空间(后面会讲,不要删)
using namespace std;

/**
 * @brief main 主函数,程序的入口
 */
int main()
{
    // 输出一个字符串后,再输出一个换行(endl)
    cout << "Hello World!" << endl;
    cout << "你好世界!" << endl;

    return 0;
}
除了main.cp以外,还有一个.pro文件,此文件用于配置项目的参数,本次课程此文件的功能主要用于使项目完全支持C++11特性,只需要在文件中添加下面一段话。
QMAKE_CXXFLAGS += -std=c++11
二、从C到C++
除了面向对象的内容,C++也有一些与C语言不同的地方,本章主要讲解一些与面向对象无关的差异。
1. 引用 reference(重点)
1.1 概念
引用是对某个变量的“别名”,对引用进行操作与对变量本身进行操作完全一样。
#include

using namespace std;


int main()
{
    int a = 1;
    // 创建一个变量a的引用
    int& b = a; // 创建一个a的引用b(b引用a)
    // a和b的操作完全相同
    b++;
    a++;
    cout << a << " " << &a << endl; // 3 0x61fe88
    cout << b << " " << &b << endl; // 3 0x61fe88

    return 0;
}
1.2 性质
(1)可以改变引用的变量的值,但是不能再次成为其他变量的引用。
#include

using namespace std;


int main()
{
    int a = 1;
    int b = 2;
    int& c = a; // c是a的引用
    c = b; // 把b的值赋给c
    cout << a << " " << &a << endl; // 2 0x61fe88
    cout << b << " " << &b << endl; // 2 0x61fe84
    cout << c << " " << &c << endl; // 2 0x61fe88
//    int& c = b; 错误
//    &c = b; 错误

    return 0;
}
(2)声明引用时,必须初始化。
#include

using namespace std;


int main()
{
    int a = 1;
//    int& b; 错误
    b = a;

    return 0;
}
(3)声明引用时初始化的值不能为NULL。
#include

using namespace std;


int main()
{
//    int& a = NULL; 错误

    return 0;
}
(4)声明引用的初始值如果是纯数值,需要使用const关键字修饰引用,表示引用的值不可变(常引用,常量引用)。
#include

using namespace std;


int main()
{
    // 常引用
    const int &a = 123;
//    a++; 错误
    cout << a << endl; // 123

    return 0;
}
(5)可以将变量引用的地址赋值给一个指针(指针指向引用),此时指针指向的还是原来的变量。
#include

using namespace std;


int main()
{
    int a = 1;
    int &b = a;
    int* c = &b; // 指针c指向b
    a++;
    cout << *c << endl; // 2

    return 0;
}
(6)可以对指针建立引用
#include

using namespace std;


int main()
{
    int a = 1;
    int* b = &a; // b是a的指针
    int*& c = b; // c是b的引用
    cout << &a << " " << a << endl; // 0x61fe88 1
    cout << b << " " << *b << endl; // 0x61fe88 1
    cout << c << " " << *c << endl; // 0x61fe88 1

    return 0;
}
(7)可以使用const关键字修饰引用,此时不能通过引用修改数值,但是可以修改引用的原变量数值。
#include

using namespace std;


int main()
{
    int a = 1;
    const int &b = a; // b是a的常引用
//    b++; 错误
    a++;
    cout << b << endl; // 2

    return 0;
}
1.3 引用参数
可以使一个函数的参数定义为引用类型,这样可以提升参数传递的效率,因为引用与指针一样,会产生副本。
引用参数应该在能被定义为const的情况下,尽量定义为const,以达到引用的安全性。
#include

using namespace std;


void show(const int& a,const int& b)
{
    cout << a << b << endl;
}

int main()
{
    int a = 1;
    int b = 2;
    show(a,b); // 12

    return 0;
}
【例子】写一个函数,输入两个整型参数,要求函数可以交换两个输入参数的值。
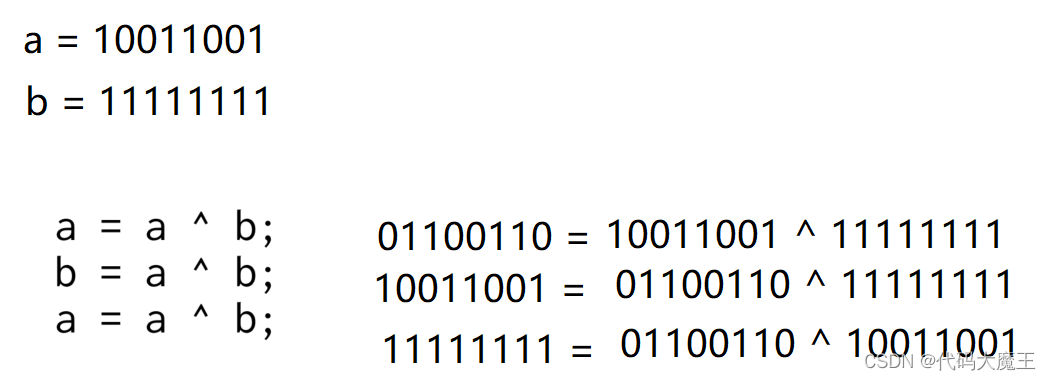
可以使用异或运算交换两个数值,原理是对同一个数使用同一个数连续进行两次异或可以恢复原数值。
#include

using namespace std;

/**
 * @brief swap1 错误,交换的是swap1局部的变量
 */
void swap1(int a,int b)
{
    // 异或交换
    a = a ^ b;
    b = a ^ b;
    a = a ^ b;
}

/**
 * @brief swap2 正确,但复杂
 */
void swap2(int* a,int* b)
{
    *a = *a ^ *b;
    *b = *a ^ *b;
    *a = *a ^ *b;
}

/**
 * @brief swap3 正确且简单
 */
void swap3(int& a,int& b)
{
    a = a ^ b;
    b = a ^ b;
    a = a ^ b;
}

int main()
{
    int a = 1;
    int b = 2;
    swap1(a,b);
    cout << a << endl; // 1
    cout << b << endl; // 2
    swap2(&a,&b);
    cout << a << endl; // 2
    cout << b << endl; // 1
    swap3(a,b);
    cout << a << endl; // 1
    cout << b << endl; // 2

    return 0;
}
2. 赋值(熟悉)
为了与后面对象的操作方式一致,C++中给普通变量也增加了新的赋值方式。
#include

using namespace std;


int main()
{
    int a = 1;
    // C++支持以下写法
    int b(2); // 相当于 int b = 2;
    cout << a << " " << b << endl; // 1 2
    int c(a); // 相当于 int c = a
    cout << c << endl; // 1

    b = 4;
    cout << b << endl; // 4
//    b(5); 错误

    return 0;
}
C++11中新增数据窄化的功能支持。
#include

using namespace std;


int main()
{
    double a = 3.14;
    int b = a;
    int c(a);
    cout << b << " " << c << endl; // 3 3
    // C++11窄化警告
    int d{a};
    cout << d << endl; // 3

    return 0;
}
3. 输入(熟悉)
C++中使用cin录入键盘输入,cin与cout一样,也支持连续输入。
#include

using namespace std;


int main()
{
    cout << "请输入两个数字:" << endl;
    int a;
    int b;
    cin >> a >> b; // 连续输入
    cout << "您输入的数字是:" << a << " " << b << endl;
    // C++中使用string类型作为字符串类型
    string c;
    cout << "请输入一个字符串:" << endl;
    cin >> c;
    cout << "您输入的字符串是:" << c << endl;

    return 0;
}
4. 字符串类型 string(掌握)
4.1 基础使用
string类型不是C++的基本类型,string是C++标准库中的一个类,使用的时候需要引入头文件#include ,而不是#include 。
string类型在绝大多数情况下可以代替char*,不必担心内存、长度等问题,同时string类内部包含了很多内置函数,可以完成特定的操作。
#include

using namespace std;


int main()
{
    string s = "你好";
    // 不支持中文(使用的ASCII编码)
    cout << "s的长度:" <<  s.size() << endl;
    cout << "s[0]=" << s[0] << endl;
    s = "Hello";
    cout << "s的长度:" <<  s.size() << endl;
    cout << "s[0]=" << s[0] << endl;

    return 0;
}
4.2 遍历
string支持三种遍历:下标循环、for-each、迭代器(后面专属篇章讲解)
#include

using namespace std;


int main()
{
    string s = "hello bye!";

    cout << "-----------下标遍历----------" << endl;
    for(int i = 0;i<s.length();i++) //length函数与size函数完全一样
    {
        cout << s[i] << endl;
    }

    cout << "-----------C++ 11 for each--------------" << endl;
    for(char i:s) // 脱离下标
    {
        cout << i << endl;
    }

    // 迭代器:略

    return 0;
}
4.3 at函数
可以使用at函数取出单个字符,与[]相比,更推荐使用at函数,原因是at函数更加安全。
#include

using namespace std;


int main()
{
    string s = "hello bye!";

    // 取出第三个字符
    cout << s[2] << endl; // l
    cout << s.at(2) << endl; // l

    // 尝试取出第100个字符
//    cout << s[99] << endl; // '\0'
    cout << s.at(99) << endl; // 程序终止

    cout << "主函数执行完毕!" << endl;
    return 0;
}
5. 快捷键
| 按键 | 功能 |
| Alt + 0 | 显示/隐藏边栏 |
| 先Ctrl+A选中范围,再Ctrl+I对齐 | 在选中的范围内对齐代码 |
| Ctrl + R | 运行 |
| Ctrl + / | 单行注释 |
6. 函数
6.1 内联函数(掌握)
C++中的内敛函数可以取代C中使用宏定义的函数,内联函数可以让一个函数在编译阶段直接把函数体展开到主函数中编译,因此可以提升程序的执行效率,可以消除普通函数调用开销,即普通函数实在程序运行过程中才会进行展开。
通常把一些短小(1-5行,不能有复杂的控制语句)且频繁调用的函数设置为内联函数。
#include

using namespace std;

void test1()
{
    cout << "这是一个普通的函数" << endl;
}

inline void test2()
{
    cout << "这是一个内联函数" << endl;
}

// 先声明后定义
void test3();

void test3()
{
    cout << "这是一个普通的函数" << endl;
}

void test4();

inline void test4() // 如果声明与定义分离,inline要在函数定义处使用
{
    cout << "这是一个内联函数" << endl;
}


int main()
{
    test1();
    test2();
    test3();
    test4();

    return 0;
}
类的成员函数默认为内联函数。
6.2 函数重载 overload(重点)
C++中允许一个函数名称定义多个函数,但是这些函数的参数不同(个数或类型不同),与返回值无关。
#include

using namespace std;

void print()
{
    cout << "没有参数的print函数" << endl;
}

//int print() 错误
//{
//    cout << "没有参数的print函数" << endl;
//}

void print(int a)
{
    cout << "一个int参数的print函数"<< a << endl;
}

void print(string s)
{
    cout << "一个string参数的print函数" << s << endl;
}

void print(int a,int b)
{
    cout << "两个int参数的print函数" << a << b << endl;
}


int main()
{
    // 通过传入参数的不同,可以调用不同的重载函数
    print(1);
    print(1,2);
    print();
    print("hjahhah");

    return 0;
}
除了上述普通函数可以重载外,后续学习的构造函数和成员函数也能重载,但是析构函数不能重载。
6.3 函数的默认参数(掌握)
C++中允许给函数的参数设定默认值(缺省值),当调用时不传递参数则会使用默认值。如果函数声明与定义分离,函数的参数默认值可以写在声明或定义处,但是只能出现一次。
默认值遵循向右原则(向后原则) :当函数中某个参数设定默认值后,其右边所有的参数都必须设定默认值。
#include

using namespace std;

void show(int a = 1,int b = 2,int c = 3)
{
    cout << a << " " << b << " " << c << endl;
}

void print(int a,int b);

void print(int a=1,int b =1)
{
    cout << a << " " << b << endl;
}

void print2(int a = 1);

void print2(int a)
{
    cout << a << endl;
}


int main()
{
    show(); // 1 2 3
    show(6); // 6 2 3
    show(5,6); // 5 6 3
    show(6,7,8); // 6 7 8

    print(); // 1 1
    print(2); // 2 1
    print(2,3); // 2 3

    print2(); // 1
    print2(2); // 2

    return 0;
}
函数的参数默认值与函数重载理论上可以一起使用,但是要注意不能出现冲突(二义性)。
#include

using namespace std;

void show(int a = 1,int b = 2,int c = 3)
{
    cout << a << " " << b << " " << c << endl;
}

void show()
{
    cout << "哈哈哈哈哈" << endl;
}


int main()
{
//    show(); 错误:二义性

    return 0;
}
6.4 哑元函数(掌握)
一个函数的参数只有类型,没有名字,则这个参数就被称为哑元,这样的函数就是哑元函数。
哑元函数的用途如下所示:
- 如果参数不使用,可以消除警告
- 保持函数的向前兼容特性
- 区分重载函数(运算符重载)
#include

using namespace std;

void print(string) // 哑元函数
{
    cout << "AAA" << endl;
}

void print(int); // 哑元函数

void print(int)
{
    cout << "BBB" << endl;
}

void test(bool); // 声明的时候省略了参数名称

void test(bool b) // 不用的话会打警告
{
    cout << "CCC" << endl;
}

int main()
{
//    print(); 错误
    print("你好");
    print(123);
    print(true);

    return 0;
}
练习一:键盘输入一个100-999之间的数,依次输出这个数的个十百位。
#include <iostream>
#include <string>
using namespace std;

int main()
{
    int a;
    cout << "please input 100-999" << endl;
    cin>>a;
    cout << "single digits is" << a%10<<endl;
    cout << "ten digits is" << a/10%10<<endl;
    cout << "hundred digits is" << a/100<<endl;

    return 0;
}
练习二:输入一行字符串,分别统计出其中的英文字母、数字和其他字符的个数。
#include <iostream>

using namespace std;

int main()
{
    string s;
    cout << "please input string" << endl;
    cin>>s;
    int digit=0;
    int letter=0;
    int other=0;
for(int i=0;i<s.size();i++)
    {
        if(s.at(i)>='0'&&s.at(i)<='9')
        {
            digit++;
        }
        else if((s.at(i)>='a'&&s.at(i)<='z')||(s.at(i)>='A'&&s.at(i)<='Z'))
        {
            letter++;
        }
        else
        {
          other++;
        }
    }
     cout << "digit number is" <<digit<< endl;
     cout << "letter number is" <<letter<< endl;
     cout << "other number is" <<other<< endl;
    return 0;

}
三、面向对象基础
1. 类与对象的概念(掌握)
类是对同一类事物的一种抽象总结,是一种概念。
对象是按照类的规则创建的独立实体。
一定先编写类的代码,才能创建这个类对象。代码中所有的对象都有对应的类。
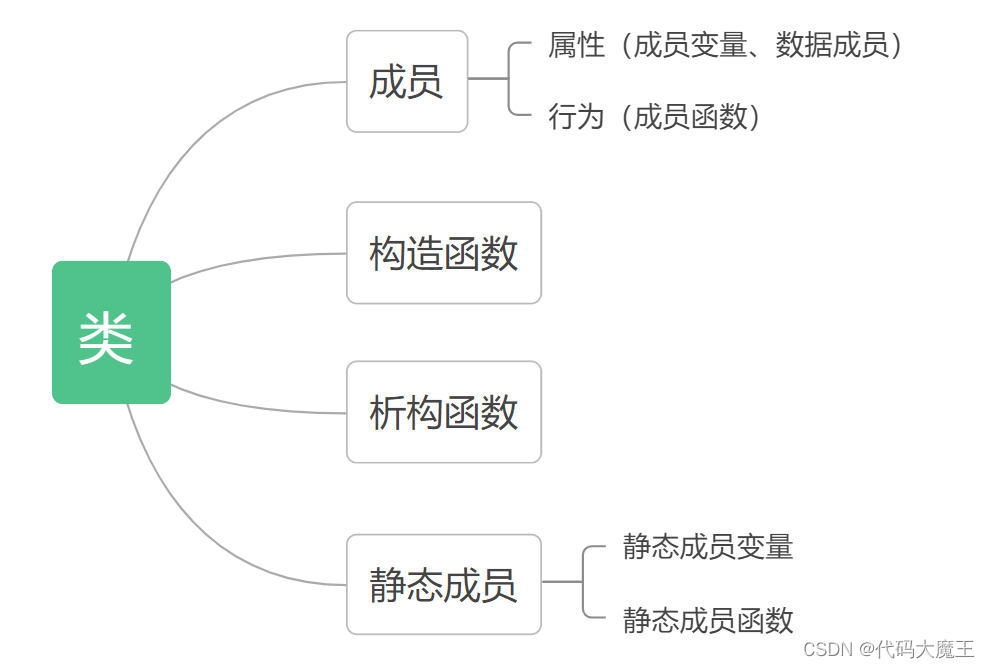
一个类中的主要内容包含,本节主要讨论的是成员:
2. 类的内容(掌握)
类的最基础内容包括属性和行为,属性表示类对象内部存储的数据,行为表示类对象能执行的动作,通常为函数的形式。
【例子】以手机实体为例,来说明类的定义。

手机的属性:品牌、型号、重量
手机的行为:听音乐、玩游戏、打电话
#include

using namespace std;

/**
 * @brief 所有类名都要使用帕斯卡(大驼峰)命名法,即所有单词的首字母使用大写
 */
class MobilePhone
{
public: // 公有权限:无任何访问限制
    string brand;
    string model;
    int weight;

    void play_music() // 播放音乐
    {
        cout << "临时抱佛脚!" << endl;
    }

    void run_game() // 运行游戏
    {
        cout << "原神!" << endl;
    }

    void communicate() // 通讯
    {
        cout << "喂?" << endl;
    }
};
上是一个最基础的类,这种完全开放类非常像结构体。这并不是类的全部。
3. 创建对象(重点)
一个类编写完成后,需要创建实体对象才能执行动作完成特定的功能。
对象创建有两种方式:
- 栈内存对象
栈内存对象的创建无需任何关键字,在其生命周期(所在的{})结束后,自动被销毁。
#include

using namespace std;

/**
 * @brief 所有类名都要使用帕斯卡(大驼峰)命名法,即所有单词的首字母使用大写
 */
class MobilePhone
{
public: // 公有权限:无任何访问限制
    string brand;
    string model;
    int weight;

    void play_music() // 播放音乐
    {
        cout << "临时抱佛脚!" << endl;
    }

    void run_game() // 运行游戏
    {
        cout << "原神!" << endl;
    }

    void communicate() // 通讯
    {
        cout << "喂?" << endl;
    }
};

int main()
{
    // 栈内存对象
    MobilePhone mp1;
    // 给属性赋值
    mp1.brand = "苹果";
    mp1.model = "15 Pro Max";
    mp1.weight = 200;
    // 调用属性值
    cout << mp1.brand << endl;
    cout << mp1.model << endl;
    cout << mp1.weight << endl;
    // 调用成员函数
    mp1.run_game();
    mp1.communicate();
    mp1.play_music();

    return 0;
}
- 堆内存对象
堆内存对象需要使用new关键字创建,使用delete关键字销毁,如果不手动销毁,对象会持续存在。堆内存对象需要使用指针访问。
#include

using namespace std;

/**
 * @brief 所有类名都要使用帕斯卡(大驼峰)命名法,即所有单词的首字母使用大写
 */
class MobilePhone
{
public: // 公有权限:无任何访问限制
    string brand;
    string model;
    int weight;

    void play_music() // 播放音乐
    {
        cout << "临时抱佛脚!" << endl;
    }

    void run_game() // 运行游戏
    {
        cout << "原神!" << endl;
    }

    void communicate() // 通讯
    {
        cout << "喂?" << endl;
    }
};

int main()
{
    MobilePhone* mp2 = new MobilePhone; // 创建堆内存对象
    // 给属性赋值
    mp2->brand = "小米";
    mp2->model = "13 Pro Ultra";
    mp2->weight = 199;
    // 获取属性值
    cout << mp2->brand << endl;
    cout << mp2->model << endl;
    cout << mp2->weight << endl;
    // 调用成员函数
    mp2->play_music();
    mp2->run_game();
    mp2->communicate();
    // 手动销毁对象
    delete mp2;
//    cout << mp2->brand << endl; 错误,销毁后不得使用
    mp2 = NULL; // 更稳妥的方式,防止销毁后使用

    return 0;
}
4. 封装(重点)
第3节中的类看起来与结构体比较相似,因为类的权限是完全开放的。封装是面向对象编程的特性之一,要求一个类讲其属性和实现细节隐藏,重新对外部提供需要调用的接口。
可以使用private等权限把类中的成员的隐藏,视情况需要使用public重新公开访问接口。
#include

using namespace std;

/**
 * @brief 所有类名都要使用帕斯卡(大驼峰)命名法,即所有单词的首字母使用大写
 */
class MobilePhone
{
private: // 私有权限:只能在类内部访问
    string brand; // 可读可写
    string model; // 只写
    int weight = 188; // 只读,赋予了初始值

public:
    string get_brand() // 读函数:getter
    {
        return brand;
    }

    void set_brand(string b) // 写函数:setter
    {
        brand = b;
    }

    void set_model(string m) // setter
    {
        model = m;
    }

    int get_weight() // getter
    {
        return weight;
    }
};

int main()
{
    MobilePhone mp1;
    mp1.set_brand("华为");
    mp1.set_model("P60");
    cout << mp1.get_brand() << endl;
    cout << mp1.get_weight() << endl;

    MobilePhone* mp2 = new MobilePhone;
    mp2->set_brand("魅族");
    mp2->set_model("20");
    cout << mp2->get_brand() << endl;
    cout << mp2->get_weight() << endl;
    delete mp2;

    return 0;
}
5. 构造函数(重点)
5.1 概念
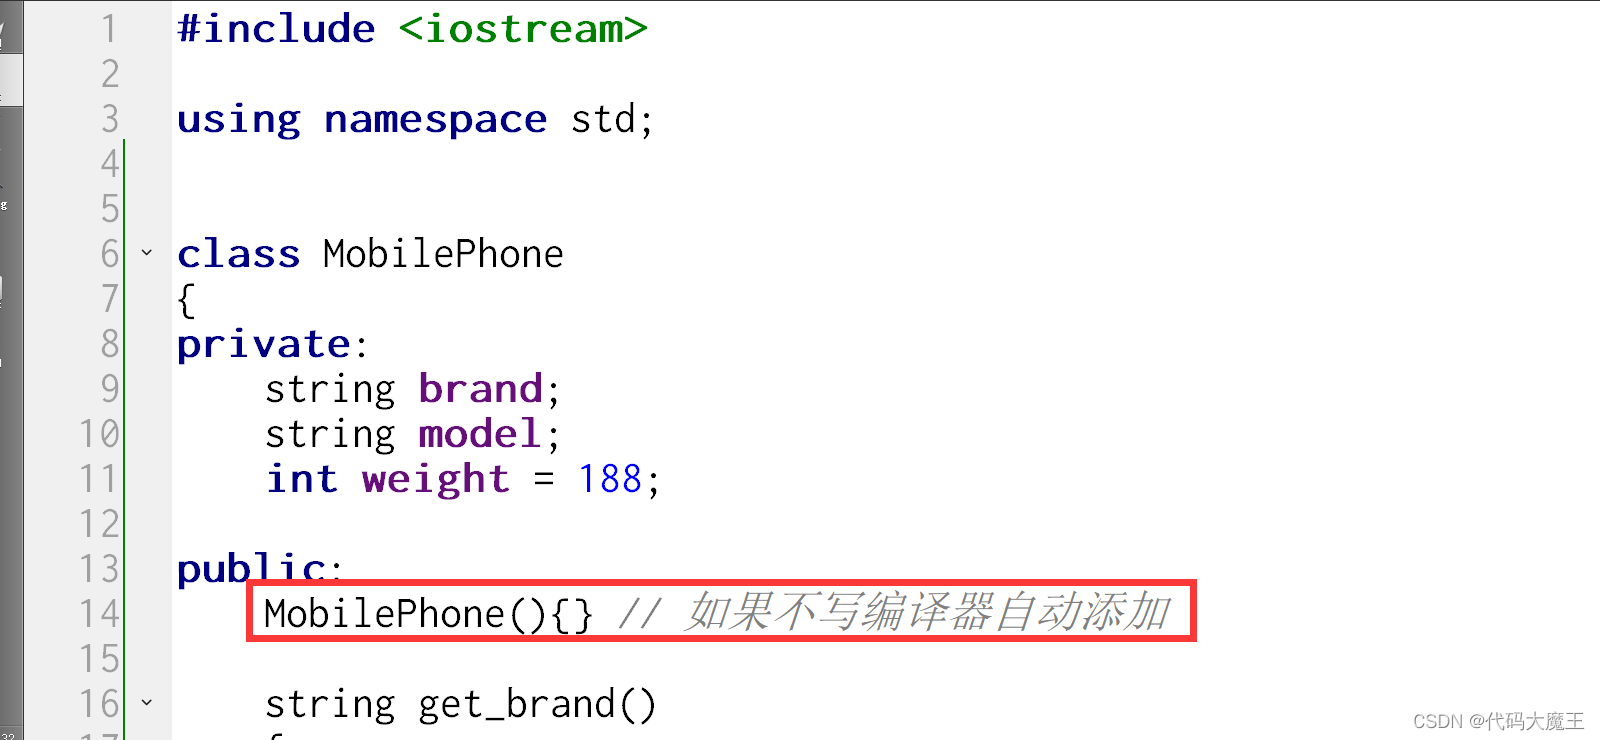
构造函数用于创建一个类对象,之前没写构造函数时,编译会自动添加一个默认的构造函数。
构造的函数的特点有:
- 函数名称与类名完全相同
- 构造函数不写返回值
- 构造函数支持函数重载
下面是一个编译器自动添加的构造函数,这个构造函数没有参数,函数体为空且权限是公有的。只要程序员手写任意一个构造函数,编译器将不再自动添加默认的构造函数。
#include

using namespace std;


class MobilePhone
{
private:
    string brand;
    string model;
    int weight = 188;

public:
    MobilePhone()
    {
        cout << "生产了一部手机" << endl;
    }

    string get_brand()
    {
        return brand;
    }

    void set_brand(string b)
    {
        brand = b;
    }

    void set_model(string m)
    {
        model = m;
    }

    int get_weight()
    {
        return weight;
    }
};

int main()
{
    MobilePhone mp1; // 生产了一部手机
    MobilePhone* mp2 = new MobilePhone; // 生产了一部手机

    delete mp2;

    return 0;
}
构造函数通常用于给新创建的对象的属性赋予初始值。
#include

using namespace std;


class MobilePhone
{
private:
    string brand;
    string model;
    int weight;

public:
    MobilePhone(string b,string m,int w)
    {
        cout << "生产了一部手机" << endl;
        // 赋予初始值
        brand = b;
        model = m;
        weight = w;
    }

    void show()
    {
        cout << brand << endl;
        cout << model << endl;
        cout << weight << endl;
    }
};

int main()
{
    MobilePhone mp1("Apple","14",288); // 生产了一部手机
    mp1.show();
    MobilePhone* mp2 = new MobilePhone("一加","10",199); // 生产了一部手机
    mp2->show();
    delete mp2;

    return 0;
}
5.2 重载
构造函数支持重载,也支持参数默认值。
#include

using namespace std;


class MobilePhone
{
private:
    string brand;
    string model;
    int weight;

public:
    MobilePhone(string b,string m,int w)
    {
        cout << "生产了一部手机" << endl;
        // 赋予初始值
        brand = b;
        model = m;
        weight = w;
    }

    MobilePhone() // 构造函数重载
    {
        cout << "生产了一部手机" << endl;
        brand = "8848";
        model = "M6巅峰版";
        weight = 500;
    }

    void show()
    {
        cout << brand << endl;
        cout << model << endl;
        cout << weight << endl;
    }
};

int main()
{
    MobilePhone mp1("Apple","14",288); // 生产了一部手机
    mp1.show();
    MobilePhone* mp2 = new MobilePhone("一加","10",199); // 生产了一部手机
    mp2->show();
    delete mp2;

    // 也可以使用无参构造函数创建对象
    MobilePhone mp3;
    mp3.show();
    MobilePhone* mp4 = new MobilePhone;
    mp4->show();
    delete mp4;

    return 0;
}
5.3 构造初始化列表
这是一种更为简便的写法。
;
#include

using namespace std;


class MobilePhone
{
private:
    string brand;
    string model;
    int weight;

public:
    MobilePhone(string b,string m,int w)
        :brand(b),model(m),weight(w) // 构造初始化列表
    {
        cout << "生产了一部手机" << endl;
    }

    // 构造初始化列表
    MobilePhone():brand("8848"),model("M6巅峰版"),weight(500)
    {
        cout << "生产了一部手机" << endl;
    }

    void show()
    {
        cout << brand << endl;
        cout << model << endl;
        cout << weight << endl;
    }
};

int main()
{
    MobilePhone mp1("Apple","14",288); // 生产了一部手机
    mp1.show();
    MobilePhone* mp2 = new MobilePhone("一加","10",199); // 生产了一部手机
    mp2->show();
    delete mp2;

    // 也可以使用无参构造函数创建对象
    MobilePhone mp3;
    mp3.show();
    MobilePhone* mp4 = new MobilePhone;
    mp4->show();
    delete mp4;

    return 0;
}
构造初始化列表具有以下特点:
- 构造初始化列表的执行效率更高
- 如果不影响代码的运行,可以视情况自行选择是否使用
- 如果成员变量被const修饰,则不能在构造函数的{}中赋值,可以在构造初始化列表中赋值。
- 可以区分重名的成员变量和局部变量
5.4 拷贝构造函数
5.4.1 默认的拷贝构造函数
如果程序员不写拷贝构造函数,编译器会为每个类提供一个重载的拷贝构造函数,用于对象拷贝,即基于某个对象创建一个数据完全相同的对象。需要注意的是,新创建的对象与原对象是两个对象。
#include

using namespace std;


class MobilePhone
{
private:
    string brand;
    string model;
    int weight;

public:
    MobilePhone(string b,string m,int w)
        :brand(b),model(m),weight(w)
    {
        cout << "带参数的构造函数" << endl;
    }

    // 默认添加的拷贝构造函数
    MobilePhone(const MobilePhone& m)
    {
        cout << "拷贝构造函数" << endl; // 默认的拷贝构造函数去掉这句话
        brand = m.brand;
        model = m.model;
        weight = m.weight;
    }

    void show()
    {
        cout << brand << endl;
        cout << model << endl;
        cout << weight << endl;
    }
};

int main()
{
    MobilePhone mp1("oppo","Find X6 Pro",201);
    // 调用默认的拷贝构造函数
    MobilePhone mp2(mp1);
    mp1.show();
    mp2.show();
    cout << &mp1 << " " << &mp2 << endl;

    return 0;
}
5.4.2 浅拷贝
当类中出现了指针类型的成员变量时,默认的拷贝构造函数会造成浅拷贝的问题。不同对象的成员变量会指向同一个区域,不符合面向对象的设计。
#include
#include

using namespace std;

class Dog
{
private:
    char* name;

public:
    Dog(char* n)
    {
        name = n;
    }

    // 复原浅拷贝(写不写都行)
    Dog(const Dog& d)
    {
        name = d.name;
    }

    void show()
    {
        cout << name << endl;
    }
};


int main()
{
    char c[20] = "wangcai";

    Dog d1(c);
    // 拷贝构造函数
    Dog d2(d1);

    strcpy(c,"xiaobai");

    d1.show(); // xiaobai
    d2.show(); // xiaobai


    return 0;
}
5.4.3 深拷贝
#include
#include

using namespace std;

class Dog
{
private:
    char* name;

public:
    Dog(char* n)
    {
        // 单独开辟一块堆内存
        name = new char[20];
        strcpy(name,n);
    }

    // 深拷贝
    Dog(const Dog& d)
    {
        // 单独开辟一块堆内存
        name = new char[20];
        strcpy(name,d.name);
    }

    void show()
    {
        cout << name << endl;
    }
};


int main()
{
    char c[20] = "wangcai";

    Dog d1(c);
    // 拷贝构造函数
    Dog d2(d1);

    strcpy(c,"xiaobai");

    d1.show(); // wangcai
    d2.show(); // wangcai


    return 0;
}
上面深拷贝代码虽然解决了浅拷贝的问题,但是也导致new开辟堆内存空间无法释放,造成内存泄漏的现象。
5.5 隐式调用构造函数
#include

using namespace std;

class Teacher
{
private:
    string name;

public:
    // 使用explicit修饰构造函数后,只支持显式调用
    Teacher(string n)
    {
        cout << "创建了一个老师" << endl;
        name = n;
    }

    string get_name()
    {
        return name;
    }
};

int main()
{
    string name = "罗翔";
    // 隐式调用构造函数
    Teacher t = name; // 创建了一个老师对象
    cout << t.get_name() << endl; // 罗翔

    return 0;
}
6. 析构函数(重点)
析构函数是类中与构造函数完全对立的函数。
| 构造函数 | 析构函数 |
| 手动调用后创建对象 | 对象销毁时自动调用 |
| 可以有参数,支持重载和参数默认值 | 无参数 |
| 函数名称是类名 | 函数名称是~类名 |
| 通常用于对象创建时初始化 | 通常用于对象销毁时回收内存和资源 |
析构函数无返回值。
#include

using namespace std;

class Test
{
public:
    ~Test()
    {
        cout << "析构函数" << endl;
    }
};


int main()
{
    { // 局部代码块
        Test t1;
    }

    Test* t2 = new Test;
    delete t2;

    cout << "主函数执行完毕" << endl;
    return 0;
}
现在回到5.4.3节深拷贝的代码中,只需要在析构函数中释放开辟的内存空间即可。
#include
#include

using namespace std;

class Dog
{
private:
    char* name;

public:
    Dog(char* n)
    {
        // 单独开辟一块堆内存
        name = new char[20];
        strcpy(name,n);
    }

    // 复原浅拷贝(写不写都行)
    Dog(const Dog& d)
    {
        // 单独开辟一块堆内存
        name = new char[20];
        strcpy(name,d.name);
    }

    void show()
    {
        cout << name << endl;
    }

    // 析构函数
    ~Dog()
    {
        delete name;
    }
};


int main()
{
    char c[20] = "wangcai";

    Dog d1(c);
    // 拷贝构造函数
    Dog d2(d1);

    strcpy(c,"xiaobai");

    d1.show(); // wangcai
    d2.show(); // wangcai

    return 0;
}
7. 作用域限定符 ::
7.1 名字空间(掌握)
名字空间是对代码的一种细分的层级,防止重名现象的产生。除此之外,名字空间也可以起到对代码归类的作用,最常见的名字空间就是C++源码中自带的标准名字空间std。
#include

// 使用标准名字空间
using namespace std;

int a = 1;

// 自定义名字空间
namespace my_space {
    int a = 3;
    int b = 4;
}

// 使用名字空间
using namespace my_space;

int main()
{
    std::string text = "Hello";
    std::cout << text << std::endl;

    int a = 2;
    cout << a << endl; // 2
    // 匿名名字空间
    cout << ::a << endl; // 1
    cout << my_space::a << endl; // 3

    // 不使用作用域限定符访问的前提是没有冲突
    cout << b << endl; // 4

    return 0;
}
7.2 类内声明,类外定义(重点)
类中的成员也可以声明定义分离,此时需要在类内进行声明,可以在类外定义。
#include

using namespace std;

class Student
{
private:
    string name = "张三";
public:
    // 声明
    void study();
};

// 定义
void Student::study()
{
    cout << name << "在努力学习!" << endl;
}

int main()
{
    Student s;
    s.study(); // 张三在努力学习!

    return 0;
}
8. this指针
8.1 概念 (重点)
this指针是一种特殊的指针,只能在类的成员函数、构造函数和析构函数中使用。this指针指向当前类的对象首地址。
#include

using namespace std;

class Test
{
public:
    Test()
    {
        cout << this << endl;
    }
};

int main()
{
    Test t1; // 0x61fe7b
    cout << &t1 << endl; // 0x61fe7b
    Test* t2 = new Test; // 0x8f0fe0
    cout << t2 << endl; // 0x8f0fe0
    delete t2;

    return 0;
}
8.2 区分重名的局部变量与成员变量(掌握)
#include

using namespace std;

class Computer
{
private:
    string brand;

public:
    Computer(string brand)
    {
        // 区分重名
        this->brand = brand;
    }

    string get_brand()
    {
        // 所有的成员在类内部调用都是靠this指针,平常可省略
        return this->brand;
    }

    void show()
    {
        // 所有的成员在类内部调用都是靠this指针,平常可省略
        cout << this->get_brand() << endl;
    }
};

int main()
{
    Computer c("联想");
    cout << c.get_brand() << endl; // 联想
    c.show(); // 联想


    return 0;
}
8.3 链式调用(掌握)
this指向了类对象的首地址,*this表示对象本身,这种用法通常与当前类的引用作为返回值的情况结合使用。
当一个类的成员函数返回值是这个类的引用时,表示此函数支持链式调用,可以连续调用,像一条锁链一样。
#include

using namespace std;

class Number
{
private:
    int value;

public:
    Number(int value):value(value) // 重名时使用构造初始化列表也可以
    {}

    Number& add(int v) // 支持链式调用
    {
        value += v;
        return *this; // 固定用法
    }

    int get_value()
    {
        return value;
    }
};


int main()
{
    Number n1(1);
    // 传统方式:非链式调用
    n1.add(2);
    n1.add(3);
    n1.add(4);
    cout << n1.get_value() << endl; // 10

    Number n2(1);
    // 链式调用
    cout << n2.add(2).add(3).add(4).get_value() << endl; // 10

    // string类的append函数在源代码中也采用了链式调用的设计
    string s = "A";
    cout << s.append("B").append("C").append("D") << endl; // ABCD

    return 0;
}在实际开发中this指针经常与多态配合使用。
练习:猫吃鱼问题。
写一个类Fish,有品种和重量两个属性,属性的类型自己选择,要求属性封装。
写一个类Cat,Cat中有一个公有的成员函数:
Fish& eat(Fish &f);
eat函数的功能要求判断Fish的品种:
- 如果品种是“秋刀鱼”,则输出“无论多沉,我都爱吃。”。同时修改Fish &f的重量为0,并作为函数的返回值返回。
- 如果品种不是“秋刀鱼”,则判断鱼的重量,若重量大于200,吃鱼输出信息并返回一个重量为0的Fish;若重量小于200,输出信息,不要修改鱼的重量,直接返回鱼的对象。
其它知识点(构造函数、构造初始化列表等)可以自行选择是否采用。
#include <iostream>

using namespace std;
class Fish
{
private:
    string variety;
    float weight;

public:
    Fish(string v,float w):variety(v),weight(w){}

    string get_variety()
    {
        return variety;
    }

    void set_weight(float w)
    {
        weight=w;
    }

    float get_weight()
    {
        return weight;
    }

};

class  Cat
{
public:
    Fish& eat(Fish &f)
    {
        if(f.get_variety()=="秋刀鱼")
        {
            cout<<"无论多沉,我都爱吃。"<<endl;
            f.set_weight(0);
        }
        else
        {
            if(f.get_weight()<200)
            {
                cout<<"不爱吃。"<<endl;
            }
            else
            {
                cout<<"大鱼我也爱吃。"<<endl;
                f.set_weight(0);
            }
        }
        return f;
    }

};


int main()
{

    Fish f1("秋刀鱼",1231);

    Fish f2("娃娃鱼",1231);
    Fish f3("马哈鱼",123);

    Cat cat;
    cat.eat(f1);
    cout<<f1.get_weight()<<endl;

    cat.eat(f2);
    cout<<f2.get_weight()<<endl;

    cat.eat(f3);
    cout<<f3.get_weight()<<endl;
    return 0;
}
9. static关键字
本章主要讨论的是类中的static用法:静态成员变量与静态成员函数。
9.1 静态成员变量(掌握)
普通的成员变量使用static修饰就是静态成员变量。这种静态成员变量需要类内声明,类外初始化。
静态成员变量与非静态成员变量的区别有:
- 静态成员变量这个类的所有对象公用一份,非静态成员变量这个类的对象各自持有一份。
- 静态成员(静态成员变量和静态成员函数)可以直接使用类名调用,尽量使用这种方式调用,因为可以提升代码的可读性。
- 静态成员变量在程序刚开始运行时就开辟了内存,在程序运行结束时自动回收内存。
- this指针可以调用静态成员(静态成员变量和静态成员函数)。
#include

using namespace std;

class Test
{
public:
    string str1 = "非静态成员变量";
    static string str2; // 类内只声明
    static const int a = 1; // 【特例】const修饰的静态成员变量可以类内初始化

    void function() // 非静态的成员函数
    {
        // 为了方便理解,加入this指针,实际编写的过程中可取消
        cout << this->str1 << endl;
        cout << this->str2 << endl;
    }
};

// 类外初始化
string Test::str2 = "静态成员变量";

int main()
{
    // 直接使用类名调用
    cout << Test::str2 << " " << &Test::str2 << endl; // 静态成员变量 0x40b038

    Test t1;
    cout << t1.str1 << " " << &t1.str1 << endl; // 非静态成员变量 0x61fe8c
    cout << t1.str2 << " " << &t1.str2<< endl; // 静态成员变量 0x40b038

    Test t2;
    cout << t2.str1 << " " << &t2.str1<< endl; // 非静态成员变量 0x61fe88
    cout << t2.str2 << " " << &t2.str2<< endl; // 静态成员变量 0x40b038

    t1.function(); // 非静态成员变量\n静态成员变量

    return 0;
}
9.2 静态成员函数(掌握)
静态成员函数没有this指针,因此不能调用非静态成员(非静态成员变量和成员函数)。
#include

using namespace std;

class Test
{
private:
    string str1 = "非静态成员";
    static string str2;

public:
    void function1()
    {
        cout << "这是一个非静态成员函数:";
        cout << str1;
        cout << str2;
        cout << endl;
    }

    static void function2()
    {
        cout << "这是一个静态成员函数:";
//        cout << str1; 错误
        cout << str2;
        cout << endl;
    }
};

string Test::str2 = "静态成员";

int main()
{
    Test::function2();

    Test t;
    t.function1();
    t.function2(); // 也能通过对象,虽然不建议

    return 0;
}
9.3 静态局部变量(熟悉)
使用static修饰的局部变量就是静态局部变量。静态局部变量所在的代码块被第一次调用时,静态局部变量内存开辟,与非静态局部变量不同的是,代码块调用完成后,静态局部变量不会被销毁,下次代码被调用时,继续使用之前的静态局部变量,直到程序运行终止后才会被自动销毁。
#include

using namespace std;

class Test
{
public:
    void func1()
    {
        int a = 1; // 非静态局部变量
        cout << a++ << endl;
    }

    void func2()
    {
        static int a = 1; // 静态局部变量
        cout << a++ << endl;
    }
};


int main()
{
    Test t1;
    Test t2;

    t1.func1(); // 1
    t1.func1(); // 1
    t2.func1(); // 1

    cout << "---------------" << endl;

    t1.func2(); // 1
    t1.func2(); // 2
    t2.func2(); // 3

    return 0;
}
静态变量最好不要盲目地大量使用:
- 生命周期太长,占用内存较高。
- 不符合面向对象的特点。
10. const关键字(掌握)
10.1 const修饰成员函数
const修饰的成员函数,称为常成员函数。
常成员函数的特点是无法修改属性值,且无法调用非const修饰的成员函数。
#include

using namespace std;

class Car
{
private:
    string brand;

public:
    Car(string brand):brand(brand){}

    string get_brand() const
    {
//        set_brand("奔驰"); 错误
//        brand = "宝马"; 错误
//        show(); 错误
        show2();
        return brand;
    }

    void set_brand(string brand)
    {
        this->brand = brand;
    }

    void show()
    {
        cout << "滴滴滴" << endl;
    }

    void show2() const
    {
        cout << "哒哒哒" << endl;
    }
};

int main()
{
    Car c("奥迪");
    c.set_brand("大众");
    cout << c.get_brand() << endl;

    return 0;
}
建议只要成员函数不修改属性值就尽量写成常成员函数,例如getter。
10.2 const修饰对象
const修饰对象,表示该对象是一个常量对象。
常量对象的属性值不能改变,不能调用非const的成员函数。
#include

using namespace std;

class Car
{
private:
    string brand;

public:
    string model = "这个变量仅用于举例,就不封装了";

    Car(string brand):brand(brand){}

    string get_brand() const
    {
//        set_brand("奔驰"); 错误
//        brand = "宝马"; 错误
//        show(); 错误
        show2();
        return brand;
    }

    void set_brand(string brand)
    {
        this->brand = brand;
    }

    void show()
    {
        cout << "滴滴滴" << endl;
    }

    void show2() const
    {
        cout << "哒哒哒" << endl;
    }
};


int main()
{
    // const两个位置都可以
    const Car c1("奥迪");
    Car const c2("凯迪拉克");

//    c1.set_brand("大众"); 错误
    cout << c1.get_brand() << endl;
//    c1.show(); 错误
    c1.show2();
//    c1.model = "A4"; 错误
    cout << c1.model << endl;

    return 0;
}
10.3 const修饰成员变量
const修饰的成员变量,表示常成员变量。
常成员变量的初始值设定后就不能在运行期间发生变化了。
#include

using namespace std;

class Person
{
private:
    const string name; // 常成员变量

public:
    const int age = 1; // 赋予初始值方式二

    Person():name("张三"){} //赋予初始值方式一(推荐)

    // 重载的构造函数
    Person(string name,int age):name(name),age(age){}

    void set_name(string name)
    {
//        this->name = name; 错误
    }

    string get_name() const
    {
        return name;
    }
};


int main()
{
    Person p;
    cout << p.get_name() << endl;
//    p.age++; 错误
    cout << p.age << endl;

    Person p2("李四",18);
    cout << p2.age << endl; // age:18

    return 0;
}
10.4 const修饰局部变量
表示局部变量不可变,通常用于引用类型的函数参数。
代码:略
详见引用参数章节。
四、运算符重载
1. 友元
类具备封装性,只有通过公开接口才能对隐藏的属性值进行读写。但是友元可以突破权限的限制,随意访问类中的任何部分。
友元可以提升程序的运行效率,但是破坏了面向对象的特性,因此在实际开发中慎用。
友元可以分为几种用法:
- 友元函数
- 友元类
- 友元成员函数
1.1 友元函数(重点)
友元函数不属于类,是类外的一个函数,但是可以在类内进行“声明”。友元函数可以突破类的权限。
#include

using namespace std;

class Job
{
private:
    int income;

public:
    Job(int income):income(income)
    {
        cout << &this->income << endl;
    }

    // “声明”友元函数
    friend void test_friend(Job&);
};

void test_friend(Job& j)
{
    // 尝试访问私有成员
    cout << ++j.income << " " << &j.income << endl;
}

int main()
{
    Job j1(20000); // 0x61fe8c
    test_friend(j1); // 20001 0x61fe8c

    return 0;
}
友元函数的特点如下所示:
- 友元函数不属于任何一个类
- 由于不属于任何一个类,所以友元函数没有this指针,所以突破权限时,必须使用对象。
- 友元函数的“声明”可以放在类的任何位置,包括private中。
- 理论上一个友元函数可以是多个类的友元函数,只需要在各个类中分别“声明”。
1.2 友元类(掌握)
当一个类B成为了另一个类A的友元类时,类A的所有成员就可以被类B访问。
#include

using namespace std;

class A
{
private:
    int value = 1;

public:
    int get_value() const
    {
        return value;
    }

    // “声明”友元关系
    friend class B;
};

class B
{
public:
    void test_friend(A& a)
    {
        cout << ++a.value << endl;
    }

    void test_friend2(A& a,int v)
    {
        a.value += v;
    }
};


int main()
{
    A a;
    B b;
    b.test_friend(a); // 2
    cout << a.get_value() << endl; // 2
    b.test_friend2(a,100);
    cout << a.get_value() << endl; // 102

    return 0;
}
关于友元类,需要注意以下几点:
- 友元关系与继承无关
- 友元关系是单向的,不具有交换性
- 友元关系不具有传递性
1.3 友元成员函数(熟悉)
可以使类B中的某个具体的成员函数称为类A的友元成员函数,这样类B只有这个成员函数能访问类A的所有成员。
#include

using namespace std;

// 第三步:提前声明类A
class A;

// 第二步:因为友元用到了类B,补充类B和函数声明。
class B
{
public:
    void func(A& a);
};

// 第一步:确定友元的函数格式并“声明”
class A
{
private:
    string str = "这是类A私有的成员!";

    // 友元关系
    friend void B::func(A& a);
};

// 第四步:定义友元成员函数的内容
void B::func(A &a)
{
    cout << a.str.append("哈哈哈") << endl;
}


int main()
{
    A a;
    B b;
    b.func(a); // 这是类A私有的成员!哈哈哈

    return 0;
}
2. 运算符重载(掌握)
除了函数之外,运算符也可以重载,甚至可以把运算符看做是一个函数。
C++中的运算符的操作对象通常是自带的基础类型,如果使自定义类型的对象也支持运算符操作,此时就需要使用运算符重载,给已有的运算符赋予新的功能,使其支持新的数据类型,完成特定的操作。
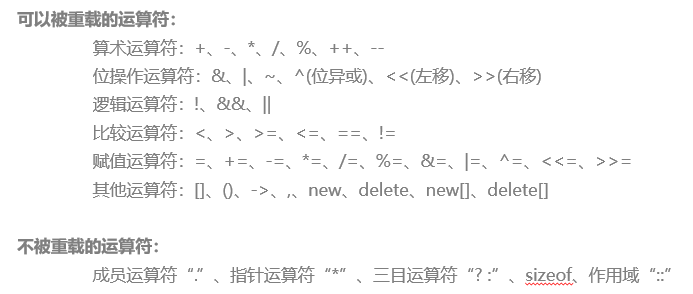
并不是所有的运算符都支持重载,具体情况如下所示:
绝大多数运算符支持两种重载方式:友元函数运算符重载、成员函数运算符重载。
2.1 友元函数运算符重载

#include

using namespace std;

/**
 * @brief 自定义整数类型
 */
class Integer
{
private:
    int value;

public:
    Integer(int value):value(value){}

    int get_value() const
    {
        return value;
    }

    // “声明”友元关系
    friend Integer operator +(const Integer& i1,const Integer& i2);
    friend Integer operator ++(Integer& i); // 前置
    friend Integer operator ++(Integer& i,int); // 后置
};

Integer operator +(const Integer& i1,const Integer& i2)
{
    return i1.value + i2.value;
}

Integer operator ++(Integer& i)
{
    return ++i.value;
}

Integer operator ++(Integer& i,int)
{
    return i.value++;
}

int main()
{
    Integer i1(1);
    cout << (++i1).get_value() << endl; // 2

    Integer i2(2);
    Integer i3 = i1+i2;
    cout << (i3++).get_value() << endl; // 4
    cout << i3.get_value() << endl; // 5

    return 0;
}
2.2 成员函数运算符重载
与友元函数运算符重载的主要区别在于,成员函数运算符重载的参数少一个。因为在成员函数运算符重载中,第一个操作数使用this指针表示。

#include

using namespace std;

/**
 * @brief 自定义整数类型
 */
class Integer
{
private:
    int value;

public:
    Integer(int value):value(value){}

    int get_value() const
    {
        return value;
    }

    // 成员函数运算符重载
    Integer operator +(const Integer& i); // 类内声明
    Integer operator ++(); // 前置++
    Integer operator ++(int); // 后置++
};

// 类外定义
Integer Integer::operator +(const Integer& i)
{
    return this->value+i.value;
}

Integer Integer::operator ++()
{
    return ++this->value;
}

Integer Integer::operator ++(int)
{
    return this->value++;
}

int main()
{
    Integer i1(1);
    cout << (++i1).get_value() << endl; // 2

    Integer i2(2);
    Integer i3 = i1+i2;
    cout << (i3++).get_value() << endl; // 4
    cout << i3.get_value() << endl; // 5

    return 0;
}
2.3 其他情况
介绍两个必须使用成员函数运算符重载的运算符。
- 赋值运算符重载
- 类型转换运算符重载
2.3.1 赋值运算符重载
所有的类如果不写赋值运算符重载,编译器会自动添加一个赋值运算符重载的函数。
#include

using namespace std;

class City
{
private:
    string name;

public:
    City(string name):name(name){}

    string get_name() const
    {
        return name;
    }

    // 以下代码写不写都一样
    City& operator =(const City& c)
    {
        cout << "赋值运算符重载" << endl; // 默认无这行代码
        this->name = c.name;
        return *this;
    }
};

int main()
{
    City c1("济南");
    City c2("青岛");
    // 赋值运算符
    cout << (c2 = c1).get_name() << endl; // 济南

    return 0;
}
与浅拷贝一样,默认的赋值运算符重载函数无法处理指针类型的成员变量。
2.3.2 类型转换运算符重载
类型转换运算符重载的写法比较特殊。
#include

using namespace std;

class Test
{
public:
    // 类型转换运算符重载
    operator int()
    {
        return 123;
    }
};

int main()
{
    Test t;
    int a = t; // 类型转换
    cout << a << endl;

    return 0;
}
2.4 注意事项
运算符重载需要注意以下几点:
1. 运算符重载只能在C++已有的运算符范围内,不能创建新的运算符。
2. 运算符重载本质上也是函数重载。
3. 重载之后的运算符无法改变原有的优先级和结合性,也不能改变运算符的操作数和语法结构。
4. 运算符重载的参数必须包含自定义数据类型,无法重载基本类型的运算符规则。
5. 运算符重载尽量符合原功能定义。
6. 运算符重载的参数不支持默认值的设定。
7. 一般情况下,建议单目运算符使用成员函数重载,双目运算符使用友元函数重载。
练习:运算符的使用。
自定义一个String类(注意是大写,不是自带的string),要求实现下面的功能
要求:比较的是长度。
class String{
public:
    String(const string &s); //构造函数
    //友元运算符重载
    friend String operator +(const String &s1,const String &s2);
    friend bool operator >(const String &s1,const String &s2);
    friend bool operator <(const String &s1,const String &s2);
    friend bool operator ==(const String &s1,const String &s2);
    //成员函数运算符
    bool operator !=(const String &other);
    //赋值运算符
    String& operator =(const String &s);
    // 类型转换
    operator string(); //String转string
    //成员函数
    string get_str();
private:
    string str;
};
实现:
:#include <iostream>

using namespace std;


class String{
public:
    String(const string &s); //构造函数
    //友元运算符重载
    friend String operator +(const String &s1,const String &s2);
    friend bool operator >(const String &s1,const String &s2);
    friend bool operator <(const String &s1,const String &s2);
    friend bool operator ==(const String &s1,const String &s2);
    //成员函数运算符
    bool operator !=(const String &other);
    //赋值运算符
    String& operator =(const String &s)
    {
        //    cout << "赋值运算符重载" << endl; // 默认无这行代码
        this->str = s.str;
        return *this;
    }

    //成员函数
    string get_str()
    {
        return str;

    }

    // 类型转换
    operator string()
    {
        return "hi";
    }

private:
    string str;

};

String:: String(const string &s):str(s){}


String operator +(const String &s1,const String &s2)
{
    return s1.str+s2.str;
}

bool operator >(const String &s1,const String &s2)
{
    return s1.str.size()>s2.str.size();

}


bool operator <(const String &s1,const String &s2)
{
    return s1.str.size()<s2.str.size();

}

bool operator ==(const String &s1,const String &s2)
{
    return s1.str.size()==s2.str.size();

}

bool String:: operator !=(const String &other)
{
    return this->str.size()!=other.str.size();
}


int main()
{
    String s1("he");
    String s2("llo");

    String s3=s1+s2;

    cout<<"s1="<<s1.get_str()<<" "<<"s2="<<s2.get_str()<<endl;

    bool a= s1.get_str()>s2.get_str();
    bool b= s1.get_str()<s2.get_str();
    bool c= s1.get_str()==s2.get_str();
    bool d= s1.get_str()!=s2.get_str();

    cout<<"拼接s1和s2后为:" <<s3.get_str()<<endl;
    cout<<"下面进行长度比较,分别从>、<、==比较,真为1,假为0"<<endl;
    cout<< a<<endl;
    cout<< b<<endl;
    cout<< c<<endl;
    cout<< d<<endl;
    cout<<"赋值运算:s2赋值给s1为:";
    cout << (s1 = s2).get_str() << endl;
    cout<<"类型转换:";
    string n=s1;
    cout << n << endl;

    return 0;
}
3. std::string 字符串类
string是C++源码中自带的类,类可以包含很多成员函数等,可以查阅文档自行学习。
#include
#include

using namespace std;

int main()
{
    string s; // 创建一个空字符串对象
    // 判断内容是否为空
    cout << s.empty() << endl;
    string s1 = "hahaha"; // 隐式调用构造函数
    // 上面的写法相当于:
    string s2("hahaha");
    cout << "比较内容:" << (s1==s2) << endl;
    // 拷贝构造函数
    string s3(s2);
    cout << s3 << endl;

    // 参数1:char* 原字符串
    // 参数2:保留几个字符
    string s4("ABCDEF",2);
    cout << s4 << endl;

    s2 = "abcdef";
    // 参数1:string 原字符串
    // 参数2:不保留前几个字符
    string s5(s2,2);
    cout << s5 << endl;

    // 参数1:字符数量
    // 参数2:字符char内容
    string s6(5,'A');
    cout << s6 << endl;

    swap(s5,s6); // 交换内容
    cout << s5 << " " << s6 << endl;

    // 字符串连接符
    string s7 = s5+s6;
    cout << s7 << endl;

    // 向后追加字符串
    cout << s7.append("UU").append("II") << endl;
    // 向后追加单字符
    s7.push_back('O');
    cout << s7 << endl;
    // 插入字符串
    // 参数1:插入位置
    // 参数2:插入内容
    s7.insert(1,"666");
    cout << s7 << endl;

    // 删除内容
    // 参数1:起始位置
    // 参数2:删除的字符数
    s7.erase(9,6);
    cout << s7 << endl;

    // 替换内容
    // 参数1:起始位置
    // 参数2:替换的字符数
    // 参数3:新替换的内容
    s7.replace(0,3,"*********");
    cout << s7 << endl;

    // 清空
    s7.clear();
    cout << s7.length() << endl; // 0

    s7 = "1234567890";

    char b[20];
    // 参数1:拷贝到哪个字符数组
    // 参数2:拷贝的字符数量
    // 参数3:拷贝的起始位置
    // 返回值:拷贝的字符数量
    int length = s7.copy(b,3,1);
    b[length] = '\0';
    cout << b << endl;

    // C++ std::string → C string
    char c[20];
    strcpy(c,s7.c_str());
    cout << c << endl;

    // C string → C++:直接赋值
    string s8 = c;
    cout << s8 << endl;

    return 0;
}
五、容器
1. 模板 template
模板可以使函数或类声明为一种通用类型,在函数或类内部可以使用这种通用类型写出与类型无关的代码。
这种编程方式被称为泛型编程。
本次将学习两种模板使用方式:
- 函数模板
- 类模板
1.1 函数模板(熟悉)
函数模板针对参数类型和返回值类型不同的函数,但是功能和函数名相同。
#include

using namespace std;

template <class T> // 声明模板的通用数据类型T
T add(T a,T b)
{
    return a+b;
}

int main()
{
    // 运行时决定具体类型的计算方式
    cout << add(2,3) << endl; // 5
    cout << add(2.2,3.3) << endl; // 5.5
    string s1 = "AAA";
    string s2 = "BBB";
    cout << add(s1,s2) << endl; // AAABBB

    // const char* 不支持加法
//    cout << add("111","222") << endl; 错误

    return 0;
}
1.2 类模板(掌握)
类模板针对成员函数的参数类型、返回值类型、成员变量类型不同的类,但是内部管理这些数据的算法相同。
#include

using namespace std;

template <typename T> // typename可与class关键字替换
class Test
{
private:
    T value;

public:
    Test(T v):value(v){}

    T get_value() const
    {
        return value;
    }
};

class Projector // 投影仪
{
public:
    void show()
    {
        cout << "投影仪播放内容中..." << endl;
    }
};


int main()
{
    Test<int> t1(123);
    cout << t1.get_value() << endl; //123

    Projector p;
    Test<Projector> t2(p);
    t2.get_value().show(); // 投影仪播放内容中...

    return 0;
}
上面的Test类中的函数可以声明定义分离,写法如下:
#include

using namespace std;

template <typename T> // typename可与class关键字替换
class Test
{
private:
    T value;

public:
    Test(T v);

    T get_value() const;
};

template <typename T>
Test<T>::Test(T v)
{
    value = v;
}

template <typename T>
T Test<T>::get_value() const
{
    return value;
}

class Projector // 投影仪
{
public:
    void show()
    {
        cout << "投影仪播放内容中..." << endl;
    }
};


int main()
{
    Test<int> t1(123);
    cout << t1.get_value() << endl; //123

    Projector p;
    Test<Projector> t2(p);
    t2.get_value().show(); // 投影仪播放内容中...

    return 0;
}
2. 容器
容器是属于标准模板库(Standard Template Library,STL)的内容,STL是惠普实验室提出的概念,后来被C++引入。
通过算法、容器和迭代器,配合模板技术,实现了一些泛型编程的类型,用于提升代码的重用机会。
容器是用来存储数据元素的集合,数据元素的类型可以使任意类型。容器分为顺序容器和关联容器两类。

所有容器都只能使用栈内存对象。
2.1 顺序容器
顺序容器的存储元素呈线性关系分布,可以通过下标或迭代器访问固定位置的元素,可以使用插入或删除等操作改变元素位置。
2.1.1 array 数组(熟悉)
array是C++11才引入的,相比于内置数组更加安全和易于使用。
#include
#include  // 容器类都需要引入头文件

using namespace std;

int main()
{
    // 创建一个长度为5的数组对象
    array<int,5> arr = {1,2,3};

    // 前三个元素的值是1,2,3
    cout << arr[0] << endl; // 1
    // 默认值0(不同的编译环境可能有所区别)
    cout << arr[3] << endl; // 0

    // 修改第四个元素的值
    arr[3] = 888;
    cout << arr[3] << endl; // 888
    // 也支持at函数(推荐)
    cout << arr.at(3) << endl; // 888

    cout << "------普通for循环-------" << endl;
    for(int i = 0;i<arr.size();i++)
    {
        cout << arr.at(i) << " ";
    }
    cout << endl;

    cout << "------for each循环-------" << endl;
    for(int i:arr)
    {
        cout << i << " ";
    }
    cout << endl;

    // 迭代器(略)

    return 0;
}
2.1.2 vector 向量(掌握)
vector内部靠数组实现,随机存取(固定位置读写)比较高效,相对插入删除操作效率较低,支持下标操作。
#include
#include  // 容器类都需要引入头文件

using namespace std;

int main()
{
    // 创建初始元素为5的向量对象
    vector<int> vec(5);
    cout << vec.size() << endl; // 5
    // 可以使用[]或at函数取出元素,推荐后者
    cout << vec.at(0) << endl; // 0
    // 判断是否为空
    cout << vec.empty() << endl; // 0
    // 尾部追加
    vec.push_back(8);
    cout << vec.at(vec.size()-1) << endl; // 8
    // 在第一个位置插入一个元素
    // 参数1:插入位置,begin函数返回一个迭代器指针,指向第一个元素
    // 参数2:插入内容
    vec.insert(vec.begin(),1);
    //  在倒数第二个位置插入一个元素
    // 参数1:end函数返回一个迭代器指针,指向最后一个元素的后面
    // 参数2:插入内容
    vec.insert(vec.end()-1,678);
    // 修改第二个元素
    vec[1] = 2;
    // 删除第二个元素
    vec.erase(vec.begin()+1);
    // 删除倒数第二个元素
    vec.erase(vec.end()-2);

    cout << "------普通for循环-------" << endl;
    for(int i = 0;i<vec.size();i++)
    {
        cout << vec.at(i) << " ";
    }
    cout << endl;

    vec.clear(); // 清空

    cout << "------for each循环-------" << endl;
    for(int i:vec)
    {
        cout << i << " ";
    }
    cout << endl;

    // 迭代器:略

    return 0;
}
2.1.3 list 列表(掌握)
list内部由双向链表实现,因此元素的内存空间不连续,不能通过下标进行元素访问,但是能高效地进行插入和删除操作。
#include
#include  // 容器类都需要引入头文件

using namespace std;

int main()
{
    // 创建一个元素是4个hello的列表对象
    list<string> lis(4,"hello");
    // 判断是否为空
    cout << lis.empty() << endl; // 0
    // 向后追加元素
    lis.push_back("bye");
    // 头插
    lis.push_front("hi");
    // 在第二个位置插入元素“second”
    // 注意:迭代器指针不支持+运算,支持++运算
    lis.insert(++lis.begin(),"second");
    // 在倒数第二个位置插入元素"aaa"
    // 注意:迭代器指针不支持-运算,支持--运算
    lis.insert(--lis.end(),"aaa");

    // 到第5个位置插入元素“555”
    // 1. 先拿到第一个元素位置的迭代器指针
    list<string>::iterator iter =  lis.begin();
    // 2. 向后移动4位
    // 参数1:迭代器指针
    // 参数2:向后移动的数量,负数为向前
    advance(iter,4);
    // 3. 插入元素“555”
    lis.insert(iter,"555");

    // 修改第五个元素为“666”,【重新获取】并移动迭代器指针
    iter = lis.begin();
    advance(iter,4);
    *iter = "666";

    // 删除第一个元素
    lis.pop_front();
    // 删除最后一个元素
    lis.pop_back();
    // 删除第四个元素
    iter = lis.begin();
    advance(iter,3);
    lis.erase(iter);

    // 取出第一个和最后一个元素
    cout << lis.front() << " " << lis.back() << endl;

    // 不支持普通for循环遍历

    cout << "------for each循环-------" << endl;
    for(string i:lis)
    {
        cout << i << " ";
    }
    cout << endl;

    // 迭代器:略


    return 0;
}
2.1.4 deque 队列(掌握)
从API上几乎完全兼容vector和list,从性能上位于vector和list之间。
代码略。
2.2 关联容器(掌握)
各个元素之间没有严格的顺序关系,但是内部有排序特点,以便于迭代器进行遍历。
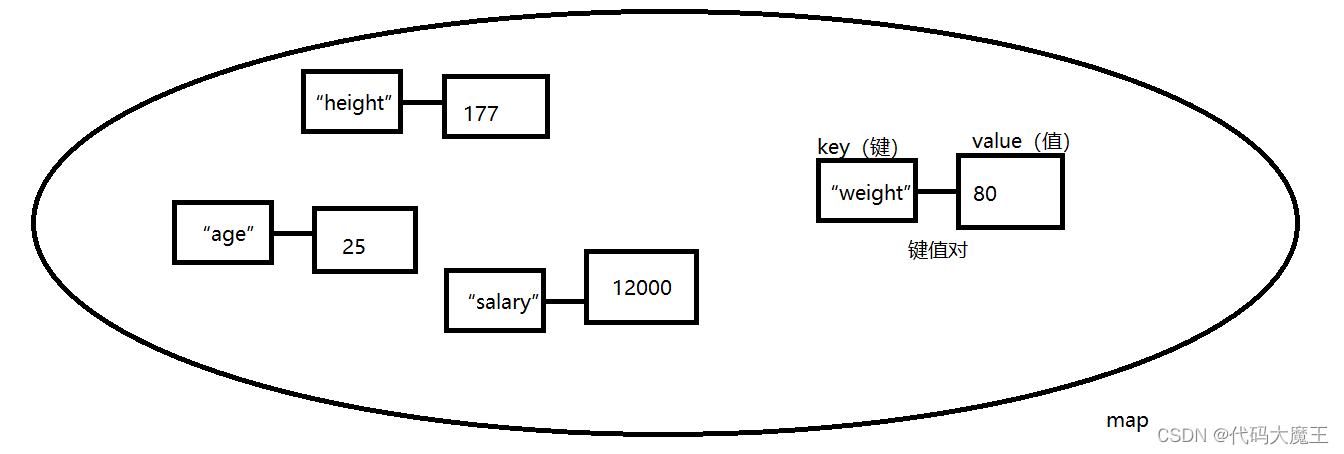
元素以键值对的方式存储,键必须具有唯一性,值可以重复;键通常是字符串类型,而值可以是任何类型。
#include
#include  // 容器类都需要引入头文件

using namespace std;

int main()
{
    // 创建一个map对象,尖括号中分别为键与值的类型
    map<string,int> map1;

    // 插入数据
    map1["height"] = 177;
    map1["weight"] = 80;
    map1["age"] = 25;
    map1.insert(pair("salary",12000));

    // 取出元素
    cout << map1["salary"] << endl; // 12000
    // 更推荐使用at函数
    cout << map1.at("age") << endl; // 25

    // 修改元素
    map1["weight"] = 70;
    cout << map1["weight"] << endl;

    // 删除元素
    map1.erase("height");
    // 判断"身高"键值存不存在
    if(map1.find("age") != map1.end()) // 在
    {
        cout << "键值对存在!" << endl;
    }else // 不在
    {
        cout << "键值对不存在!" << endl;
    }

    cout << map1.size() << endl;
    // 清空
    map1.clear();
    cout << map1.size() << endl; // 0


    // 迭代器:略

    cout << "主函数直接完毕" << endl;
    return 0;
}
2.3 迭代器(掌握)
迭代器是一种特殊的指针,对所有容器类型使用统一的操作方式进行遍历。
如果要使用迭代器进行读写操作,迭代器类型应为iterator;如果要使用迭代器进行只读操作,迭代器类型建议为const_iterator,效率会比iterator略高。
建议使用迭代器进行遍历。
#include
#include
#include
#include
#include
#include  // 容器类都需要引入头文件

using namespace std;

int main()
{
    string s = "djkshfjk";
    array<int,5> arr = {1,2,3,4,5};
    vector<int> vec(5,5);
    list<int> lis(5,5);
    deque<int> deq(5,5);
    map<string,string> m;
    m["fhdj"] = "fdfdfdf";
    m["fhj"] = "fdfdf";
    m["hdj"] = "fddf";

    // 迭代器遍历
    for(string::const_iterator iter = s.begin();iter!=s.end();iter++)
    {
        cout << *iter << " ";
    }
    cout << endl;

    for(array<int,5>::const_iterator iter = arr.begin();
        iter!=arr.end();iter++)
    {
        cout << *iter << " ";
    }
    cout << endl;

    for(vector<int>::const_iterator iter = vec.begin();
        iter!=vec.end();iter++)
    {
        cout << *iter << " ";
    }
    cout << endl;

    for(list<int>::const_iterator iter = lis.begin();iter!=lis.end();iter++)
    {
        cout << *iter << " ";
    }
    cout << endl;

    for(deque<int>::const_iterator iter = deq.begin();
        iter!=deq.end();iter++)
    {
        cout << *iter << " ";
    }
    cout << endl;

    for(map<string,string>::const_iterator iter = m.begin();
        iter!=m.end();iter++)
    {
        // 键使用first表示
        // 值使用second表示
        cout << iter->first << " " << iter->second << endl;
    }

    return 0;
}
练习:模板
写一个函数show_array,要求传入两个参数 void show_array(T t,int len)
第一个参数为数组默认值,第二个参数为数组的长度
此函数的功能为创建一个长度为len类型为T,默认值为t的数组并输出。
#include <iostream>
using namespace std;
template <class T>
void show_array(T t, int len){
T arr[len];
for(int i=0;i< len; i++){
arr[i] =t;
cout << arr[i]<<" ";
}
cout <<endl;
}
int main()
{
show_array(6,6);
show_array(6.66,6);
show_array("shizheyangzuoma",6);
return 0;
}
六、面向对象核心
1. 继承(重点)
继承是在一个已经存在的类的基础上新建一个类,新的类拥有已经存在的类的特性。已经存在的类被称为“基类”或“父类”;新建立的类被称为“派生类”或“子类”。
继承是面向对象的三大特性之一,体现了代码复用的思想。
#include

using namespace std;

class Father
{
private:
    string first_name = "张";
public:
    void job()
    {
        cout << "我是一名厨师" << endl;
    }

    string get_first_name() const
    {
        return first_name;
    }

    void set_first_name(const string& first_name)
    {
        this->first_name = first_name;
    }
};

/**
 * @brief The Son class 公有继承
 */
class Son:public Father
{
public:
    void play() // 新增内容
    {
//        cout << first_name << endl; 虽然继承了,无法直接访问
        cout << "我爱打游戏!" << endl;
    }

    // 函数隐藏
    void job()
    {
        cout << "我要做码农!" << endl;
    }
};


int main()
{
    Son s;
    cout << s.get_first_name() << endl; // 张
    s.job(); // 我要做码农!
    s.Father::job(); // 调用被隐藏的基类函数,输出:我是一名厨师
    s.play(); // 我爱打游戏!
    // 更改属性值
    s.set_first_name("王");
    cout << s.get_first_name() << endl; // 王

    return 0;
}
派生类可以继承基类的成员,并可以对其进行必要的增加或修改。一个基类可以有多个派生类,派生类又可以有多个新的派生类,所以继承关系是相对的。
通常基类更加抽象,派生类更加具象。
默认的继承是private权限的,当前必须使用public。
2. 继承中的构造函数
2.1 基础特性(重点)
构造函数和析构函数不能被继承。
#include

using namespace std;

class Father
{
private:
    string first_name;

public:
    Father(string first_name)
    {
        this->first_name = first_name;
    }

    string get_first_name() const
    {
        return first_name;
    }
};

class Son:public Father
{

};


int main()
{
//    Son s1("张"); 错误:构造函数不能被继承
//    Son s1; 错误:找不到Father::Father()构造函数

    return 0;
}
在继承中,任何一个派生类的任意一个构造函数都必须直接或间接调用基类的任一一个构造函数。因为在创建派生类对象时,需要调用基类的代码,使用基类的逻辑去开辟部分继承的空间。
在上一节的代码中,没写构造函数,编译器会为Father类和Son类增加无参构造函数,与此同时,还在Son的构造函数中尝试调用Father的无参构造函数。
实际上,只要一个派生类没有手动调用基类构造函数,编译器都会尝试调用基类的无参构造函数。
上面的代码可以有两种解决方案:
- 给Father构造函数增加无参调用的接口
- Father类增加一个重载的无参构造函数
    Father()
    {
        first_name = "张";
    }
-
- 给Father已有的构造函数增加默认值,使其支持无参调用。
    Father(string first_name = "张")
    {
        this->first_name = first_name;
    }
- 给Son类增加调用Father构造函数的代码。
见2.2节。
2.2 派生类构造函数调用基类构造函数
派生类的构造函数中调用基类的构造函数一共有三种方式:
- 透传构造
- 委托构造
- 继承构造
2.2.1 透传构造(重点)
透传构造指的是在派生类的构造函数中直接调用基类的构造函数。

#include

using namespace std;

class Father
{
private:
    string first_name;

public:
    Father(string first_name)
    {
        this->first_name = first_name;
    }

    string get_first_name() const
    {
        return first_name;
    }
};

class Son:public Father
{
public:
//    Son():Father(){} 如果不写构造函数,编译器自动添加
    Son():Father("王"){} // 透传构造
    Son(string name)
        :Father(name){} // 透传构造
};


int main()
{
    Son s1;
    cout << s1.get_first_name() << endl;
    Son s2("张");
    cout << s2.get_first_name() << endl;

    return 0;
}
2.2.2 委托构造(掌握)
同一个类中的构造函数可以调用另一个重载的构造函数,需要注意的是,在继承中,派生类构造函数A委托其它构造函数,最终必须有一个构造函数透传调用基类的构造函数。
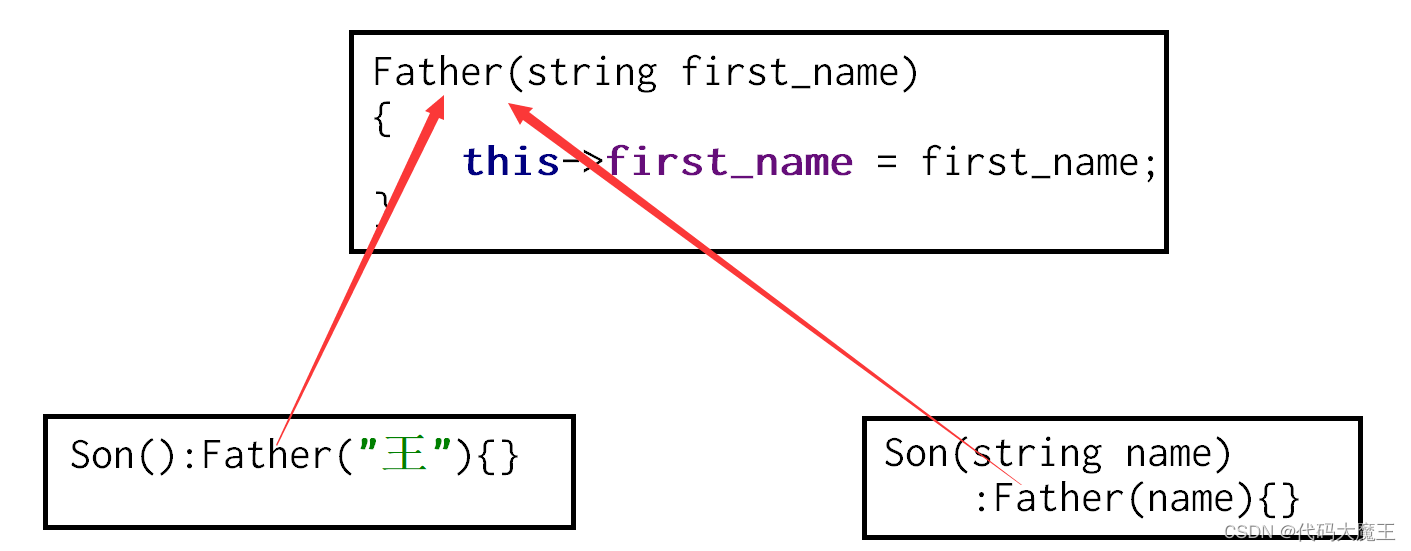
#include

using namespace std;

class Father
{
private:
    string first_name;

public:
    Father(string first_name)
    {
        this->first_name = first_name;
    }

    string get_first_name() const
    {
        return first_name;
    }
};

class Son:public Father
{
public:
    Son():Son("王"){} // 委托构造
    Son(string name)
        :Father(name){} // 透传构造
};

int main()
{
    Son s1;
    cout << s1.get_first_name() << endl;
    Son s2("张");
    cout << s2.get_first_name() << endl;

    return 0;
}
2.2.3 继承构造(了解)
继承构造是C++11的特性,并不是真正的继承构造函数,而是编译器自动为派生类创建n个构造函数(n的数量取决于基类构造函数的数量),并且每个派生类的构造函数参数都与基类的相同,每个派生类的构造函数透传基类的参数相同的构造函数。
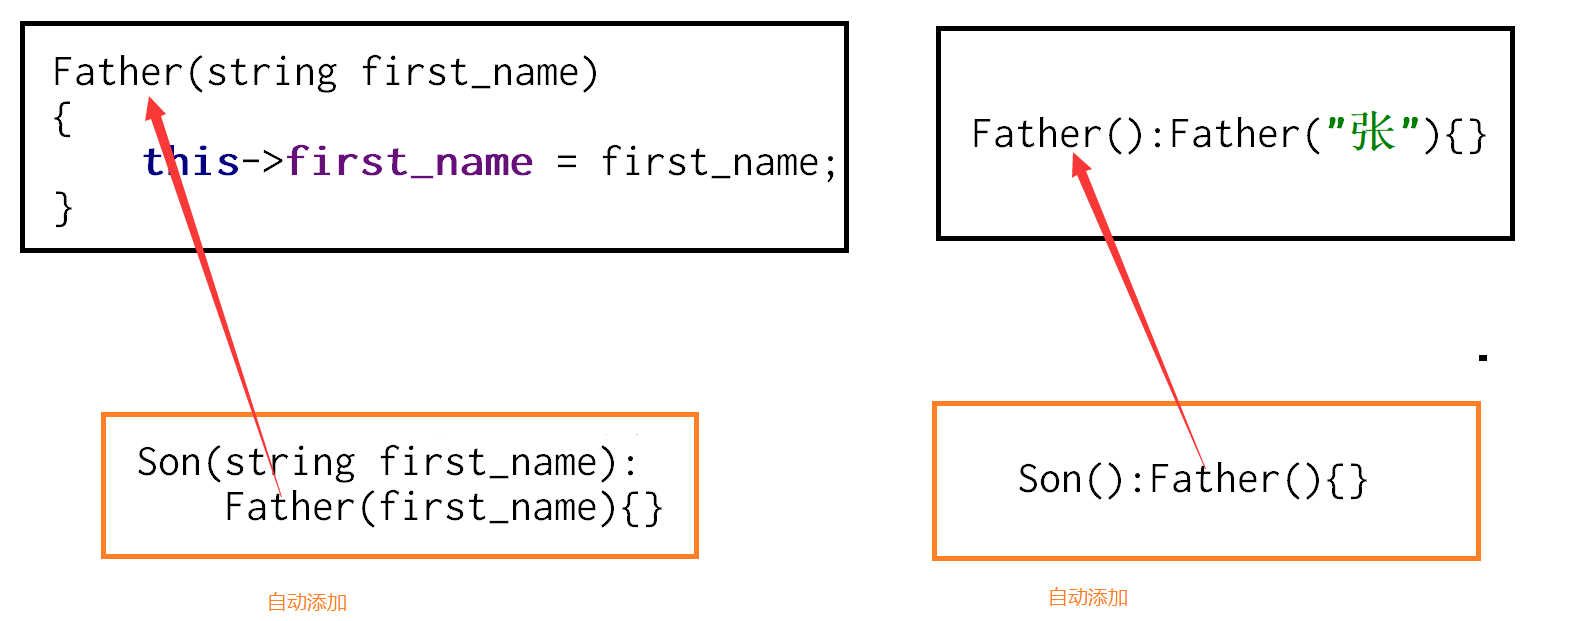
#include

using namespace std;

class Father
{
private:
    string first_name;

public:
    Father(string first_name)
    {
        this->first_name = first_name;
    }

    Father():Father("张"){}

    string get_first_name() const
    {
        return first_name;
    }
};

class Son:public Father
{
public:
    // 一句话搞定
    using Father::Father;

    // 相当于添加了下面的代码
//    Son(string first_name):
//        Father(first_name){}

//    Son():Father(){}
};


int main()
{
    Son s1;
    cout << s1.get_first_name() << endl;
    Son s2("张");
    cout << s2.get_first_name() << endl;

    return 0;
}
3. 对象的创建和销毁流程(掌握)
#include

using namespace std;

/**
 * @brief The Value class 作为其他类的变量
 */
class Value
{
private:
    string name;

public:
    Value(string name):name(name)
    {
        cout << name << "创建了" << endl;
    }

    ~Value()
    {
        cout << name << "销毁了" << endl;
    }
};

class Father
{
public:
    Value value = Value("Father类的成员变量");
    static Value s_value;

    Father()
    {
        cout << "Father类的构造函数" << endl;
    }

    ~Father()
    {
        cout << "Father类的析构函数" << endl;
    }
};

Value Father::s_value = Value("Father类的静态成员变量");

class Son:public Father
{
public:
    Value value2 = Value("Son类的成员变量");
    static Value s_value2;

    Son():Father()
    {
        cout << "Son类的构造函数" << endl;
    }

    ~Son()
    {
        cout << "Son类的析构函数" << endl;
    }
};

Value Son::s_value2 = Value("Son类的静态成员变量");


int main()
{
    cout << "程序开始执行" << endl;
    {
        Son s;
        cout << "对象s使用中......" << endl;
    }

    cout << "程序结束执行" << endl;
    return 0;
}
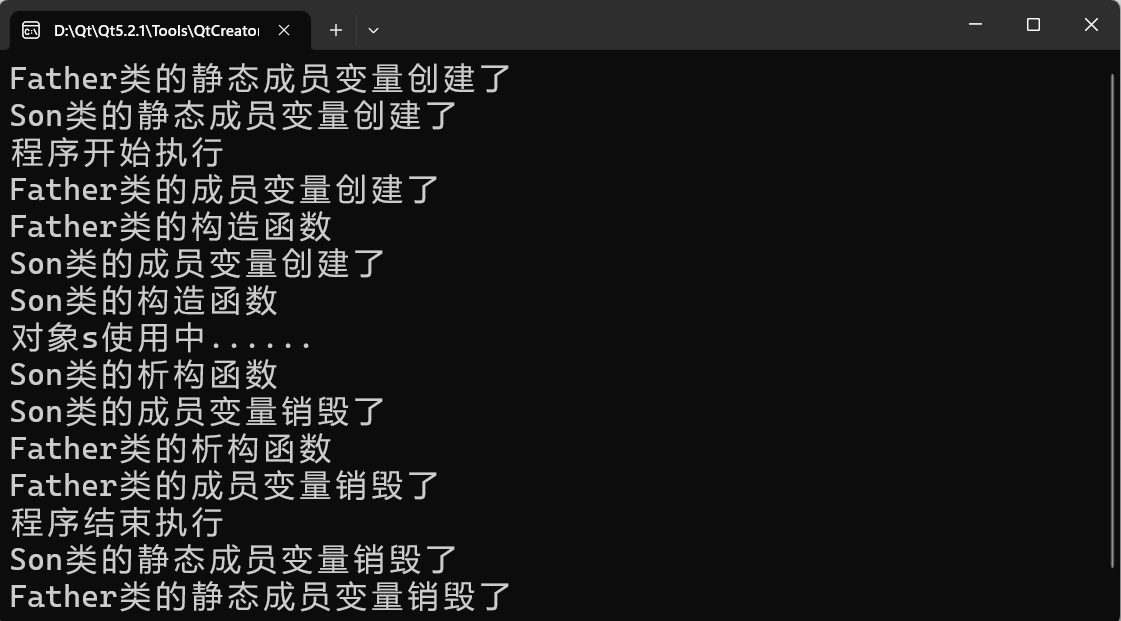
观察可得规律:
1. 创建与销毁流程完全对称。
2. 创建过程中,同类型功能都是基类先执行,派生类后执行。
3. 静态成员变量的生命周期与程序运行的周期相同。
通过上述例子,可以看到面向对象编程的特点:编写效率高,执行效率低。
4. 多重继承(掌握)
4.1 基础使用
C++支持多继承,即一个派生类可以有多个基类。
#include

using namespace std;

class Sofa
{
public:
    void sit()
    {
        cout << "能坐着!" << endl;
    }
};

class Bed
{
public:
    void lay()
    {
        cout << "能躺着!" << endl;
    }
};

class SofaBed:public Sofa,public Bed
{

};

int main()
{
    SofaBed sb;
    sb.sit();
    sb.lay();

    return 0;
}
4.2 二义性问题
4.2.1 第一种情况
多个基类拥有重名的成员时,会出现二义性问题。
#include

using namespace std;

class Sofa
{
public:
    void position()
    {
        cout << "放在客厅" << endl;
    }

    void sit()
    {
        cout << "能坐着!" << endl;
    }
};

class Bed
{
public:
    void position()
    {
        cout << "放在卧室" << endl;
    }

    void lay()
    {
        cout << "能躺着!" << endl;
    }
};

class SofaBed:public Sofa,public Bed
{

};

int main()
{
    SofaBed sb;
    sb.sit();
    sb.lay();
//    sb.position(); 错误
    // 手动告诉编译器调用来自哪个基类的成员
    sb.Sofa::position();
    sb.Bed::position();

    return 0;
}
4.2.2 第二种情况
菱形继承:如果一个派生类的多个基类拥有共同的基类,这种情况就是菱形继承。
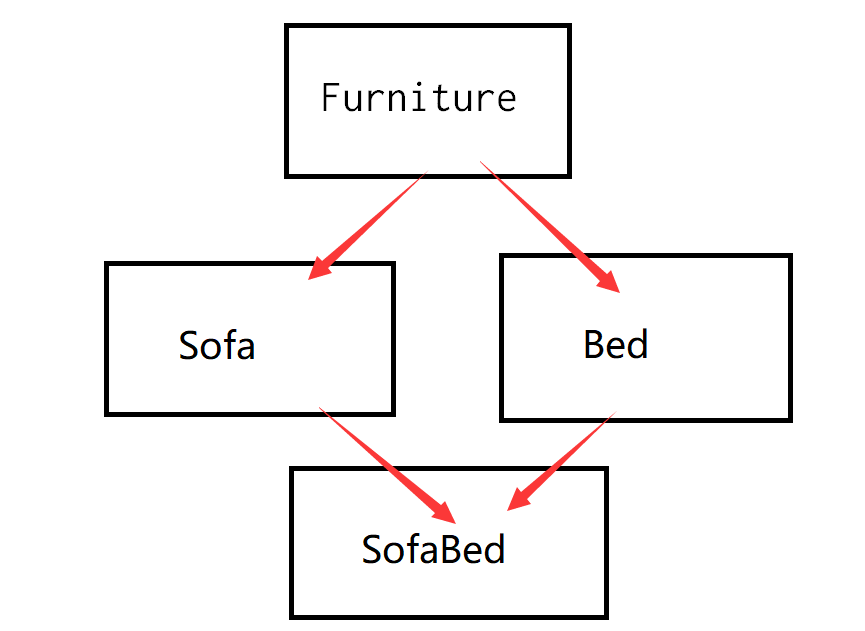
第一种解决方法是直接写出来自于哪个基类继承的成员。
#include

using namespace std;

class Furniture // 家具
{
public:
    void show()
    {
        cout << "这是个家具" << endl;
    }
};

class Bed:public Furniture // 床
{

};

class Sofa:public Furniture // 沙发
{

};

class SofaBed:public Bed,public Sofa // 沙发床
{

};

int main()
{
    SofaBed sb;
//    sb.show(); 错误:二义性

    // 告诉编译器用哪个基类的代码
    sb.Bed::show();
    sb.Sofa::show();
//    sb.Furniture::show(); 错误:二义性


    return 0;
}
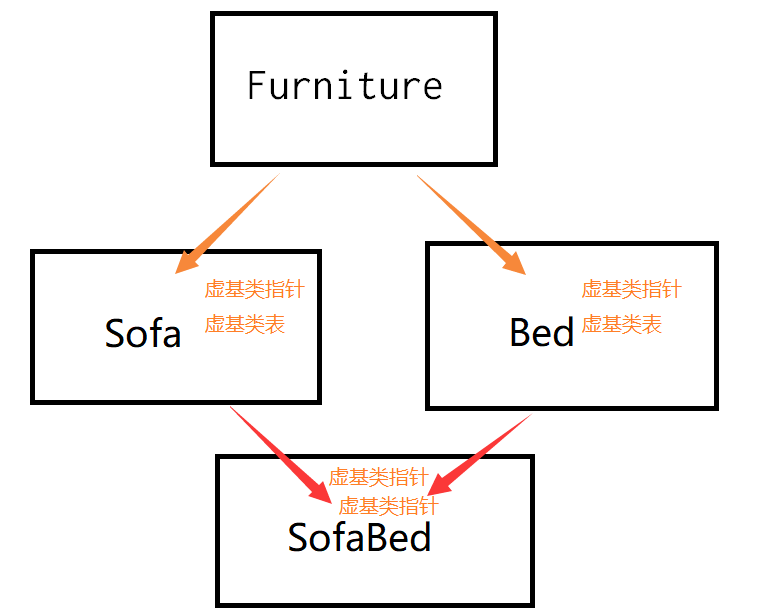
第二种解决方法是使用虚继承,在虚继承中Sofa和Bed类中都有增加一个虚基类指针和虚基类表,当Sofa和Bed作为基类时,其派生类SofaBed类也会继承虚基类指针(不继承虚基类表)。当SofaBed类调用Furniture的内容时,优先使用继承到的虚基类指针在虚基类表中进行查询,处理二义性问题。
#include

using namespace std;

class Furniture // 家具
{
public:
    void show()
    {
        cout << "这是个家具" << endl;
    }
};

class Bed:virtual public Furniture // 床
{

};

class Sofa:virtual public Furniture // 沙发
{

};

class SofaBed:public Bed,public Sofa // 沙发床
{

};

int main()
{
    SofaBed sb;
    sb.show();

    return 0;
}
虚继承的缺点是调用速度较慢,因为增加了查表的过程。
5. 权限
5.1 三种权限修饰符(重点)
| 类内访问 | 派生类内访问 | 全局访问 | |
| 私有权限 private | √ | X | X |
| 保护权限 protected | √ | √ | X |
| 公有权限 public | √ | √ | √ |
#include

using namespace std;

class Father
{
private:
    string str = "Father的私有权限";

protected:
    string str2 = "Father的保护权限";

public:
    Father()
    {
        cout << str2 << endl;
    }
};

class Son:public Father
{
public:
    void test()
    {
//        cout << str << endl; 错误
        cout << str2 << endl;
    }
};

int main()
{
    Father f; // Father的保护权限
    Son s; // Father的保护权限
    s.test(); // Father的保护权限
//    cout << f.str2 << endl; 错误

    return 0;
}
5.2 不同权限的继承
5.2.1 公有继承(重点)
派生类可以继承基类所有权限的成员,但是无法直接访问基类的私有成员,对于基类的保护成员与公有成员,在派生类中仍然是原来的权限。
#include

using namespace std;

class Father
{
private:
    string str1 = "Father的私有权限";

protected:
    string str2 = "Father的保护权限";

public:
    string str3 = "Father的公有权限";
};

class Son:public Father
{


};

class Grandson:public Son
{
public:
    void test()
    {
        cout << str2 << endl;
        cout << str3 << endl;
    }
};

int main()
{
    Son s;
//    cout << s.str2 << endl; 错误
    cout << s.str3 << endl;

    Grandson gs;
    gs.test();

    return 0;
}
公有继承是使用的最多的一种继承方式。
5.2.2 保护继承(掌握)
派生类可以继承基类所有权限的成员,但是无法直接访问基类的私有成员,对于基类的保护成员与公有成员,在派生类中都变为保护权限。
#include

using namespace std;

class Father
{
private:
    string str1 = "Father的私有权限";

protected:
    string str2 = "Father的保护权限";

public:
    string str3 = "Father的公有权限";
};

class Son:protected Father
{


};

class Grandson:public Son
{
public:
    void test()
    {
        cout << str2 << endl;
        cout << str3 << endl;
    }
};

int main()
{
    Son s;
//    cout << s.str2 << endl; 错误
//    cout << s.str3 << endl; 错误

    Grandson gs;
    gs.test();

    return 0;
}
5.2.3 私有继承(掌握)
派生类可以继承基类所有权限的成员,但是无法直接访问基类的私有成员,对于基类的保护成员与公有成员,在派生类中都变为私有权限。
#include

using namespace std;

class Father
{
private:
    string str1 = "Father的私有权限";

protected:
    string str2 = "Father的保护权限";

public:
    string str3 = "Father的公有权限";
};

class Son:private Father
{
public:
    void test()
    {
        cout << str2 << endl;
        cout << str3 << endl;
    }
};

class Grandson:public Son
{
public:
    void test()
    {
        //        cout << str2 << endl; 错误
        //        cout << str3 << endl; 错误
    }
};

int main()
{
    Son s;
    //    cout << s.str2 << endl; 错误
    //    cout << s.str3 << endl; 错误

    Grandson gs;
    gs.test();
    s.test();

    return 0;
}
6. 多态(重点)
多态可以被概括为“一个接口,多重状态”,只写一个函数接口,在程序运行时才决定调用类型对应的代码。
多态的使用需要有以下条件:
- 必须使用公有继承
- 派生类要有函数覆盖(重写)
- 基类引用/指针指向派生类对象
6.1 函数覆盖
函数覆盖与函数隐藏非常相似,区别在于基类被覆盖的函数需要设置为虚函数。
虚函数的特点如下:
1. 虚函数具有传递性,当基类的虚函数被覆盖时,派生类的覆盖函数自动成为虚函数。
2. 只有非静态成员函数与析构函数可以被定义为虚函数。
3. 如果声明定义分离,只需要使用virtual关键字修饰函数声明处。
#include

using namespace std;

class Animal
{
public:
    virtual void eat() // 虚函数
    {
        cout << "动物吃东西" << endl;
    }
};

class Cat:public Animal
{
public:
    void eat() // 虚函数
    {
        cout << "猫吃鱼" << endl;
    }
};

class Dog:public Animal
{
public:
    void eat() // 虚函数
    {
        cout << "狗吃骨头" << endl;
    }
};
6.2 使用多态
多态通常搭配函数参数使用,分别写两个函数,触发引用和指针类型的多态。
#include

using namespace std;

class Animal
{
public:
    virtual void eat() // 虚函数
    {
        cout << "动物吃东西" << endl;
    }
};

class Cat:public Animal
{
public:
    void eat() // 虚函数
    {
        cout << "猫吃鱼" << endl;
    }
};

class Dog:public Animal
{
public:
    void eat() // 虚函数
    {
        cout << "狗吃骨头" << endl;
    }
};

// 引用多态
void test_eat1(Animal& a)
{
    a.eat();
}

void test_eat2(Animal* a)
{
    a->eat();
}

int main()
{
    Animal a1;
    Cat c1;
    Dog d1;
    // 测试引用多态效果
    test_eat1(a1); // 动物吃东西
    test_eat1(c1); // 猫吃鱼
    test_eat1(d1); // 狗吃骨头

    Animal* a2 = new Animal;
    Cat* c2 = new Cat;
    Dog* d2 = new Dog;
    test_eat2(a2); // 动物吃东西
    test_eat2(c2); // 猫吃鱼
    test_eat2(d2); // 狗吃骨头

    return 0;
}
练习:类的继承使用
定义学生类,有姓名,学号,性别,年龄等私有成员变量,有构造和析构函数,有打印信息的成员函数。
要求通过构造函数可以给属性赋予初始值。
定义大学生类,继承自学生类,大学生有专业名、成绩的私有成员变量,还有是否获得奖学金的成员函数(成绩为判断依据)。隐藏基类打印信息的成员函数,新的打印信息的成员函数也要能打印姓名、学号、性别、年龄信息。
要求通过构造函数可以给属性赋予初始值。
再定义研究生类,继承自大学生类,有导师姓名和工资的私有成员变量,有打印工资这个成员函数。
要求通过构造函数可以给属性赋予初始值。
#include <iostream>

using namespace std;
class Student
{
private:
    string name;
    int num;
    string gender;
    int age;

public:
    Student(string name,int num,string gender,int age):name(name),num(num),gender(gender),age(age){}
    void show()
    {
        cout<<name<<" "<<num<<" "<<gender<<" "<<age<<endl;
    }

    ~Student(){}

};

class Collagestudent:public Student
{
private:
    string majoy;
    double score;

public:
    Collagestudent(string name,int num,string gender,int age,string majoy,double score):Student(name,num,gender,age),majoy(majoy),score(score){}
    void scholarship()
    {
        if(score>90)
        {
            cout<<"acquire scholarship"<<endl;
        }
        else
        {
            cout<<"no scholarship"<<endl;
        }
    }

    void show()
    {
        Student::show();
        cout<<majoy<<" "<<score<<endl;

    }

};

class Graduatestudent: public Student
{
private:
    string teacher;
    double wage;

public:
    Graduatestudent(string name,int num,string gender,int age,string teacher,double wage):Student(name,num,gender,age),teacher(teacher),wage(wage){}

    void show()
    {

        cout<<wage<<endl;
    }

};

int main()
{
    Student s("zhangsan",1,"nan",20);
    s.show();
    Collagestudent cs("lisi",2,"nan",21,"pe",99);
    cs.show();
    cs.scholarship();
    Graduatestudent gs("zhangsan",1,"nan",20,"jiaoshou",12345);
    gs.show();

}
6.3 多态原理
当一个类中有虚函数时,编译器会为这个类分类一个虚函数表,对象中会有一个虚函数表指针指向这张表。
当出现继承且函数覆盖时,派生类会修改自己类中的虚函数表,其对象的虚函数表指针会指向这张表。
当基类的引用或指针指向派生类对象时,程序会在运行的过程中通过虚函数表指针查找对应的虚函数并调用内容。
这种过程被称为动态类型绑定,使用多态会产生一些额外的调用开销,因此多态会降低程序的执行效率,但是可以提升编程效率。
#include

using namespace std;

class Animal
{
public:
    virtual void eat() // 虚函数
    {
        cout << "动物吃东西" << endl;
    }
};

class Cat:public Animal
{
public:
    void eat() // 虚函数
    {
        cout << "猫吃鱼" << endl;
    }
};

class Dog:public Animal
{
public:
    void eat() // 虚函数
    {
        cout << "狗吃骨头" << endl;
    }
};

// 引用多态
void test_eat1(Animal& a)
{
    a.eat();
}

void test_eat2(Animal* a)
{
    a->eat();
}

int main()
{
    Animal a1;
    Cat c1;
    Dog d1;
    // 测试引用多态效果
    test_eat1(a1); // 动物吃东西
    test_eat1(c1); // 猫吃鱼
    test_eat1(d1); // 狗吃骨头

    Animal* a2 = new Animal;
    Cat* c2 = new Cat;
    Dog* d2 = new Dog;
    test_eat2(a2); // 动物吃东西
    test_eat2(c2); // 猫吃鱼
    test_eat2(d2); // 狗吃骨头
    // 先别管delete

    return 0;
}
6.4 虚析构函数
如果通过基类引用或者指针指向派生类对象,当使用delete销毁对象时,只会调用基类的析构函数,不会调用派生类的析构函数。此时,如果派生类中有new申请的内存资源,那么造成内存泄漏问题。
#include

using namespace std;

class Animal
{
public:
    virtual ~Animal()
    {
        cout << "基类的析构函数" << endl;
    }
};
class Dog:public Animal
{
public:
    ~Dog()
    {
        cout << "派生类的析构函数" << endl;
    }
};

int main()
{
    Animal* a = new Dog;
    delete a; //派生类的析构函数 基类的析构函数
    return 0;
}
因此在设计一个类时,如果这个类会成为其他类的基类,哪怕析构函数什么都不写,也要手写空的析构函数并加上virtual关键字修饰,除非可以确定此类不会被任何类继承。
7. 抽象类
7.1 抽象类的概念
如果我们的基类只表达一些抽象的概念,并不与具体的对象相联系,他可以为派生类提供一个框架,这就是抽象类。
如果一个类有至少一个纯虚函数,则这个类是抽象类。
如果一个类时抽象类,则这个类至少也有一个纯虚函数。
纯虚函数是一种特殊的虚函数,纯虚函数只有声明,没有定义。
抽象类的析构函数都应该写为虚析构函数。
#include

using namespace std;

class Shape
{
public:
    //纯虚函数
    virtual void perimeter() = 0;
    virtual void area() = 0;
    virtual ~Shape(){}
};

int main()
{
//    Shape s; //错误
    return 0;
}
7.2 抽象类的使用
抽象类作为算法框架,其主要的使用方式是使其派生类实现所有的纯虚函数。此时派生类会变成一个普通的类,就可以实例化了。
#include

using namespace std;
//形状类
class Shape
{
public:
    //纯虚函数
    virtual void perimeter() = 0;
    virtual void area() = 0;
    virtual ~Shape()
    {

    }
};
//圆形类
class Circle:public Shape
{
public:
    void perimeter()
    {
        cout << "周长:2πR" << endl;
    }
    void area()
    {
        cout << "面积:πR^2" << endl;
    }
};

int main()
{
    Circle c;
    c.perimeter();
    c.area();
    return 0;
}
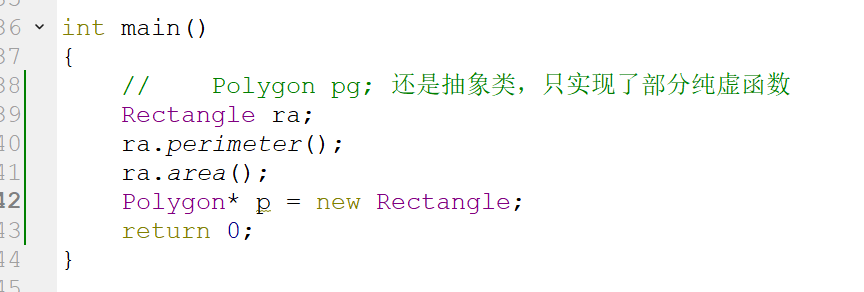
另一种情况就是,抽象类的派生类只实现部分的纯虚函数,说明派生类仍然是抽象类,其纯虚函数要等待再次派生,直到所有的纯虚函数都在派生类中实现。
#include

using namespace std;

class Shape
{
public:
    //纯虚函数
    virtual void perimeter() = 0;
    virtual void area() = 0;
    virtual ~Shape()
    {

    }
};
//多边形类
class Polygon:public Shape
{
public:
    void perimeter()
    {
        cout << "周长:∑边长" << endl;
    }

};
//矩形类
class Rectangle:public Polygon
{
public:
    void area()
    {
        cout << "面积" << endl;
    }
};

int main()
{
    //    Polygon pg; 还是抽象类,只实现了部分纯虚函数
    Rectangle ra;
    ra.perimeter();
    ra.area();
    return 0;
}
抽象类支持多态。
七、异常处理
1. 异常的定义
异常是在程序运行期间产生的问题,即编译期间语法无问题。
#include
#include

using namespace std;


int main()
{
    array<int,100> arr;
    cout << arr.at(12) << endl; //1875651656
    cout << arr.at(101) << endl; //程序会终止运行,并抛出一个异常对象

    cout << "程序执行结束" << endl;
    return 0;
}
程序在运行的过程中,一旦出现异常有两种情况:
- 用户有捕获异常的代码,且捕获成功后,可以对当我们当前的异常执行对应的弥补措施的代码,保证程序继续正常执行
- 程序在抛出异常对象的位置找不到捕获异常的代码,此时会去调用再次寻找捕获异常的代码,逐层寻找,如果每一层调用处都没有捕获异常的代码,程序终止运行。
#include
#include

using namespace std;

void test1()
{
    array<int,100> arr;
    cout << arr.at(12) << endl; //1875651656
    cout << arr.at(101) << endl; //程序会终止运行,并抛出一个异常对象
}
void test2()
{
    test1();
}

int main()
{

    test2();
    cout << "程序执行结束" << endl;
    return 0;
}
2. 处理异常
程序员在代码中有两种操作异常的方式:
- 抛出异常
程序员也可以手动使用throw关键字抛出异常对象,来干预程序运行的过程。
- 捕获异常
捕获异常是针对抛出的异常对象,经过合理的处理,让程序仍然在修复后继续执行。
2.1 抛出异常
throw抛出的异常对象可以是任何类型的。下面的例子使用const char* 来作为抛出的异常对象。
#include
#include

using namespace std;

double division(double a,double b)
{
    if(b == 0)
    {
        throw "不能除以0";
    }
    return a/b;
}

int main()
{
    cout << division(1,0) << endl; //infinite
    //terminate called after throwing an instance of 'char const*'

    cout << "程序执行结束" << endl;
    return 0;
}
2.2 捕获异常
如果一个代码抛出异常,捕获异常使用try和catch代码块。
try代码块中放置可能会出现异常的代码,如果try块中代码中抛出了异常那么此时跳到啊catch块中进行异常类型匹配;如果try块中的代码没有抛出异常,那么程序执行完try块后忽略catch块。
#include
#include

using namespace std;

double division(double a,double b)
{
    if(b == 0)
    {
        throw "不能除以0";

    }
    return a/b;
}


int main()
{
    try{
        cout << division(1,3) << endl; //infinite
    }catch(const char* e)
    {
        cout << e << endl; //异常对象的信息
        cout << "1/100,下次不要怎么样" << endl; //弥补措施

    }

    //terminate called after throwing an instance of 'char const*'

    cout << "程序执行结束" << endl;
    return 0;
}
八、智能指针
1. 智能指针的定义
1.1 为什么使用智能指针
C++中堆内存的对象在new之后创建,如果忘记delete则会产生内存泄漏的问题。
诸如Java、C#、JS等语言则提供一些垃圾回收机制来处理不使用的对象。因此在C++98中也引入了智能指针的概念,并在C+++11中趋于完善。
1.2 智能指针的功能
使用智能指针,程序员可以使堆内存的对象不需要delete就可以自动销毁,达到一种近似于栈内存对象的效果。
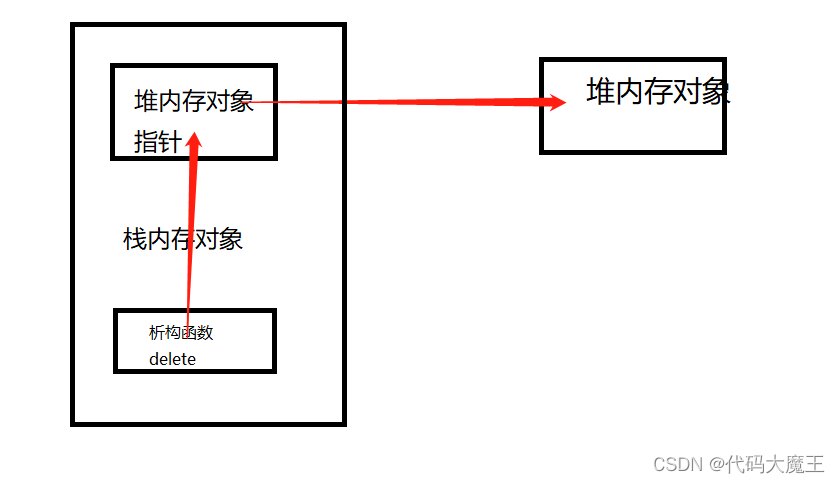
智能指针主用于管理堆内存对象,它将堆内存对象的指针封装为一个栈对象;当外部的栈内存对象的生命周期结束后,会在析构函数中释放掉管理的堆内存对象,从而防止内存泄漏的问题。
1.3 智能指针的分类
首先,我们C++中有四种智能指针,都在标准名字空间下,使用时都需要引入头文件*include ,这四种指针分别是:
- auto_ptr(自动指针,C++98中引入,目前推荐不使用)
- unique_ptr (唯一指针,C++11引入)
- shared_ptr(共享指针,C++11引入)
- weak_ptr(虚指针,C++11中引入)
-
2.智能指针的使用
2.1 auto_ptr
auto_ptr的基础使用代码如下。·
#include
#include

using namespace std;

class Test
{
private:
    string name;
public:
    Test(string name):name(name)
    {
        cout << "构造函数" << endl;
    }
    void show()
    {
        cout << name << "调用成员" << endl;
    }
    ~Test()
    {
        cout << name << "析构函数" << endl;
    }
};

int main()
{
    {
        //新创建的这个对象A交给ap1管理
        auto_ptr<Test> ap1(new Test("A"));
        Test* t = ap1.get(); //获取资源对象
        t->show();
//        delete t;  被智能指针管理的资源对象不要手动销毁

        //如果要恢复手动管理方式,请先释放智能指针ap1对对象A的所有权
        ap1.release();
        delete t;
        //ap2管理对象B
        auto_ptr<Test> ap2(new Test("B"));
        //ap2重新管理对象C
        ap2.reset(new Test("C"));
        ap2.get()->show();
    }

    cout << "主函数结束" << endl;
    return 0;
}
auto_ptr真正让人误用的地方在于复制语义,当执行这个拷贝构造函数或赋值运算符操作时,原智能指针对象所持有的堆内存对象的管理权也会转移给新的智能指针对象。
#include
#include

using namespace std;

class Test
{
private:
    string name;
public:
    Test(string name):name(name)
    {
        cout << "构造函数" << endl;
    }
    void show()
    {
        cout << name << "调用成员" << endl;
    }
    ~Test()
    {
        cout << name << "析构函数" << endl;
    }
};

int main()
{
    {
        auto_ptr<Test> ap1(new Test("A"));
        auto_ptr<Test> ap2(new Test("B"));
        auto_ptr<Test> ap3(new Test("C"));
        auto_ptr<Test> ap4(ap1); //拷贝构造函数
        auto_ptr<Test> ap5 = ap2; //隐式调用拷贝构造函数
        auto_ptr<Test> ap6;
        ap6 = ap3; //赋值运算符
        cout << ap1.get() << endl; //0
        cout << ap2.get() << endl; //0
        cout << ap3.get() << endl; //0
        cout << ap4.get() << endl; //0xf015e8
        cout << ap5.get() << endl; //0xf024e8
        cout << ap6.get() << endl; //0xf02688
//        ap1.get()->show();
    }

    cout << "主函数结束" << endl;
    return 0;
}
2.2 unique_ptr
作为对auto_ptr的改进 unique_ptr对其持有的堆内存对象具有唯一控制权,即从语法上屏蔽了复制语义。
#include
#include

using namespace std;

class Test
{
private:
    string name;
public:
    Test(string name):name(name)
    {
        cout << "构造函数" << endl;
    }
    void show()
    {
        cout << name << "调用成员" << endl;
    }
    ~Test()
    {
        cout << name << "析构函数" << endl;
    }
};

int main()
{
    {
        unique_ptr<Test> up1(new Test("A"));
        unique_ptr<Test> up2(new Test("B"));
        unique_ptr<Test> up3(new Test("C"));
//        unique_ptr up4(up1); //拷贝构造函数
//        unique_ptr up5 = up2; //隐式调用拷贝构造函数
//        unique_ptr up6;
//        up6 = up3; //赋值运算符

        up1.get()->show();
    }

    cout << "主函数结束" << endl;
    return 0;
}
unique_ptr提供了move函数来完成控制权的转移,
#include
#include

using namespace std;

class Test
{
private:
    string name;
public:
    Test(string name):name(name)
    {
        cout << "构造函数" << endl;
    }
    void show()
    {
        cout << name << "调用成员" << endl;
    }
    ~Test()
    {
        cout << name << "析构函数" << endl;
    }
};

int main()
{
    {
        unique_ptr<Test> up1(new Test("A"));
        unique_ptr<Test> up2(new Test("B"));
        unique_ptr<Test> up3(new Test("C"));
        unique_ptr<Test> up4(move(up1)); //拷贝构造函数
        unique_ptr<Test> up5 = move(up2); //隐式调用拷贝构造函数
        unique_ptr<Test> up6;
        up6 = move(up3); //赋值运算符

        cout << up1.get() << endl;
        cout << up2.get() << endl;
        cout << up3.get() << endl;
        cout << up4.get() << endl;
        cout << up5.get() << endl;
        cout << up6.get() << endl;
    }

    cout << "主函数结束" << endl;
    return 0;
}
2.3 shared_ptr
shared_ptr所持有的的资源可以在多个shared_ptr直接共享。
2.3.1 初始化方式
shared_ptr出来支持传统的初始化方式外,还支持使用make_shared函数初始化。
#include
#include

using namespace std;

class Test
{
private:
    string name;
public:
    Test(string name):name(name)
    {
        cout << "构造函数" << endl;
    }
    void show()
    {
        cout << name << "调用成员" << endl;
    }
    ~Test()
    {
        cout << name << "析构函数" << endl;
    }
};

int main()
{
    {
        //传统初始化方式
        shared_ptr<Test> sp1(new Test("A"));
        //make_shared初始化
        shared_ptr<Test> sp2 = make_shared("B");
        sp1.get()->show();
        sp2.get()->show();
    }

    cout << "主函数结束" << endl;
    return 0;
}
make_shared相比new来讲有以下特点:
- 性能更好
- 更加安全
- 有可能会导致内存延迟释放
2.3.2 引入计数
每多一个shared_ptr对资源进行管理,资源的引用计数讲增加1,每一个管理该资源的shared_ptr对象析构后,资源的引用计数将减少1,当计数减少到0时,释放所持有的的资源对象。
#include
#include

using namespace std;

class Test
{
private:
    string name;
public:
    Test(string name):name(name)
    {
        cout << "构造函数" << endl;
    }
    void show()
    {
        cout << name << "调用成员" << endl;
    }
    ~Test()
    {
        cout << name << "析构函数" << endl;
    }
};

int main()
{
    shared_ptr<Test> sp5;
    {
        cout << "{" << endl;

        shared_ptr<Test> sp1 = make_shared("A");
        cout << "引用计数:" << sp1.use_count() << endl; //1
        shared_ptr<Test> sp2(sp1); //显示调用构造函数
        cout << "引用计数:" << sp2.use_count() << endl; //2
        shared_ptr<Test> sp3 = sp2; //隐式调用构造函数
        cout << "引用计数:" << sp3.use_count() << endl; //3
        shared_ptr<Test> sp4;
        sp4 = sp3; //赋值运算符
        cout << "引用计数:" << sp4.use_count() << endl; //4
        sp1.reset(); //释放并销毁(引用计数-1)资源
        sp2.reset();
        sp3.reset();
        cout << "引用计数:" << sp4.use_count() << endl; //1
        sp5 = sp4;
        cout << "引用计数:" << sp5.use_count() << endl; //2
        sp4.reset(); //引用计数为0,释放资源
        cout << "引用计数:" << sp5.use_count() << endl; //1


        cout << "}" << endl;
    }
    cout << "引用计数:" << sp5.use_count() << endl;
    cout << "主函数结束" << endl;
    return 0;
}
2.4 weak_ptr
weak_ptr是一个不控制对象生命周期的智能指针,只是提供了一种管理对象的访问手段,引入他的目的是协助共享指针shared_ptr来工作,weak_ptr也不会影响引用计数。
#include
#include

using namespace std;

class Test
{
private:
    string name;
public:
    Test(string name):name(name)
    {
        cout << "构造函数" << endl;
    }
    void show()
    {
        cout << name << "调用成员" << endl;
    }
    ~Test()
    {
        cout << name << "析构函数" << endl;
    }
};

int main()
{
    shared_ptr<Test> sp1 = make_shared("A");
    {
        //       weak_ptr wp1(new Test("A")); 不能独立使用
        //创建一个虚指针weak_ptr
        weak_ptr<Test> wp1(sp1);
        cout << wp1.use_count() << endl; //1

        weak_ptr<Test> wp2 = wp1; //隐式调用构造函数
        cout << wp2.use_count() << endl; //3
        weak_ptr<Test> wp3;
        wp3 = wp2; //赋值运算符
        //        wp3.get()->show();
        sp1.reset();

        weak_ptr<Test> wp4;
        wp4 = wp1;
        cout << wp4.use_count() << endl; //0
    }
    cout << "主函数结束" << endl;
    return 0;
}
九、补充内容
1. nullptr
C++11中用来代替NULL的。
#include
#include

using namespace std;

void test(int)
{
    cout << 1 << endl;
}
void test(char*)
{
    cout << 2 << endl;
}

int main()
{
    //C++的源码NULL就是个0
    test(NULL);//1
    test(nullptr); //2
    return 0;
}
2. 类型推导
#include
#include

using namespace std;


int main()
{
    int i = 1;
    auto a1 = 1; //auto被推导为整型
    auto a2 = 1.2; //auto被推导为double
    auto a3 = new auto(10); //auto被推导为int*
    cout << *a3 << endl; //10
    return 0;
}
注意,auto不能用作参数类型,他是也不支持数组
3. 输入输出流
3.1 格式化输出
3.1.1 数字进制输出
#include
#include

using namespace std;


int main()
{
    //展示当前的进制:八进制开头0,十六进制开头0x,十进制不变
    cout << showbase;

    //八进制
    cout << oct;
    cout << 1234 << endl; // 2322
    cout << 8 << endl; // 10
    //十六进制
    cout << hex;
    cout << 255 << endl; //ff
    cout << 16 << endl; //10
    //切回十进制
    cout << dec;
    cout << 1234 << endl; //1234
    cout << 8 << endl; //8

    //不显示进制
    cout << noshowbase;
    return 0;
}
3.1.2 域输出(输出域)
通过setw函数设置输出内容的宽度,有两种情况:
- 当设置宽度小于数据本身的宽度时,显示为数据本身的宽度
- 当设置的宽度大于数据本身的宽度时,显示为设置的宽度
#include
#include

using namespace std;


int main()
{
    cout << setw(10) << "124" << setw(10) << 244 << endl;
    cout << setw(10) << "1" << setw(10) << 244786756565656 << endl;
    return 0;
}
3.2 字符串流
可以完成字符串和数字之间的转换,需要引入头文件#include <sstream>
#include
#include

using namespace std;


int main()
{
//    int→string
   int a = 123;
   stringstream ss;
   ss << a;
   string s = ss.str();
   cout << s.append("lala") << endl; //123lala
   //string→int
   istringstream is(s);
   int i;
   is >> i;
   cout << i+1 << endl; //124

    return 0;
}
