<script src="https://unpkg.com/vue@next"></script>mixin混入(局部使用)
定义mixin对象
<script>
    // mixin 混入
    const mymixin={
        data(){
            return {
                number:2,
                count:1
            }
        },
        created(){
            console.log('mymixin created');
        },
        methods:{
            handleClick(){
                console.log('mymixin click');
            }
        }
    };

    const app = Vue.createApp({
        data() {
            return {
                number: 1
            }
        },
        mixins:[mymixin],
        created(){
            console.log('created');
        },
        methods: {
            handleClick() {
                console.log('handleClick');
            },

        },
        template: `
            <div>
                <div>{{number}}</div>
                <div>{{count}}</div>
                <button @click="handleClick">增加</button>
            </div>
        `
    });

    const vm = app.mount('#root');
</script>

说明:组件data,methods优先级高于mixin中data,methods优先级,而生命周期函数先执行mixin里面的,再执行组件里面的
mixin混入(全局使用)
const app = Vue.createApp({
        data() {
            return {
                number: 1
            }
        },
        created(){
            console.log('created');
        },
        methods: {
            handleClick() {
                console.log('handleClick');
            },

        },
        template: `
            <div>
                <div>{{number}}</div>
                <child />
                <button @click="handleClick">增加</button>
            </div>
        `
    });

    app.mixin({
        data(){
            return{
                number:2,
                count:1
            }
        },
        created(){
            console.log('mymixin created');
        },
        methods:{
            handleClick(){
                console.log('mymixin click');
            }
        }
    })

    app.component('child',{
        template:"<div>{{count}}</div>"
    });


    const vm = app.mount('#root');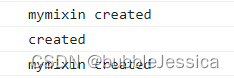
显示自定义属性
默认情况下,组件的属性优先级高于mixin的属性优先级,想要修改的话,必须补充配置合并策略
// mixin 混入
    const mymixin = {
        number: 1
    };

    const app = Vue.createApp({
        mixins:[mymixin],
        number: 2,
        template: `
            <div>
                <div>{{this.$options.number}}</div>
            </div>
        `
    });

    app.config.optionMergeStrategies.number=(mixinVal,appValue)=>{
        return mixinVal||appValue;
    }
    const vm = app.mount('#root');
自定义指令(局部和全局)
// 自定义指令 directive

    // 局部指令
    // const directives={
    //     focus:{
    //         mounted(el){
    //             el.focus();
    //         }
    //     }
    // }

    const app=Vue.createApp({
        data(){
            return{
                hello:true
            }
        },
        // directives:directives,
        template:`
            <div>
                <div v-show="hello"><input v-focus /></div>
            </div>
          `
    })

    // 全局指令
    app.directive('focus',{
        beforeMount(el){
            console.log('beforeMount');
        },
        mounted(el){
            el.focus();
            console.log('mounted');
        },
        // 变化前执行 v-show
        beforeUpdate(){
            console.log('beforeUpdate');
        },
        updated(){
            console.log('updated');
        },
        // 销毁前执行 v-if
        beforeUnmount(){
            console.log('beforeUnmount');
        },
        unmounted(){
            console.log('unmounted');
        }
    });
    const vm = app.mount('#root');
v-pos指令(定位)
<!DOCTYPE html>
<html lang="en">

<head>
    <meta charset="UTF-8">
    <meta http-equiv="X-UA-Compatible" content="IE=edge">
    <meta name="viewport" content="width=device-width, initial-scale=1.0">
    <title>lesson 29</title>
    <style>
        .header{
            position: absolute;
        }
    </style>
    <script src="https://unpkg.com/vue@next"></script>
</head>

<body>
    <div id="root"></div>
</body>
<script>
    // 自定义指令 directive

    const app=Vue.createApp({
        data(){
            return{
                distance:100
            }
        },
        template:`
            <div>
                <div v-pos:left="distance" class="header"><input /></div>
            </div>
          `
    })

    // 全局指令
    // app.directive('pos',{
    //     mounted(el,binding){
    //         el.style.top=(binding.value+'px');
    //     },
    //     updated(el,binding){
    //         el.style.top=(binding.value+'px');
    //     }
    // });

    // 当只有mounted和updated且里面内容一样时,可以使用箭头函数
    app.directive('pos',(el,binding)=>{
        console.log(binding);
        el.style[binding.arg]=(binding.value+'px');
    })
    const vm = app.mount('#root');
</script>

</html>
传送门teleport
<!DOCTYPE html>
<html lang="en">

<head>
    <meta charset="UTF-8">
    <meta http-equiv="X-UA-Compatible" content="IE=edge">
    <meta name="viewport" content="width=device-width, initial-scale=1.0">
    <title>lesson 30</title>
    <style>
        .area {
            position: absolute;
            left: 50%;
            top: 50%;
            transform: translate(-50%, -50%);
            width: 200px;
            height: 300px;
            background-color: #000;
        }

        .mask {
            position: absolute;
            left: 0;
            right: 0;
            bottom: 0;
            top: 0;
            background: #000;
            opacity: 0.5;
            color: #fff;
            font-size: 100px;
        }
    </style>
    <script src="https://unpkg.com/vue@next"></script>
</head>

<body>
    <div id="root"></div>
    <div id="hello"></div>
</body>
<script>
    // 传送门 teleport

    const app = Vue.createApp({
        data() {
            return {
                show: false,
                message: 'hello'
            }
        },
        methods: {
            handleBtnClick() {
                this.show = !this.show;
            }
        },
        template: `
            <div class="area">
                <button @click="handleBtnClick">按钮</button>
                <teleport to="#hello">
                    <div class="mask" v-show="show">{{message}}</div>
                </teleport>
            </div>
          `
    })
    const vm = app.mount('#root');
</script>

</html>
slot插槽
const app = Vue.createApp({
        template: `
            <my-title>
                hello
            </my-title>
          `
    });

    app.component('my-title',{
        template:`
        <h1>
            <slot/>
        </h1>
        `
    })
    const vm = app.mount('#root');
render函数(难底层) 选修课
作用形式:template -> render -> h -> 虚拟DOM(JS对象) -> 真实DOM -> 展示到页面上
// render function

    //加:level="1" 其中1代表数字1,如果不加冒号的话为字符串1
    const app = Vue.createApp({
        template: `
            <my-title :level="1">
                hello jessica
            </my-title>
          `
    });

    app.component('my-title',{
        props:['level'],
        render(){
            const {h}=Vue;
            // 虚拟 DOM
            // {
            //     tagName:'h2',
            //     text:'hello jessica',
            //     attributes:{}

            // }
            return h('h'+this.level,{},this.$slots.default());
        }
    })

    // app.component('my-title',{
    //     props:['level'],
    //     render(){
    //         const {h}=Vue;
    //         return h('h'+this.level,{name: 123123},'hello world');
    //     },
    //     template:`
    //         <h1 name="123123" v-if="level === 1"><slot /></h1>
    //         <h2 v-if="level === 2"><slot /></h2>
    //         <h3 v-if="level === 3"><slot /></h3>
    //     `
    // })

    const vm = app.mount('#root');
解释:h(标签类型,属性对象,插槽) 它也可以嵌套
h('h'+this.level,{},[this.$slots.default(),h('h4',{},'huhu')])
插件Plugin
// plugin 插件 把通用功能封装起来
    const myPlugin={
        install(app,options){
            console.log(app,options);
            app.provide('name','Dell Lee');
            app.directive('focus',{
                mounted(el){
                    el.focus();
                }
            });
            app.mixin({
                mounted(){
                    console.log('mixin');
                }
            });
            app.config.globalProperties.$sayHello='hello world';
        }
    }

    const app = Vue.createApp({
        template: `
            <my-title />
          `
    });

    app.component('my-title',{
        inject:['name'],
        mounted(){
            console.log(this.$sayHello);
        },
        template:`
            <div>{{name}} <input v-focus/></div>
        `
    });

    app.use(myPlugin,{name:'jessica'})
const vm = app.mount('#root');mixin打印2次是因为2个组件一旦挂载成功就会执行(注意:先子组件后父组件 mixin里生命周期函数优先级高于组件里优先级(并不会覆盖,只是先后顺序问题))


对数据做校验的插件(有bug默认值没有校验)
const app = Vue.createApp({
        data() {
            return {
                name: 'dell',
                age: 28
            }
        },
        rules: {
            age: {
                validate: age => age > 25,
                message: 'too young,to simple'
            },
            name: {
                validate: name => name.length >= 4,
                message: 'name too short'
            }
        },
        template: `
            <div>name:{{name}},age:{{age}}</div>
          `
    });

    const validatePlugin = (app, options) => {
        app.mixin({
            created() {
                //console.log('mixin ready');//表示当组件初始化差不多结束的时候才执行
                for (let key in this.$options.rules) {
                    const item = this.$options.rules[key];//获取key:age里面的值
                    this.$watch(key, (value) => {
                        const result = item.validate(value);
                        if (!result) console.log(item.message);
                    });
                }
            }
        })
    };

    app.use(validatePlugin);
    const vm = app.mount('#root');
默认值比如年龄23,没有进行校验,还没想出解决方案
CompositionAPI使用
setup(props,context)作用方式:在实例被完全初始化之前执行的函数
const app = Vue.createApp({
        template: `
            <div @click="handleClick">{{name}}</div>
        `,
        methods:{
            test(){
                console.log(this.$options.setup());
            }
        },
        mounted(){
            this.test();
        },
        // 实例被完全初始化之前执行的函数
        setup(props,context){
            return{
                name:'dell',
                handleClick:()=>{
                    alert(123)
                }
            }
        }
    });

const vm = app.mount('#root');解释说明:在setup方法里无法调用外部的方法,模板和生命周期函数,而在外部这些实例的方法或生命周期函数能直接调用setup方法,原因是setup方法执行的时候这个实例并没有被创建并没有完成初始化压根不存在this 拿不到app实例,但是在app实例创建好之后呢 这个setup已经被挂载到app实例上,所以当你有这个实例时候,你在这个实例一定可以获取到setup方法
ref和reactive响应式的引用
原理:通过proxy对数据进行封装,当数据变化时,触发模板等内容的更新
ref处理基础类型的数据,如:字符串,数字(都封装成对象形式,自动调用对象.value显示)
reactive处理非基础类型的数据,如:数组,对象(都封装成原来的样子显示)
Vue在对模板处理的时候会进行转化,当他知道返回的name是一个响应式引用,底层会自动帮我们调用name.value,因此我们只需要写{{name}}就可以显示
const app = Vue.createApp({
        template: `
            <div>{{arr[0]}}</div>
        `,

        //<div>{{name}}</div> 基本类型写法
        //<div>{{nameObj.name}}</div> 对象类型写法

        // 实例被完全初始化之前执行的函数
        // setup(props, context) {
        //     const {ref}=Vue;
        //     // proxy,'dell' 变成 proxy({value:'dell'}) 这样的一个响应式引用
        //     let name = ref('dell');
        //     // 设置延时器
        //     setTimeout(() => {
        //         name.value = 'lee'
        //     }, 2000);
        //     return { name }
        // }

        // setup(props, context) {
        //     const {reactive}=Vue;
        //     // proxy,{name:'zhangsan'} 变成 proxy({name:'zhangsan'}) 这样的一个响应式引用
        //     let nameObj = reactive({name:'zhangsan'});
        //     // 设置延时器
        //     setTimeout(() => {
        //         nameObj.name='lisi'
        //     }, 2000);
        //     return { nameObj }
        // }

        setup(props, context) {
            const { reactive } = Vue;
            let arr = reactive([123]);
            // 设置延时器
            setTimeout(() => {
                arr[0] = 456
            }, 2000);
            return { arr }
        }
    });

    const vm = app.mount('#root');
2s后就变成lisi了
readonly只读不可修改会发生报警
const app = Vue.createApp({
        template: `
        <div>{{nameObj[0]}}</div>
        `,

        setup(props, context) {
            const { reactive,readonly } = Vue;
            let nameObj = reactive([123]);
            let copyNameObj=readonly(nameObj);
            // 设置延时器
            setTimeout(() => {
                nameObj[0] = 456,
                copyNameObj[0]=456
            }, 2000);
            return { nameObj,copyNameObj }
        }
    });

    const vm = app.mount('#root');
toRefs使用
const app = Vue.createApp({
        template: `
        <div>{{name}} {{age}}</div>
        `,

        setup(props, context) {
            const { reactive,readonly,toRefs } = Vue;
            let nameObj = reactive({name:'dell',age:28});
            // 设置延时器
            setTimeout(() => {
                nameObj.name='lee',
                nameObj.age=24
            }, 2000);
            // toRefs proxy({name:'dell',age:28}),
            //{
            // name:proxy({value:'dell'}),
            // age:proxy({value:24})
            //}
            const {name,age}=toRefs(nameObj);
            return { name,age }
        }
    });

    const vm = app.mount('#root');
记住: 创建reactive对象直接解构的话不能在模板上直接使用的,它不具备响应式,想具备响应式必须调用toRefs做一个转化,再做解构,在模板上就可以响应显示了
toRef使用
如果一个对象上本来没有其属性,但是后面你又想给其添加属性,就可以使用toRef(不建议使用)
// toRef,context
    const app = Vue.createApp({
        template: `
        <div>{{age}}</div>
        `,

        setup(props, context) {
            const { reactive,toRef } = Vue;
            // 推荐注释起来的使用,下面只是为了演示
            // const data=reactive({name:'dell',age:''});
            const data=reactive({name:'dell'});
            const age=toRef(data,'age');
            setTimeout(()=>{
                age.value='28'
            },2000);
            return {age}
        }
    });

    const vm = app.mount('#root');
context使用
emit传统使用
const app = Vue.createApp({
        methods: {
            handleChange() {
                alert('change')
            }
        },
        template: `
            <child @change="handleChange">parent</child>
        `,
    });

    app.component('child', {
        mounted(){
            this.$emit('change');
        },
        setup(props,context){
            const {h}=Vue;
            const {attrs,slots,emit}=context;
            return ()=> h('div',{},slots.default());
        }
    })

    const vm = app.mount('#root');
结果:先弹出窗口,再显示parent
emit使用CompositionAPI
const app = Vue.createApp({
        methods: {
            handleChange() {
                alert('change')
            }
        },
        template: `
            <child @change="handleChange"></child>
        `,
    });

    app.component('child', {
        template:`
            <div @click="handleClick">123123</div>
        `,
        setup(props,context){
            const {attrs,slots,emit}=context;
            function handleClick(){
                emit('change');
            }
            return {handleClick};
        }
    })

    const vm = app.mount('#root');
结果:先显示123123,然后点击弹出窗口
attrs
const app = Vue.createApp({
        template: `
            <child app="app"></child>
        `,
    });

    app.component('child', {
        template:`
            <div>child</div>
        `,
        setup(props,context){
            const {attrs,slots,emit}=context;
            console.log(attrs.app);//app
            return {};
        }
    })

    const vm = app.mount('#root');
slots
const app = Vue.createApp({
        template: `
            <child>parent</child>
        `,
    });

    app.component('child', {
        mounted(){
            console.log(this.$slots);
        },
        setup(props,context){
            const {h}=Vue;
            const {attrs,slots,emit}=context;
            //console.log(slots);
            return ()=>h('div',{},slots.default());
        }
    })

    const vm = app.mount('#root');
实例输入添加到list显示
// 关于list 操作的内容进行了封装
    const listRelativeEffect = () => {
        const { reactive } = Vue;
        const list = reactive([]);
        const addItemToList = (item) => {
            list.push(item);
        }
        return {
            list,
            addItemToList
        }
    }

    // 关于 inputValue 操作的内容进行封装
    const inputRelativeEffect = () => {
        const { ref } = Vue;
        const inputValue = ref('');
        const handleInputValueChange = (e) => {
            inputValue.value = e.target.value;
        }
        return {
            inputValue,
            handleInputValueChange
        };
    }

    const app = Vue.createApp({
        setup() {
            const {list,addItemToList}=listRelativeEffect();
            const {inputValue,handleInputValueChange}=inputRelativeEffect();
            return{
                list,addItemToList,
                inputValue,handleInputValueChange
            }
        },
        template: `
            <div>
                <div>
                    <input :value="inputValue" @input="handleInputValueChange"  />
                    <button @click="addItemToList(inputValue)">提交</button>
                </div>
                <ul>
                    <li v-for="(item,index) in list" :key="index">{{item}}</li>
                </ul>
            </div>
        `
    });

    const vm = app.mount('#root');
computed属性
// computed计算属性
    const app = Vue.createApp({
        setup() {
            const {reactive,computed}=Vue;
            const countObj=reactive({count:0});
            const handleClick=()=>{
                countObj.count+=1;
            };
            let countAddFive=computed({
                get:()=>{
                    return countObj.count+5;
                },
                set:(param)=>{
                    countObj.count=param-5;
                }
            });
            setTimeout(()=>{
                countAddFive.value=100;
            },3000);
            return {countObj,countAddFive,handleClick};
        },
        template: `
            <div>
                <span @click="handleClick">{{countObj.count}}</span> --{{countAddFive}}
            </div>
        `
    });

    const vm = app.mount('#root');
watch监听
使用ref时,watch(对象,()=>{}),而使用reactive时,watch([()=>对象],([])=>{}) 注意:当只有一个对象数组可以去掉
// watch 监听
    const app = Vue.createApp({
        setup() {
            const {ref,watch} =Vue;
            const name=ref('dell');
            // 具备一定的惰性 lazy
            // 参数可以拿到原始和当前值
            // 可以侦听多个数据的变化,用一个侦听器承载
            watch(name,(currentValue,prevValue)=>{
                console.log(currentValue,prevValue);
            })
            return {name};
        },
        template: `
        <div>
            <div>
                 Name:<input v-model="name"/>
            </div>
            <div>
                 Name is {{name}}
            </div>
        </div>

        `
    });

const vm = app.mount('#root');![]()
// watch 监听
    const app = Vue.createApp({
        setup() {
            const {reactive,watch,toRefs} =Vue;
            const nameObj=reactive({
                name:'张三',
                englishName:'zhangsan'
            });
            // 具备一定的惰性 lazy
            // 参数可以拿到原始和当前值
            // 可以侦听多个数据的变化,用一个侦听器承载
            watch([()=>nameObj.name,()=>nameObj.englishName],([curName,curEng],[prevName,prevEng])=>{
                console.log('中文名:'+curName,prevName+',英文名:'+curEng,prevEng);
            });
            const {name,englishName}=toRefs(nameObj);
            return {name,englishName};
        },
        template: `
        <div>
            <div>
                 Name:<input v-model="name"/>
            </div>
            <div>
                 Name is {{name}}
            </div>
            <div>
                 engName:<input v-model="englishName"/>
            </div>
            <div>
                engName is {{englishName}}
            </div>
        </div>
        `
    });

    const vm = app.mount('#root');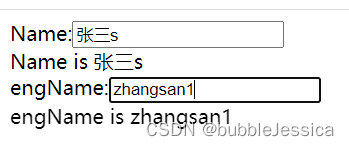

watchEffect监听器
// watchEffect 监听
    const app = Vue.createApp({
        setup() {
            const {reactive,watchEffect,toRefs} =Vue;
            const nameObj=reactive({
                name:'张三',
                englishName:'zhangsan'
            });

            // 立即执行,没有惰性
            // 不需要传递你要侦听的内容,自动会感知代码依赖
            // 不需要传递很多参数,只需要一个回调函数
            // 不能获取之前数据的值
            const stop=watchEffect(()=>{
                console.log(nameObj.name);
                console.log(nameObj.englishName);
                setTimeout(()=>{
                    stop();
                },5000);
            });
            const {name,englishName}=toRefs(nameObj);
            return {name,englishName};
        },
        template: `
        <div>
            <div>
                 Name:<input v-model="name"/>
            </div>
            <div>
                 Name is {{name}}
            </div>
            <div>
                 engName:<input v-model="englishName"/>
            </div>
            <div>
                engName is {{englishName}}
            </div>
        </div>
        `
    });

    const vm = app.mount('#root');
如果你监听的内容没依赖代码的变化,那么该监听器只会立即执行一次,而watch监听器本身是惰性,想要改变也可以,只需要增加第三个参数{immediate:true}
CompositionAPI生命周期函数
mounted(){}:// dom结构挂载完成之后打印出来
特别注意:CompositionAPI里面没有beforeCreate,created,因为setup()执行时间点在beforeCreate和created两者之间,但是,CompositionAPI却增加了onRenderTracked(页面渲染时,每次都会收集响应式依赖就会自动执行)onRenderTriggered(页面渲染时,每次都会收集响应式依赖第一次渲染不会打印)
const app = Vue.createApp({
        // 特别注意:CompositionAPI里面没有beforeCreate,created
        // beforeMount => onBeforeMount
        // mounted => onMounted
        setup() {
            const {
                ref,onBeforeMount,onMounted,onBeforeUpdate,onUpdated,
                onBeforeUnmount,onUnmounted,onRenderTracked,onRenderTriggered
            }=Vue;
            const name=ref('dell');
            onBeforeMount(()=>{
                console.log('onBeforeMount');
            });
            onMounted(()=>{
                console.log('onMounted');
            });
            onBeforeUpdate(()=>{
                console.log('onBeforeUpdate');
            });
            onUpdated(()=>{
                console.log('onUpdated');
            });
            onRenderTracked(()=>{
                console.log('onRenderTracked');
            });
            onRenderTriggered(()=>{
                console.log('onRenderTriggered');
            });
            const handleClick=()=>{
                name.value='lee';
            };
            return {name,handleClick};
        },
        template: `
        <div @click="handleClick">
           {{name}}
        </div>
        `
    });

const vm = app.mount('#root'); 
单向数据流(子组件不能改变父组件传递过来的数据)
// 单向数据流
    const app = Vue.createApp({
        setup() {
            const {provide,ref,readonly}=Vue;
            const name=ref('dell')
            provide('name',readonly(name));
            provide('changeName',(value)=>{
                name.value=value;
            })
            return {};
        },
        template: `
        <div>
           <child />
        </div>
        `
    });

    app.component('child',{
        setup(){
            const {inject}=Vue;
            // inject('name','hello') 给name默认值hello
            const name=inject('name');
            const changeName=inject('changeName');
            const handleClick=()=>{
                // 因为父组件设置了readonly可以有效限制了 子组件进行数据变化
                // name.value='jessica';
                changeName('lee');
            };
            return {name,handleClick};
        },
        template:`
            <div @click="handleClick">{{name}}</div>
        `
    })

    const vm = app.mount('#root');
获取模板dom元素的节点
const app=Vue.createApp({
        setup(){
            const { ref,onMounted }=Vue;
            const hello=ref(null);
            onMounted(()=>{
                console.log(hello.value);
            })
            return {hello};
        },
        template:`
            <div ref="hello">hello world</div>
        `
    });

    const vm = app.mount('#root');
结论:CompositionAPI的语法下,获取真实的DOM元素节点