1. 源码跟踪
1.简单描述
在SpringBoot2.0.9之前需要手动自定义线程池(如下2.1), 然后指定线程池的名称
SpringBoot2.0.9以及之前的版本,使用的线程池默认是SimpleAsyncTaskExcutor, , 之后的版本使用的是ThreadpoolTaskExecutor
并且不需要手动的创建当前线程池(但往往我们还是会手动指定,具体原因看源码就可以自有判断⚜️ ).
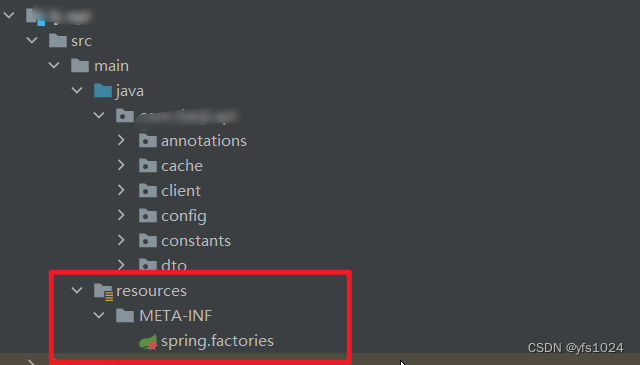
SpringBoot会自动的扫描两个文件下的配置信息:
所以如果我们写的配置类想让SpringBoot自动扫描到就可以放到两个中的任意一个
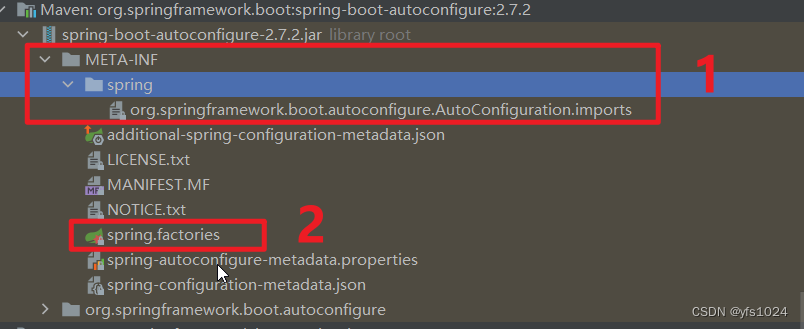
我们项目中就是这样使用的:在 spring.factories文件中指定一些配置类相对路径,这样配置类中的指定的Bean就可以放入到IOC容器中了
SpringBoot在org.springframework.boot.autoconfigure.AutoConfiguration.imports118行配置了TaskExecutionAutoConfiguration的位置,这样SpringBoot就可以扫描到当前配置类
![[外链图片转存失败,源站可能有防盗链机制,建议将图片保存下来直接上传(img-sOUosu98-1685781636628)(C:\Users\57589\AppData\Roaming\Typora\typora-user-images\image-20230603155549533.png)]](https://img-blog.csdnimg.cn/f47ec573e4e545c6b2f0abd90fb25948.png)
2. TaskExecutionAutoConfiguration
配置类信息如下
@ConditionalOnClass({ThreadPoolTaskExecutor.class})   // 代表如果容器中有这个类,就不在创建
@AutoConfiguration
@EnableConfigurationProperties({TaskExecutionProperties.class})  // 配置文件
public class TaskExecutionAutoConfiguration {
    // 应用程序任务执行器任务名称 applicationTaskExecutor
    public static final String APPLICATION_TASK_EXECUTOR_BEAN_NAME = "applicationTaskExecutor";

    public TaskExecutionAutoConfiguration() {
    }

    @Bean
    @ConditionalOnMissingBean
    public TaskExecutorBuilder taskExecutorBuilder(TaskExecutionProperties properties, ObjectProvider<TaskExecutorCustomizer> taskExecutorCustomizers, ObjectProvider<TaskDecorator> taskDecorator) {
        Pool pool = properties.getPool();
        TaskExecutorBuilder builder = new TaskExecutorBuilder();
        builder = builder.queueCapacity(pool.getQueueCapacity());
        builder = builder.corePoolSize(pool.getCoreSize());
        builder = builder.maxPoolSize(pool.getMaxSize());
        builder = builder.allowCoreThreadTimeOut(pool.isAllowCoreThreadTimeout());
        builder = builder.keepAlive(pool.getKeepAlive());
        Shutdown shutdown = properties.getShutdown();
        builder = builder.awaitTermination(shutdown.isAwaitTermination());
        builder = builder.awaitTerminationPeriod(shutdown.getAwaitTerminationPeriod());
        builder = builder.threadNamePrefix(properties.getThreadNamePrefix());
        Stream var10001 = taskExecutorCustomizers.orderedStream();
        var10001.getClass();
        builder = builder.customizers(var10001::iterator);
        builder = builder.taskDecorator((TaskDecorator)taskDecorator.getIfUnique());
        return builder;
    }

    @Lazy
    @Bean(
        name = {"applicationTaskExecutor", "taskExecutor"}
    )
    @ConditionalOnMissingBean({Executor.class})
    public ThreadPoolTaskExecutor applicationTaskExecutor(TaskExecutorBuilder builder) {
        return builder.build();
    }
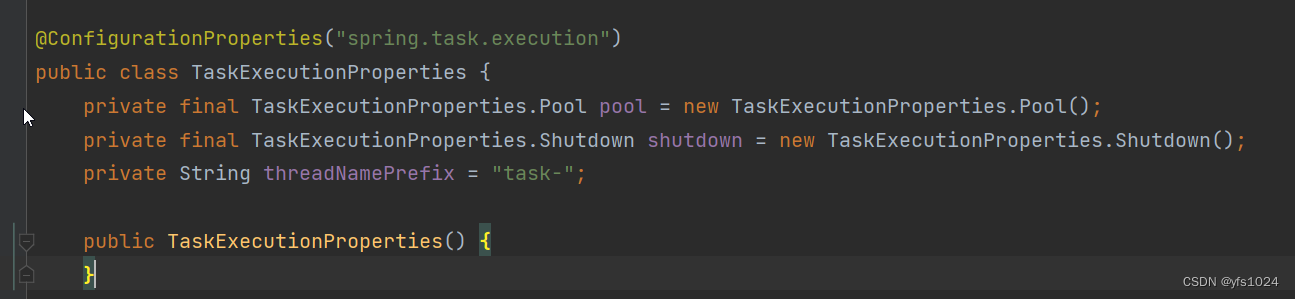
3. TaskExecutionProperties
配置文件中
定义了线程名 task -
4. ThreadPoolTaskExecutor
public class ThreadPoolTaskExecutor extends ExecutorConfigurationSupport
		implements AsyncListenableTaskExecutor, SchedulingTaskExecutor {

	private final Object poolSizeMonitor = new Object();

	private int corePoolSize = 1;

	private int maxPoolSize = Integer.MAX_VALUE;

	private int keepAliveSeconds = 60;

	private int queueCapacity = Integer.MAX_VALUE;

	private boolean allowCoreThreadTimeOut = false;

	private boolean prestartAllCoreThreads = false;

	//       ......  ......................省略
	// 创建代码
	@Override
	protected ExecutorService initializeExecutor(
			ThreadFactory threadFactory, RejectedExecutionHandler rejectedExecutionHandler) {

		BlockingQueue<Runnable> queue = createQueue(this.queueCapacity);

		ThreadPoolExecutor executor;
		if (this.taskDecorator != null) {
            // 还是 new ThreadPoolExecutor
			executor = new ThreadPoolExecutor(
					this.corePoolSize, this.maxPoolSize, this.keepAliveSeconds, TimeUnit.SECONDS,
					queue, threadFactory, rejectedExecutionHandler) {
				@Override
				public void execute(Runnable command) {
					Runnable decorated = taskDecorator.decorate(command);
					if (decorated != command) {
						decoratedTaskMap.put(decorated, command);
					}
					super.execute(decorated);
				}
			};
		}
		else {
			executor = new ThreadPoolExecutor(
					this.corePoolSize, this.maxPoolSize, this.keepAliveSeconds, TimeUnit.SECONDS,
					queue, threadFactory, rejectedExecutionHandler);
		}

		if (this.allowCoreThreadTimeOut) {
			executor.allowCoreThreadTimeOut(true);
		}
		if (this.prestartAllCoreThreads) {
			executor.prestartAllCoreThreads();
		}

		this.threadPoolExecutor = executor;
		return executor;
	}
测试代码:
// 注入
@Autowired
private ThreadPoolTaskExecutor executor;

@Test
public void testThreadPool(){
    System.out.println(executor);
    System.out.println("默认前缀:"+executor.getThreadNamePrefix());
    System.out.println("默认核心线程数:"+executor.getCorePoolSize());
    System.out.println("默认最大线程数:"+executor.getMaxPoolSize());
    System.out.println("当前活跃线程数:"+executor.getActiveCount());
    System.out.println("临时线程空闲时间:"+executor.getKeepAliveSeconds());
    System.out.println("队列最大值:"+executor.getQueueCapacity());
    System.out.println("队列数量:"+executor.getQueueSize());
}
结果如下:
org.springframework.scheduling.concurrent.ThreadPoolTaskExecutor@7410c197
默认前缀:task-
默认核心线程数:8
默认最大线程数:2147483647
当前活跃线程数:0
临时线程空闲时间:60
队列最大值:2147483647
队列数量:0
我们可以看到SpringBoot中默认配置的线程池的数量, 很不符合我们的实际要求, 而且还容易发生OOM(Out Of Memory)
所以我们一般是手动指定线程池中的信息
2. SpringBoot异步执行方法
1.定义一个配置类
SpringBoot底层对手动注入的Bean采用的名称如果不在@Bean注解后面指定默认采用的是方法名
即: 这里的
generateExchangeCodeExecutor
@Slf4j
@Configuration
public class PromotionConfig {

    @Bean
    public Executor generateExchangeCodeExecutor(){
        ThreadPoolTaskExecutor executor = new ThreadPoolTaskExecutor();
        // 1.核心线程池大小
        executor.setCorePoolSize(2);
        // 2.最大线程池大小
        executor.setMaxPoolSize(5);
        // 3.队列大小
        executor.setQueueCapacity(200);
        // 4.线程名称
        executor.setThreadNamePrefix("exchange-code-handler-");
        // 5.拒绝策略
        executor.setRejectedExecutionHandler(new ThreadPoolExecutor.CallerRunsPolicy());
        executor.initialize();
        return executor;
    }
}
2. 在启动类上添加注解
@EnableAsync
3. 在想要异步执行的方法上添加 @Async()注解
并指定ThreadPoolTaskExecutor 执行器的名称
    @Override
    @Async("generateExchangeCodeExecutor")
    public void asyncGenerateCode(Coupon coupon) {
    		......
    }


![[图表]pyecharts模块-柱状图](https://img-blog.csdnimg.cn/d89a258102674921aff18e286628f6ca.png#pic_center)