目录
一、传统程序开发与控制反转🍭
1、传统程序开发🍉
传统程序开发的缺陷🍓
解决传统开发中的缺陷🍓
2、控制反转思维程序开发🍉
3 对比总结规律🍉
二、Spring创建与使用🍭
1、创建Spring🍉
Ⅰ、创建Maven项目🍓
Ⅱ、添加Spring框架支持🍓
Ⅲ、添加启动类🍓
注意:maven 项目下载 jar 失败的解决方案🍉
Ⅰ、配置好国内的Maven源🍓
配置国内源🍓
Ⅱ、重新下载jar包🍓
Ⅲ、其他问题🍓
2.存储 Bean 对象🍉
Ⅰ、创建Bean🍓
Ⅱ、将 Bean 注册到容器🍓
3.获取并使用Bean 对象🍉
Ⅰ、获取Spring对象🍓
多学一招:ApplicationContext与BeanFactory(常见面试题)
Ⅱ、获取指定的 Bean 对象🍓
Ⅲ、使用Bean对象🍓
多学一招:getBean 方法的更多用法🍉
Ⅰ、根据类型获取 Bean:🍓
Ⅱ、根据名称 + 类型获取 Bean 🍓
两种方法的区别🍓
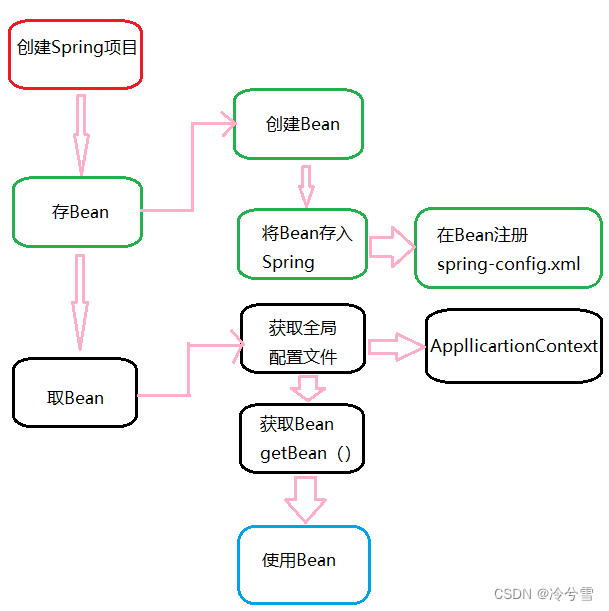
操作流程图
Spring_冷兮雪的博客-CSDN博客
上期我们讲解了Spring是什么及Spring的核心特点,其中重点讲解了控制反转(IoC)和依赖注入(DI),下面我们通过示例代码来去更深刻了解这其中的含义。
一、传统程序开发与控制反转🍭
1、传统程序开发🍉
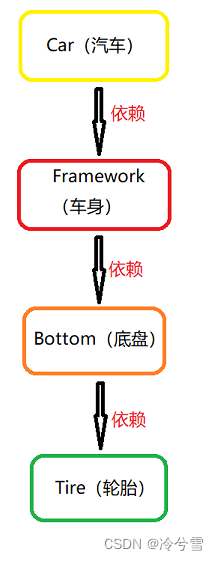
public class NewCarExample {
    public static void main(String[] args) {
        Car car = new Car();
        car.init();
    }

    /**
     * 汽⻋对象
     */
    static class Car {
        public void init() {
            // 依赖⻋身
            Framework framework = new Framework();
            framework.init();
        }
    }

    /**
     * ⻋身类
     */
    static class Framework {
        public void init() {
            // 依赖底盘
            Bottom bottom = new Bottom();
            bottom.init();
        }
    }

    /**
     * 底盘类
     */
    static class Bottom {
        public void init() {
            // 依赖轮胎
            Tire tire = new Tire();
            tire.init();
        }
    }

    /**
     * 轮胎类
     */
    static class Tire {
        public void init() {
            // 尺⼨
            int size = 30;
            System.out.println("轮胎尺⼨:" + size);
        }
    }
}
传统程序开发的缺陷🍓
public class NewCarUpdateExample {
    public static void main(String[] args) {
        Car car = new Car(20);
        car.run();
    }
    /**
     * 汽⻋对象
     */
    static class Car {
        private Framework framework;
        public Car(int size) {
            framework = new Framework(size);
        }
        public void run() {
            // 依赖⻋身
            framework.init();
        }
    }
    /**
     * ⻋身类
     */
    static class Framework {
        private Bottom bottom;
        public Framework(int size) {
            bottom = new Bottom(size);
        }
        public void init() {
            // 依赖底盘
            bottom.init();
        }
    }
    /**
     * 底盘类
     */
    static class Bottom {
        private Tire tire;
        public Bottom(int size) {
            tire = new Tire(size);
        }
        public void init() {
            // 依赖轮胎
            tire.init();
        }
    }
    /**
     * 轮胎类
     */
    static class Tire {
        // 尺⼨
        private int size;
        public Tire(int size) {
            this.size = size;
        }
        public void init() {
            System.out.println("轮胎尺⼨:" + size);
        }
    }
}
解决传统开发中的缺陷🍓
PS:解耦指的是解决了代码的耦合性,耦合性也可以换⼀种叫法叫程序相关性。好的程序代码的耦合 性(代码之间的相关性)是很低的,也就是代码之间要实现解耦。
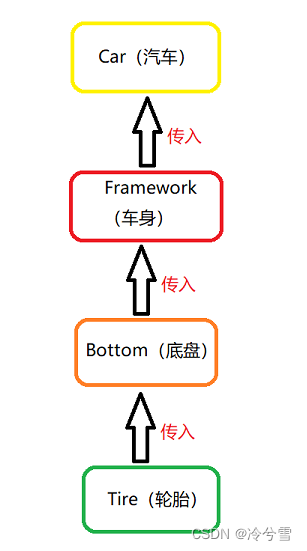
2、控制反转思维程序开发🍉
public class IocCarExample {
        public static void main(String[] args) {
            Tire tire = new Tire(20);
            Bottom bottom = new Bottom(tire);
            Framework framework = new Framework(bottom);
            Car car = new Car(framework);
            car.run();
        }
        static class Car {
            private Framework framework;
            public Car(Framework framework) {
                this.framework = framework;
            }
            public void run() {
                framework.init();
            }
        }
        static class Framework {
            private Bottom bottom;
            public Framework(Bottom bottom) {
                this.bottom = bottom;
            }
            public void init(){
                bottom.init();
            }
        }
    static class Bottom {
        private Tire tire;
        public Bottom(Tire tire) {
            this.tire = tire;
        }
        public void init() {
            tire.init();
        }
    }
    static class Tire {
        private int size;
        public Tire(int size) {
            this.size = size;
        }
        public void init() {
            System.out.println("轮胎:" + size);
        }
    }
}
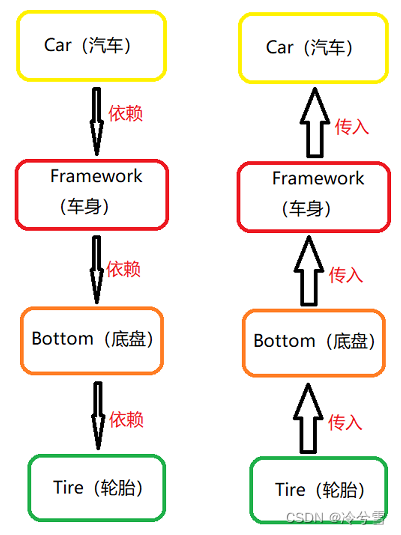
3 对比总结规律🍉
我们理解到了Spring的核心,下面我们来开始写第一个Spring代码。
二、Spring创建与使用🍭
1、创建Spring🍉
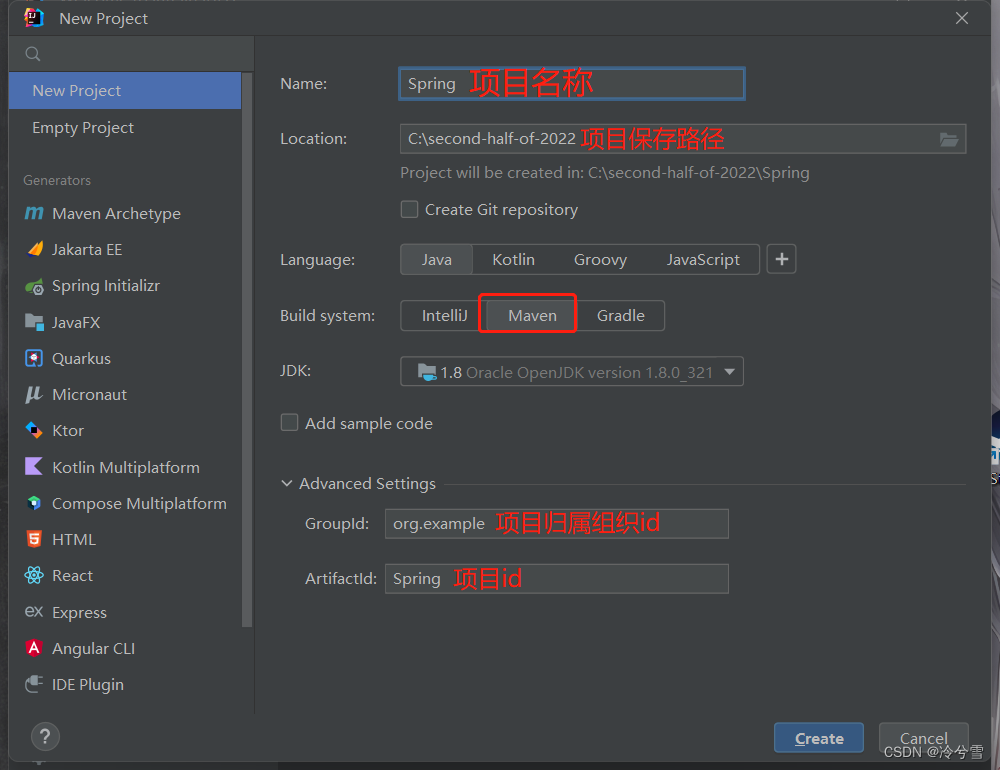
下面我们通过Maven ⽅式来创建⼀个 Spring 项⽬,具体可以分为三步:
- 创建⼀个普通 Maven 项⽬。
- 添加 Spring 框架支持(spring-context、spring-beans)。
- 创建一个普通类和main方法运行Spring框架。
Ⅰ、创建Maven项目🍓
Ⅱ、添加Spring框架支持🍓
创建好了之后,在pom.xml添加 Spring 框架支持
<dependencies>
        <dependency>
            <groupId>org.springframework</groupId>
            <artifactId>spring-context</artifactId>
            <version>5.2.3.RELEASE</version>
        </dependency>

        <dependency>
            <groupId>org.springframework</groupId>
            <artifactId>spring-beans</artifactId>
            <version>5.2.3.RELEASE</version>
        </dependency>
    </dependencies>
添加之后
<?xml version="1.0" encoding="UTF-8"?>
<project xmlns="http://maven.apache.org/POM/4.0.0"
         xmlns:xsi="http://www.w3.org/2001/XMLSchema-instance"
         xsi:schemaLocation="http://maven.apache.org/POM/4.0.0 http://maven.apache.org/xsd/maven-4.0.0.xsd">
    <modelVersion>4.0.0</modelVersion>

    <groupId>org.example</groupId>
    <artifactId>springdemo</artifactId>
    <version>1.0-SNAPSHOT</version>

    <properties>
        <maven.compiler.source>8</maven.compiler.source>
        <maven.compiler.target>8</maven.compiler.target>
    </properties>

    <dependencies>
        <dependency>
            <groupId>org.springframework</groupId>
            <artifactId>spring-context</artifactId>
            <version>5.2.3.RELEASE</version>
        </dependency>

        <dependency>
            <groupId>org.springframework</groupId>
            <artifactId>spring-beans</artifactId>
            <version>5.2.3.RELEASE</version>
        </dependency>
    </dependencies>
</project>
Ⅲ、添加启动类🍓
public class App {
    public static void main(String[] args) {

    }
}
注意:maven 项目下载 jar 失败的解决方案🍉
Ⅰ、配置好国内的Maven源🍓
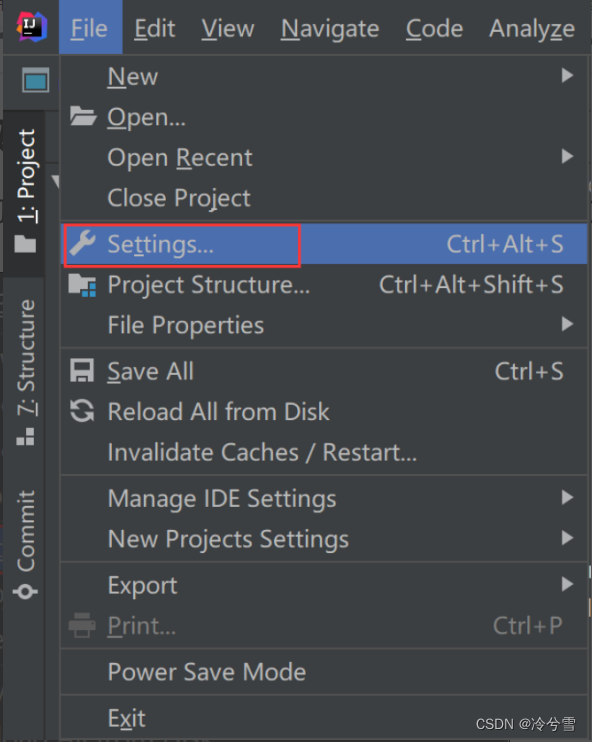
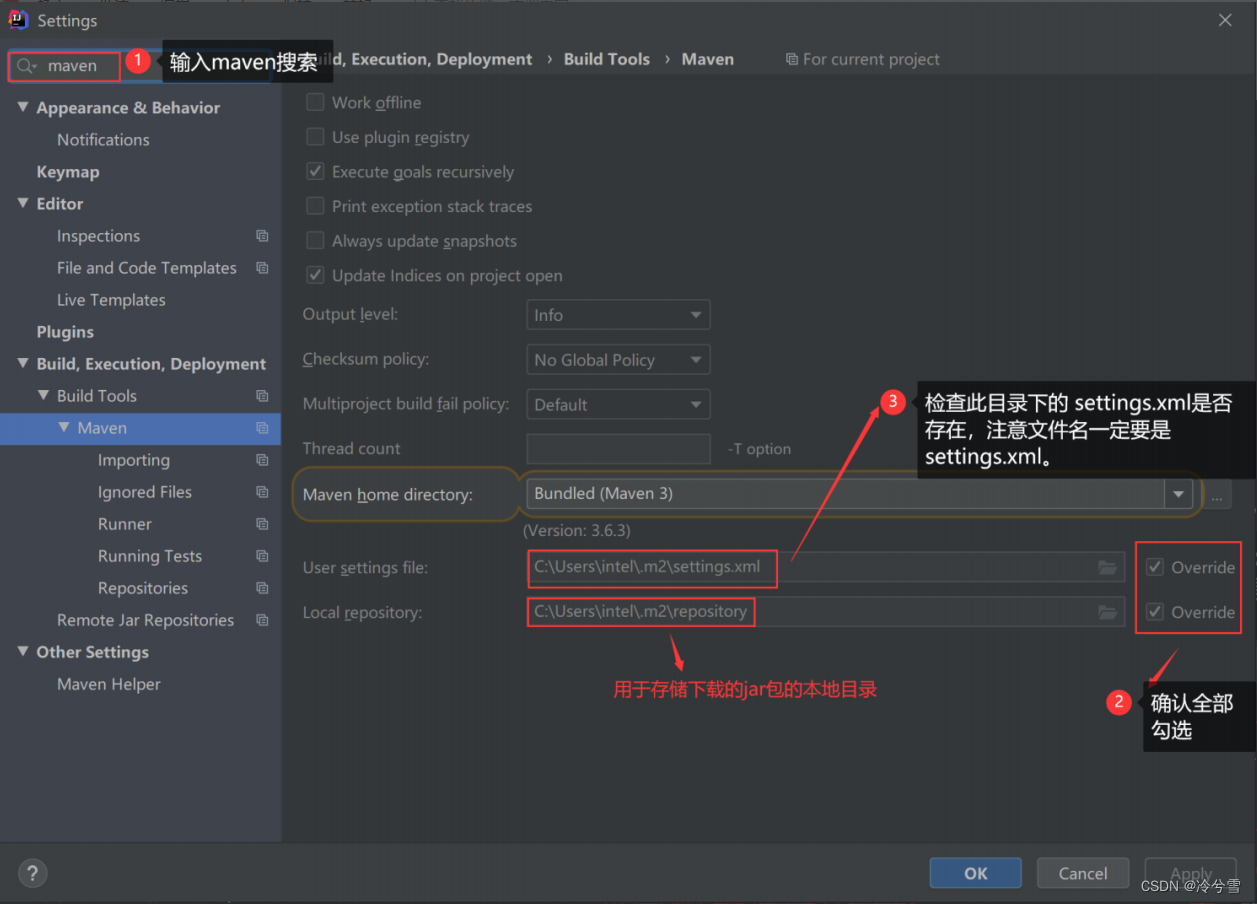
检查项⼀共有两个:
注意:两个路径中都不能出现中文!不能出现中文!不能出现中文!(重要的事说三遍)
配置国内源🍓
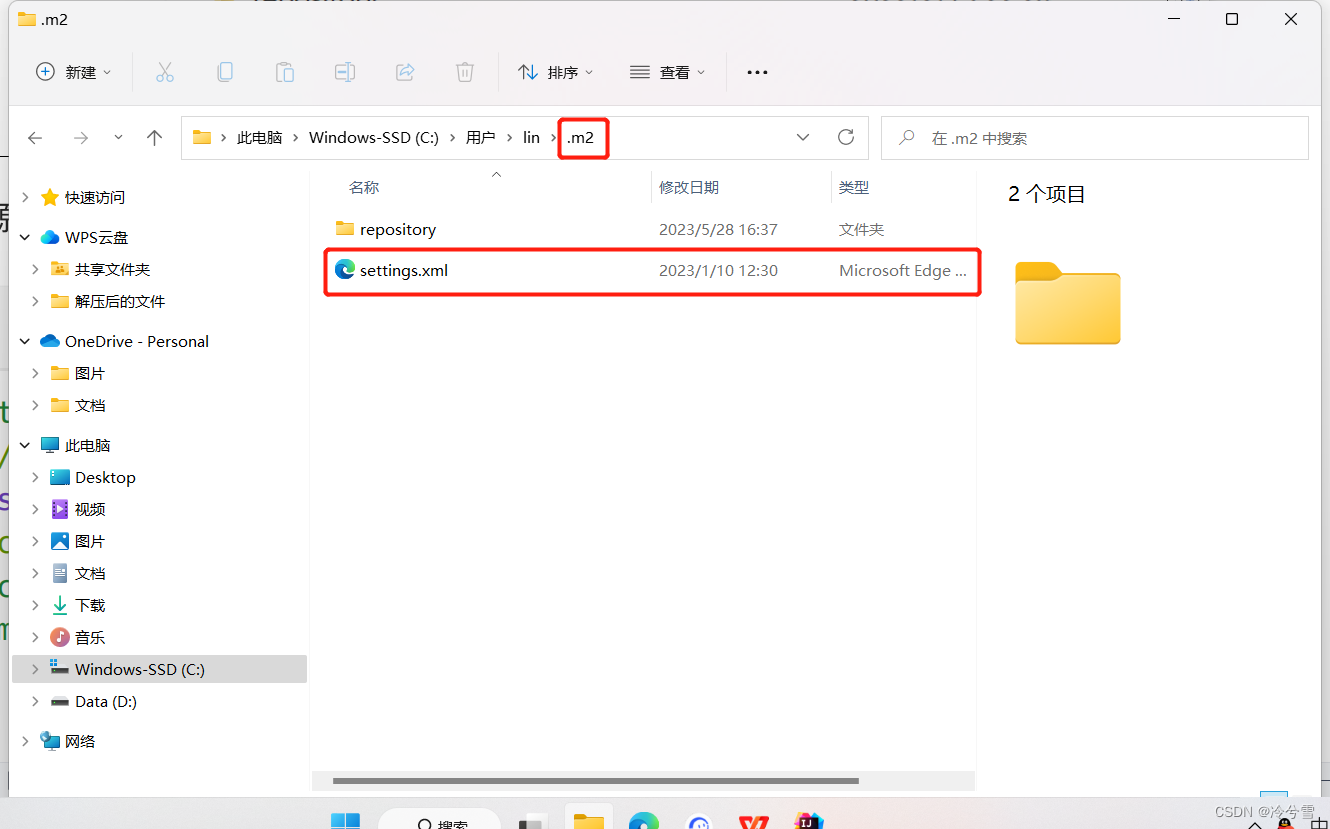
可以在Settings->搜索maven中 找到settings.xml ⽂件
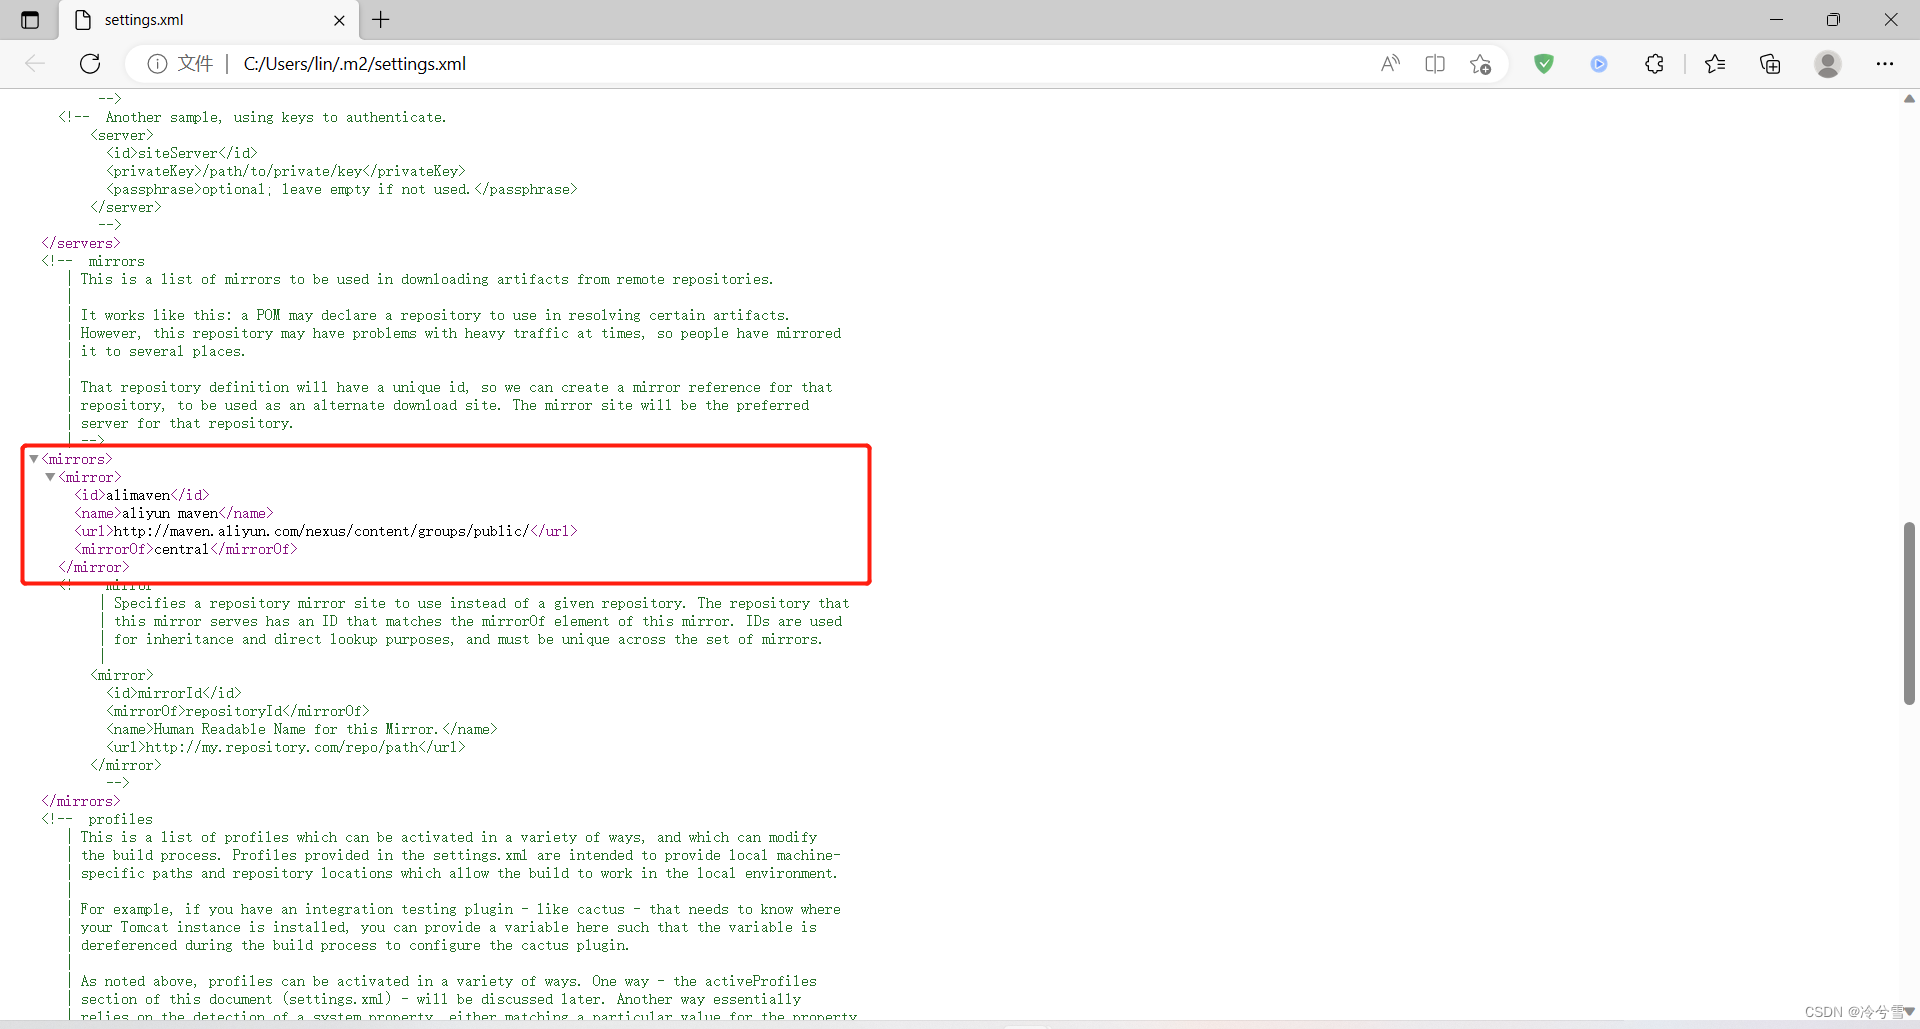
<settings xmlns="http://maven.apache.org/SETTINGS/1.1.0" xmlns:xsi="htt
p://www.w3.org/2001/XMLSchema-instance"
 xsi:schemaLocation="http://maven.apache.org/SETTINGS/1.1.0 http://maven.
apache.org/xsd/settings-1.1.0.xsd">
<localRepository>C:\Users\intel\.m2\repository</localRepository>
 <mirrors>
 <mirror>
 <id>alimaven</id>
 <name>aliyun maven</name>
 <url>http://maven.aliyun.com/nexus/content/groups/public/</url>
 <mirrorOf>central</mirrorOf>
 </mirror>
 </mirrors>
</settings>Ⅱ、重新下载jar包🍓
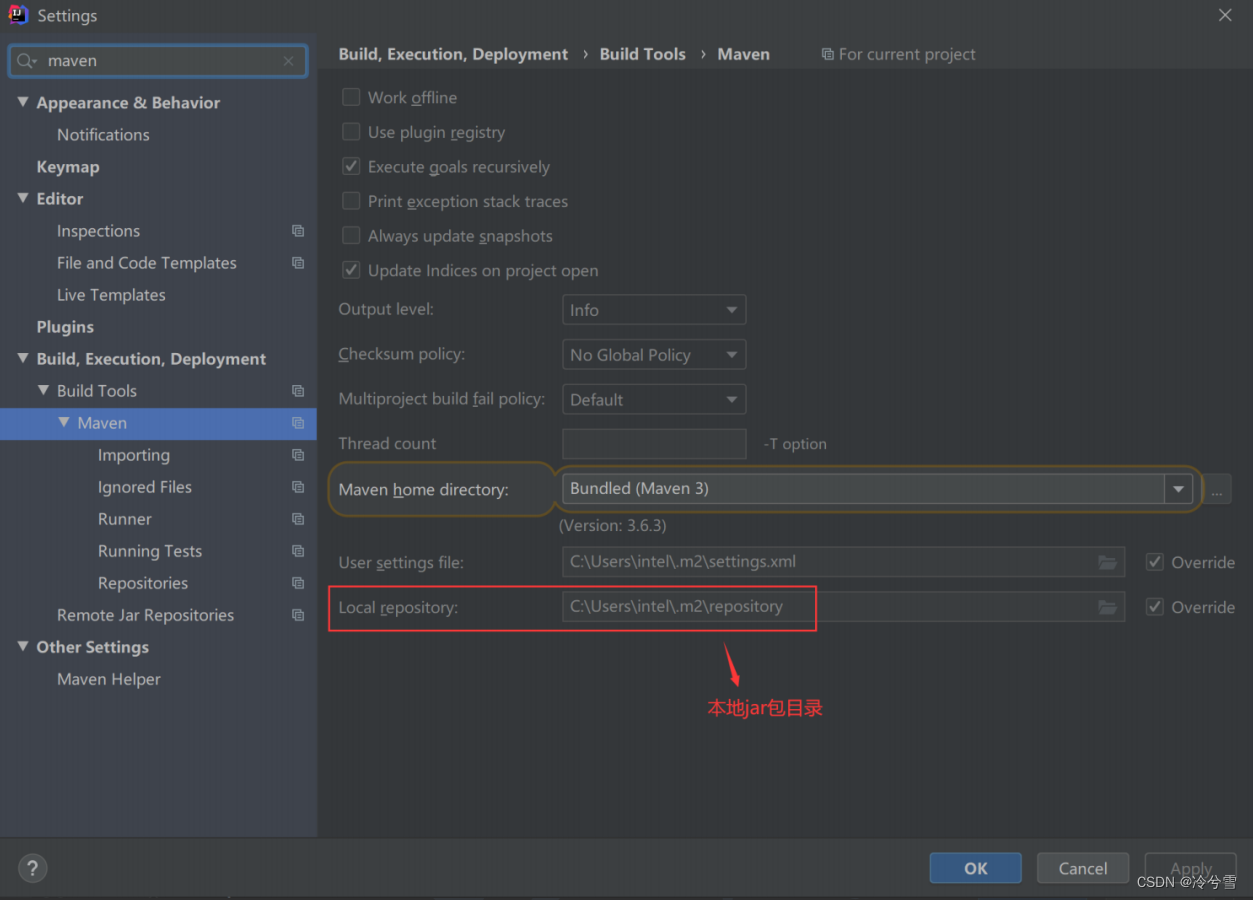
删除本地jar⽬录中的所有⽂件,切换到 Idea 中,重新下载 jar 包,如下图所示
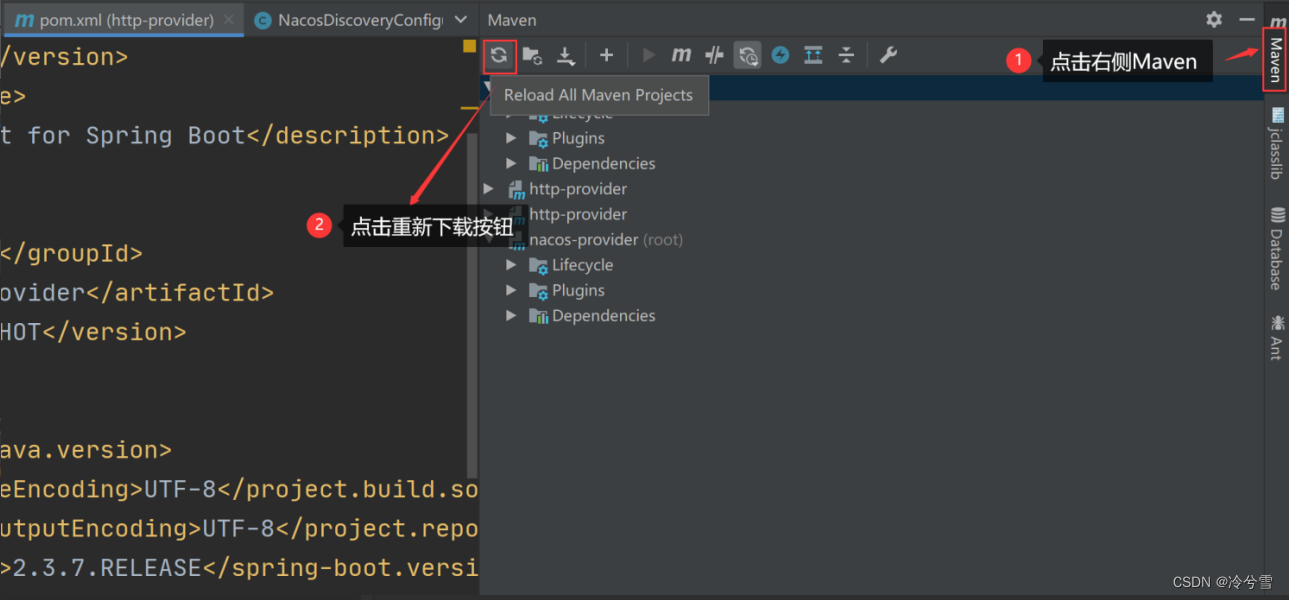
待下载完成,如果还是下载失败那就是本地网速问题,重复步骤 1 和步骤 2 直到下载成功!
Ⅲ、其他问题🍓
- 上⾯的步骤没看仔细,可能遗漏了其中一步;
- Maven 路径中出现中⽂:出现中⽂会 导致下载的jar 包,在项目中不能正常使用;
- 当前网络运营商有问题:当前所在区域连接的网络运营商(中国电信、移动..)连接数据源有问题,尝试更好网络,使用手机热点或朋友的手机热点尝试,如果还是不行,就等三四个小时之后再试。
2.存储 Bean 对象🍉
- 先创建⼀个 Bean。
- 将创建的 Bean 注册到 Spring 容器中。
Ⅰ、创建Bean🍓
public class User {
    public String sayHi(String name){
        return "hello"+name;
    }
}
Ⅱ、将 Bean 注册到容器🍓
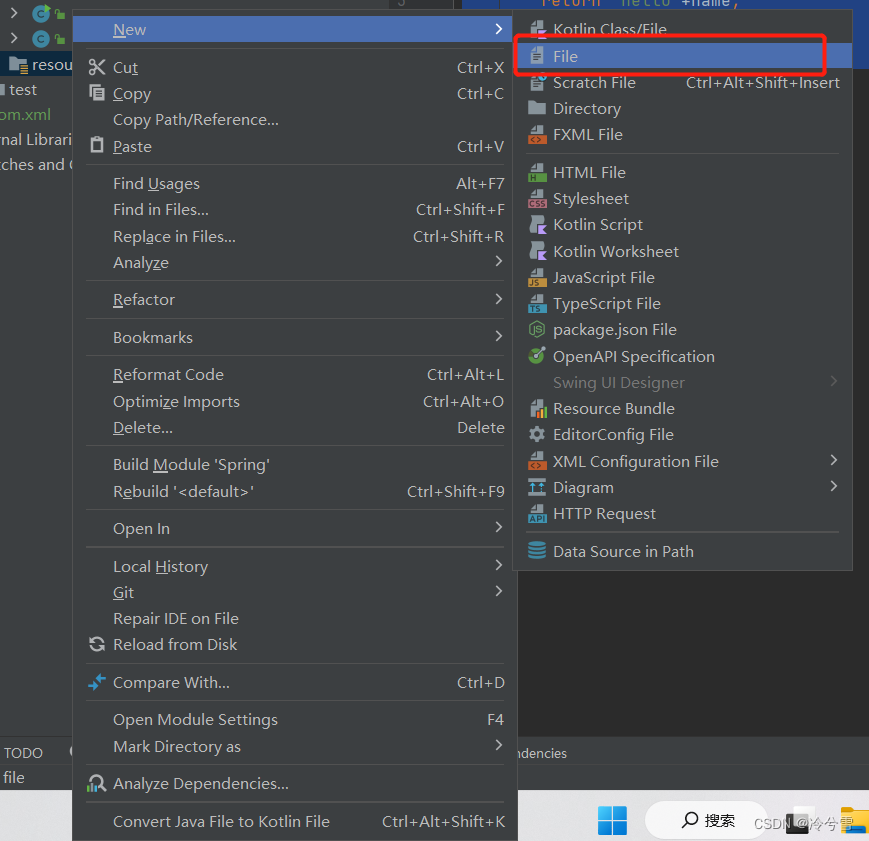
创建之后
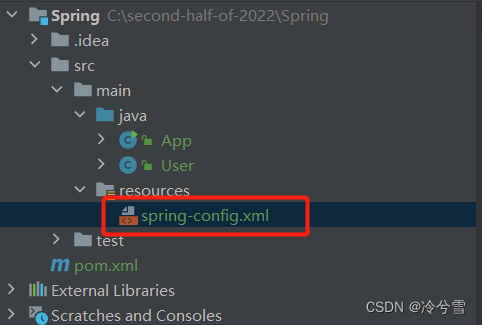
<?xml version="1.0" encoding="UTF-8"?>
<beans xmlns="http://www.springframework.org/schema/beans"
       xmlns:xsi="http://www.w3.org/2001/XMLSchema-instance"
       xsi:schemaLocation="http://www.springframework.org/schema/beans http://www.springframework.org/schema/beans/spring-beans.xsd">

</beans><bean id="user" class="User"></bean>
3.获取并使用Bean 对象🍉
- 得到 Spring 上下文对象,因为对象都交给 Spring 管理了,所以获取对象要从 Spring 中获取,那么就得先得到 Spring 的上下文。
- 通过Spring 上下文,获取某⼀个指定的 Bean 对象。
- 使用Bean 对象。
Ⅰ、获取Spring对象🍓
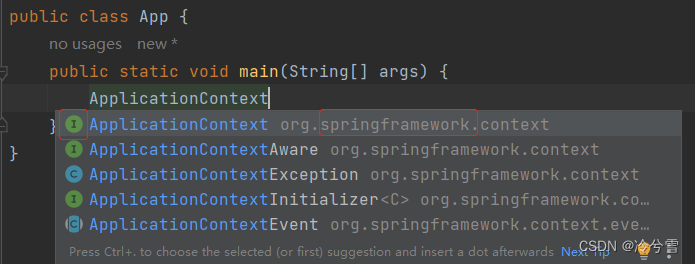
ApplicationContext:来自于Spring框架的接口。通过这个接口去获取Spring对象。

多学一招:ApplicationContext与BeanFactory(常见面试题)
BeanFactory是以前的老方法了,现在已经被弃用,或者说现在比较少用了

import org.springframework.beans.factory.BeanFactory;
import org.springframework.beans.factory.xml.XmlBeanFactory;
import org.springframework.context.ApplicationContext;
import org.springframework.context.support.ClassPathXmlApplicationContext;
import org.springframework.core.io.ClassPathResource;

public class App {
    public static void main(String[] args) {
        //1、获取spring对象
        BeanFactory context = new XmlBeanFactory(new ClassPathResource("spring-config.xml"));
        //2、从Spring中取出Bean对象 根据名称 + 类型获取 Bean
        User user= (User) context.getBean("user",User.class);//输出hello张三
        //3、使用Bean(可选)
        System.out.println(user.sayHi("张三"));
    }
}
ApplicationContext VS BeanFactory
相同点:
- 都可以得到 Spring 上下文对象。
- 都是来自 Spring 的接口。
不同点
1、继承关系和功能: 虽然都是Spring 容器的接口,但 ApplicationContext 属于 BeanFactory 的子类 。其中BeanFactory提供了基础的访问容器的能力,ApplicationContext除了继承BeanFactory 的所有功能之外,它还拥有独特的特性,还添加了对国际化支持、资源访问支持、以及事件传播等方面的支持。2、性能:ApplicationContext 是⼀次性加载并初始化所有的 Bean 对象,而BeanFactory 是需要哪个才去加载哪个,因此更加轻量。
Ⅱ、获取指定的 Bean 对象🍓
然后通过getBean方法取出Bean对象
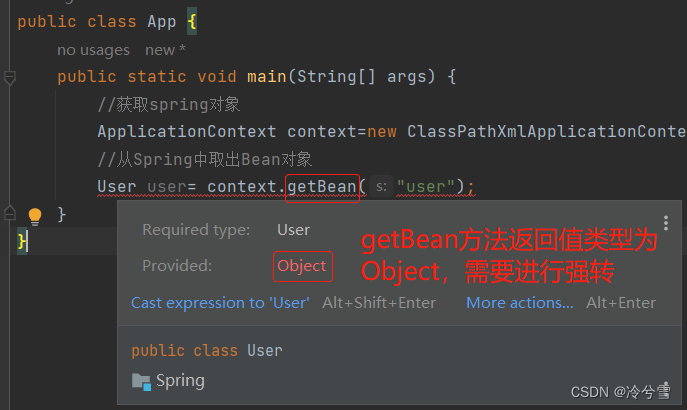
注意:Bean 的 Id 要⼀⼀对应:

Ⅲ、使用Bean对象🍓
我们现在就可以使用Bean,然后调用其中的方法了
import org.springframework.context.ApplicationContext;
import org.springframework.context.support.ClassPathXmlApplicationContext;

public class App {
    public static void main(String[] args) {
        //1、获取spring对象
        ApplicationContext context=new ClassPathXmlApplicationContext("spring-config.xml");
        //2、从Spring中取出Bean对象
        User user= (User) context.getBean("user");
        //3、使用Bean(可选)
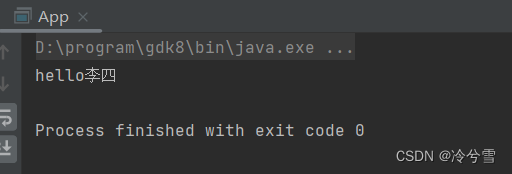
        System.out.println(user.sayHi("李四"));
    }
}
多学一招:getBean 方法的更多用法🍉
Ⅰ、根据类型获取 Bean:🍓
User user= (User) context.getBean(User.class);import org.springframework.context.ApplicationContext;
import org.springframework.context.support.ClassPathXmlApplicationContext;
public class App {
public static void main(String[] args) {
//1、获取spring对象
ApplicationContext context=new ClassPathXmlApplicationContext("spring-config.xml");
//2、从Spring中取出Bean对象 Ⅰ、根据类型获取Bean
User user= (User) context.getBean(User.class);
//3、使用Bean(可选)
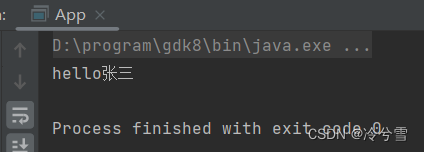
System.out.println(user.sayHi("张三"));
}
}
Ⅱ、根据名称 + 类型获取 Bean 🍓
User user= (User) context.getBean("user",User.class);两种方法的区别🍓
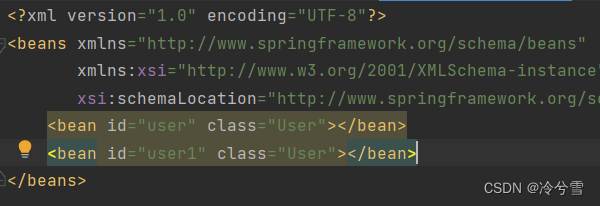
当有⼀个类型被重复注册到 spring-config.xml 中时,只能使用 根据名称+类型获取了,比如以下程序
import org.springframework.context.ApplicationContext;
import org.springframework.context.support.ClassPathXmlApplicationContext;

public class App {
    public static void main(String[] args) {
        //1、获取spring对象
        ApplicationContext context=new ClassPathXmlApplicationContext("spring-config.xml");
        //2、从Spring中取出Bean对象 Ⅰ、根据类型获取Bean
        User user= (User) context.getBean(User.class);//报错
        //Ⅱ、根据名称 + 类型获取 Bean
        //User user= (User) context.getBean("user",User.class);//输出hello张三
        //3、使用Bean(可选)
        System.out.println(user.sayHi("张三"));
    }
    public static void main1(String[] args) {
        //1、获取spring对象
        ApplicationContext context=new ClassPathXmlApplicationContext("spring-config.xml");
        //2、从Spring中取出Bean对象
        User user= (User) context.getBean("user");
        //3、使用Bean(可选)
        System.out.println(user.sayHi("李四"));
    }
}
操作流程图
