YOLOV5 + PYQT5双目测距
- 1. 测距源码
- 2. 测距原理
- 3. PYQT环境配置
- 4. 实验结果
- 4.1 界面1(简洁版)
- 4.2 界面2(改进版)
1. 测距源码
详见文章 YOLOV5 + 双目测距(python)
2. 测距原理
如果想了解双目测距原理,请移步该文章 双目三维测距(python)
3. PYQT环境配置
首先安装一下pyqt5
pip install PyQt5
pip install PyQt5-tools
接着再pycharm设置里配置一下
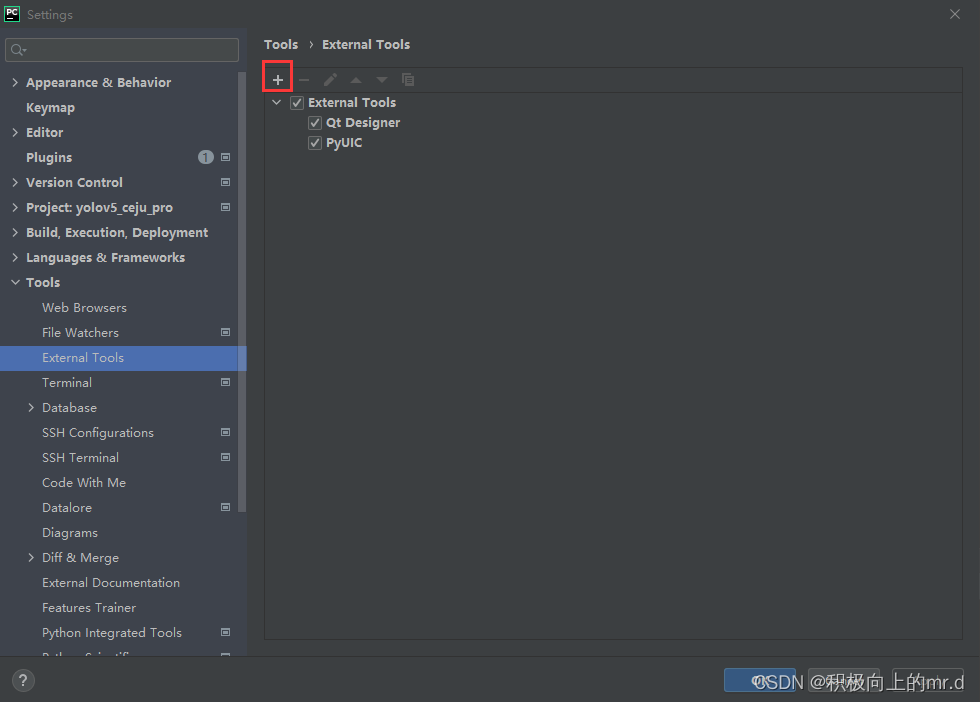
添加下面两个工具:
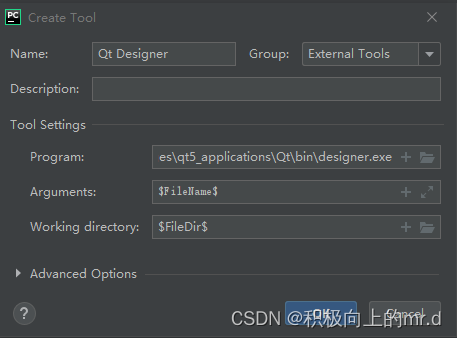
工具1:Qt Designer
Program D:\Anaconda3\Lib\site-packages\qt5_applications\Qt\bin\designer.exe#代码所用环境路径
Arauments : $FileName$
Working directory :$FileDir$
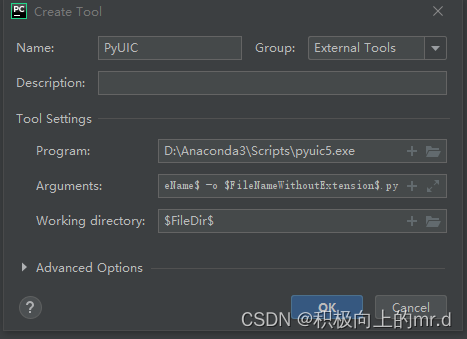
工具2:PyUIC
Program D:\Anaconda3\Scripts\pyuic5.exe
Arguments : $FileName$ -o $FileNameWithoutExtension$.py
Working directory :$FileDir$
4. 实验结果
4.1 界面1(简洁版)
在文件目录下创建一个main.py文件,将以下代码写入
import sys
import os
from PIL import Image
from PyQt5.QtCore import *
from PyQt5.QtGui import *
from PyQt5.QtWidgets import *

class filedialogdemo(QWidget):
    def __init__(self, parent=None):
        super(filedialogdemo, self).__init__(parent)
        self.resize(500,500)
        layout = QVBoxLayout()
        self.btn = QPushButton("加载图片")
        self.btn.clicked.connect(self.getfile)
        layout.addWidget(self.btn)


        self.le = QLabel(" csdn:积极向上的mr.d")
        self.btn1 = QPushButton("加载本地摄像头")
        self.btn1.clicked.connect(self.getfiles)
        layout.addWidget(self.btn1)
        layout.addWidget(self.le)

        self.setLayout(layout)
        self.setWindowTitle("双目测距系统")

    def getfile(self):
        '''
        getOpenFileName():返回用户所选择文件的名称,并打开该文件
        第一个参数用于指定父组件
        第二个参数指定对话框标题
        第三个参数指定目录
        第四个参数是文件扩展名过滤器
        '''

        self.fname, _  = QFileDialog.getOpenFileName(self, 'Open file',r'C:\Users\hp\Desktop\sale\yolov5_ceju_pro\data\images',"Image files (*.jpg *.gif *.mp4)")
        self.le.setPixmap(QPixmap(self.fname))
        import shutil
        shutil.rmtree('./runs/detect/exp')
        str=(r'python C:\Users\hp\Desktop\sale\yolov5_ceju_pro\detect_01.py --source ' + self.fname+ ' --exist-ok ')
        os.system(str)  # 运行图片识别文件
        path = os.listdir(r'C:\Users\hp\Desktop\sale\yolov5_ceju_pro\runs\detect\exp')
        s = path[0]
        pathend = r'C:\Users\hp\Desktop\sale\yolov5_ceju_pro\runs\detect\exp'+ '\\'+ s
        I = Image.open(pathend)
        I.show()

    def getfiles(self):   # 加载摄像头
        str=(r'python C:\Users\hp\Desktop\sale\yolov5_ceju_pro\detect_01.py ')   # python命令 + B.py + 参数:IC.txt'
        os.environ['CUDA_LAUNCH_BLOCKING'] = '1' # 不加这个可能会报错
        os.system(str)


if __name__ == '__main__':
    app = QApplication(sys.argv)
    ex = filedialogdemo()
    ex.show()
    sys.exit(app.exec_())
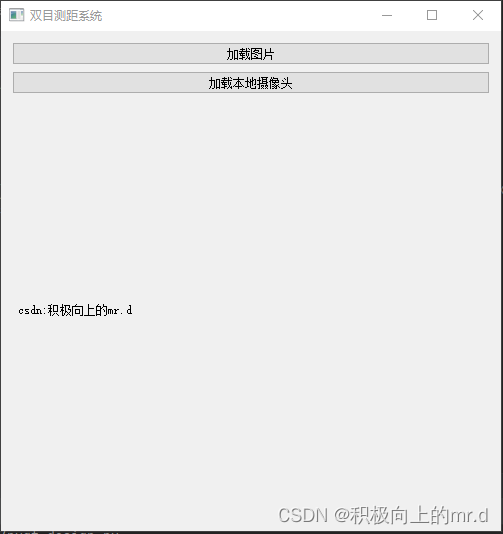
运行main.py即可实现检测
4.2 界面2(改进版)
创建一个main1.py文件,将以下代码写入
# Form implementation generated from reading ui file '.\project.ui'
# Created by: PyQt5 UI code generator 5.9.2

import sys
import cv2
import argparse
import random
import torch
import numpy as np
import torch.backends.cudnn as cudnn

from PyQt5 import QtCore, QtGui, QtWidgets
from utils.torch_utils import select_device
from models.experimental import attempt_load
from utils.general import check_img_size, non_max_suppression, scale_coords
from utils.datasets import letterbox
from utils.plots import plot_one_box

from stereo.dianyuntu_yolo import preprocess, undistortion, getRectifyTransform, draw_line, rectifyImage, \
    stereoMatchSGBM
from stereo import stereoconfig
class Ui_MainWindow(QtWidgets.QMainWindow):
    def __init__(self, parent=None):
        super(Ui_MainWindow, self).__init__(parent)
        self.timer_video = QtCore.QTimer()
        self.setupUi(self)
        self.init_logo()
        self.init_slots()
        self.cap = cv2.VideoCapture()
        self.out = None
        # self.out = cv2.VideoWriter('prediction.avi', cv2.VideoWriter_fourcc(*'XVID'), 20.0, (640, 480))

        parser = argparse.ArgumentParser()
        parser.add_argument('--weights', nargs='+', type=str,
                            default='yolov5s.pt', help='model.pt path(s)')
        # file/folder, 0 for webcam
        parser.add_argument('--source', type=str,
                            default='data/images', help='source')
        parser.add_argument('--img-size', type=int,
                            default=640, help='inference size (pixels)')
        parser.add_argument('--conf-thres', type=float,
                            default=0.25, help='object confidence threshold')
        parser.add_argument('--iou-thres', type=float,
                            default=0.45, help='IOU threshold for NMS')
        parser.add_argument('--device', default='',
                            help='cuda device, i.e. 0 or 0,1,2,3 or cpu')
        parser.add_argument(
            '--view-img', action='store_true', help='display results')
        parser.add_argument('--save-txt', action='store_true',
                            help='save results to *.txt')
        parser.add_argument('--save-conf', action='store_true',
                            help='save confidences in --save-txt labels')
        parser.add_argument('--nosave', action='store_true',
                            help='do not save images/videos')
        parser.add_argument('--classes', nargs='+', type=int,
                            help='filter by class: --class 0, or --class 0 2 3')
        parser.add_argument(
            '--agnostic-nms', action='store_true', help='class-agnostic NMS')
        parser.add_argument('--augment', action='store_true',
                            help='augmented inference')
        parser.add_argument('--update', action='store_true',
                            help='update all models')
        parser.add_argument('--project', default='runs/detect',
                            help='save results to project/name')
        parser.add_argument('--name', default='exp',
                            help='save results to project/name')
        parser.add_argument('--exist-ok', action='store_true',
                            help='existing project/name ok, do not increment')
        self.opt = parser.parse_args()
        print(self.opt)

        source, weights, view_img, save_txt, imgsz = self.opt.source, self.opt.weights, self.opt.view_img, self.opt.save_txt, self.opt.img_size

        self.device = select_device(self.opt.device)
        self.half = self.device.type != 'cpu'  # half precision only supported on CUDA

        cudnn.benchmark = True

        # Load model
        self.model = attempt_load(
            weights, map_location=self.device)  # load FP32 model
        stride = int(self.model.stride.max())  # model stride
        self.imgsz = check_img_size(imgsz, s=stride)  # check img_size
        if self.half:
            self.model.half()  # to FP16

        # Get names and colors
        self.names = self.model.module.names if hasattr(
            self.model, 'module') else self.model.names
        self.colors = [[random.randint(0, 255)
                        for _ in range(3)] for _ in self.names]

    def setupUi(self, MainWindow):
        MainWindow.setObjectName("MainWindow")
        MainWindow.resize(800, 600)
        self.centralwidget = QtWidgets.QWidget(MainWindow)
        self.centralwidget.setObjectName("centralwidget")
        self.pushButton = QtWidgets.QPushButton(self.centralwidget)
        self.pushButton.setGeometry(QtCore.QRect(20, 130, 112, 34))
        self.pushButton.setObjectName("pushButton")
        self.pushButton_2 = QtWidgets.QPushButton(self.centralwidget)
        self.pushButton_2.setGeometry(QtCore.QRect(20, 220, 112, 34))
        self.pushButton_2.setObjectName("pushButton_2")
        self.pushButton_3 = QtWidgets.QPushButton(self.centralwidget)
        self.pushButton_3.setGeometry(QtCore.QRect(20, 300, 112, 34))
        self.pushButton_3.setObjectName("pushButton_3")
        self.groupBox = QtWidgets.QGroupBox(self.centralwidget)
        self.groupBox.setGeometry(QtCore.QRect(160, 90, 611, 411))
        self.groupBox.setObjectName("groupBox")
        self.label = QtWidgets.QLabel(self.groupBox)
        self.label.setGeometry(QtCore.QRect(10, 40, 561, 331))
        self.label.setObjectName("label")
        self.textEdit = QtWidgets.QTextEdit(self.centralwidget)
        self.textEdit.setGeometry(QtCore.QRect(150, 10, 471, 51))
        self.textEdit.setObjectName("textEdit")
        MainWindow.setCentralWidget(self.centralwidget)
        self.menubar = QtWidgets.QMenuBar(MainWindow)
        self.menubar.setGeometry(QtCore.QRect(0, 0, 800, 30))
        self.menubar.setObjectName("menubar")
        MainWindow.setMenuBar(self.menubar)
        self.statusbar = QtWidgets.QStatusBar(MainWindow)
        self.statusbar.setObjectName("statusbar")
        MainWindow.setStatusBar(self.statusbar)

        self.retranslateUi(MainWindow)
        QtCore.QMetaObject.connectSlotsByName(MainWindow)

    def retranslateUi(self, MainWindow):
        _translate = QtCore.QCoreApplication.translate
        MainWindow.setWindowTitle(_translate("MainWindow", "双目测距系统"))
        self.pushButton.setText(_translate("MainWindow", "图片检测"))
        self.pushButton_2.setText(_translate("MainWindow", "摄像头检测"))
        self.pushButton_3.setText(_translate("MainWindow", "视频检测"))
        self.groupBox.setTitle(_translate("MainWindow", "检测结果"))
        self.label.setText(_translate("MainWindow", "TextLabel"))
        self.textEdit.setHtml(_translate("MainWindow",
                                         "<!DOCTYPE HTML PUBLIC \"-//W3C//DTD HTML 4.0//EN\" \"http://www.w3.org/TR/REC-html40/strict.dtd\">\n"
                                         "<html><head><meta name=\"qrichtext\" content=\"1\" /><style type=\"text/css\">\n"
                                         "p, li { white-space: pre-wrap; }\n"
                                         "</style></head><body style=\" font-family:\'SimSun\'; font-size:9pt; font-weight:400; font-style:normal;\">\n"
                                         "<p align=\"center\" style=\" margin-top:0px; margin-bottom:0px; margin-left:0px; margin-right:0px; -qt-block-indent:0; text-indent:0px;\"><span style=\" font-size:18pt; font-weight:600;\">双目测距系统</span></p></body></html>"))

    def init_slots(self):
        self.pushButton.clicked.connect(self.button_image_open)
        self.pushButton_3.clicked.connect(self.button_video_open)
        self.pushButton_2.clicked.connect(self.button_camera_open)
        self.timer_video.timeout.connect(self.show_video_frame)

    def init_logo(self):
        pix = QtGui.QPixmap('wechat.jpg')
        self.label.setScaledContents(True)
        self.label.setPixmap(pix)

    def button_image_open(self):
        print('button_image_open')
        name_list = []

        img_name, _ = QtWidgets.QFileDialog.getOpenFileName(
            self, "打开图片", "", "*.jpg;;*.png;;All Files(*)")
        if not img_name:
            return

        img = cv2.imread(img_name)
        print(img_name)
        showimg = img
        with torch.no_grad():
            img = letterbox(img, new_shape=self.opt.img_size)[0]
            # Convert
            # BGR to RGB, to 3x416x416
            img = img[:, :, ::-1].transpose(2, 0, 1)
            img = np.ascontiguousarray(img)
            img = torch.from_numpy(img).to(self.device)
            img = img.half() if self.half else img.float()  # uint8 to fp16/32
            img /= 255.0  # 0 - 255 to 0.0 - 1.0
            if img.ndimension() == 3:
                img = img.unsqueeze(0)
            # Inference
            pred = self.model(img, augment=self.opt.augment)[0]
            # Apply NMS
            pred = non_max_suppression(pred, self.opt.conf_thres, self.opt.iou_thres, classes=self.opt.classes,
                                       agnostic=self.opt.agnostic_nms)
            print(pred)
            # Process detections
            for i, det in enumerate(pred):
                if det is not None and len(det):
                    # Rescale boxes from img_size to im0 size
                    det[:, :4] = scale_coords(
                        img.shape[2:], det[:, :4], showimg.shape).round()

                    for *xyxy, conf, cls in reversed(det):
                        label = '%s %.2f' % (self.names[int(cls)], conf)
                        name_list.append(self.names[int(cls)])
                        plot_one_box(xyxy, showimg, label=label,
                                     color=self.colors[int(cls)], line_thickness=2)

        cv2.imwrite('prediction.jpg', showimg)
        self.result = cv2.cvtColor(showimg, cv2.COLOR_BGR2BGRA)
        self.result = cv2.resize(
            self.result, (640, 480), interpolation=cv2.INTER_AREA)
        self.QtImg = QtGui.QImage(
            self.result.data, self.result.shape[1], self.result.shape[0], QtGui.QImage.Format_RGB32)
        self.label.setPixmap(QtGui.QPixmap.fromImage(self.QtImg))

    def button_video_open(self):
        video_name, _ = QtWidgets.QFileDialog.getOpenFileName(
            self, "打开视频", "", "*.mp4;;*.avi;;All Files(*)")

        if not video_name:
            return

        flag = self.cap.open(video_name)
        if flag == False:
            QtWidgets.QMessageBox.warning(
                self, u"Warning", u"打开视频失败", buttons=QtWidgets.QMessageBox.Ok, defaultButton=QtWidgets.QMessageBox.Ok)
        else:
            self.out = cv2.VideoWriter('prediction.avi', cv2.VideoWriter_fourcc(
                *'MJPG'), 20, (int(self.cap.get(3)), int(self.cap.get(4))))
            self.timer_video.start(30)
            self.pushButton_3.setDisabled(True)
            self.pushButton.setDisabled(True)
            self.pushButton_2.setDisabled(True)

    def button_camera_open(self):
        if not self.timer_video.isActive():
            # 默认使用第一个本地camera
            flag = self.cap.open(0)
            if flag == False:
                QtWidgets.QMessageBox.warning(
                    self, u"Warning", u"打开摄像头失败", buttons=QtWidgets.QMessageBox.Ok,
                    defaultButton=QtWidgets.QMessageBox.Ok)
            else:
                self.out = cv2.VideoWriter('prediction.avi', cv2.VideoWriter_fourcc(
                    *'MJPG'), 20, (int(self.cap.get(3)), int(self.cap.get(4))))
                self.timer_video.start(30)
                self.pushButton_3.setDisabled(True)
                self.pushButton.setDisabled(True)
                self.pushButton_2.setText(u"关闭摄像头")
        else:
            self.timer_video.stop()
            self.cap.release()
            self.out.release()
            self.label.clear()
            self.init_logo()
            self.pushButton_3.setDisabled(False)
            self.pushButton.setDisabled(False)
            self.pushButton_2.setText(u"摄像头检测")

    def show_video_frame(self):
        name_list = []

        flag, img = self.cap.read()
        config = stereoconfig.stereoCamera()
        map1x, map1y, map2x, map2y, Q = getRectifyTransform(720, 1280, config)
        if img is not None:
            showimg = img
            with torch.no_grad():
                img = letterbox(img, new_shape=self.opt.img_size)[0]
                # Convert
                # BGR to RGB, to 3x416x416
                img = img[:, :, ::-1].transpose(2, 0, 1)
                img = np.ascontiguousarray(img)
                img = torch.from_numpy(img).to(self.device)
                img = img.half() if self.half else img.float()  # uint8 to fp16/32
                img /= 255.0  # 0 - 255 to 0.0 - 1.0
                if img.ndimension() == 3:
                    img = img.unsqueeze(0)
                # Inference
                pred = self.model(img, augment=self.opt.augment)[0]

                # Apply NMS
                pred = non_max_suppression(pred, self.opt.conf_thres, self.opt.iou_thres, classes=self.opt.classes,
                                           agnostic=self.opt.agnostic_nms)
                # Process detections
                for i, det in enumerate(pred):  # detections per image
                    if det is not None and len(det):
                        # Rescale boxes from img_size to im0 size
                        det[:, :4] = scale_coords(
                            img.shape[2:], det[:, :4], showimg.shape).round()
                        # Write results
                        for *xyxy, conf, cls in reversed(det):
                            x = (xyxy[0] + xyxy[2]) / 2
                            y = (xyxy[1] + xyxy[3]) / 2
                            if (0 < x <= 1280):

                                height_0, width_0 = showimg.shape[0:2]
                                iml = showimg[0:int(height_0), 0:int(width_0 / 2)]
                                imr = showimg[0:int(height_0), int(width_0 / 2):int(width_0)]

                                height, width = iml.shape[0:2]
                                config = stereoconfig.stereoCamera()
                                map1x, map1y, map2x, map2y, Q = getRectifyTransform(720, 1280, config)
                                iml_rectified, imr_rectified = rectifyImage(iml, imr, map1x, map1y, map2x,
                                                                            map2y)
                                line = draw_line(iml_rectified, imr_rectified)
                                iml = undistortion(iml, config.cam_matrix_left, config.distortion_l)
                                imr = undistortion(imr, config.cam_matrix_right, config.distortion_r)
                                iml_, imr_ = preprocess(iml, imr)
                                iml_rectified_l, imr_rectified_r = rectifyImage(iml_, imr_, map1x, map1y, map2x,map2y)
                                disp, _ = stereoMatchSGBM(iml_rectified_l, imr_rectified_r, True)
                                points_3d = cv2.reprojectImageTo3D(disp, Q)


                                distance = ((points_3d[int(y), int(x), 0] ** 2 + points_3d[int(y), int(x), 1] ** 2 +
                                        points_3d[int(y), int(x), 2] ** 2) ** 0.5) / 10
                                distance = '%.2f' % distance

                                label = '%s %.2f' % (self.names[int(cls)], conf)
                                label = label +  "  " + "dis:" + str(distance) + "m"
                                name_list.append(self.names[int(cls)])
                                print(label)
                                plot_one_box(
                                    xyxy, showimg, label=label, color=self.colors[int(cls)], line_thickness=2)

            self.out.write(showimg)
            show = cv2.resize(showimg, (640, 480))
            self.result = cv2.cvtColor(show, cv2.COLOR_BGR2RGB)
            showImage = QtGui.QImage(self.result.data, self.result.shape[1], self.result.shape[0],
                                     QtGui.QImage.Format_RGB888)
            self.label.setPixmap(QtGui.QPixmap.fromImage(showImage))

        else:
            self.timer_video.stop()
            self.cap.release()
            self.out.release()
            self.label.clear()
            self.pushButton_3.setDisabled(False)
            self.pushButton.setDisabled(False)
            self.pushButton_2.setDisabled(False)
            self.init_logo()


if __name__ == '__main__':

    app = QtWidgets.QApplication(sys.argv)
    ui = Ui_MainWindow()
    ui.show()
    sys.exit(app.exec_())
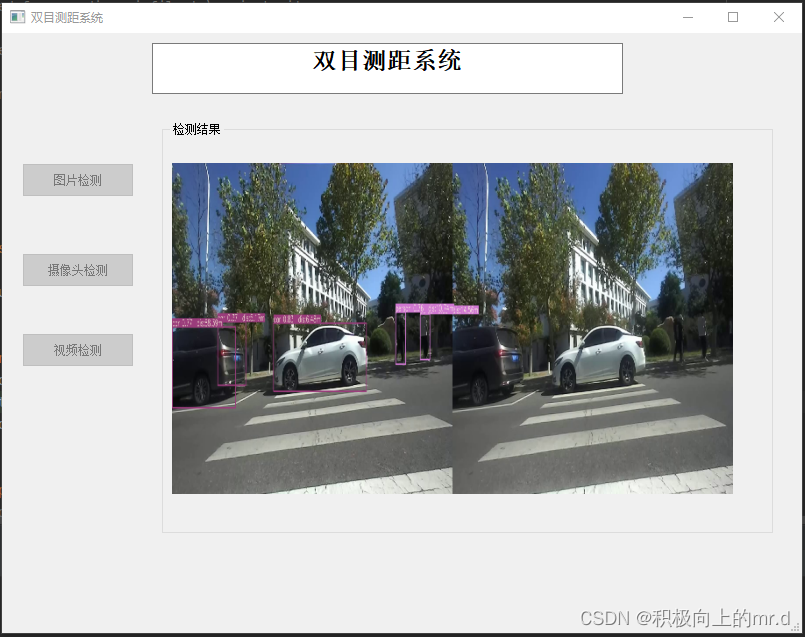
对 if name == ‘main’: 改写添加背景图片
if __name__ == '__main__':
    stylesheet = """
                Ui_MainWindow {
                    background-image: url("01.jpg");
                    background-repeat: no-repeat;
                    background-position: center;
                }
            """
    app = QtWidgets.QApplication(sys.argv)
    app.setStyleSheet(stylesheet)
    ui = Ui_MainWindow()
    ui.show()
    sys.exit(app.exec_())
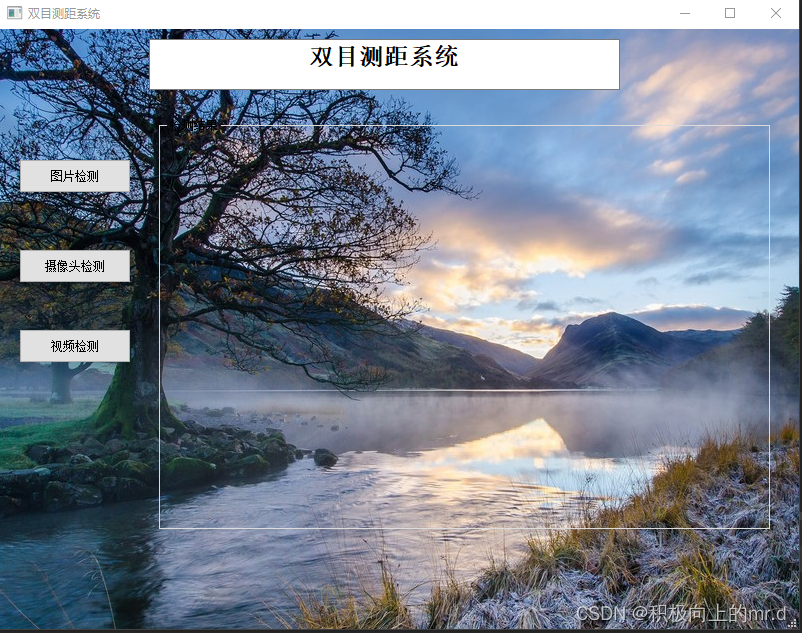
视频展示:
工程源码下载:https://github.com/up-up-up-up/yolov5_ceju-pyqt/tree/main
文章内容后续会慢慢完善…


