嵌入式Linux开机启动过程:
可以分为以下几个步骤:
-
CPU复位:开机时,CPU会执行复位操作,将内存的内容清空,寄存器的初始值复位。
-
ROM启动:CPU会从ROM中读取启动程序,将其加载到内存中,开始启动内核。
-
Bootloader(启动管理程序)加载:启动管理程序是一段小程序,用于加载操作系统的内核和文件系统。这里使用的是U-boot。
-
内核加载:启动管理程序会加载内核文件,内核启动后会进行硬件初始化和设备驱动的加载。
-
根文件系统加载:内核会加载根文件系统,根据启动管理程序中设置的参数(如NFS、SD卡、EMMC等)加载根文件系统。
-
启动脚本执行:内核启动后会执行启动脚本(如/etc/rc.d/rc.local),对系统进行配置和初始化。
-
用户应用启动:系统配置和初始化完成后,用户应用程序会被启动,系统进入正常运行状态。。
启动脚本的执行过程:
BusyBox init 会在启动后读取 /etc/ 目录下的 inittab 文件,下面是其内容样式:
# /etc/inittab
#
# Copyright (C) 2001 Erik Andersen <andersen@codepoet.org>
#
# Note: BusyBox init doesn't support runlevels.  The runlevels field is
# completely ignored by BusyBox init. If you want runlevels, use
# sysvinit.
#
# Format for each entry: <id>:<runlevels>:<action>:<process>
#
# id        == tty to run on, or empty for /dev/console
# runlevels == ignored
# action    == one of sysinit, respawn, askfirst, wait, and once
# process   == program to run

# Startup the system
::sysinit:/bin/mount -t proc proc /proc
::sysinit:/bin/mount -o remount,rw /
::sysinit:/bin/mkdir -p /dev/pts /dev/shm
::sysinit:/bin/mount -a
::sysinit:/bin/mkdir -p /run/lock/subsys
::sysinit:/sbin/swapon -a
null::sysinit:/bin/ln -sf /proc/self/fd /dev/fd
null::sysinit:/bin/ln -sf /proc/self/fd/0 /dev/stdin
null::sysinit:/bin/ln -sf /proc/self/fd/1 /dev/stdout
null::sysinit:/bin/ln -sf /proc/self/fd/2 /dev/stderr
::sysinit:/bin/hostname -F /etc/hostname
# now run any rc scripts
::sysinit:/etc/init.d/rcS

# Put a getty on the serial port
console::respawn:/sbin/getty -L  console 0 vt100 # GENERIC_SERIAL

# Stuff to do for the 3-finger salute
#::ctrlaltdel:/sbin/reboot

# Stuff to do before rebooting
::shutdown:/etc/init.d/rcK
::shutdown:/sbin/swapoff -a
::shutdown:/bin/umount -a -r
BusyBox init 会在启动后执行第三个字段为 sysinit 的语句中的命令,会在关机时执行第三个字段为 shutdown 的语句中的命令。
其中:rcS 和 rcK可以来执行开关机。

可以看到 rcS 脚本会依据文件名排序依次读取 /etc/init.d/ 目录下名字为 S??* 格式的脚本文件,并执行其中的 start 方法。同用的 rcK 脚本会依据文件名逆排序读取 /etc/init.d/ 目录下名字为 S??* 格式的脚本文件,并执行其中的 stop 方法。
rcS:
#!/bin/sh


# Start all init scripts in /etc/init.d
# executing them in numerical order.
#
for i in /etc/init.d/S??* ;do

     # Ignore dangling symlinks (if any).
     [ ! -f "$i" ] && continue

     case "$i" in
        *.sh)
            # Source shell script for speed.
            (
                trap - INT QUIT TSTP
                set start
                . $i
            )
            ;;
        *)
            # No sh extension, so fork subprocess.
            $i start
            ;;
    esac
done
rcK:
#!/bin/sh


# Stop all init scripts in /etc/init.d
# executing them in reversed numerical order.
#
for i in $(ls -r /etc/init.d/S??*) ;do

     # Ignore dangling symlinks (if any).
     [ ! -f "$i" ] && continue

     case "$i" in
        *.sh)
            # Source shell script for speed.
            (
                trap - INT QUIT TSTP
                set stop
                . $i
            )
            ;;
        *)
            # No sh extension, so fork subprocess.
            $i stop
            ;;
    esac
done
设置开机自动运行程序
对于我们需要设置开机运行程序而言,可以编写名字为 S??* 格式的脚本文件存放到 /etc/init.d/ 目录下,这样它就会在开机时被调用执行其中的 start 方法了。
编写了一个自己的脚本开机脚本:
#!/bin/sh
start() {
        echo "S99 iS start !"
        sh /sbin/helloworld
}
stop() {
        echo "S99 iS stop !"
}

restart() {
        stop
        start
}

case "$1" in
  start)
        start
        ;;
  stop)
        stop
        ;;
  restart|reload)
        restart
        ;;
  *)
        echo "Usage: $0 {start|stop|restart}"
        exit 1
esac

exit $?
额!也跑起来了,就是是在shell 里面操作点灯脚本,然后控制台不可以使用了。
如下是如何点灯!
关于点灯脚本:
LED灯的指示引脚:
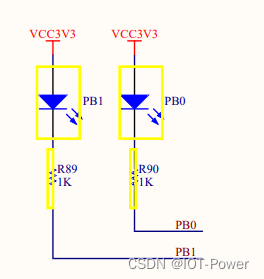
所以可以通过读写 /sys/class/gpio/ 目录下指定GPIO口编号的文件来操作GPIO口。GPIO口编号换算如下:
PB13 = 32 x 1(PA) + 13 = 45
PE12 = 32 x 4(PA/PB/PC/PD) + 12 = 140
PF10 = 32 x 5(PA/PB/PC/PD/PE) + 10 = 170
所以连个LED灯分别是:
PB0 = 32 x 1(PA) + 10 = 32
PB1 = 32 x 1(PA) + 1 = 33
在终端写操作LED
# 导出以使用GPIO32
echo 32 > /sys/class/gpio/export
# 导出后将在 /sys/class/gpio/ 目录下出现 gpio32 目录,读写其中的文件即可操作该GPIO口# 将GPIO32设置为输出模式
echo out > /sys/class/gpio/gpio32/direction
# 将GPIO32设置为输出高电平
echo 1 > /sys/class/gpio/gpio32/value
# 将GPIO32设置为输出低电平
echo 0 > /sys/class/gpio/gpio32/value# ====================
# 导出以使用GPIO140
echo 140 > /sys/class/gpio/export
# 将GPIO140设置为输入模式
echo in > /sys/class/gpio/gpio140/direction
# 打印GPIO140端口电平
cat /sys/class/gpio/gpio140/value# ====================
# 取消使用GPIO32
echo 32 > /sys/class/gpio/unexport
# 取消使用GPIO140
echo 140 > /sys/class/gpio/unexport
点灯脚本:
#!/bin/bash
echo 32 > /sys/class/gpio/export
echo "out" > /sys/class/gpio/gpio32/direction
while true
do
    echo 1 > /sys/class/gpio/gpio32/value
    echo "灭"
    sleep 1
    echo 0 > /sys/class/gpio/gpio32/value
    echo "亮"
    sleep 1
done


