目录
前期准备
域对象共享数据
一:向request域共享数据(五种方法)
1. 使用ServletAPI向request域对象共享数据(了解)
2. 使用ModelAndView向request域对象共享数据
3. 使用Model向request域对象共享数据
4. 使用map向request域对象共享数据
5. 使用ModelMap向request域对象共享数据
6. Model、ModelMap、Map的关系
二:向session域共享数据
三:向application域共享数据
前期准备
pomx.ml:引入依赖
<?xml version="1.0" encoding="UTF-8"?>

<project xmlns="http://maven.apache.org/POM/4.0.0" xmlns:xsi="http://www.w3.org/2001/XMLSchema-instance"
  xsi:schemaLocation="http://maven.apache.org/POM/4.0.0 http://maven.apache.org/xsd/maven-4.0.0.xsd">
  <modelVersion>4.0.0</modelVersion>

  <groupId>org.example</groupId>
  <artifactId>springmvc-thymeleaf003</artifactId>
  <version>1.0-SNAPSHOT</version>
  <packaging>war</packaging>

  <name>springmvc-thymeleaf003 Maven Webapp</name>
  <!-- FIXME change it to the project's website -->
  <url>http://www.example.com</url>

  <properties>
    <project.build.sourceEncoding>UTF-8</project.build.sourceEncoding>
    <maven.compiler.source>1.8</maven.compiler.source>
    <maven.compiler.target>1.8</maven.compiler.target>
  </properties>

  <dependencies>
    <dependency>
      <groupId>org.springframework</groupId>
      <artifactId>spring-webmvc</artifactId>
      <version>5.2.5.RELEASE</version>
    </dependency>
    <dependency>
      <groupId>ch.qos.logback</groupId>
      <artifactId>logback-classic</artifactId>
      <version>1.2.3</version>
    </dependency>
    <dependency>
      <groupId>org.thymeleaf</groupId>
      <artifactId>thymeleaf-spring5</artifactId>
      <version>3.0.10.RELEASE</version>
    </dependency>
    <dependency>
      <groupId>javax.servlet</groupId>
      <artifactId>javax.servlet-api</artifactId>
      <version>3.1.0</version>
    </dependency>
  </dependencies>

  <build>
    <!--指定资源文件的位置-->
    <resources>
      <resource>
        <directory>src/main/java</directory>
        <includes>
          <include>**/*.xml</include>
          <include>**/*.properties</include>
        </includes>
      </resource>
      <resource>
        <directory>src/main/resources</directory>
        <includes>
          <include>**/*.xml</include>
          <include>**/*.properties</include>
        </includes>
      </resource>
    </resources>

  </build>
</project>
web.xml:配置请求乱码的CharacterEncodingFilter和注册前端控制器DispatcherServlet
<?xml version="1.0" encoding="UTF-8"?>
<web-app xmlns="http://xmlns.jcp.org/xml/ns/javaee"
         xmlns:xsi="http://www.w3.org/2001/XMLSchema-instance"
         xsi:schemaLocation="http://xmlns.jcp.org/xml/ns/javaee http://xmlns.jcp.org/xml/ns/javaee/web-app_4_0.xsd"
         version="4.0">
    <!--注册过滤器:解决post请求乱码问题-->
    <filter>
        <filter-name>encode</filter-name>
        <filter-class>org.springframework.web.filter.CharacterEncodingFilter</filter-class>
        <!--指定字符集-->
        <init-param>
            <param-name>encoding</param-name>
            <param-value>utf-8</param-value>
        </init-param>
        <!--强制request使用字符集encoding-->
        <init-param>
            <param-name>forceRequestEncoding</param-name>
            <param-value>true</param-value>
        </init-param>
        <!--强制response使用字符集encoding-->
        <init-param>
            <param-name>forceResponseEncoding</param-name>
            <param-value>true</param-value>
        </init-param>
    </filter>
    <!--所有请求-->
    <filter-mapping>
        <filter-name>encode</filter-name>
        <url-pattern>/*</url-pattern>
    </filter-mapping>


    <!--注册SpringMVC框架-->
    <servlet>
        <servlet-name>springmvc</servlet-name>
        <servlet-class>org.springframework.web.servlet.DispatcherServlet</servlet-class>
        <!--配置springMVC位置文件的位置和名称-->
        <init-param>
            <param-name>contextConfigLocation</param-name>
            <param-value>classpath:springmvc.xml</param-value>
        </init-param>
        <!--将前端控制器DispatcherServlet的初始化时间提前到服务器启动时-->
        <load-on-startup>1</load-on-startup>
    </servlet>
    <servlet-mapping>
        <servlet-name>springmvc</servlet-name>
        <!--指定拦截什么样的请求
            例如:http://localhost:8080/demo.action
        -->
        <url-pattern>/</url-pattern>
    </servlet-mapping>
</web-app>
springmvc核心配置文件:引入包扫描组件、配置Thymeleaf视图解析器
<?xml version="1.0" encoding="UTF-8"?>
<beans xmlns="http://www.springframework.org/schema/beans"
       xmlns:xsi="http://www.w3.org/2001/XMLSchema-instance"
       xmlns:context="http://www.springframework.org/schema/context"
       xmlns:mvc="http://www.springframework.org/schema/mvc"
       xsi:schemaLocation="http://www.springframework.org/schema/beans http://www.springframework.org/schema/beans/spring-beans.xsd http://www.springframework.org/schema/context https://www.springframework.org/schema/context/spring-context.xsd http://www.springframework.org/schema/mvc https://www.springframework.org/schema/mvc/spring-mvc.xsd">
    <!--配置包扫描-->
    <context:component-scan base-package="com.zl.controller"/>
    <!-- 配置Thymeleaf视图解析器 -->
    <bean id="viewResolver" class="org.thymeleaf.spring5.view.ThymeleafViewResolver">
        <property name="order" value="1"/>
        <property name="characterEncoding" value="UTF-8"/>
        <property name="templateEngine">
            <bean class="org.thymeleaf.spring5.SpringTemplateEngine">
                <property name="templateResolver">
                    <bean class="org.thymeleaf.spring5.templateresolver.SpringResourceTemplateResolver">
                        <!-- 视图前缀 -->
                        <property name="prefix" value="/WEB-INF/templates/"/>
                        <!-- 视图后缀 -->
                        <property name="suffix" value=".html"/>
                        <property name="templateMode" value="HTML5"/>
                        <property name="characterEncoding" value="UTF-8"/>
                    </bean>
                </property>
            </bean>
        </property>
    </bean>
</beans>
域对象共享数据
一:向request域共享数据(五种方法)
1. 使用ServletAPI向request域对象共享数据(了解)
index.html发出请求
<!DOCTYPE html>
<html lang="en" xmlns:th="http://www.thymeleaf.org">
<head>
    <meta charset="UTF-8">
    <title>Title</title>
</head>
<body>
<h1>测试</h1>
<a th:href="@{/testRequestServletAPI}">使用ServletAPI向request域对象共享数据</a>
</body>
</html>
ActionTest接收请求并存取数据
package com.zl.controller;

import org.springframework.stereotype.Controller;
import org.springframework.web.bind.annotation.RequestMapping;

import javax.servlet.http.HttpServletRequest;

@Controller
public class ActionTest {
    // 是为了开启就跳转到index.html目录下
    @RequestMapping("/")
    public String test(){
        return "index";
    }
    @RequestMapping("/testRequestServletAPI")
    public String testRequestServletAPI(HttpServletRequest request){
        // 使用原生的ServletAPI存取数据
        request.setAttribute("requestScope","hello");
        return "success";
    }
}
success.html取出数据
注:这是使用的不是jsp,不能直接用${变量名}取出数据;需要借助于thymeleaf!
<!DOCTYPE html>
<html lang="en" xmlns:th="http://www.thymeleaf.org">
<head>
    <meta charset="UTF-8">
    <title>Title</title>
</head>
<body>

<font color="#dc143c" th:text="${requestScope}"></font>
</body>
</html>
2. 使用ModelAndView向request域对象共享数据
ModelAndView主要有两个功能:一个模型,一个视图。
模型:指的是向域中共享数据的功能;
视图:指的是根据我们设置的视图名称,经过视图解析器解析,跳转到指定页面的过程。
index.html发出请求
<a th:href="@{/testRequestModelAndView}">使用ModelAndView向request域对象共享数据</a><br>
ActionTest接收请求并存取数据
①方法的返回值必须是ModelAndView,这样才能被前端控制器DispatcherServlet解析。
②创建ModelAndView对象,调用addObject()方法设置共享的数据。
③调用setViewName()方法,设置要跳转的视图名称,最终返回这个ModelAndView对象。
    @RequestMapping("/testRequestModelAndView")
    public ModelAndView testRequestModelAndView(){
        // 创建ModelAndView对象
        ModelAndView mav = new ModelAndView();
        // 处理模型数据,即向请求域request中共享数据
        mav.addObject("requestScope","hello,ModelAndView");
        //设置视图名称
        mav.setViewName("success");
        // 返回ModelAndView对象
        return mav;
    }
3. 使用Model向request域对象共享数据
Model就是ModelAndView中的Model,用法和原生的Servlet用法很类似!
index.html发出请求
<a th:href="@{/testRequestModel}">使用Model向request域对象共享数据</a><br>ActionTest接收请求并存取数据
Model向reuqest一样以方法的属性方式存在,然后调用Model对象的addAttreibute()方法存取共享的数据!
    @RequestMapping("/testRequestModelw")
    public String testRequestModel(Model model){
        // 使用model存取共享的数据
        model.addAttribute("requestScope","hello,Model");
        return "success";
    }
4. 使用map向request域对象共享数据
这里的Map集合就是前面我们学过的普通Map,用法和Model、原生的Servlet用法很类似!
index.html发出请求
<a th:href="@{/testRequestMap}">使用Map向request域对象共享数据</a><br>ActionTest接收请求并存取数据
调用map集合的put()方法存取共享的数据!
    @RequestMapping("/testRequestMap")
    public String testRequestMap(Map<String,Object> map){
        // 使用map存取共享的数据
        map.put("requestScope","hello,Map");
        return "success";
    }
5. 使用ModelMap向request域对象共享数据
ModelMap和Model的用法是一模一样的!
index.html发出请求
<a th:href="@{/testRequestModelMap}">使用ModelMap向request域对象共享数据</a><br>ActionTest接收请求并存取数据
和Model一样也是调用addAttribute()方法存取共享数据;但是因为ModelMap本身是继承LinkedHashMap集合,所以使用put()方法也可以存取共享数据。
    @RequestMapping("/testRequestModelMap")
    public String testRequestModelMap(ModelMap modelMap){
        // 使用modelMap存取共享的数据
        modelMap.addAttribute("requestScope","hello,ModelMap");
        // 调用put方法也可以
        modelMap.put("requestScope","hello,ModelMap");
        return "success";
    }
6. Model、ModelMap、Map的关系
现象:Model、ModelMap、Map输出的引用格式是相同的!
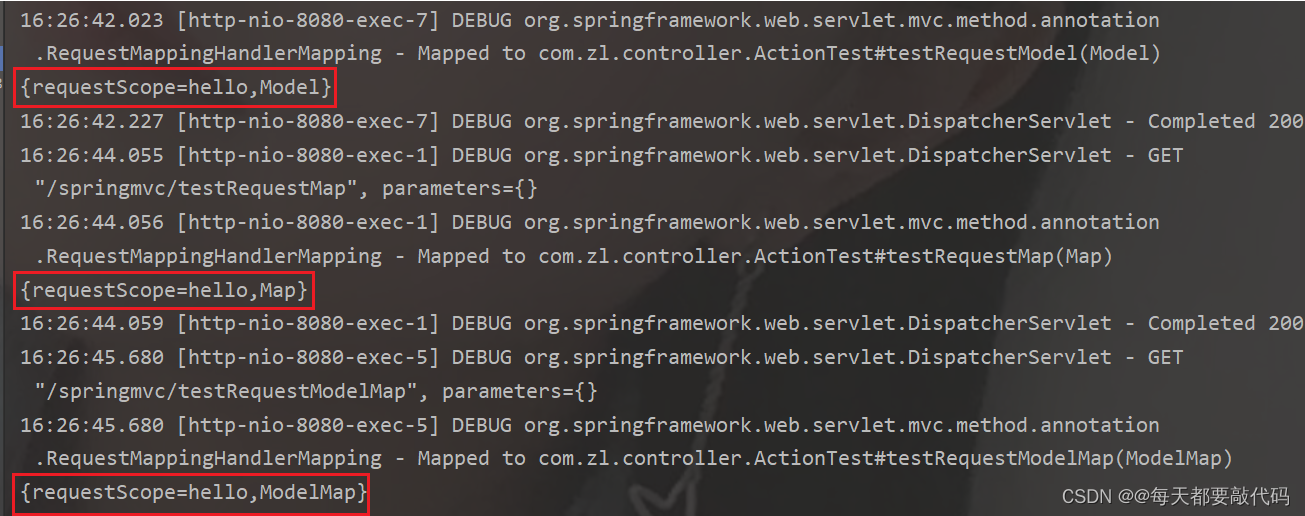
解释:说明调用的是同一个类的toString方法;实际上Model、ModelMap、Map类型的参数其实本质上都是 BindingAwareModelMap 类型的!
怎么验证?通过反射机制!调用getClass()方法获取当前类,在调用getName()方法就可以获取到参数的类型。例如:modelMap.getClass().getName()

通过源码解析
对于Model:说明是一个顶级接口
public interface Model {}对于Map:就是前面我们学习的Map集合
public interface Map<K,V> {对于ModelMap继承了 LinkedHashMap,本质上就是一个Map
public class ModelMap extends LinkedHashMap<String, Object> {}此时Map和ModelMap已经建立了关系,目前就看Model和ModelMap(Map)有什么关系?
选定Model,ctrl+h查看它的继承结构,发现有一个子类BindingAwareModelMap类

通过点开原码发现BindingAwareModelMap又是继承ExtendedModelMap的
public class BindingAwareModelMap extends ExtendedModelMap {}而ExtendedModelMap又是继承ModelMap实现Model的,此时就使Model和ModelMap建立了联系
public class ExtendedModelMap extends ModelMap implements Model {}结果:BindingAwareModelMap间接或直接继承或实现了Model、ModelMap、Map,是它们的子类,可以通过它去实例化对象!
小总结:以上的五种方式:无论是原生的Servlet、ModelAndView、Model、Map、ModelMap最终都是把数据封装到ModelAndView当中去!
二:向session域共享数据
向session域中共享数据,建议使用原生的ServletAPI,比较简单!
index.html发出请求
<a th:href="@{/testSessionServletAPI}">使用ServletAPI向session域对象共享数据</a><br>
ActionTest接收请求并存取数据
注意:此时的方法参数是HttpSession对象!
    @RequestMapping("/testSessionServletAPI")
    public String testSessionServletAPI(HttpSession session){
        session.setAttribute("sessionScope","hello session");
        return "success";
    }
success.html取出数据
注意:对于session域中的数据,访问时不像request域中的数据那样,直接使用${变量名}就可以访问到;必须使用${session.变量名}的方式进行访问!
<font color="#dc143c" th:text="${session.sessionScope}"></font>三:向application域共享数据
application域本质上就是ServletContext(上下文对象)!所以我们只需要获取到ServletContext对象即可!
获取ServletContext对象的方式有多种,例如:
(1)通过request对象获取
ServletContext application=request.getServletContext();(2)通过session对象获取
ServletContext application=request.getServletConfig().getServletContext();index.html发出请求
<a th:href="@{/testApplicationServletAPI}">使用ServletAPI向application域对象共享数据</a><br>ActionTest接收请求并存取数据
获取ServletContext对象的方式很多,例如:request、session、ServletConfig对象!
    @RequestMapping("/testApplicationServletAPI")
    public String testApplicationServletAPI(HttpServletRequest request){
        // 通过request
        ServletContext application = request.getServletContext();
        // 通过session
        // ServletContext application = request.getSession().getServletContext();

        application.setAttribute("applicationScope","hello application");
        return "success";
    }
success.html取出数据
必须使用${application.变量名}的方式进行访问!
<font color="#dc143c" th:text="${application.applicationScope}"></font>

