统计软件与数据分析Lesson16----pytorch基本知识及模型构建
- 0.上节回顾
- 0.1 一元线性回归
- 数据生成
- 数据处理
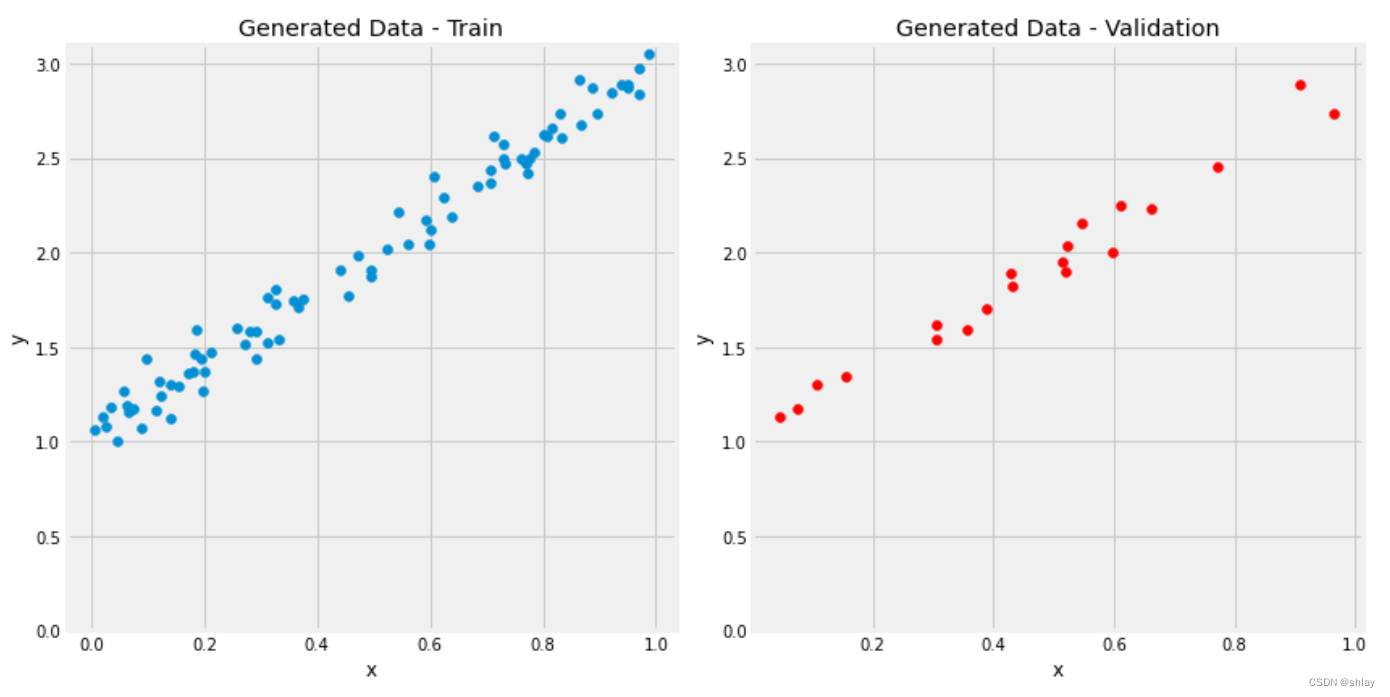
- 初始数据可视化
- 0.2 梯度下降Gradient Descent
- Step 0: 随机初始化 Random Initialization
- Step 1: 计算模型预测值 Compute Model's Predictions
- Step 2: 计算损失 Compute the Loss
- Step 3: 计算梯度 Compute the Gradients
- Step 4: 参数更新 Update the Parameters
- Step 5: 重复迭代 Rinse and Repeat!
- step5:基于Numpy 的完整迭代code
- 1. PyTorch
- 1.1 Tensor
- 1.1.1 概念定义
- 1.1.2 数据加载、设备选择
- 定义 `device`
- 加载数据到指定`device`
- 1.1.3 创建参数
- 方法1
- 方法2
- 方法3
- 方法4
- 1.2 Autograd
- 1.2.1 反向传播 backward
- 1.2.2 grad
- 1.2.3 参数更新 `no_grad()`
- 1.3 动态计算图 Dynamic Computation Graph
- 1.4 优化器 Optimizer
- 1.5 损失 Loss
- 1.5.1 损失函数的定义和调用
- 1.5.2 包含loss的完整code
- 2. 模型 Model
- 2.1 回归模型 LinearRegression
- 2.1.1 定义` model class`
- 2.1.2 参数 Parameters
- 2.1.3 状态字典 `state_dict()`
- 2.1.4 device
- 2.1.5 前向传播 Forward Pass
- 2.1.6 训练 train
- 2.2 嵌套模型 Nested Models
- 2.2.1 定义` model class`
- 2.2.2 查看参数
- 2.3 序贯模型 Sequential Models
- 2.4 层 Layers
- 2.5 code整合
- 2.5.1 准备数据
- 2.5.2 设置模型
- 2.5.3 训练模型
- 3. 知识点小结
0.上节回顾
加载包
import numpy as np
from sklearn.linear_model import LinearRegression

import torch
import torch.optim as optim
import torch.nn as nn
from torchviz import make_dot
from plots_lesson16 import *
plots_lesson16.py下载
plots_lesson16.py下载
plots_lesson16.py下载
0.1 一元线性回归
y = b + w x + ϵ \Large y = b + w x + \epsilon y=b+wx+ϵ
数据生成
true_b = 1
true_w = 2
N = 100

# Data Generation
np.random.seed(42)
x = np.random.rand(N, 1)
epsilon = (.1 * np.random.randn(N, 1))
y = true_b + true_w * x + epsilon
数据处理
# Shuffles the indices
idx = np.arange(N)
np.random.shuffle(idx)

# Uses first 80 random indices for train
train_idx = idx[:int(N*.8)]
# Uses the remaining indices for validation
val_idx = idx[int(N*.8):]

# Generates train and validation sets
x_train, y_train = x[train_idx], y[train_idx]
x_val, y_val = x[val_idx], y[val_idx]
初始数据可视化
figure1(x_train, y_train, x_val, y_val)
0.2 梯度下降Gradient Descent
Step 0: 随机初始化 Random Initialization
# Step 0 - Initializes parameters "b" and "w" randomly
np.random.seed(42)
b = np.random.randn(1)
w = np.random.randn(1)

print(b, w)
[0.49671415] [-0.1382643]
Step 1: 计算模型预测值 Compute Model’s Predictions
# Step 1 - Computes our model's predicted output - forward pass
yhat = b + w * x_train
Step 2: 计算损失 Compute the Loss
# Step 2 - Computing the loss
# We are using ALL data points, so this is BATCH gradient
# descent. How wrong is our model? That's the error!
error = (yhat - y_train)

# It is a regression, so it computes mean squared error (MSE)
loss = (error ** 2).mean()

print(loss)
2.7421577700550976
Step 3: 计算梯度 Compute the Gradients
# Step 3 - Computes gradients for both "b" and "w" parameters
b_grad = 2 * error.mean()
w_grad = 2 * (x_train * error).mean()
print(b_grad, w_grad)
-3.044811379650508 -1.8337537171510832
Step 4: 参数更新 Update the Parameters
# Sets learning rate - this is "eta" ~ the "n" like Greek letter
lr = 0.1
print(b, w)

# Step 4 - Updates parameters using gradients and
# the learning rate
b = b - lr * b_grad
w = w - lr * w_grad

print(b, w)
[0.49671415] [-0.1382643]
[0.80119529] [0.04511107]
Step 5: 重复迭代 Rinse and Repeat!
回到前面再次运行step1到step4 一直重复
step5:基于Numpy 的完整迭代code
# Step 0 - Initializes parameters "b" and "w" randomly
np.random.seed(42)
b = np.random.randn(1)
w = np.random.randn(1)

print(b, w)

# Sets learning rate
lr = 0.1
# Defines number of epochs
n_epochs = 1000

for epoch in range(n_epochs):
    # Step 1 - Computes model's predicted output - forward pass
    yhat = b + w * x_train

    # Step 2 - Computes the loss
    # We are using ALL data points, so this is BATCH gradient descent.
    error = (yhat - y_train)
    # It is a regression, so it computes mean squared error (MSE)
    loss = (error ** 2).mean()

    # Step 3 - Computes gradients for both "b" and "w" parameters
    b_grad = 2 * error.mean()
    w_grad = 2 * (x_train * error).mean()

    # Step 4 - Updates parameters using gradients and the learning rate
    b = b - lr * b_grad
    w = w - lr * w_grad

print(b, w)
输出:
    [0.49671415] [-0.1382643]
    [1.02354094] [1.96896411]
# Sanity Check: do we get the same results as our  gradient descent?
linr = LinearRegression()
linr.fit(x_train, y_train)
print(linr.intercept_, linr.coef_[0])
输出:
    [1.02354075] [1.96896447]
fig = figure3(x_train, y_train)

1. PyTorch
1.1 Tensor
1.1.1 概念定义
在Numpy中,你可能有一个具有三维空间的数组,对吧?从技术上来说,这就是一个张量。
A scalar (a single number) has zero dimensions, a vector has one dimension, a matrix has two dimensions, and a tensor has three or more dimensions. That’s it!
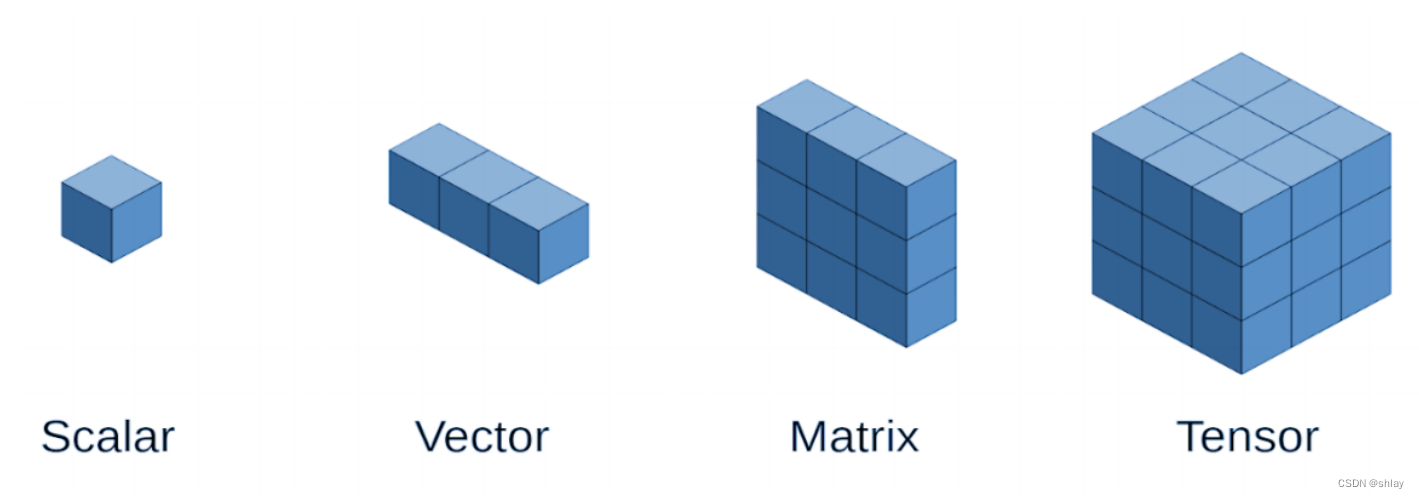
但是,为了简单起见,调用向量和矩阵张量也很常见——所以,从现在开始,所有的东西都是标量或张量。
PyTorch的张量与它的Numpy具有等价的函数,比如ones(), zeros(), rand(), randn(),等等。在下面的例子中,我们分别创建一个:标量、向量、矩阵和张量——或者,换句话说,是一个标量和三个张量。
scalar = torch.tensor(3.14159)
vector = torch.tensor([1, 2, 3])
matrix = torch.ones((2, 3), dtype=torch.float)
tensor = torch.randn((2, 3, 4), dtype=torch.float)

print(scalar)
print(vector)
print(matrix)
print(tensor)
输出:
    tensor(3.1416)
    tensor([1, 2, 3])
    tensor([[1., 1., 1.],
            [1., 1., 1.]])
    tensor([[[-0.4934,  0.2415, -1.1109,  0.0915],
             [-2.3169, -0.2168, -1.3847, -0.8712],
             [ 0.0780,  0.5258, -0.4880,  1.1914]],

            [[-0.8140, -0.7360, -0.8371, -0.9224],
             [-0.0635,  0.6756, -0.0978,  1.8446],
             [-1.1845,  1.3835, -1.2024,  0.7078]]])
You can get the shape of a tensor using its size() method or its shape attribute.
print(tensor.size(), tensor.shape)
输出:
    torch.Size([2, 3, 4]) torch.Size([2, 3, 4])
All tensors have shapes, but scalars have “empty” shapes, since they are dimensionless (or zero dimensions, if you prefer):
print(scalar.size(), scalar.shape)
输出:
    torch.Size([]) torch.Size([])
You can also reshape a tensor using its view() (preferred) or reshape() methods.
# We get a tensor with a different shape but it still is the SAME tensor
same_matrix = matrix.view(1, 6)
# If we change one of its elements...
same_matrix[0, 1] = 2.
# It changes both variables: matrix and same_matrix
print(matrix)
print(same_matrix)
输出:
    tensor([[1., 2., 1.],
            [1., 1., 1.]])
    tensor([[1., 2., 1., 1., 1., 1.]])
注意:view()方法只返回一个具有所需形状的张量,它与原始张量共享底层数据——它不会创建一个新的、独立的张量! reshape()方法可能创建也可能不创建副本!正是因为这种明显奇怪的行为,所以对tensor进行形状变换时首选view()的原因。
# We can use "new_tensor" method to REALLY copy it into a new one
different_matrix = matrix.new_tensor(matrix.view(1, 6))
# Now, if we change one of its elements...
different_matrix[0, 1] = 3.
# The original tensor (matrix) is left untouched!
# But we get a "warning" from PyTorch telling us to use "clone()" instead!
print(matrix)
print(different_matrix)
输出:
    tensor([[1., 2., 1.],
            [1., 1., 1.]])
    tensor([[1., 3., 1., 1., 1., 1.]])
# Lets follow PyTorch's suggestion and use "clone" method
another_matrix = matrix.view(1, 6).clone().detach()
# Again, if we change one of its elements...
another_matrix[0, 1] = 4.
# The original tensor (matrix) is left untouched!
print(matrix)
print(another_matrix)
输出:
    tensor([[1., 2., 1.],
            [1., 1., 1.]])
    tensor([[1., 4., 1., 1., 1., 1.]])
1.1.2 数据加载、设备选择
将Numpy代码转换为PyTorch:从训练数据开始即x_train和y_train数组。 as_tensor()
x_train_tensor = torch.as_tensor(x_train)
x_train.dtype, x_train_tensor.dtype
输出:
    (dtype('float64'), torch.float64)
可以很容易地将其转换为一个不同的类型,比如一个较低精度(32位)的浮点数,它将占用更少的内存空间,使用.float():
float_tensor = x_train_tensor.float()
float_tensor.dtype
输出:
    torch.float32
作为as_tensor()和from_numpy()都返回一个tensor,它与原始的Numpy数组共享底层数据,即修改原始的Numpy数组,也会相应修改PyTorch的tensor,反之亦然。
dummy_array = np.array([1, 2, 3])
dummy_tensor = torch.as_tensor(dummy_array)
# Modifies the numpy array
dummy_array[1] = 0
# Tensor gets modified too...
dummy_tensor
输出:
    tensor([1, 0, 3], dtype=torch.int32)
dummy_tensor.numpy()
输出:
    array([1, 0, 3])
定义 device
上面创建的都是CPU张量。这是什么意思?这意味着张量中的数据存储在计算机的CPU中,对其执行的任何操作都将由其CPU(中央处理单元)来处理,我们称这种张量为CPU张量。
另一种称为GPU张量。GPU(代表图形处理单元)是图形卡的处理器。这些张量将数据存储在显卡的内存中,在它们上面的操作由GPU执行。
device = 'cuda' if torch.cuda.is_available() else 'cpu'
device
输出:
    'cpu'
n_cudas = torch.cuda.device_count()
for i in range(n_cudas):
    print(torch.cuda.get_device_name(i))
gpu_tensor = torch.as_tensor(x_train).to(device)
gpu_tensor[0]
输出:
    tensor([0.7713], dtype=torch.float64)
加载数据到指定device
因此,我们定义了一个device,先将两个Numpy数组转换为PyTorch张量,再将它们转换为浮点数,最后将它们发送到device中。接下来看看此时的变量类型:
device = 'cuda' if torch.cuda.is_available() else 'cpu'

# Our data was in Numpy arrays, but we need to transform them
# into PyTorch's Tensors and then we send them to the
# chosen device
x_train_tensor = torch.as_tensor(x_train).float().to(device)
y_train_tensor = torch.as_tensor(y_train).float().to(device)
# Here we can see the difference - notice that .type() is more
# useful since it also tells us WHERE the tensor is (device)
print(type(x_train), type(x_train_tensor), x_train_tensor.type())
输出:
    <class 'numpy.ndarray'> <class 'torch.Tensor'> torch.FloatTensor
back_to_numpy = x_train_tensor.numpy()
back_to_numpy = x_train_tensor.cpu().numpy()
Can’t convert CUDA tensor to numpy. Use Tensor.cpu() to copy the tensor to host memory first.
1.1.3 创建参数
方法1
下面的代码块为我们创建了参数b和w的两个张量,包括梯度,但在默认情况下,它们是CPU张量。
# FIRST
# Initializes parameters "b" and "w" randomly, ALMOST as we
# did in Numpy since we want to apply gradient descent on
# these parameters we need to set REQUIRES_GRAD = TRUE
torch.manual_seed(42)
b = torch.randn(1, requires_grad=True, dtype=torch.float)
w = torch.randn(1, requires_grad=True, dtype=torch.float)
print(b, w)
输出:
    tensor([0.3367], requires_grad=True) tensor([0.1288], requires_grad=True)
相较于训练集或测试集的数据,参数需要计算其梯度,因此我们可以更新它们的值(即参数值的值)。这就是需要requires_grad=True,它告诉PyTorch计算梯度。
注意:永远不要忘记设置种子以确保reproducibility,就像我们之前在使用Numpy时所做的那样。PyTorch对应的随机种子设置方法是torch.manual_seed()。
在PyTorch和Numpy中使用相同的种子(如此处我们都是用的42),会得到相同的数字吗?
答案是否定的!
在相同的第三方包设置相同的随机种子才会得到相同的数字。PyTorch生成的数字序列与Numpy生成的序列不同,即使两个序列中使用的随机种子数值相同。即使都是pytorch在CPU和GPU上设置相同的种子得到的数据也不同。
方法2
如果下面的device为cuda GPU则会失去梯度设置
# SECOND
# But what if we want to run it on a GPU? We could just
# send them to device, right?
torch.manual_seed(42)
b = torch.randn(1, requires_grad=True, dtype=torch.float).to(device)
w = torch.randn(1, requires_grad=True, dtype=torch.float).to(device)
print(b, w)
# Sorry, but NO! The to(device) "shadows" the gradient...
输出:
    tensor([0.3367], requires_grad=True) tensor([0.1288], requires_grad=True)
方法3
若在GPU上创建参数。我们首先需要将tensor发送到device,然后使用requires_grad_()将其属性设置为True。
# THIRD
# We can either create regular tensors and send them to
# the device (as we did with our data)
torch.manual_seed(42)
b = torch.randn(1, dtype=torch.float).to(device)
w = torch.randn(1, dtype=torch.float).to(device)
# and THEN set them as requiring gradients...
b.requires_grad_()
w.requires_grad_()
print(b, w)
输出:
 tensor([0.3367], requires_grad=True) tensor([0.1288], requires_grad=True)
方法3可以成功地为参数b和w提供了需要梯度的GPU张量。但这样比较麻烦,下面的方法4是更为推荐的在GPU上创建参数的方法。
方法4
总是在device创建的时刻为其分配张量,以避免意外的行为!
# FINAL
# We can specify the device at the moment of creation
# RECOMMENDED!

# Step 0 - Initializes parameters "b" and "w" randomly
torch.manual_seed(42)
b = torch.randn(1, requires_grad=True, \
                dtype=torch.float, device=device)
w = torch.randn(1, requires_grad=True, \
                dtype=torch.float, device=device)
print(b, w)
输出:
    tensor([0.3367], requires_grad=True) tensor([0.1288], requires_grad=True)
1.2 Autograd
pytorch自带求梯度的包,为我们省去了求偏导、链式法则等其它的一些复杂问题。
1.2.1 反向传播 backward
backward()的作用是告诉PyTorch计算所有数据加载时requires_grad=True的tensor对应的梯度。
# Step 1 - Computes our model's predicted output - forward pass
yhat = b + w * x_train_tensor

# Step 2 - Computes the loss
# We are using ALL data points, so this is BATCH gradient descent
# How wrong is our model? That's the error!
error = (yhat - y_train_tensor)
# It is a regression, so it computes mean squared error (MSE)
loss = (error ** 2).mean()

# Step 3 - Computes gradients for both "b" and "w" parameters
# No more manual computation of gradients!
# b_grad = 2 * error.mean()
# w_grad = 2 * (x_tensor * error).mean()
loss.backward()
新的“Step 3 Computes gradients for both “b” and “w” parameters”使用的是backward()
print(error.requires_grad, yhat.requires_grad, \
      b.requires_grad, w.requires_grad)
print(y_train_tensor.requires_grad, x_train_tensor.requires_grad)
输出:
    True True True True
    False False
1.2.2 grad
查看参数的具体梯度值
print(b.grad, w.grad)
输出:
    tensor([-3.1125]) tensor([-1.8156])
多次运行上面两个代码块,能看到梯度是累积的。另外,CPU和GPU上的输出会略有不同。
我们需要使用对应于当前损失的梯度来执行参数更新。而不应该使用累积的梯度。事实证明,这种行为可以用于规避硬件限制。
当我们的计算机内存不是很大时,我们还可以把一个mini-batch分成sub-mini-batches,计算这些“subs”的梯度,并累积它们,以得到与计算整个小批处理上的梯度相同的结果。
如果我们的内存能够处理的数据,不希望梯度累计怎么办呢?zero_()能够帮我们实现
# This code will be placed *after* Step 4
# (updating the parameters)
b.grad.zero_(), w.grad.zero_()
输出:
    (tensor([0.]), tensor([0.]))
1.2.3 参数更新 no_grad()
# Sets learning rate - this is "eta" ~ the "n"-like Greek letter
lr = 0.1

# Step 0 - Initializes parameters "b" and "w" randomly
torch.manual_seed(42)
b = torch.randn(1, requires_grad=True, \
                dtype=torch.float, device=device)
w = torch.randn(1, requires_grad=True, \
                dtype=torch.float, device=device)

# Defines number of epochs
n_epochs = 1000

for epoch in range(n_epochs):
    yhat = b + w * x_train_tensor
    error = (yhat - y_train_tensor)
    loss = (error ** 2).mean()
    loss.backward()
    with torch.no_grad():
        b -= lr * b.grad
        w -= lr * w.grad

    b.grad.zero_()
    w.grad.zero_()

print(b, w)
输出:
    tensor([1.0235], requires_grad=True) tensor([1.9690], requires_grad=True)
1.3 动态计算图 Dynamic Computation Graph
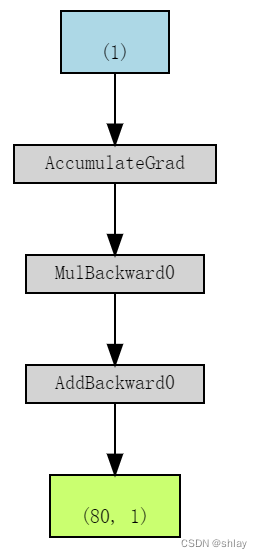
PyTorchViz包及其make_dot(variable)方法能让我们轻松地可视化与梯度计算相关联变量的Python变量图
# Step 0 - Initializes parameters "b" and "w" randomly
torch.manual_seed(42)
b = torch.randn(1, requires_grad=True, \
                dtype=torch.float, device=device)
w = torch.randn(1, requires_grad=True, \
                dtype=torch.float, device=device)

# Step 1 - Computes our model's predicted output - forward pass
yhat = b + w * x_train_tensor

# Step 2 - Computes the loss
# We are using ALL data points, so this is BATCH gradient
# descent. How wrong is our model? That's the error!
error = (yhat - y_train_tensor)
# It is a regression, so it computes mean squared error (MSE)
loss = (error ** 2).mean()

# We can try plotting the graph for any python variable:
# yhat, error, loss...
make_dot(yhat)
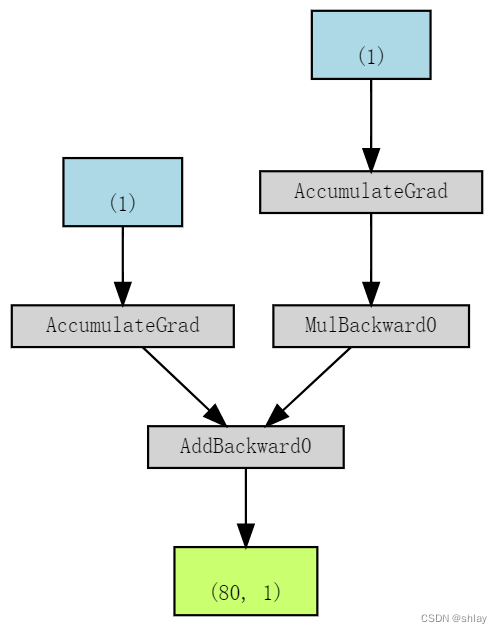
- 蓝框((1)s):对应于作为参数的张量,即要求PyTorch计算梯度的张量
- 灰框 (MulBackward0 和 AddBackward0)::涉及梯度计算张量或其依赖关系的Python操作
- 绿框 ((80, 1)):用作计算梯度起点的张量(假设 backward()方法从用于可视化图的变量调用)——它们是从图的自下而上计算的
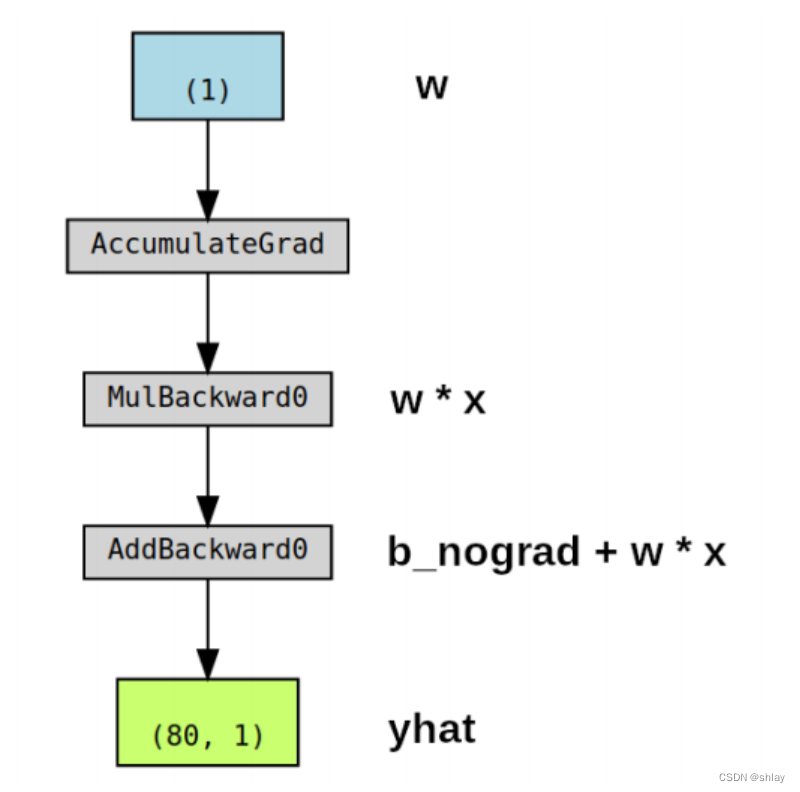
便于理解,上图对应的变量标注如下所示:
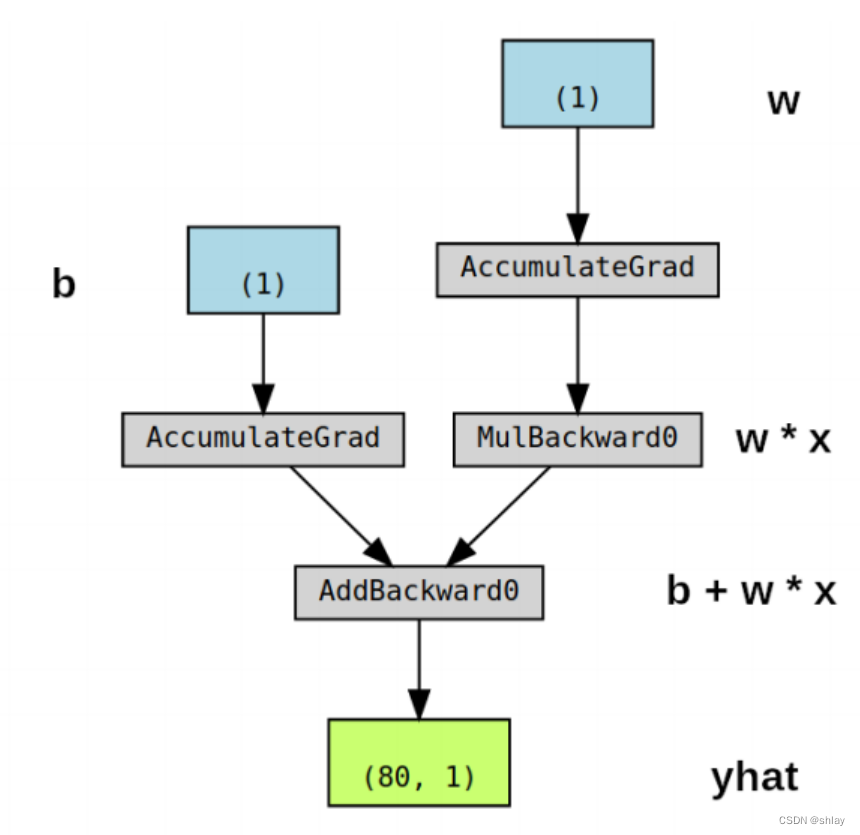
即使在计算图所执行的操作中涉及到更多的张量,它也只显示了梯度计算张量及其依赖关系。如果我们为参数b设置requires_grad=False,其对应的计算图如下所示:
b_nograd = torch.randn(1, requires_grad=False, \
                       dtype=torch.float, device=device)
w = torch.randn(1, requires_grad=True, \
                dtype=torch.float, device=device)

yhat = b_nograd + w * x_train_tensor

make_dot(yhat)
Simple enough:** No gradients, no graph!**
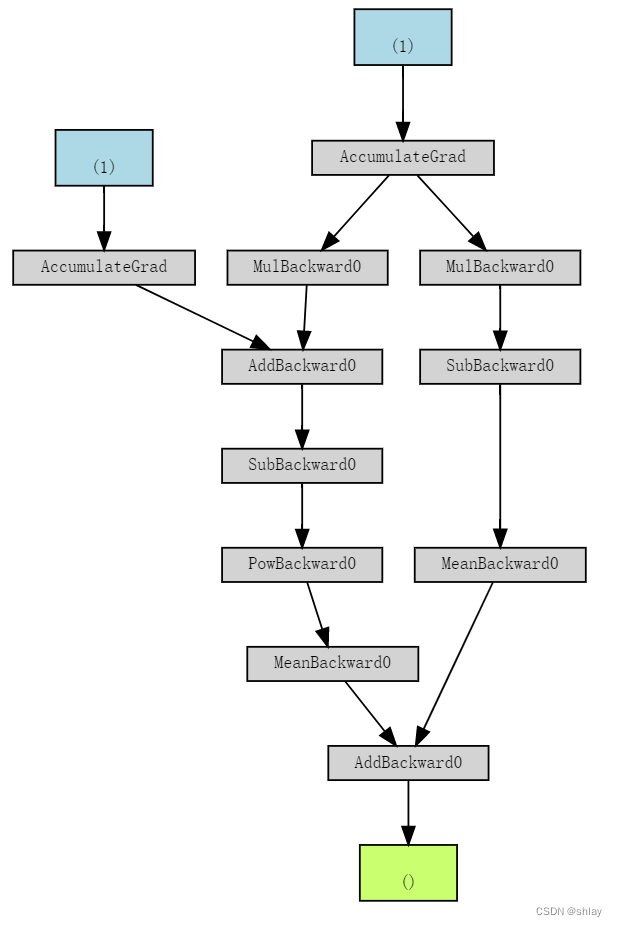
关于动态计算图,最好的一点是,我们可以使它尽可能复杂。甚至可以使用控制流语句(例如,if语句)来控制梯度的流。
即使计算是荒谬的,我们也可以清楚地看到添加控制流语句的效果,如if loss > 0:它将计算图分支为两部分。右分支在if语句中执行计算,该语句最后被添加到左分支的结果中。很酷,对吧?尽管我们在这里没有构建更复杂的模型,但这个小例子很好地说明了PyTorch的功能,以及在代码中实现它们的难度。
b = torch.randn(1, requires_grad=True, \
                dtype=torch.float, device=device)
w = torch.randn(1, requires_grad=True, \
                dtype=torch.float, device=device)

yhat = b + w * x_train_tensor
error = yhat - y_train_tensor
loss = (error ** 2).mean()

# this makes no sense!!
if loss > 0:
    yhat2 = w * x_train_tensor
    error2 = yhat2 - y_train_tensor

# neither does this :-)
loss += error2.mean()

make_dot(loss)
1.4 优化器 Optimizer
上面的例子中我们已经使用计算出的梯度手动更新参数。这对于两个参数来说可能还可以,但如果我们有很多参数呢?我们需要使用PyTorch的优化器,如SGD、RMSprop或Adam。
有许多优化器: 其中SGD是最基本的,而Adam是最受欢迎的之一。不同的优化器使用不同的机制来更新参数,但它们都通过不同的路径来实现相同的目标。
注意:
mini-batch size的选择和Optimizer优化器的选择都会影响梯度下降的路径。
一个优化器的输入需要我们想要更新的参数,想要使用的学习速率(可能还有许多其他的超参数!),并通过optimizer.step()方法执行更新。
# Defines a SGD optimizer to update the parameters
optimizer = optim.SGD([b, w], lr=lr)
# Sets learning rate - this is "eta" ~ the "n"-like Greek letter
lr = 0.1

# Step 0 - Initializes parameters "b" and "w" randomly
torch.manual_seed(42)
b = torch.randn(1, requires_grad=True, \
                dtype=torch.float, device=device)
w = torch.randn(1, requires_grad=True, \
                dtype=torch.float, device=device)

# Defines a SGD optimizer to update the parameters
optimizer = optim.SGD([b, w], lr=lr)

# Defines number of epochs
n_epochs = 1000

for epoch in range(n_epochs):
    yhat = b + w * x_train_tensor

    error = (yhat - y_train_tensor)

    loss = (error ** 2).mean()
    loss.backward()
    optimizer.step()
    optimizer.zero_grad()

print(b, w)
输出:
    tensor([1.0235], requires_grad=True) tensor([1.9690], requires_grad=True)
1.5 损失 Loss
pytorch中有许多损失函数可供选择。由于我们的是一元线性回归,所以使用均方误差(MSE)作为损失,即PyTorch的nn.MSELoss():
1.5.1 损失函数的定义和调用
# Defines a MSE loss function
loss_fn = nn.MSELoss(reduction='mean')
loss_fn
输出:
    MSELoss()
# This is a random example to illustrate the loss function
predictions = torch.tensor([0.5, 1.0])
labels = torch.tensor([2.0, 1.3])
loss_fn(predictions, labels)
输出:
    tensor(1.1700)
1.5.2 包含loss的完整code
# Sets learning rate - this is "eta" ~ the "n"-like
# Greek letter
lr = 0.1

# Step 0 - Initializes parameters "b" and "w" randomly
torch.manual_seed(42)
b = torch.randn(1, requires_grad=True, \
                dtype=torch.float, device=device)
w = torch.randn(1, requires_grad=True, \
                dtype=torch.float, device=device)

# Defines a SGD optimizer to update the parameters
optimizer = optim.SGD([b, w], lr=lr)

# Defines a MSE loss function
loss_fn = nn.MSELoss(reduction='mean')

# Defines number of epochs
n_epochs = 1000

for epoch in range(n_epochs):
    # Step 1 - Computes model's predicted output - forward pass
    yhat = b + w * x_train_tensor

    # Step 2 - Computes the loss
    loss = loss_fn(yhat, y_train_tensor)

    # Step 3 - Computes gradients for both "b" and "w" parameters
    loss.backward()

    # Step 4 - Updates parameters using gradients and the learning rate
    optimizer.step()
    optimizer.zero_grad()

print(b, w)
输出:
    tensor([1.0235], requires_grad=True) tensor([1.9690], requires_grad=True)
loss
输出:
    tensor(0.0080, grad_fn=<MseLossBackward0>)
如果想把loss作为一个Numpy数组呢?我们可以尝试再用一次numpy(),对吧?如果loss是在cuda设备中先用.cpu()。
loss.cpu().numpy()
输出:
    ---------------------------------------------------------------------------

    RuntimeError                              Traceback (most recent call last)

    <ipython-input-140-58c76a7bac74> in <module>()
    ----> 1 loss.cpu().numpy()


    RuntimeError: Can't call numpy() on Tensor that requires grad. Use tensor.detach().numpy() instead.
报错了,这是因为loss tensor 实际上是在计算梯度与我们的数据张量不同,,为了使用numpy(),我们需要先用detach()将张量从计算图中分离出来:
loss.detach().cpu().numpy()
这样貌似有点麻烦,因为loss只有一个元素,所以可以使用item()或者tolist()来返回一个标量。
print(loss.item(), loss.tolist())
2. 模型 Model
在PyTorch中,模型由一个继承自模块类的常规Python类表示。一个 model class需要实现的最基本的方法是:
- 1.init(self):它定义了组成模型的部分——如上例中的两个参数b和w。
- 2.forward(self, x):执行实际计算;即给定输入x,输出一个预测值。
2.1 回归模型 LinearRegression
为上面的回归任务建立一个合适的(但也很简单的)模型。code如下:
2.1.1 定义 model class
class ManualLinearRegression(nn.Module):
    def __init__(self):
        super().__init__()
        # To make "b" and "w" real parameters of the model,
        # we need to wrap them with nn.Parameter
        self.b = nn.Parameter(torch.randn(1,
                                          requires_grad=True,
                                          dtype=torch.float))
        self.w = nn.Parameter(torch.randn(1,
                                          requires_grad=True,
                                          dtype=torch.float))

    def forward(self, x):
        # Computes the outputs / predictions
        return self.b + self.w * x
2.1.2 参数 Parameters
通过定义 model class,然后在__init__(self)中定义参数可以使用我们模型的parameters()方法来检索模型参数上的迭代器,包括嵌套模型的参数。然后可以使用它来feed我们的优化器(而不是自己构建一个参数列表!)。
torch.manual_seed(42)
# Creates a "dummy" instance of our ManualLinearRegression model
dummy = ManualLinearRegression()
list(dummy.parameters())
输出:
[Parameter containing:
 tensor([0.3367], requires_grad=True), Parameter containing:
 tensor([0.1288], requires_grad=True)]
2.1.3 状态字典 state_dict()
此外,还可以利用模型的state_dict()方法得到所有参数的当前值。
dummy.state_dict()
输出:
OrderedDict([('b', tensor([0.3367])), ('w', tensor([0.1288]))])
optimizer.state_dict()
输出:
{'state': {0: {'momentum_buffer': None}, 1: {'momentum_buffer': None}},
 'param_groups': [{'lr': 0.1,
   'momentum': 0,
   'dampening': 0,
   'weight_decay': 0,
   'nesterov': False,
   'params': [0, 1]}]}
2.1.4 device
如果使用GPU,则需要把虚拟模型发送到设备上,如下所示:
torch.manual_seed(42)
# Creates a "dummy" instance of our ManualLinearRegression model
# and sends it to the device
dummy = ManualLinearRegression().to(device)
2.1.5 前向传播 Forward Pass
注意:您需要对调用模型
model(x)进行预测,不要调用`model.forward(x))!否则,模型的hooks将无法工作。
# Sets learning rate - this is "eta" ~ the "n"-like
# Greek letter
lr = 0.1

# Step 0 - Initializes parameters "b" and "w" randomly
torch.manual_seed(42)
# Now we can create a model and send it at once to the device
model = ManualLinearRegression().to(device)

# Defines a SGD optimizer to update the parameters
# (now retrieved directly from the model)
optimizer = optim.SGD(model.parameters(), lr=lr)

# Defines a MSE loss function
loss_fn = nn.MSELoss(reduction='mean')

# Defines number of epochs
n_epochs = 1000

for epoch in range(n_epochs):
    model.train() # What is this?!?

    # Step 1 - Computes model's predicted output - forward pass
    # No more manual prediction!
    yhat = model(x_train_tensor)

    # Step 2 - Computes the loss
    loss = loss_fn(yhat, y_train_tensor)

    # Step 3 - Computes gradients for both "b" and "w" parameters
    loss.backward()

    # Step 4 - Updates parameters using gradients and the learning rate
    optimizer.step()
    optimizer.zero_grad()

# We can also inspect its parameters using its state_dict
print(model.state_dict())
输出:
OrderedDict([('b', tensor([1.0235])), ('w', tensor([1.9690]))])
2.1.6 训练 train
进入for循环的第一步就是执行model.train(),在PyTorch中,模型有model.train()方法,但该方法并没有真正执行训练步骤。它唯一的目的是将模型设置为训练模式。因为一些模型中可能会使用像Dropout这样的机制,它们在训练和评估阶段有不同的行为。
2.2 嵌套模型 Nested Models
linear = nn.Linear(1, 1)
linear
输出:
Linear(in_features=1, out_features=1, bias=True)
linear.state_dict()
输出:
OrderedDict([('weight', tensor([[-0.2191]])), ('bias', tensor([0.2018]))])
2.2.1 定义 model class
现在,使用PyTorch的线性模型作为自己的属性,从而创建一个嵌套的模型。__init__(self)中并不受限于定义参数,也可以包含其他模型作为其属性,所以很容易实现嵌套模型。
-
在
__init__()函数中,创建了一个包含我们嵌套的线性模型这一属性。 -
在
forward(self, x)函数中,调用嵌套模型本身来执行正向传递(注意,没有调用self.linear.forward(x)!)。
class MyLinearRegression(nn.Module):
    def __init__(self):
        super().__init__()
        # Instead of our custom parameters, we use a Linear model
        # with single input and single output
        self.linear = nn.Linear(1, 1)

    def forward(self, x):
        # Now it only takes a call
        self.linear(x)
2.2.2 查看参数
此时调用这个模型的parameters()方法,PyTorch将递归地计算出其属性的参数。另外,state_dict()同样可用。
torch.manual_seed(42)
dummy = MyLinearRegression().to(device)
list(dummy.parameters())
输出:
[Parameter containing:
 tensor([[0.7645]], requires_grad=True), Parameter containing:
 tensor([0.8300], requires_grad=True)]
dummy.state_dict()
输出:
OrderedDict([('linear.weight', tensor([[0.7645]])),
             ('linear.bias', tensor([0.8300]))])
2.3 序贯模型 Sequential Models
torch.manual_seed(42)
# Alternatively, you can use a Sequential model
model = nn.Sequential(nn.Linear(1, 1)).to(device)

model.state_dict()
输出:
OrderedDict([('0.weight', tensor([[0.7645]])), ('0.bias', tensor([0.8300]))])
2.4 层 Layers
线性模型可以看作是神经网络中的一个层。
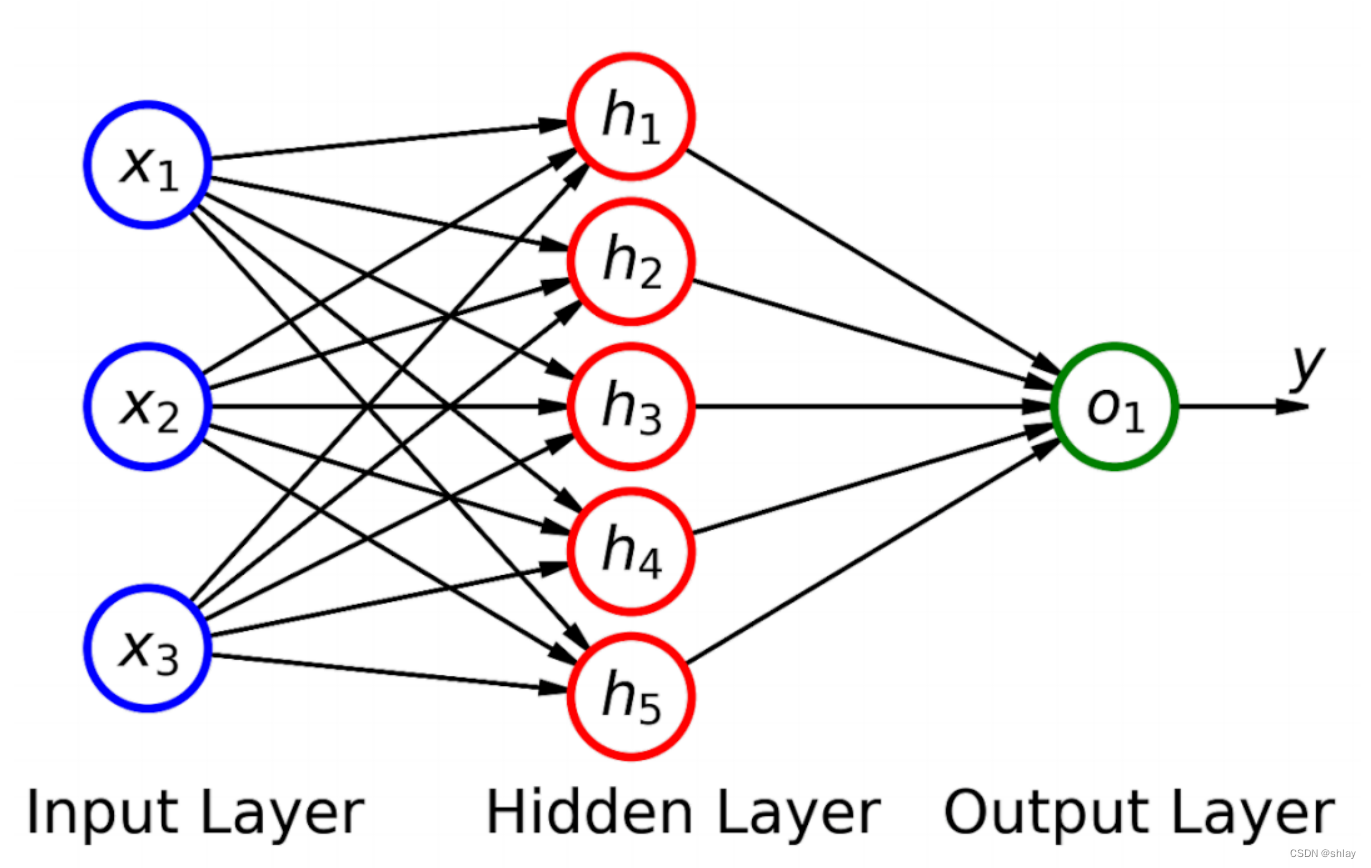
torch.manual_seed(42)
# Building the model from the figure above
model = nn.Sequential(nn.Linear(3, 5), nn.Linear(5, 1)).to(device)

model.state_dict()
输出:
OrderedDict([('0.weight', tensor([[ 0.4414,  0.4792, -0.1353],
                      [ 0.5304, -0.1265,  0.1165],
                      [-0.2811,  0.3391,  0.5090],
                      [-0.4236,  0.5018,  0.1081],
                      [ 0.4266,  0.0782,  0.2784]])),
             ('0.bias', tensor([-0.0815,  0.4451,  0.0853, -0.2695,  0.1472])),
             ('1.weight',
              tensor([[-0.2060, -0.0524, -0.1816,  0.2967, -0.3530]])),
             ('1.bias', tensor([-0.2062]))])
由于这个序贯模型没有属性名称,所以state_dict()使用了数字前缀。
我们可以使用模型的add_module()方法来命名图层:
torch.manual_seed(42)
# Building the model from the figure above
model = nn.Sequential()
model.add_module('layer1', nn.Linear(3, 5))
model.add_module('layer2', nn.Linear(5, 1))
model.to(device)
输出:
Sequential(
  (layer1): Linear(in_features=3, out_features=5, bias=True)
  (layer2): Linear(in_features=5, out_features=1, bias=True)
)
目前我们只使用了一个Linear Layers。在PyTorch中有许多不同的图层可供使用:
- Convolution Layers
- Pooling Layers
- Padding Layers
- Non-linear Activations
- Normalization Layers
- Recurrent Layers
- Transformer Layers
- Linear Layers
- Dropout Layers
- Sparse Layers (embeddings)
- Vision Layers
- DataParallel Layers (multi-GPU)
- Flatten Layer
2.5 code整合
到目前为止,我们已经学习了很多基本术语和相关操作,从在Numpy中使用梯度下降训练线性回归,到逐步将其转换为PyTorch模型。现在把它们全部放在一起,并把我们的代码重构成三个基本部分,即:
2.5.1 准备数据
%%writefile data_preparation16.py

device = 'cuda' if torch.cuda.is_available() else 'cpu'

# Our data was in Numpy arrays, but we need to transform them
# into PyTorch's Tensors and then we send them to the
# chosen device
x_train_tensor = torch.as_tensor(x_train).float().to(device)
y_train_tensor = torch.as_tensor(y_train).float().to(device)
输出:
Overwriting data_preparation16.py
%run -i data_preparation16.py
2.5.2 设置模型
%%writefile model_configuration16.py

# This is redundant now, but it won't be when we introduce
# Datasets...
device = 'cuda' if torch.cuda.is_available() else 'cpu'

# Sets learning rate - this is "eta" ~ the "n"-like Greek letter
lr = 0.1

torch.manual_seed(42)
# Now we can create a model and send it at once to the device
model = nn.Sequential(nn.Linear(1, 1)).to(device)

# Defines a SGD optimizer to update the parameters
# (now retrieved directly from the model)
optimizer = optim.SGD(model.parameters(), lr=lr)

# Defines a MSE loss function
loss_fn = nn.MSELoss(reduction='mean')
输出:
Overwriting model_configuration16.py
%run -i model_configuration16.py
2.5.3 训练模型
%%writefile model_training16.py

# Defines number of epochs
n_epochs = 1000

for epoch in range(n_epochs):
    # Sets model to TRAIN mode
    model.train()

    # Step 1 - Computes model's predicted output - forward pass
    yhat = model(x_train_tensor)

    # Step 2 - Computes the loss
    loss = loss_fn(yhat, y_train_tensor)

    # Step 3 - Computes gradients for both "b" and "w" parameters
    loss.backward()

    # Step 4 - Updates parameters using gradients and  the learning rate
    optimizer.step()
    optimizer.zero_grad()
输出:
Overwriting model_training16.py
%run -i model_training/v0.py
print(model.state_dict())
输出:
OrderedDict([('0.weight', tensor([[1.9690]])), ('0.bias', tensor([1.0235]))])
3. 知识点小结
- 1.使用梯度下降实现线性回归
- 2.在PyTorch创建张量,发送到device,并利用它们生成参数
- 3.理解PyTorch的主要特性,如
autograd,backward(),grad,zero_(), andno_grad() - 4.可视化动态计算图与一系列相关的操作
- 5.创建一个优化器同时使用
step()andzero_grad()更新多个参数 - 6.使用PyTorch相应的高阶函数创建损失函数
loss function - 7.理解PyTorch的模块类并创建自己的模型,实现
__init__()andforward()方法,并利用其parameters()andstate_dict()方法 - 8.使用上面的函数将原始的Numpy实现转换为PyTorch实现
- 9.了解在模型迭代过程中包含
model.train()重要性 - 10.使用PyTorch的层实现嵌套模型和序贯模型
- 11.核心代码的整合,分为三个模块:数据准备、模型构建、模型训练
