Mybatis源码系列文章
手写源码(了解源码整体流程及重要组件)
Mybatis源码解析(一):环境搭建
Mybatis源码解析(二):全局配置文件的解析
Mybatis源码解析(三):映射配置文件的解析
Mybatis源码解析(四):sql语句及#{}、${}的解析
Mybatis源码解析(五):SqlSession会话的创建
Mybatis源码解析(六):缓存执行器操作流程
Mybatis源码解析(六):查询数据库主流程
Mybatis源码解析(七):Mapper代理原理
Mybatis源码解析(八):插件机制
目录
- 前言
- 一、Mybatis插件介绍
- 二、自定义插件
- 1、自定义插件注解和接口
- 2、代码示例
- 三、源码分析-插件
- 1、加载解析拦截器
- 2、拦截器包装四大对象
- 3、代理对象生成时序图
- 四、四大对象拦截位置
- 总结
前言
什么是Mybatis插件?有什么作用?
- 一般开源框架都会提供扩展点,让开发者自行扩展,从而完成逻辑的增强
- 基于插件机制可以实现了很多有用的功能,比如说分页,字段加密,监控等功能,这种通用的功能,就如同AOP一样
- 通过Mybatis插件可以实现对框架的扩展,来实现自定义功能,并且对于用户是无感知的
一、Mybatis插件介绍
- Mybatis插件本质上来说就是一个拦截器,它体现了JDK动态代理和责任链设计模式的综合运用
- Mybatis中针对四大组件提供了扩展机制,这四个组件分别是:
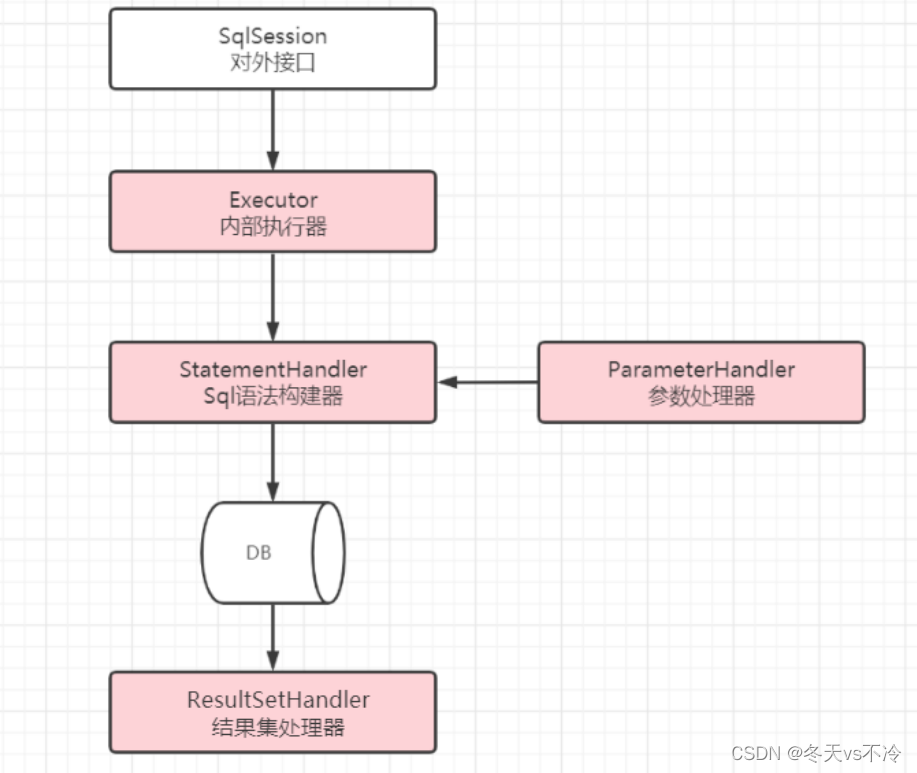
- 允许拦截的方法如下:
- Executor 【SQL执行器】【update,query,commit,rollback】
- StatementHandler 【Sql语法构建器对象】【prepare,parameterize,batch,update,query等】
- ParameterHandler 【参数处理器】【getParameterObject,setParameters等】
- ResultSetHandler 【结果集处理器】【handleResultSets,handleOuputParameters等】
二、自定义插件
1、自定义插件注解和接口
注解
- @Intercepts注解-标记为拦截器类(插件类)
@Documented
@Retention(RetentionPolicy.RUNTIME)
@Target(ElementType.TYPE)
public @interface Intercepts {
  Signature[] value();
}
- @Signature注解-标记拦截器拦截哪个类的哪个方法
- 可以设置多个拦截器,所有可以配置多个@Signature
@Documented
@Retention(RetentionPolicy.RUNTIME)
@Target({})
public @interface Signature {
  Class<?> type();

  String method();

  Class<?>[] args();
}
接口
- 拦截后要干什么就需要实现 Intercetor#intercept 方法
public interface Interceptor {

  // 真正方法被拦截执行的逻辑
  Object intercept(Invocation invocation) throws Throwable;

  // 生成目标对象的代理对象
  default Object plugin(Object target) {
    return Plugin.wrap(target, this);
  }

  // 可以拦截器设置一些属性
  default void setProperties(Properties properties) {

  }
}
2、代码示例
- 使用@Intercepts注解拦截四大对象之一的sql语句处理器的prepare方法
- 执行流程
- setProperties():先执行 xml中配置此插件时候可以添加自定义参数,这里可以获取
- plugin():再执行 如果确认正在创建的对象为拦截对象,则再套一次,jdk动态代理
- intercept():最后执行 上一步动态代理的invoke方法就是执行此方法,拦截方法后的增强逻辑
- invocation对象包含拦截的对象、拦截的对象方法、方法参数
- 本拦截器是拦截StatementHandler对象,所有invocation.getTarget()即使此对象
- invocation.proceed():放行;执行后面的拦截器或对应的拦截方法,否则将返回,不再往后执行
@Intercepts({
    @Signature(type = StatementHandler.class,
               method = "prepare",
               args = {Connection.class,Integer.class})
})
public class MyPlugin implements Interceptor {

  /**
   * 拦截方法:每次执行目标方法时,都会进入到intercept方法中
   * @param invocation :多个参数的封装类
   */
  @Override
  public Object intercept(Invocation invocation) throws Throwable {
    // 增强逻辑:将执行的sql进行记录(打印)
    StatementHandler statementHandler = (StatementHandler) invocation.getTarget();
    BoundSql boundSql = statementHandler.getBoundSql();
    String sql = boundSql.getSql();

    System.out.println("拦截方法,记录Sql:" + sql);

    return invocation.proceed();
  }

  /**
   * 将目标对象生成代理对象,添加到拦截器链中
   * @param target :目标对象
   */
  @Override
  public Object plugin(Object target) {
    // wrap 将目标对象,基于JDK动态代理生成代理对象
    return Plugin.wrap(target,this);
  }

  /**
   * 设置属性
   */
  @Override
  public void setProperties(Properties properties) {
    System.out.println("插件配置的初始化参数:" + properties);

  }
}
将插件注册到全局配置文件中
<configuration>
	...
    <plugins>
        <plugin interceptor="com.xc.interceptor.MyPlugin">
            <property name="username" value="zhangsan"/>
        </plugin>
    </plugins>
    ...
</configuration>
执行结果
已连接到目标 VM, 地址: ''127.0.0.1:51955',传输: '套接字''
插件配置的初始化参数:{username=zhangsan}
拦截方法,记录Sql:SELECT id,username FROM  user WHERE id = ?
与目标 VM 断开连接, 地址为: ''127.0.0.1:51955',传输: '套接字''

进程已结束,退出代码0
核心思想
- 使用JDK动态代理的方式,对这四个对象进行包装增强
- 创建一个类实现Mybatis的拦截器接口,并且加入到拦截器链(拦截器集合)
- 在创建四大对象的时候,不直接返回,而是遍历拦截器链,把每一个拦截器都作用于四大对象中
- 这么一来,Mybatis创建的四大对象其实都是代理对象,都是被包装过的
三、源码分析-插件
1、加载解析拦截器
- 插件配置在核心配置文件xml中,所以插件的解析也在这里
- Mybatis源码解析(二):全局配置文件的解析,进入<configuration>标签的子标签<plugins>的解析
进入<plugins>标签的解析方法
- <plugins>可以配置多个拦截器<plugin>,这里就是遍历多个<plugin>标签
- child.getStringAttribute(“interceptor”):获取到的拦截器类的全限定类路径(“com.xc.interceptor.MyPlugin”),反射获取自定义拦截器对象
- interceptorInstance.setProperties:这里就是调用自定义拦截器的属性初始化方法,xml中配置属性,可以在自定义拦截器中获取
- addInterceptor:添加到拦截器链(拦截器集合)
private void pluginElement(XNode parent) throws Exception {
  if (parent != null) {
    for (XNode child : parent.getChildren()) {
      // 获取拦截器
      String interceptor = child.getStringAttribute("interceptor");
      // 获取配置的Properties属性
      Properties properties = child.getChildrenAsProperties();
      // 根据配置文件中配置的插件类的全限定名 进行反射初始化
      Interceptor interceptorInstance = (Interceptor) resolveClass(interceptor).getDeclaredConstructor().newInstance();
      // 将属性添加到Intercepetor对象
      interceptorInstance.setProperties(properties);
      // 添加到配置类的InterceptorChain属性,InterceptorChain类维护了一个List<Interceptor>
      configuration.addInterceptor(interceptorInstance);
    }
  }
}
添加到拦截器链
- InterceptorChain:拦截器链对象,核心属性就是interceptors-拦截器对象集合
public void addInterceptor(Interceptor interceptor) {
  interceptorChain.addInterceptor(interceptor);
}
public class InterceptorChain {

  private final List<Interceptor> interceptors = new ArrayList<>();
  ...
  public void addInterceptor(Interceptor interceptor) {
    interceptors.add(interceptor);
  }
  ...
}
2、拦截器包装四大对象
- 上面说到拦截器就是为四大对象创建代理对象
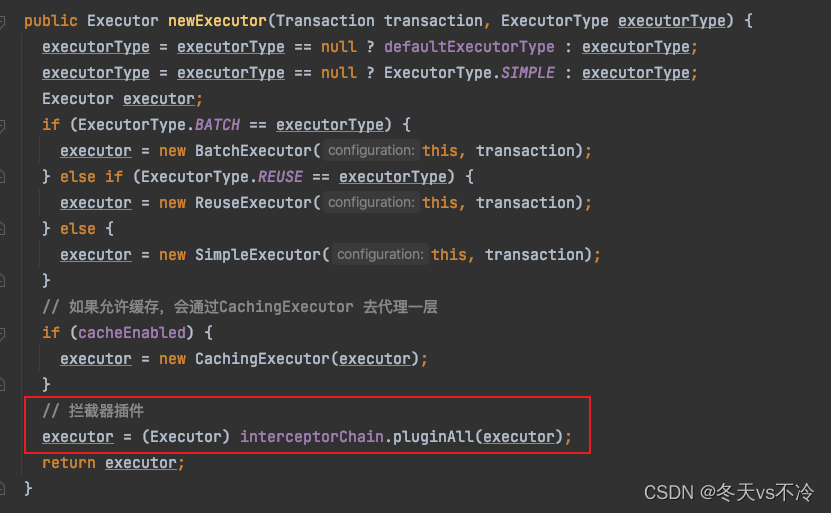
查看执行器对象的创建的源码
- 先创建批量、重用或简单执行器
- 默认开启缓存,则执行器外添加一层缓存执行器(装饰者模式)
- 上面说到,自定义拦截器会添加到拦截器链interceptorChain中,查看pluginAll
public Executor newExecutor(Transaction transaction, ExecutorType executorType) {
  executorType = executorType == null ? defaultExecutorType : executorType;
  executorType = executorType == null ? ExecutorType.SIMPLE : executorType;
  Executor executor;
  if (ExecutorType.BATCH == executorType) {
    executor = new BatchExecutor(this, transaction);
  } else if (ExecutorType.REUSE == executorType) {
    executor = new ReuseExecutor(this, transaction);
  } else {
    executor = new SimpleExecutor(this, transaction);
  }
  // 如果允许缓存,会通过CachingExecutor 去代理一层
  if (cacheEnabled) {
    executor = new CachingExecutor(executor);
  }
  // 拦截器插件
  executor = (Executor) interceptorChain.pluginAll(executor);
  return executor;
}
查看拦截器链的pluginAll方法
- 遍历拦截器链的自定义拦截器
- 调用拦截器的plugin方法,这个方法就是自己创建自定义拦截器中的plugin方法(创建代理对象)
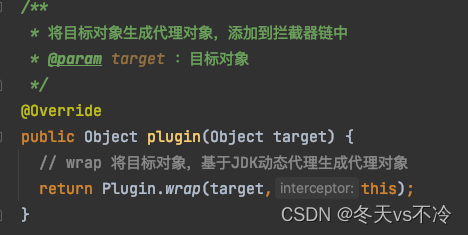
public Object pluginAll(Object target) {
  for (Interceptor interceptor : interceptors) {
    target = interceptor.plugin(target);
  }
  return target;
}
查看Plugin的wrap方法
- Map对象signatureMap
- key:拦截的四大对象对应的Class对象
- value:拦截的四大对象的方法
- getAllInterfaces方法:判断目标类对象是否是拦截的对象,是,则添加到interfaces中
- 判断interfaces,不为0,表示拦截器对象与目标对象一致,则通过JDK动态代理创建代理类返回
- 第三个参数new Plugin(),肯定是InvocationHandler的实现类,invoke方法则是增强方法
public static Object wrap(Object target, Interceptor interceptor) {
  // 1.解析该拦截器所拦截的所有接口及对应拦截接口的方法
  Map<Class<?>, Set<Method>> signatureMap = getSignatureMap(interceptor);
  Class<?> type = target.getClass();
  // 2.获取目标对象实现的所有被拦截的接口
  Class<?>[] interfaces = getAllInterfaces(type, signatureMap);
  // 3.目标对象有实现被拦截的接口,生成代理对象并返回
  if (interfaces.length > 0) {
    // 通过JDK动态代理的方式实现
    return Proxy.newProxyInstance(
        type.getClassLoader(),
        interfaces,
        new Plugin(target, interceptor, signatureMap));
  }
  // 目标对象没有实现被拦截的接口,直接返回原对象
  return target;
}
查看Plugin的invoke方法
- interceptor.intercept:这里即时调用自己创建的拦截器的实现方法
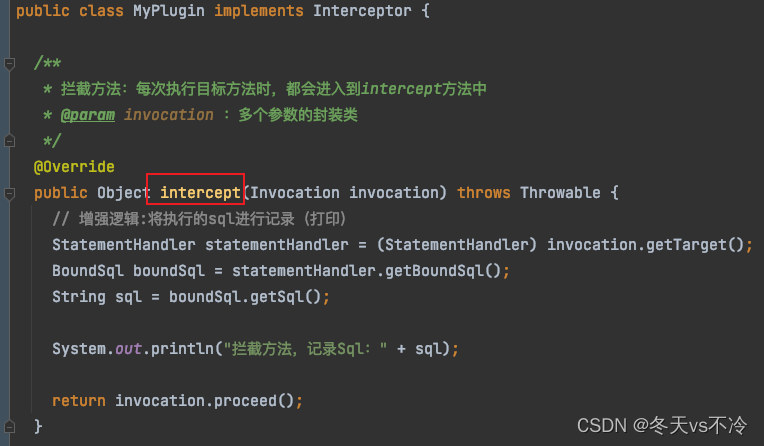
- Invocation:目标对象、方法、参数则是这里new对象传入自定义拦截器的intercept方法
@Override
public Object invoke(Object proxy, Method method, Object[] args) throws Throwable {
  try {
    // 获取被拦截的方法 key:拦截的组件对象 value:拦截的组件对象的方法
    Set<Method> methods = signatureMap.get(method.getDeclaringClass());
    // 如果当前执行的方法属于拦截方法,那就执行代理对象的方法intercept
    if (methods != null && methods.contains(method)) {
      return interceptor.intercept(new Invocation(target, method, args));
    }
    // 如果没有方法被代理,则调用原方法
    return method.invoke(target, args);
  } catch (Exception e) {
    throw ExceptionUtil.unwrapThrowable(e);
  }
}
查看自定义插件intercept方法的invocation.proceed()
- method:目标方法也是拦截方法
- 此时拦截方法的增强逻辑已完成,接下来执行目标方法的原始逻辑
public Object proceed() throws InvocationTargetException, IllegalAccessException {
  return method.invoke(target, args);
}
3、代理对象生成时序图
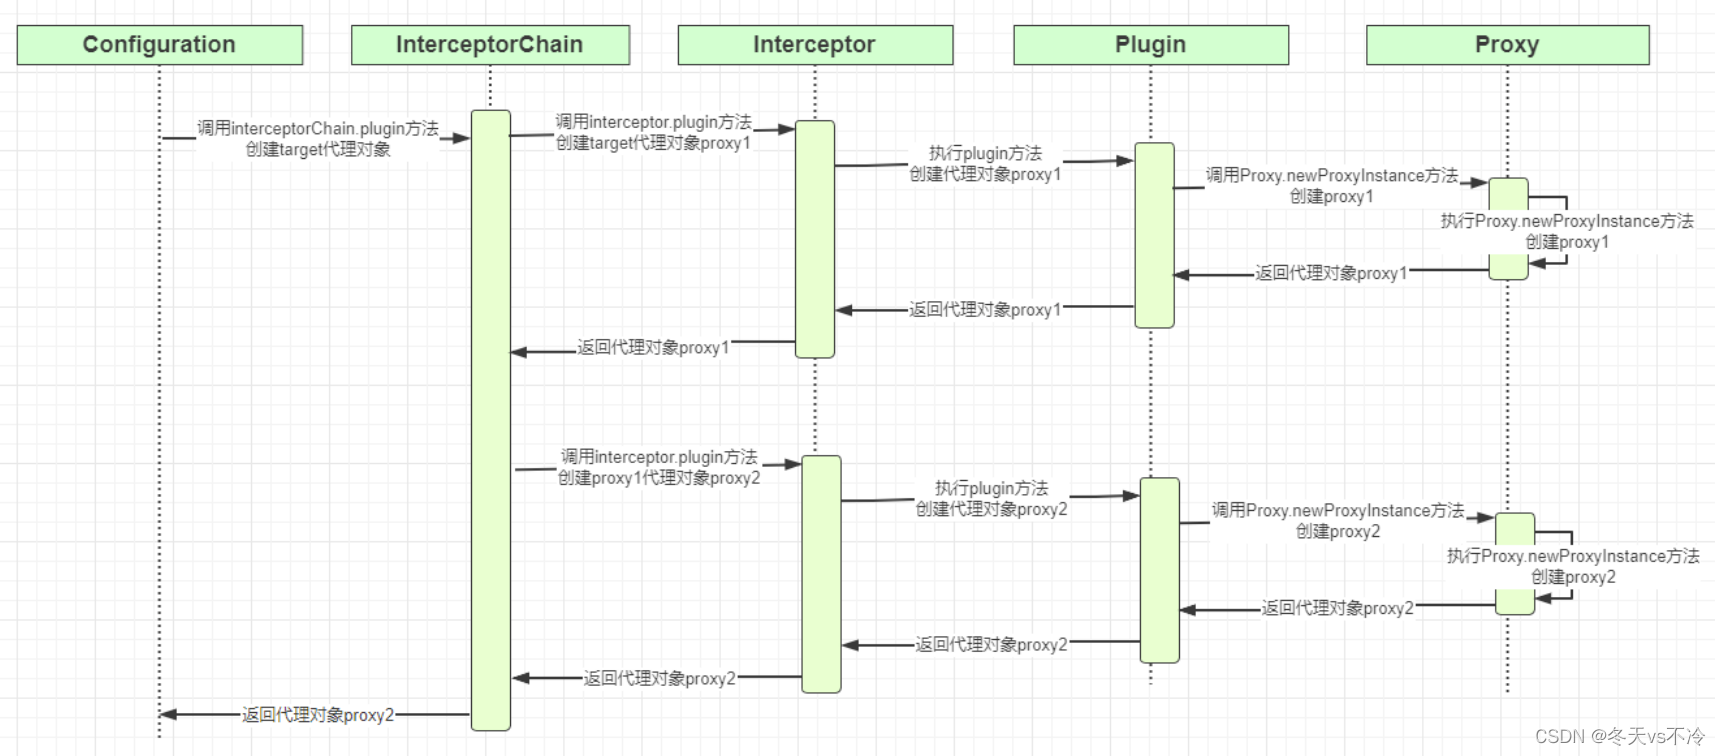
- 同一个组件对象的同一个方法可以被多个拦截器进行拦截
- 配置在最前面的拦截器最先被代理,但是执行的时候却是最外层的先执行
- 执行流程:
- 假如依次定义了三个插件: 插件1、插件2、插件3
- 包装代理类顺序:插件1、插件2、插件3
- 执行代理对象的invoke方法顺序:插件3、插件2、插件1
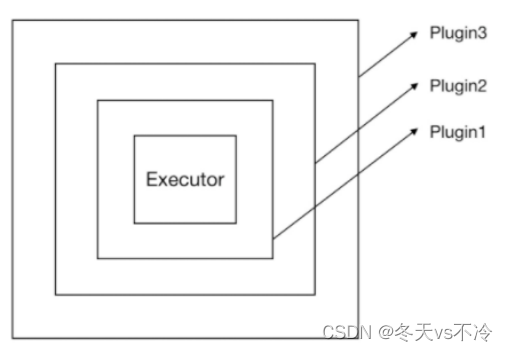
四、四大对象拦截位置
- 创建执行器对象方法
- 创建参数处理器对象方法

- 创建返回值处理器对象方法

- 创建sql语句执行器对象方法

总结
- Mybatis插件就是为四大对象创建代理类
- 拦截四大对象中的方法,invoke添加增强的内容,之后再执行四大对象的原始方法


![BUUCTF Misc 黑客帝国 [MRCTF2020]你能看懂音符吗 [HBNIS2018]caesar [HBNIS2018]低个头](https://img-blog.csdnimg.cn/2aa82c1cd30d436ca76f738a08119ab4.png)
![[附源码]计算机毕业设计校园疫情防范管理系统Springboot程序](https://img-blog.csdnimg.cn/2362527bfa184581b37aec7b9c74e82b.png)


