一、前言
本章将在前面几章基础上进行讲解,所以大家最好尽量先去看一下前几章的内容再来跟进会好很多。那么本章我们将通过redis和本地缓存Caffeine对JdbcTokenStore进行重写,并且讲解资源服务器配置的新方案,使得我们可以不用在资源服务器又配置一个和授权服务器一样的tokenStore.
我们上一章实现了JdbcTokenStore,那么大家都知道,redis的速度是肯定的比普通的数据库是要快的,且JdbcTokenStore实在是有点难拓展,尤其涉及到表结构的更改,所以选择使用Redis对TokenStore进行重写。但是大量的请求,且token基本都是长信息,肯定也是会对Redis造成不小的压力,所以这里使用了本地缓存Caffeine。那么这里的写法我是照着下面这篇博客写的,我看了很多重写的方法,基本只有这篇我仿写后能够正常运行。再次也对这篇博客作者表示感谢,真的强!
https://www.cnblogs.com/chongsha/p/14558011.html
后面有时间和能力后我会阅读OAuth2源码结合之前写的代码做几期分享
二、实现JsonRedisTokenStore
在说实现之前,先来说一下为什么要重写这个类,其实懂一点的开发同仁会说,欸,OAuth2不是提供了RedisTokenStore类吗,为啥还要重写?
确实,OAuth2给我们提供了RedisTokenStore类,并且使用上比JdbcTokenStore还简单,我们只需要配置好redis以及在授权服务器类注入RedisConnectFactory就可以直接配置RedisTokenStore。
但是你或许也看到了,默认的RedisTokenStore采用的默认序列化方式是JDK序列化。
学过Redis的应该了解了,这会引起存储的对象产生乱码问题,所以我们需要使用json对Authentication和token进行序列化,这就是我们重写的原因,且我们可以在其基础上加入本地缓存减小Redis的压力。
首先在授权服务器项目上我们需要redis和Caffeine,fastJson的依赖,大家如果有自己想用的本地缓存也可以直接换,例如仍然使用Redis实现本地缓存也是Ok的:
       <!--redis-->
        <dependency>
            <groupId>org.springframework.boot</groupId>
            <artifactId>spring-boot-starter-data-redis</artifactId>
        </dependency>
        <dependency>
            <groupId>com.github.ben-manes.caffeine</groupId>
            <artifactId>caffeine</artifactId>
        </dependency>
然后在yaml文件需要对redis做相关配置:
spring:
  # redis配置
  redis:
    host: 127.0.0.1
    password: 123456
    port: 6379
然后就可以重写了,关于方法的大致解释我已经做了相关注释,大家直接看着一块儿块儿自己写就好,我们这儿
JsonRedisTokenStore.java
package com.mbw.security.token;
import cn.hutool.core.date.DateUnit;
import cn.hutool.core.date.DateUtil;
import cn.hutool.core.util.StrUtil;
import com.alibaba.fastjson.JSONObject;
import com.github.benmanes.caffeine.cache.Cache;
import com.github.benmanes.caffeine.cache.Caffeine;
import com.mbw.pojo.Role;
import com.mbw.pojo.User;
import com.mbw.security.dto.JwtUserDto;
import org.springframework.data.redis.core.StringRedisTemplate;
import org.springframework.security.authentication.UsernamePasswordAuthenticationToken;
import org.springframework.security.oauth2.common.DefaultOAuth2AccessToken;
import org.springframework.security.oauth2.common.ExpiringOAuth2RefreshToken;
import org.springframework.security.oauth2.common.OAuth2AccessToken;
import org.springframework.security.oauth2.common.OAuth2RefreshToken;
import org.springframework.security.oauth2.provider.OAuth2Authentication;
import org.springframework.security.oauth2.provider.OAuth2Request;
import org.springframework.security.oauth2.provider.token.AuthenticationKeyGenerator;
import org.springframework.security.oauth2.provider.token.TokenStore;
import org.springframework.stereotype.Component;
import java.util.ArrayList;
import java.util.Collection;
import java.util.Collections;
import java.util.Date;
import java.util.HashMap;
import java.util.HashSet;
import java.util.LinkedHashMap;
import java.util.List;
import java.util.Map;
import java.util.Set;
import java.util.concurrent.TimeUnit;
import java.util.function.Function;
@Component
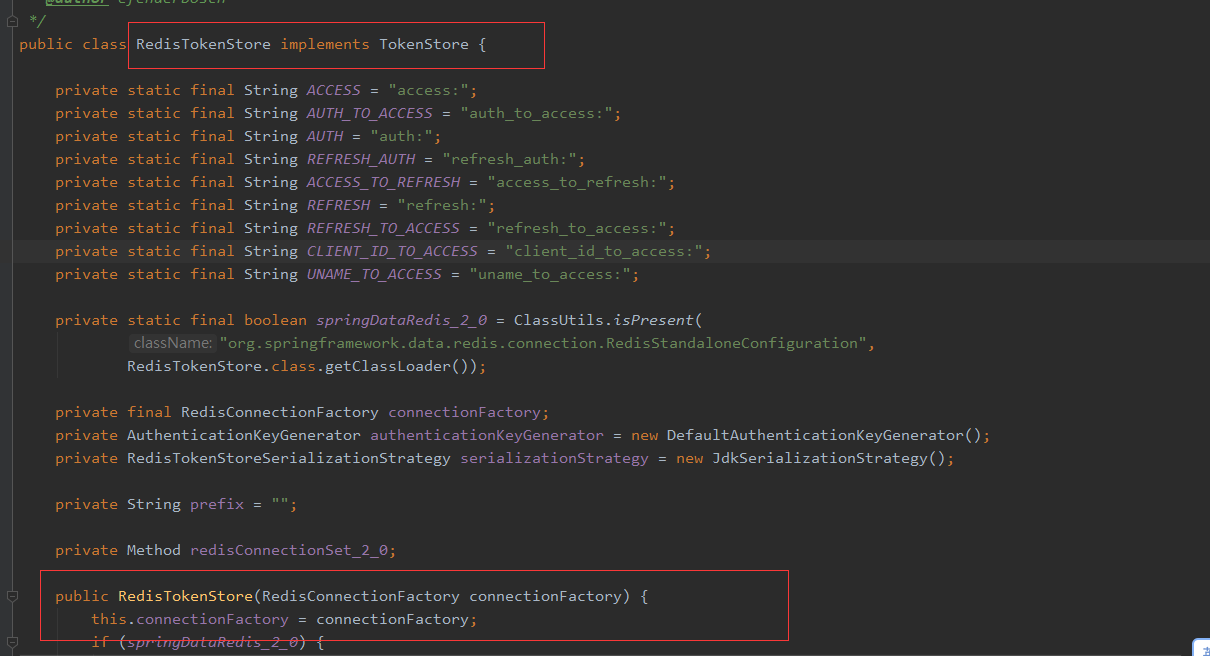
public class JsonRedisTokenStore implements TokenStore {
private static final String ACCESS = "access:";
private static final String AUTH_TO_ACCESS = "auth_to_access:";
private static final String AUTH = "auth:";
private static final String REFRESH_AUTH = "refresh_auth:";
private static final String ACCESS_TO_REFRESH = "access_to_refresh:";
private static final String REFRESH = "refresh:";
private static final String REFRESH_TO_ACCESS = "refresh_to_access:";
private static final String CLIENT_ID_TO_ACCESS = "client_id_to_access:";
private static final String UNAME_TO_ACCESS = "uname_to_access:";
private final static Cache<Object, Object> CACHE;
static {
CACHE = Caffeine.newBuilder()
.expireAfterWrite(60, TimeUnit.SECONDS)
.maximumSize(1000).build();
}
private final StringRedisTemplate stringRedisTemplate;
private final AuthenticationKeyGenerator authenticationKeyGenerator = new CustomAuthenticationKeyGenerator();
public JsonRedisTokenStore(StringRedisTemplate stringRedisTemplate) {
this.stringRedisTemplate = stringRedisTemplate;
}
@Override
public OAuth2Authentication readAuthentication(OAuth2AccessToken token) {
return this.readAuthentication(token.getValue());
}
//根据AccessToken对象查询对应的OAuth2Authentication(认证的用户信息)
@Override
public OAuth2Authentication readAuthentication(String token) {
String key = AUTH + token;
return (OAuth2Authentication) loadCache(key, (k) -> {
String json = stringRedisTemplate.opsForValue().get(key);
if (StrUtil.isBlank(json)) {
return null;
}
return fullParseJSON(json);
});
}
/**
* 完整的OAuth2Authentication 对象转换
*
* @param json 完整OAuth2Authentication json字符串
* @return OAuth2Authentication对象
*/
private OAuth2Authentication fullParseJSON(String json) {
JSONObject jsonObject = JSONObject.parseObject(json);
JSONObject userAuthenticationObject = jsonObject.getJSONObject("userAuthentication");
/**
* 这里通过之前写的UserDetails的构造方法,我的UserDetails由三部分构造:User类,Set<Role>,List<String> authorityName
* 所以这里你可以直接按照你自己的userDetails来进行json解析
* 而UserDetails在这里就是Principal部分,所以json得先解析principal才能得到我需要的UserDetails组件
*/
User userInfo = userAuthenticationObject.getJSONObject("principal").getObject("user",User.class);
Set<Role> roleInfo = new HashSet<>(userAuthenticationObject.getJSONObject("principal").getJSONArray("roleInfo").toJavaList(Role.class));
List<String> authorityNames = userAuthenticationObject.getJSONObject("principal").getJSONArray("authorityNames").toJavaList(String.class);
JwtUserDto jwtUserDto = new JwtUserDto(userInfo, roleInfo, authorityNames);
String credentials = userAuthenticationObject.getString("credentials");
JSONObject detailsJSONObject = userAuthenticationObject.getJSONObject("details");
LinkedHashMap<String, Object> details = new LinkedHashMap<>();
for (String key : detailsJSONObject.keySet()) {
details.put(key, detailsJSONObject.get(key));
}
UsernamePasswordAuthenticationToken userAuthentication = new UsernamePasswordAuthenticationToken(jwtUserDto
, credentials, new ArrayList<>(0));
userAuthentication.setDetails(details);
JSONObject storedRequest = jsonObject.getJSONObject("oAuth2Request");
String clientId = storedRequest.getString("clientId");
JSONObject requestParametersJSON = storedRequest.getJSONObject("requestParameters");
Map<String, String> requestParameters = new HashMap<>();
for (String key : requestParametersJSON.keySet()) {
requestParameters.put(key, requestParametersJSON.getString(key));
}
Set<String> scope = convertSetString(storedRequest, "scope");
Set<String> resourceIds = convertSetString(storedRequest, "resourceIds");
Set<String> responseTypes = convertSetString(storedRequest, "responseTypes");
OAuth2Request oAuth2Request = new OAuth2Request(requestParameters
, clientId
//由于这个项目不需要处理权限角色,所以就没有对权限角色集合做处理
, new ArrayList<>(0)
, storedRequest.getBoolean("approved")
, scope
, resourceIds
, storedRequest.getString("redirectUri")
, responseTypes
, null //extensionProperties
);
return new OAuth2Authentication(oAuth2Request, userAuthentication);
}
private static Set<String> convertSetString(JSONObject data, String key) {
List<String> list = data.getJSONArray(key).toJavaList(String.class);
return new HashSet<>(list);
}
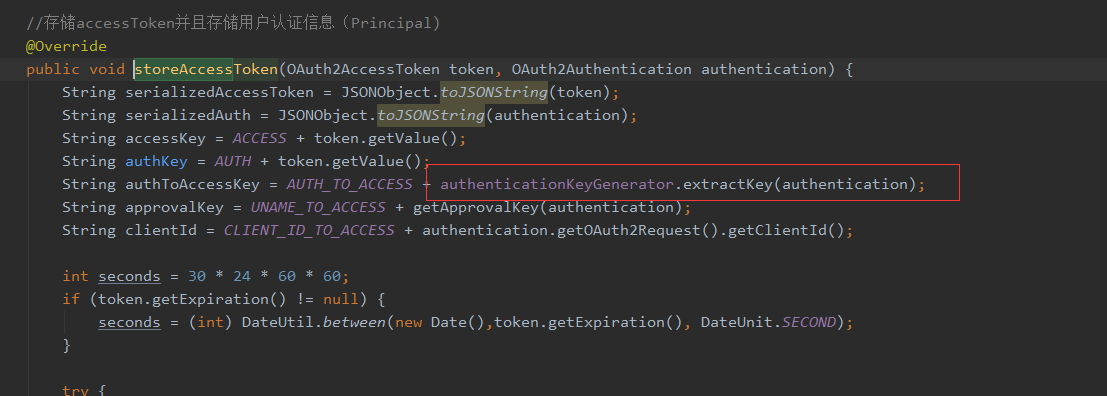
//存储accessToken并且存储用户认证信息(Principal)
@Override
public void storeAccessToken(OAuth2AccessToken token, OAuth2Authentication authentication) {
String serializedAccessToken = JSONObject.toJSONString(token);
String serializedAuth = JSONObject.toJSONString(authentication);
String accessKey = ACCESS + token.getValue();
String authKey = AUTH + token.getValue();
String authToAccessKey = AUTH_TO_ACCESS + authenticationKeyGenerator.extractKey(authentication);
String approvalKey = UNAME_TO_ACCESS + getApprovalKey(authentication);
String clientId = CLIENT_ID_TO_ACCESS + authentication.getOAuth2Request().getClientId();
int seconds = 30 * 24 * 60 * 60;
if (token.getExpiration() != null) {
seconds = (int) DateUtil.between(new Date(),token.getExpiration(), DateUnit.SECOND);
}
try {
stringRedisTemplate.opsForValue().set(accessKey, serializedAccessToken);
stringRedisTemplate.opsForValue().set(authKey, serializedAuth);
stringRedisTemplate.opsForValue().set(authToAccessKey, serializedAccessToken);
if (!authentication.isClientOnly()) {
stringRedisTemplate.opsForHash().putIfAbsent(approvalKey, token.getValue(), serializedAccessToken);
}
} finally {
//如果中途失败,则还可以补偿过期时间
stringRedisTemplate.expire(accessKey, seconds, TimeUnit.SECONDS);
stringRedisTemplate.expire(authKey, seconds, TimeUnit.SECONDS);
stringRedisTemplate.expire(authToAccessKey, seconds, TimeUnit.SECONDS);
stringRedisTemplate.expire(clientId, seconds, TimeUnit.SECONDS);
stringRedisTemplate.expire(approvalKey, seconds, TimeUnit.SECONDS);
}
OAuth2RefreshToken refreshToken = token.getRefreshToken();
if (refreshToken != null && refreshToken.getValue() != null) {
String refreshValue = token.getRefreshToken().getValue();
String refreshToAccessKey = REFRESH_TO_ACCESS + refreshValue;
String accessToRefreshKey = ACCESS_TO_REFRESH + token.getValue();
try {
stringRedisTemplate.opsForValue().set(refreshToAccessKey, token.getValue());
stringRedisTemplate.opsForValue().set(accessToRefreshKey, refreshValue);
} finally {
//如果中途失败,则还可以补偿过期时间
refreshTokenProcess(refreshToken, refreshToAccessKey, accessToRefreshKey);
}
CACHE.put(refreshToAccessKey, token.getValue());
CACHE.put(accessToRefreshKey, refreshValue);
}
CACHE.put(accessKey, token);
CACHE.put(authKey, authentication);
CACHE.put(authToAccessKey, token);
}
private void refreshTokenProcess(OAuth2RefreshToken refreshToken, String refreshKey, String refreshAuthKey) {
int seconds = 30 * 24 * 60 * 60;
if (refreshToken instanceof ExpiringOAuth2RefreshToken) {
ExpiringOAuth2RefreshToken expiringRefreshToken = (ExpiringOAuth2RefreshToken) refreshToken;
Date expiration = expiringRefreshToken.getExpiration();
int temp;
if (expiration != null) {
temp = Long.valueOf((expiration.getTime() - System.currentTimeMillis()) / 1000L)
.intValue();
} else {
temp = seconds;
}
stringRedisTemplate.expire(refreshKey, temp, TimeUnit.SECONDS);
stringRedisTemplate.expire(refreshAuthKey, temp, TimeUnit.SECONDS);
}
}
private String getApprovalKey(OAuth2Authentication authentication) {
String userName = "";
if (authentication.getUserAuthentication() != null) {
JwtUserDto userInfoDetails = (JwtUserDto) authentication.getUserAuthentication().getPrincipal();
userName = userInfoDetails.getUser().getMobile() + "_" + userInfoDetails.getUsername();
}
return getApprovalKey(authentication.getOAuth2Request().getClientId(), userName);
}
private String getApprovalKey(String clientId, String userName) {
return clientId + (userName == null ? "" : ":" + userName);
}
//根据AccessToken的value值查询对应的token对象
@Override
public OAuth2AccessToken readAccessToken(String tokenValue) {
String key = ACCESS + tokenValue;
//先从本地缓存取,没有再从redis中取,都没有返回Null
return (OAuth2AccessToken) loadCache(key, (k) -> {
String json = stringRedisTemplate.opsForValue().get(key);
if (StrUtil.isNotBlank(json)) {
return JSONObject.parseObject(json, DefaultOAuth2AccessTokenEx.class);
}
return null;
});
}
@Override
public void removeAccessToken(OAuth2AccessToken accessToken) {
removeAccessToken(accessToken.getValue());
}
public void removeAccessToken(String tokenValue) {
String accessKey = ACCESS + tokenValue;
String authKey = AUTH + tokenValue;
String accessToRefreshKey = ACCESS_TO_REFRESH + tokenValue;
OAuth2Authentication authentication = readAuthentication(tokenValue);
String access = stringRedisTemplate.opsForValue().get(accessKey);
List<String> keys = new ArrayList<>(6);
keys.add(accessKey);
keys.add(authKey);
keys.add(accessToRefreshKey);
stringRedisTemplate.delete(keys);
if (authentication != null) {
String key = authenticationKeyGenerator.extractKey(authentication);
String authToAccessKey = AUTH_TO_ACCESS + key;
String unameKey = UNAME_TO_ACCESS + getApprovalKey(authentication);
String clientId = CLIENT_ID_TO_ACCESS + authentication.getOAuth2Request().getClientId();
stringRedisTemplate.delete(authToAccessKey);
stringRedisTemplate.opsForHash().delete(unameKey, tokenValue);
stringRedisTemplate.opsForList().remove(clientId, 1, access);
stringRedisTemplate.delete(ACCESS + key);
CACHE.invalidate(authToAccessKey);
CACHE.invalidate(ACCESS + key);
}
CACHE.invalidateAll(keys);
}
@Override
public void storeRefreshToken(OAuth2RefreshToken refreshToken, OAuth2Authentication authentication) {
String refreshKey = REFRESH + refreshToken.getValue();
String refreshAuthKey = REFRESH_AUTH + refreshToken.getValue();
String serializedRefreshToken = JSONObject.toJSONString(refreshToken);
stringRedisTemplate.opsForValue().set(refreshKey, serializedRefreshToken);
stringRedisTemplate.opsForValue().set(refreshAuthKey, JSONObject.toJSONString(authentication));
refreshTokenProcess(refreshToken, refreshKey, refreshAuthKey);
CACHE.put(refreshKey, refreshToken);
CACHE.put(refreshAuthKey, authentication);
}
//和readAccessToken的原理一致
@Override
public OAuth2RefreshToken readRefreshToken(String tokenValue) {
String key = REFRESH + tokenValue;
return (OAuth2RefreshToken) loadCache(key, (k) -> {
String json = stringRedisTemplate.opsForValue().get(key);
if (StrUtil.isNotBlank(json)) {
return JSONObject.parseObject(json, DefaultOAuth2RefreshTokenEx.class);
}
return null;
});
}
@Override
public OAuth2Authentication readAuthenticationForRefreshToken(OAuth2RefreshToken token) {
return this.readAuthenticationForRefreshToken(token.getValue());
}
public OAuth2Authentication readAuthenticationForRefreshToken(String token) {
String key = REFRESH_AUTH + token;
return (OAuth2Authentication) loadCache(key, (k) -> {
String json = stringRedisTemplate.opsForValue().get(key);
if (StrUtil.isBlank(json)) {
return null;
}
return fullParseJSON(json);
});
}
@Override
public void removeRefreshToken(OAuth2RefreshToken refreshToken) {
this.removeRefreshToken(refreshToken.getValue());
}
public void removeRefreshToken(String refreshToken) {
String refreshKey = REFRESH + refreshToken;
String refreshAuthKey = REFRESH_AUTH + refreshToken;
String refresh2AccessKey = REFRESH_TO_ACCESS + refreshToken;
String access2RefreshKey = ACCESS_TO_REFRESH + refreshToken;
List<String> keys = new ArrayList<>(7);
keys.add(refreshKey);
keys.add(refreshAuthKey);
keys.add(refresh2AccessKey);
keys.add(access2RefreshKey);
stringRedisTemplate.delete(keys);
CACHE.invalidateAll(keys);
}
@Override
public void removeAccessTokenUsingRefreshToken(OAuth2RefreshToken refreshToken) {
this.removeAccessTokenUsingRefreshToken(refreshToken.getValue());
}
private void removeAccessTokenUsingRefreshToken(String refreshToken) {
String key = REFRESH_TO_ACCESS + refreshToken;
String accessToken = stringRedisTemplate.opsForValue().get(key);
stringRedisTemplate.delete(key);
if (accessToken != null) {
removeAccessToken(accessToken);
}
CACHE.invalidate(key);
}
private <T> Object loadCache(String key, Function<Object, ? extends T> loadData) {
try {
Object value = CACHE.getIfPresent(key);
if (value == null) {
value = loadData.apply(key);
//如果redis中有则将redis中的token放入本地缓存中
if (value != null) {
CACHE.put(key, value);
}
}
return value;
} catch (Exception e) {
throw new RuntimeException("JsonRedisTokenStore.loadCache从缓存中加载数据发生错误", e);
}
}
@Override
public OAuth2AccessToken getAccessToken(OAuth2Authentication authentication) {
String key = AUTH_TO_ACCESS + authenticationKeyGenerator.extractKey(authentication);
return (OAuth2AccessToken) loadCache(key, (k) -> {
String json = stringRedisTemplate.opsForValue().get(key);
if (StrUtil.isNotBlank(json)) {
DefaultOAuth2AccessToken accessToken = JSONObject.parseObject(json, DefaultOAuth2AccessTokenEx.class);
OAuth2Authentication storedAuthentication = readAuthentication(accessToken.getValue());
if (storedAuthentication == null
|| !key.equals(authenticationKeyGenerator.extractKey(storedAuthentication))) {
this.storeAccessToken(accessToken, authentication);
}
return accessToken;
}
return null;
});
}
@Override
public Collection<OAuth2AccessToken> findTokensByClientIdAndUserName(String clientId, String userName) {
String approvalKey = UNAME_TO_ACCESS + getApprovalKey(clientId, userName);
return getOAuth2AccessTokens(approvalKey);
}
private Collection<OAuth2AccessToken> getOAuth2AccessTokens(String approvalKey) {
return (Collection<OAuth2AccessToken>) loadCache(approvalKey, (k) -> {
Map<Object, Object> accessTokens = stringRedisTemplate.opsForHash().entries(approvalKey);
if (accessTokens.size() == 0) {
return Collections.emptySet();
}
List<OAuth2AccessToken> result = new ArrayList<>();
for (Object json : accessTokens.values()) {
String strJSON = json.toString();
OAuth2AccessToken accessToken = JSONObject.parseObject(strJSON, DefaultOAuth2AccessTokenEx.class);
result.add(accessToken);
}
return Collections.unmodifiableCollection(result);
});
}
@Override
public Collection<OAuth2AccessToken> findTokensByClientId(String clientId) {
String key = CLIENT_ID_TO_ACCESS + clientId;
return getOAuth2AccessTokens(key);
}
}
DefaultOAuth2RefreshTokenEx.java
package com.mbw.security.token;

import lombok.Data;
import org.springframework.security.oauth2.common.DefaultOAuth2RefreshToken;
import org.springframework.security.oauth2.common.ExpiringOAuth2RefreshToken;

import java.util.Date;

@Data
public class DefaultOAuth2RefreshTokenEx extends DefaultOAuth2RefreshToken implements ExpiringOAuth2RefreshToken {
	private Date expiration;
	private String value;

	public DefaultOAuth2RefreshTokenEx() {
		super(null);
	}
}
DefaultOAuth2AccessTokenEx.java
package com.mbw.security.token;

import org.springframework.security.oauth2.common.DefaultOAuth2AccessToken;

public class DefaultOAuth2AccessTokenEx extends DefaultOAuth2AccessToken {
	private DefaultOAuth2RefreshTokenEx refreshToken;

	public DefaultOAuth2AccessTokenEx() {
		super((String) null);
	}

	@Override
	public void setValue(String value) {
		super.setValue(value);
	}

	@Override
	public DefaultOAuth2RefreshTokenEx getRefreshToken() {
		return refreshToken;
	}

	public void setRefreshToken(DefaultOAuth2RefreshTokenEx refreshToken) {
		this.refreshToken = refreshToken;
	}
}
在项目中使用spring security oauth2做了统一登录授权,在实际开发过程中,发现不同终端同一账号登录,返回的token是一样的。我们使用的是redis存储token,于是查了资料,发现是因为生成token key的算法的原因,导致了多端登录返回一个token的问题,原因如图:
生成key使用的是DefaultAuthenticationKeyGenerator,代码:
public class DefaultAuthenticationKeyGenerator implements AuthenticationKeyGenerator {

	private static final String CLIENT_ID = "client_id";

	private static final String SCOPE = "scope";

	private static final String USERNAME = "username";

	public String extractKey(OAuth2Authentication authentication) {
		Map<String, String> values = new LinkedHashMap<String, String>();
		OAuth2Request authorizationRequest = authentication.getOAuth2Request();
		if (!authentication.isClientOnly()) {
			values.put(USERNAME, authentication.getName());
		}
		values.put(CLIENT_ID, authorizationRequest.getClientId());
		if (authorizationRequest.getScope() != null) {
			values.put(SCOPE, OAuth2Utils.formatParameterList(new TreeSet<String>(authorizationRequest.getScope())));
		}
		return generateKey(values);
	}
}
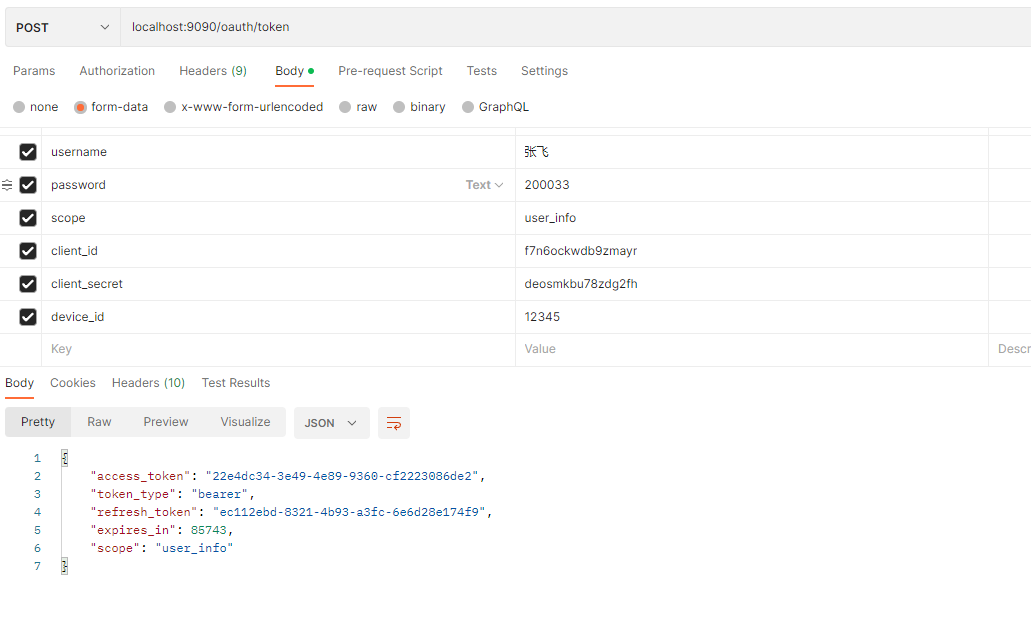
从代码里面看,生成key使用的是 client_id、scope、username三个字段,由于这三个字段同一用户在同一子系统中是不变的,所以导致多端登录时,生成的token key是一样的,就会造成返回的token一样,这样的后果就是,其中一个终端退出登录,所有已登录设备就失效了,于是就重写这extractKey方法,继承这个类,增加了一个device_id字段,从而解决多端登录需要互不干扰的需求:
package com.mbw.security.token;

import org.springframework.security.oauth2.common.util.OAuth2Utils;
import org.springframework.security.oauth2.provider.OAuth2Authentication;
import org.springframework.security.oauth2.provider.OAuth2Request;
import org.springframework.security.oauth2.provider.token.DefaultAuthenticationKeyGenerator;

import java.util.LinkedHashMap;
import java.util.Map;
import java.util.TreeSet;

public class CustomAuthenticationKeyGenerator extends DefaultAuthenticationKeyGenerator {
	private static final String CLIENT_ID = "client_id";

	private static final String SCOPE = "scope";

	private static final String USERNAME = "username";

	private static final String DEVICE_ID = "device_id";

	@Override
	public String extractKey(OAuth2Authentication authentication) {
		Map<String, String> values = new LinkedHashMap<String, String>();
		OAuth2Request authorizationRequest = authentication.getOAuth2Request();
		if (!authentication.isClientOnly()) {
			values.put(USERNAME, authentication.getName());
		}
		values.put(CLIENT_ID, authorizationRequest.getClientId());
		if (authorizationRequest.getScope() != null) {
			values.put(SCOPE, OAuth2Utils.formatParameterList(new TreeSet<String>(authorizationRequest.getScope())));
		}

		String deviceId = authorizationRequest.getRequestParameters().get(DEVICE_ID);
		values.put(DEVICE_ID, deviceId);

		return generateKey(values);
	}
}
而我们生成Token的接口的参数就要再加一个device_id,而这个deviceId可以通过存进用户表让前端取到。
然后就可以在AuthServerConfig配置该类了:
package com.mbw.security.config;

import com.mbw.security.service.ClientDetailsServiceImpl;
import com.mbw.security.service.UserDetailsServiceImpl;
import com.mbw.security.token.JsonRedisTokenStore;
import org.springframework.beans.factory.annotation.Autowired;
import org.springframework.context.annotation.Configuration;
import org.springframework.security.authentication.AuthenticationManager;
import org.springframework.security.oauth2.config.annotation.configurers.ClientDetailsServiceConfigurer;
import org.springframework.security.oauth2.config.annotation.web.configuration.AuthorizationServerConfigurerAdapter;
import org.springframework.security.oauth2.config.annotation.web.configuration.EnableAuthorizationServer;
import org.springframework.security.oauth2.config.annotation.web.configurers.AuthorizationServerEndpointsConfigurer;
import org.springframework.security.oauth2.config.annotation.web.configurers.AuthorizationServerSecurityConfigurer;
import org.springframework.security.oauth2.provider.token.DefaultTokenServices;

@Configuration
@EnableAuthorizationServer
public class AuthServerConfig extends AuthorizationServerConfigurerAdapter {
	@Autowired
	private AuthenticationManager authenticationManager;
	@Autowired
	private ClientDetailsServiceImpl clientDetailsServiceImpl;
	@Autowired
	private UserDetailsServiceImpl userDetailsServiceImpl;
	@Autowired
	private JsonRedisTokenStore jsonRedisTokenStore;

	@Override
	public void configure(AuthorizationServerEndpointsConfigurer endpoints) throws Exception {
		endpoints.authenticationManager(authenticationManager)
		.userDetailsService(userDetailsServiceImpl)
				.tokenStore(jsonRedisTokenStore);
		DefaultTokenServices tokenService = getTokenStore(endpoints);
		endpoints.tokenServices(tokenService);
	}

	//配置TokenService参数
	private DefaultTokenServices getTokenStore(AuthorizationServerEndpointsConfigurer endpoints) {
		DefaultTokenServices tokenService = new DefaultTokenServices();
		tokenService.setTokenStore(endpoints.getTokenStore());
		tokenService.setSupportRefreshToken(true);
		tokenService.setClientDetailsService(endpoints.getClientDetailsService());
		tokenService.setTokenEnhancer(endpoints.getTokenEnhancer());
		//token有效期 1小时
		tokenService.setAccessTokenValiditySeconds(3600);
		//token刷新有效期 15天
		tokenService.setRefreshTokenValiditySeconds(3600 * 12 * 15);
		tokenService.setReuseRefreshToken(false);
		return tokenService;
	}

	@Override
	public void configure(ClientDetailsServiceConfigurer clients) throws Exception {
		clients.withClientDetails(clientDetailsServiceImpl);
	}


	/**
	 * 解决访问/oauth/check_token 403的问题
	 *
	 * @param security
	 * @throws Exception
	 */
	@Override
	public void configure(AuthorizationServerSecurityConfigurer security) throws Exception {
		// 允许表单认证
		security
				.tokenKeyAccess("permitAll()")
				.checkTokenAccess("permitAll()")
				.allowFormAuthenticationForClients();

	}
}
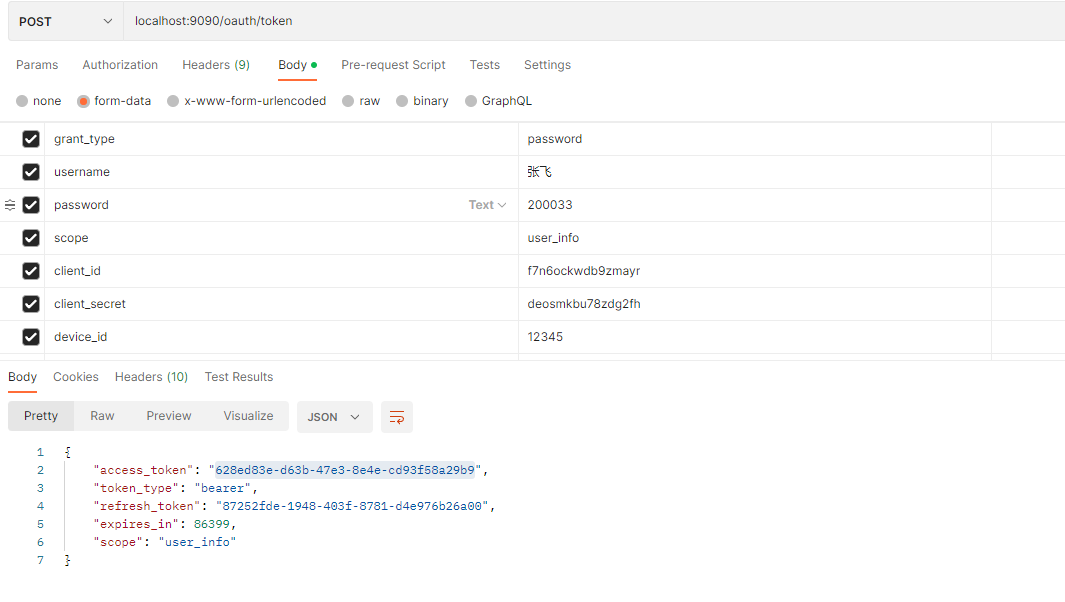
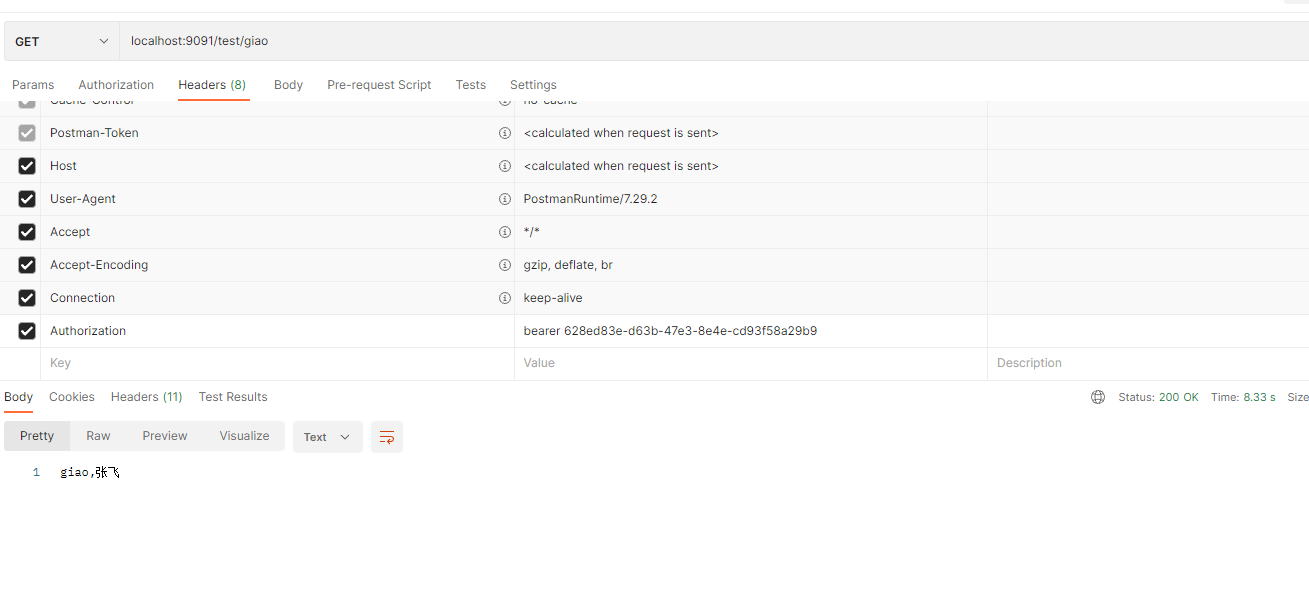
然后现在启动授权服务器调用获取token
然后回到redis看看成果:
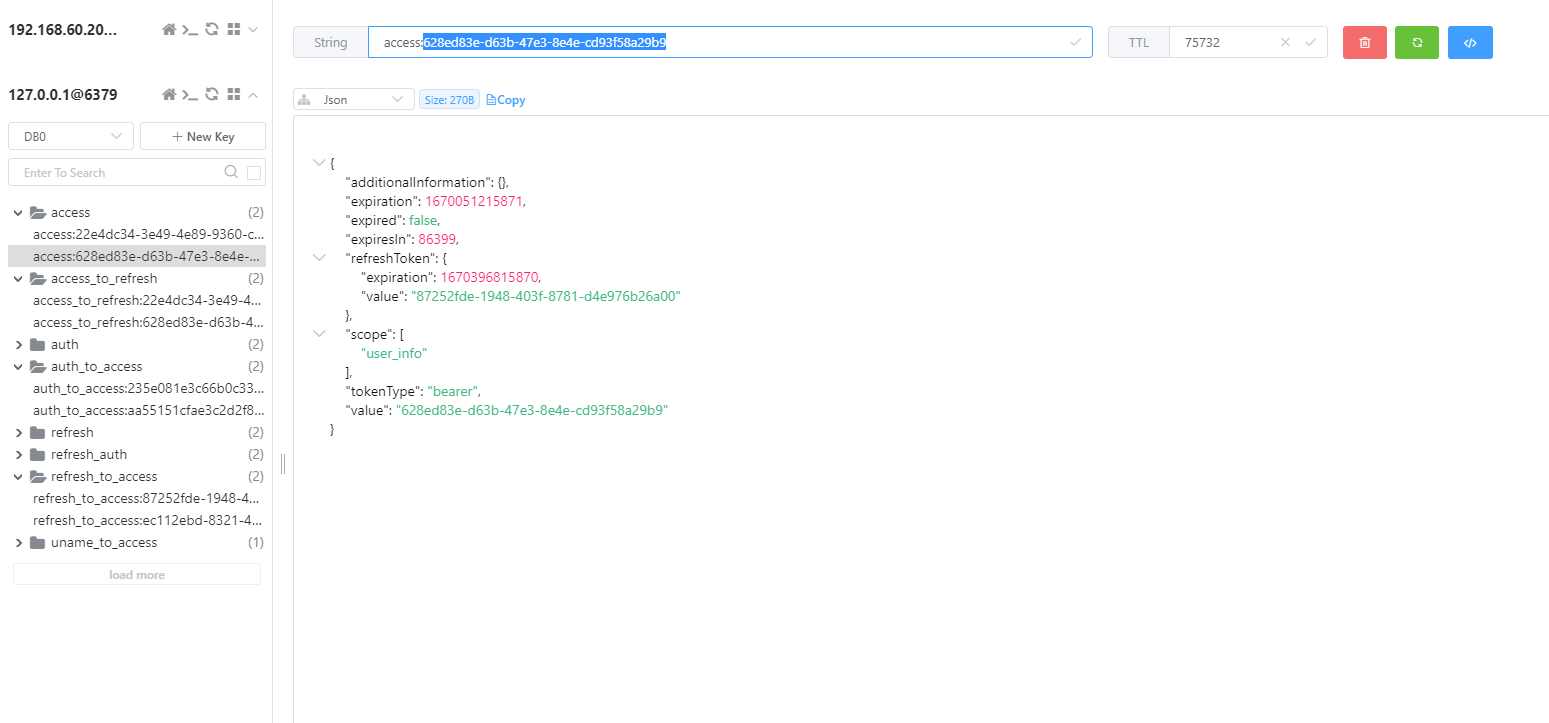
发现token已经存进redis,并且序列化。
三、资源服务器配置
如果按照上一章的说法,我们接下来要在资源服务器也要配置同样的tokenStore,但是这也是我上一章结尾提到的代码耦合问题,明显不应该这样做。那么怎么解决呢?首先大家需要了解一个额外的配置:user-info-uri。user-info-uri原理是在授权服务器认证后将认证信息Principal通过形参绑定的方法通过URL的方式获取用户信息。所以这个大家可以想象成和token-info-uri类似的作用,只是我们不再直接调用授权服务器而已,而是一种类似职责分离,授权认证交给授权服务器,认证后的用户信息给到资源服务器,资源服务器再提供资源。
那么我们只需要在application.yaml修改如下配置即可:
security:
  oauth2:
    resource:
      id: resource_server
      user-info-uri: http://localhost:9090/api/member
      prefer-token-info: false
与此同时,资源服务器的配置类只需要专注于我们需要保护的资源即可:
ResourceServerConfig.java
package com.mbw.config;

import org.springframework.context.annotation.Configuration;
import org.springframework.security.config.annotation.web.builders.HttpSecurity;
import org.springframework.security.oauth2.config.annotation.web.configuration.EnableResourceServer;
import org.springframework.security.oauth2.config.annotation.web.configuration.ResourceServerConfigurerAdapter;

import javax.servlet.http.HttpServletResponse;


@Configuration
@EnableResourceServer
public class ResourceServerConfig extends ResourceServerConfigurerAdapter {
	@Override
	public void configure(HttpSecurity http) throws Exception {
		http
				.csrf().disable()
				.exceptionHandling()
				.authenticationEntryPoint((request, response, authException) -> response.sendError(HttpServletResponse.SC_UNAUTHORIZED))
				.and()
				.authorizeRequests()
				.antMatchers("/test/**").authenticated()
				.and()
				.httpBasic();
	}

}
那资源服务器怎么知道我要访问哪个tokenStore呢?
还记得如果资源服务器和授权服务器在同一个项目时访问的是同一个bean这个结论吗,那么我们只需要在授权服务器项目上再配置一个资源服务器去保护user-info-uri这个资源即可:
package com.mbw.security.config;

import org.springframework.context.annotation.Configuration;
import org.springframework.core.annotation.Order;
import org.springframework.security.config.annotation.web.builders.HttpSecurity;
import org.springframework.security.oauth2.config.annotation.web.configuration.EnableResourceServer;
import org.springframework.security.oauth2.config.annotation.web.configuration.ResourceServerConfigurerAdapter;

import javax.servlet.http.HttpServletResponse;


@Configuration
@EnableResourceServer
@Order(3)
public class ResourceServerConfig extends ResourceServerConfigurerAdapter {
	@Override
	public void configure(HttpSecurity http) throws Exception {
		http
				.csrf().disable()
				.exceptionHandling()
				.authenticationEntryPoint((request, response, authException) -> response.sendError(HttpServletResponse.SC_UNAUTHORIZED))
				.and()
				.requestMatchers().antMatchers("/api/**")
				.and()
				.authorizeRequests()
				.antMatchers("/api/**").authenticated()
				.and()
				.httpBasic();
	}
}
而在授权服务器配置的资源服务器是知道用哪个tokenStore的,那么一个调用链就出现了:
①用户带着token访问资源服务器保护的资源,而资源服务器为了获取用户信息,就会去调用user-info-uri,而这个路径被我们在授权服务器配置的资源服务器拦截,因为需要经过身份认证,第一站经过OAuth2AuthenticationProcessingFilter认证处理过滤器:
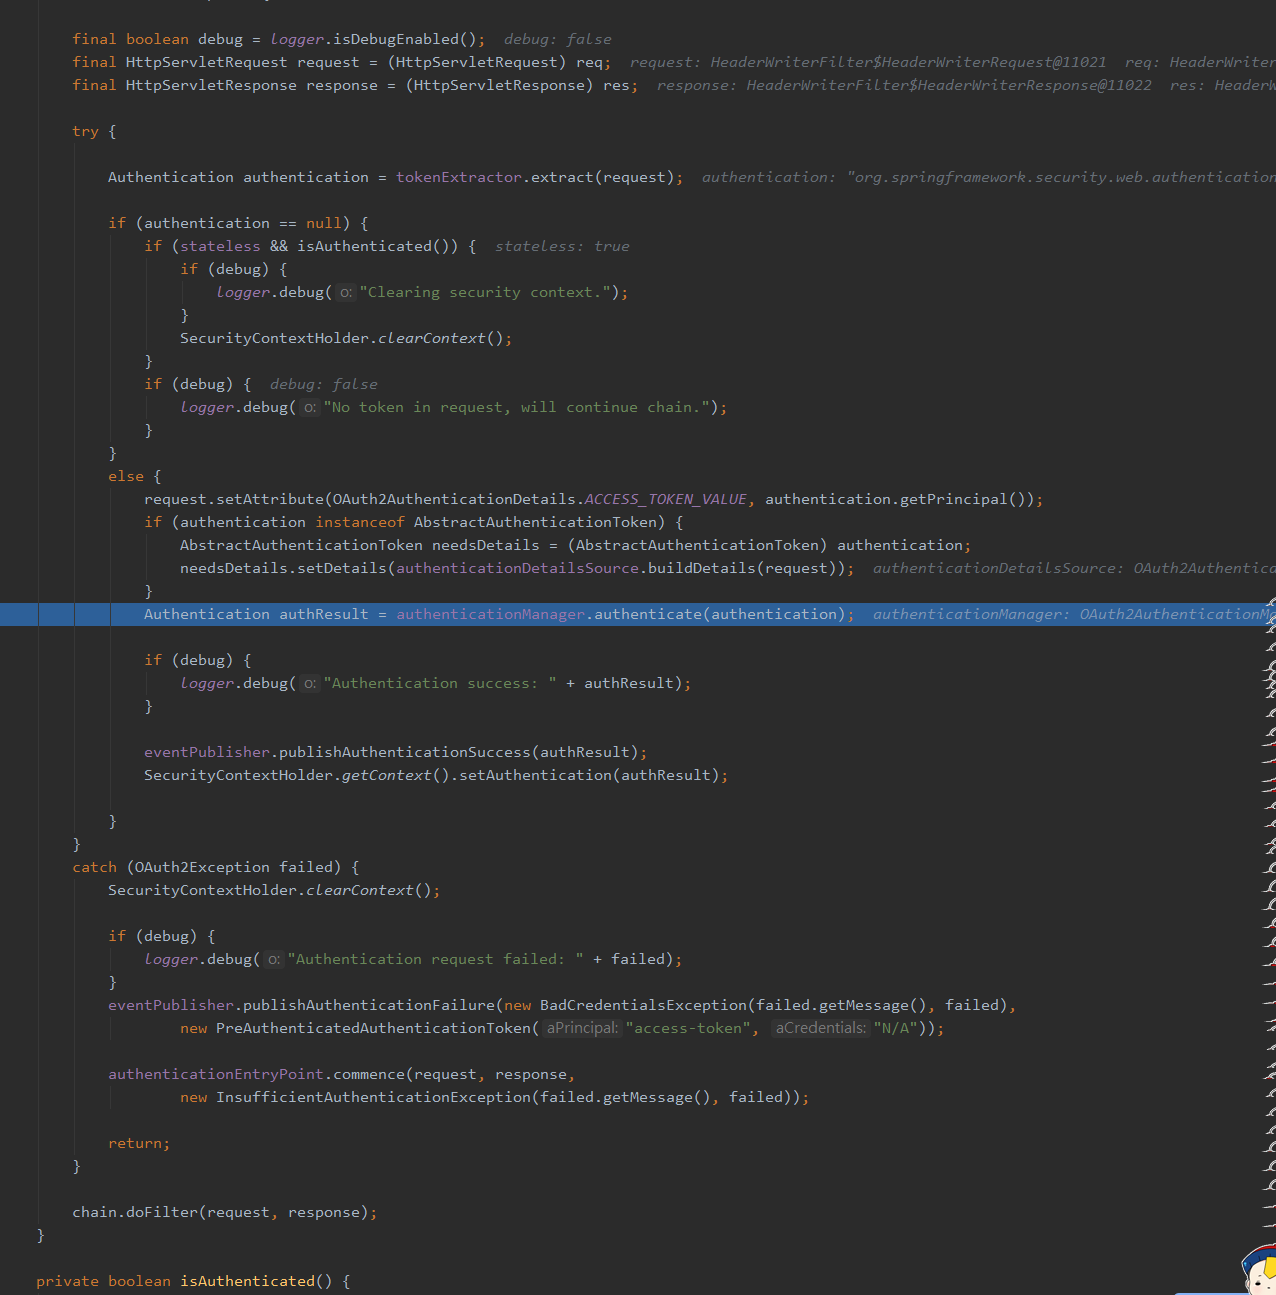
此时Authentication中的Principal装着就是token,就类似于短信认证,认证前我们自己封装的Authentication对象Principal认证前放的是短信一个道理

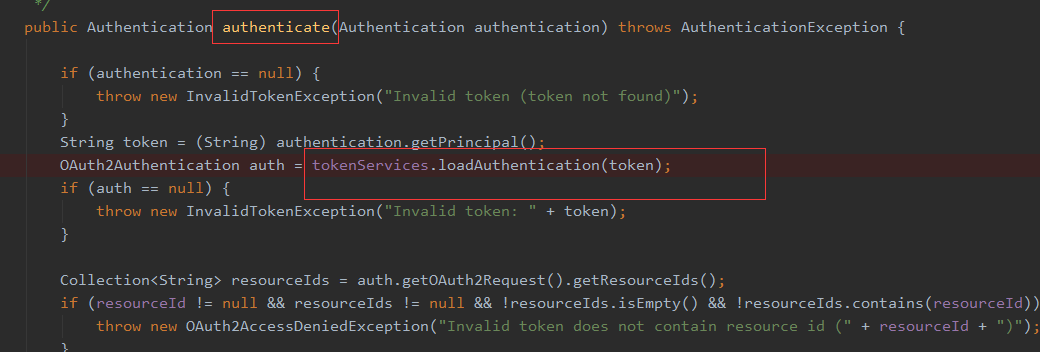
②然后由AuthenticationManager通过token进行身份验证,熟悉吗,是不是和之前学习的原生Spring Security的身份验证链很像,然后通过tokenService的loadAuthentication进行认证获取认证对象,这里的tokenService大家想象成UserDetailsService就好了。
③tokenService获取Authentication对象来自DefaultTokenServices类,就是我们授权服务器配置的类:
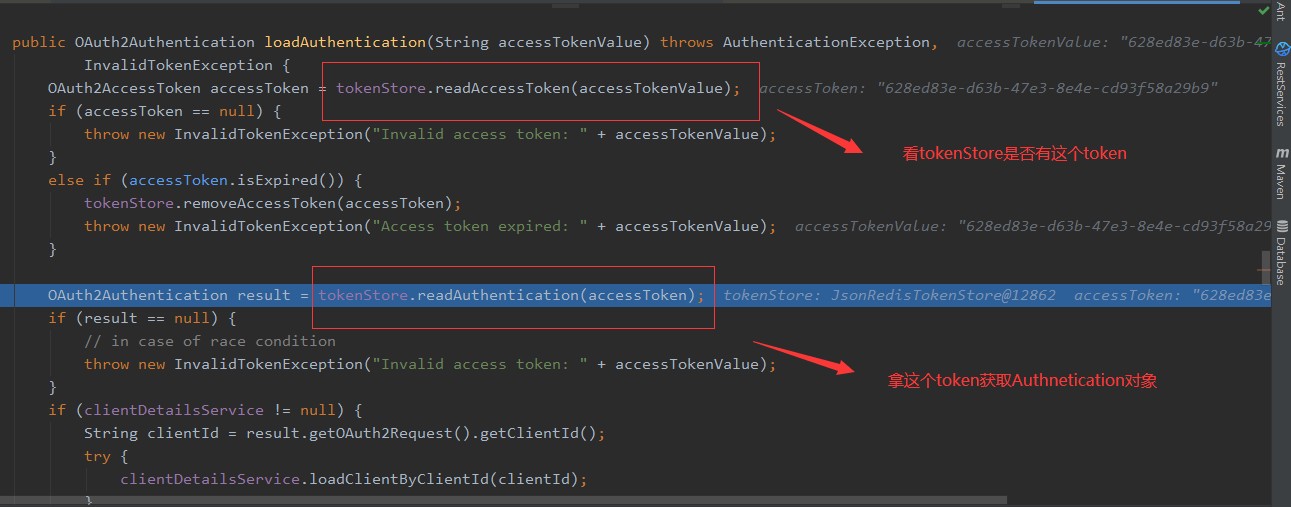
那这里的tokenStore就是授权服务器配置的,也就是我们重写的jsonRedisTokenStore:

最后,来到这个配置的user-info-uri,读取用户认证信息返回给我们真正的授权服务器。
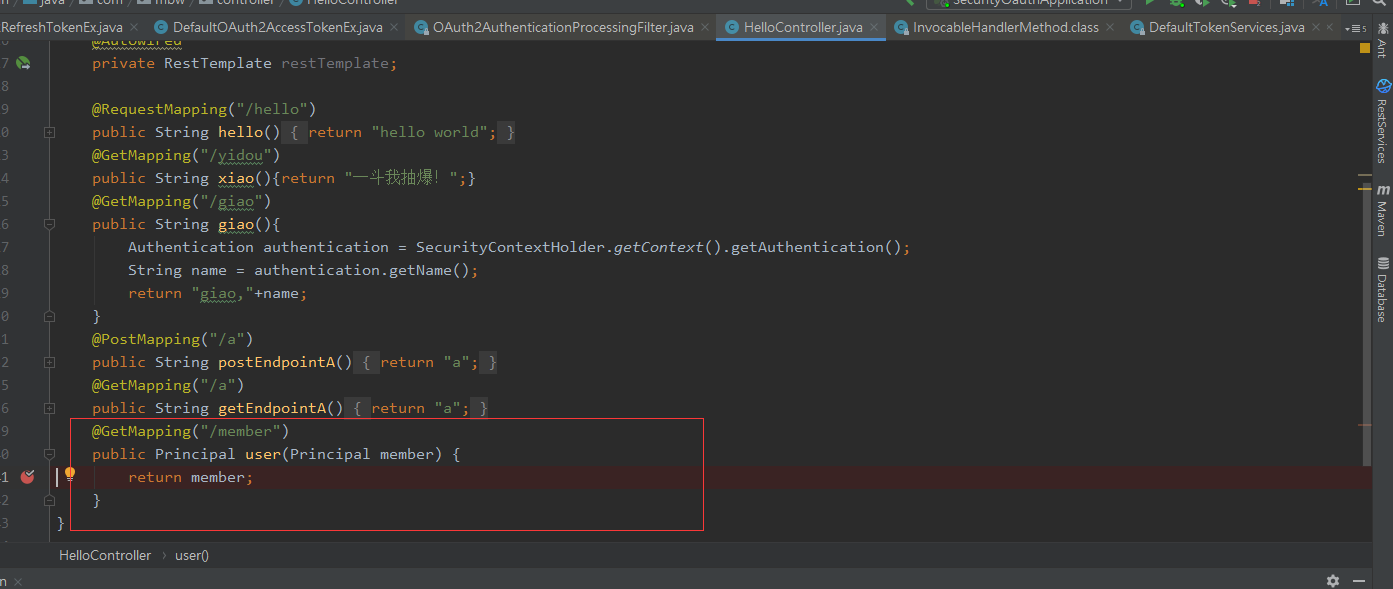
然后有了用户的认证信息,资源服务器把资源返回给客户端:
当然这只是我的个人理解,我自己debug了很多遍,由于找不到类似的资料,书上也没有讲解,我只能这样理解。如果大家有更好的想法,可以在评论区分享。
![[附源码]计算机毕业设计springboot校园疫情防范管理系统](https://img-blog.csdnimg.cn/7fef47e057fd4ea8b4ebec69f2d87e53.png)

![[附源码]Python计算机毕业设计Django健身房信息管理](https://img-blog.csdnimg.cn/f122023b72d4475d9e45211b74dcffc3.png)


![[附源码]计算机毕业设计疫苗及注射管理系统Springboot程序](https://img-blog.csdnimg.cn/ef68e8f3c43a4e5b929cd4aec4624a54.png)


![[附源码]计算机毕业设计springboot小区物业管理系统](https://img-blog.csdnimg.cn/9570f70337d2473db5a780bd511b2753.png)