整体效果如上. 下面一步一步添加部件来实现.
目录
1. 菜单栏
2. 文件选择部件
3. 垂直可折叠部件
3.1 label部件
3.2 复选框checkbox
3.3 色板
3.4 下拉框combobox
3.5 拨动开关toggleSwitch
3.6 部件代理WidgetProxy
3.7 WidgetStack
3.8 列表
3.9 树形视图
3.10 数字编辑器NumberEdit
3.11 进度条 ProgressBar
3.12 滚动条Slider
3.13 文本框
3.14 显示3D数组VectorEdit
3.15 网格布局
3.16 选项卡TabControl
3.17 终止程序
4. 完整程序
1. 菜单栏
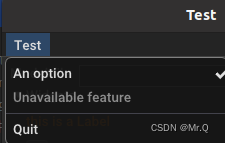
首先是菜单栏.
class ExampleWindow:
    MENU_CHECKABLE = 1
    MENU_DISABLED = 2
    MENU_QUIT = 3

    def __init__(self):
        self.window = gui.Application.instance.create_window("Test", 400, 768)
        # self.window = gui.Application.instance.create_window("Test", 400, 768,
        #                                                        x=50, y=100)
        w = self.window  # for more concise code

        # Rather than specifying sizes in pixels, which may vary in size based
        # on the monitor, especially on macOS which has 220 dpi monitors, use
        # the em-size. This way sizings will be proportional to the font size,
        # which will create a more visually consistent size across platforms.
        em = w.theme.font_size

        # Widgets are laid out in layouts: gui.Horiz, gui.Vert,
        # gui.CollapsableVert, and gui.VGrid. By nesting the layouts we can
        # achieve complex designs. Usually we use a vertical layout as the
        # topmost widget, since widgets tend to be organized from top to bottom.
        # Within that, we usually have a series of horizontal layouts for each
        # row.
        # 整个部件界面是垂直布局,然后部件内部是行布局.
        layout = gui.Vert(0, gui.Margins(0.5 * em, 0.5 * em, 0.5 * em,
                                         0.5 * em))  # 这里选垂直布局Vert. em=w.theme.font_size

        # 1, Create the menu. The menu is global (because the macOS menu is global),
        # so only create it once.
        if gui.Application.instance.menubar is None:
            menubar = gui.Menu()  # 菜单栏
            test_menu = gui.Menu()  # 添加第一个菜单
            test_menu.add_item("An option", ExampleWindow.MENU_CHECKABLE)  # 关联数字1 MENU_CHECKABLE
            test_menu.set_checked(ExampleWindow.MENU_CHECKABLE, True)  # 关联数字1 是否选中

            test_menu.add_item("Unavailable feature", ExampleWindow.MENU_DISABLED)  # 关联数字2 MENU_DISABLED
            test_menu.set_enabled(ExampleWindow.MENU_DISABLED, False)  # 关联数字2 是否开启该item.

            test_menu.add_separator()
            test_menu.add_item("Quit", ExampleWindow.MENU_QUIT)
            # On macOS the first menu item is the application menu item and will
            # always be the name of the application (probably "Python"),
            # regardless of what you pass in here. The application menu is
            # typically where About..., Preferences..., and Quit go.
            menubar.add_menu("Test", test_menu)
            gui.Application.instance.menubar = menubar

        # Each window needs to know what to do with the menu items, so we need
        # to tell the window how to handle menu items.
        # item关联回调函数
        w.set_on_menu_item_activated(ExampleWindow.MENU_CHECKABLE,  # menubar.set_checked
                                     self._on_menu_checkable)
        w.set_on_menu_item_activated(ExampleWindow.MENU_QUIT,  # 关停整个app
                                     self._on_menu_quit)


    def _on_menu_checkable(self):
        gui.Application.instance.menubar.set_checked(
            ExampleWindow.MENU_CHECKABLE,
            not gui.Application.instance.menubar.is_checked(
                ExampleWindow.MENU_CHECKABLE))

    def _on_menu_quit(self):
        gui.Application.instance.quit()
2. 文件选择部件
        # 2, Create a file-chooser widget. One part will be a text edit widget for
        # the filename and clicking on the button will let the user choose using
        # the file dialog.
        # 文件选择部件. 选中按钮将会展示目录
        self._fileedit = gui.TextEdit()    # 生成文本框
        filedlgbutton = gui.Button("...")  # 生成选择文件按钮
        filedlgbutton.horizontal_padding_em = 0.5  # em是相对度量单位. 以em为单位的水平填充
        filedlgbutton.vertical_padding_em = 0
        filedlgbutton.set_on_clicked(self._on_filedlg_button)  # 按钮关联回调函数

        # (Create the horizontal widget for the row. This will make sure the
        # text editor takes up as much space as it can.)
        fileedit_layout = gui.Horiz()  # 水平布局
        fileedit_layout.add_child(gui.Label("Model file"))  # 水平布局内先添加一个Label
        fileedit_layout.add_child(self._fileedit)  # 添加一个文本框
        fileedit_layout.add_fixed(0.25 * em)  # 在布局中添加固定数量的空白空间. em=w.theme.font_size
        fileedit_layout.add_child(filedlgbutton)  # 再添加按钮
        # add to the top-level (vertical) layout
        layout.add_child(fileedit_layout)

    def _on_filedlg_button(self):  # 选择文件按钮
        filedlg = gui.FileDialog(gui.FileDialog.OPEN, "Select file",
                                 self.window.theme)
        filedlg.add_filter(".obj .ply .stl", "Triangle mesh (.obj, .ply, .stl)")  # 过滤条件, 提示说明文本.
        filedlg.add_filter("", "All files")  # 过滤条件为空,即不过滤.
        filedlg.set_on_cancel(self._on_filedlg_cancel)
        filedlg.set_on_done(self._on_filedlg_done)
        self.window.show_dialog(filedlg)
3. 垂直可折叠部件
        # 3, Create a collapsible vertical widget, which takes up enough vertical
        # space for all its children when open, but only enough for text when
        # closed. This is useful for property pages, so the user can hide sets
        # of properties they rarely use. All layouts take a spacing parameter,
        # which is the spacinging between items in the widget, and a margins
        # parameter, which specifies the spacing of the left, top, right,
        # bottom margins. (This acts like the 'padding' property in CSS.)
        collapse = gui.CollapsableVert("Widgets", 0.33 * em,
                                       gui.Margins(em, 0, 0, 0))  # 生成一个可折叠的垂直部件.
3.1 label部件
![]()
        # 3.1 label
        self._label = gui.Label("this is a Label")  # 生成一个label
        self._label.text_color = gui.Color(1.0, 0.5, 0.0)  # 设置label颜色
        collapse.add_child(self._label)
3.2 复选框checkbox
![]()
        # 3.2 Create a checkbox. Checking or unchecking would usually be used to set
        # a binary property, but in this case it will show a simple message box,
        # which illustrates how to create simple dialogs.
        cb = gui.Checkbox("Enable some really cool effect")
        cb.set_on_checked(self._on_cb)  # set the callback function: 可实现一些回调功能
        collapse.add_child(cb)


    def _on_cb(self, is_checked):
        if is_checked:
            text = "Sorry, effects are unimplemented"
        else:
            text = "Good choice"

        self.show_message_dialog("There might be a problem...", text)
3.3 色板
![]()
        # 3.3 Create a color editor. We will change the color of the orange label
        # above when the color changes.  色板
        color = gui.ColorEdit()
        color.color_value = self._label.text_color  # 设置初值颜色
        color.set_on_value_changed(self._on_color)  # 选中后关联回调功能, 这里的回调功能是修改_label颜色
        collapse.add_child(color)


    def _on_color(self, new_color):
        self._label.text_color = new_color
3.4 下拉框combobox

        # 3.4 This is a combobox, nothing fancy here, just set a simple function to
        # handle the user selecting an item. 下拉框
        combo = gui.Combobox()  # 下拉框
        combo.add_item("Show point labels")
        combo.add_item("Show point velocity")
        combo.add_item("Show bounding boxes")
        combo.set_on_selection_changed(self._on_combo)  # 选中后关联回调: 打印信息
        collapse.add_child(combo)


    def _on_combo(self, new_val, new_idx):
        print(new_idx, new_val)  # 0 Show point labels
3.5 拨动开关toggleSwitch
![]()
        # 3.5 This is a toggle switch, which is similar to a checkbox. To my way of
        # thinking the difference is subtle: a checkbox toggles properties
        # (for example, purely visual changes like enabling lighting) while a
        # toggle switch is better for changing the behavior of the app (for
        # example, turning on processing from the camera).
        switch = gui.ToggleSwitch("Continuously update from camera")  # 拨动开关
        switch.set_on_clicked(self._on_switch)  # 选中后关联回调: 打印信息
        collapse.add_child(switch)


    def _on_switch(self, is_on):
        if is_on:
            print("Camera would now be running")
        else:
            print("Camera would now be off")
3.6 部件代理WidgetProxy


![]()
        # 3.6 部件代理. 通过按钮控制部件代理显示不同的图片或者文字.
        self.logo_idx = 0
        proxy = gui.WidgetProxy()  # 部件代理

        def switch_proxy():
            self.logo_idx += 1  # 每次点击会递增
            if self.logo_idx % 3 == 0:
                proxy.set_widget(None)
            elif self.logo_idx % 3 == 1:
                # Add a simple image
                logo = gui.ImageWidget(basedir + "/icon-32.png")
                proxy.set_widget(logo)  # 显示不同的图片
            else:
                label = gui.Label(
                    'Open3D: A Modern Library for 3D Data Processing')
                proxy.set_widget(label)  # 显示不同的文字.
            w.set_needs_layout()

        logo_btn = gui.Button('Switch Logo By WidgetProxy')  # 按钮
        logo_btn.vertical_padding_em = 0
        logo_btn.background_color = gui.Color(r=0, b=0.5, g=0)
        logo_btn.set_on_clicked(switch_proxy)  # 每次点击会调用一次

        collapse.add_child(logo_btn)  # 先添加按钮
        collapse.add_child(proxy)  # 再在按钮下添加部件代理,该部件代理其实就是显示图片或者文字.
3.7 WidgetStack
![]()
        # 3.7 Widget stack demo: push_widget(). 动态生成和减少多个部件
        self._widget_idx = 0
        hz = gui.Horiz(spacing=5)  # 水平部件
        push_widget_btn = gui.Button('Push widget')  # 添加部件
        push_widget_btn.vertical_padding_em = 0
        pop_widget_btn = gui.Button('Pop widget')    # 减少部件
        pop_widget_btn.vertical_padding_em = 0

        stack = gui.WidgetStack()  # 生成多个部件
        stack.set_on_top(lambda w: print(f'New widget is: {w.text}'))

        hz.add_child(gui.Label('WidgetStack '))  # 先添加label
        hz.add_child(push_widget_btn)  # 再添加bn
        hz.add_child(pop_widget_btn)   # 再添加bn
        hz.add_child(stack)            # 再添加stack集

        collapse.add_child(hz)

        def push_widget():  # 自定义的,也可以用stack.push_widget()
            self._widget_idx += 1
            stack.push_widget(gui.Label(f'Widget {self._widget_idx}'))  # 压入部件.

        push_widget_btn.set_on_clicked(push_widget)  # 关联生成部件函数,也可以用stack.push_widget()
        pop_widget_btn.set_on_clicked(stack.pop_widget)  # 关联减少部件函数
3.8 列表

        # 3.8 Add a list of items. 列表
        lv = gui.ListView()
        lv.set_items(["Ground", "Trees", "Buildings", "Cars", "People", "Cats"])
        lv.selected_index = lv.selected_index + 2  # initially is -1, so now 1
        lv.set_max_visible_items(4)
        lv.set_on_selection_changed(self._on_list)  # 当改变选中时触发回调函数. 这里只是打印信息
        collapse.add_child(lv)


    def _on_list(self, new_val, is_dbl_click):
        print(new_val)
3.9 树形视图

        # 3.9 Add a tree view. 树形视图
        tree = gui.TreeView()
        tree.add_text_item(tree.get_root_item(), "Camera")  # 根部添加
        geo_id = tree.add_text_item(tree.get_root_item(), "Geometries")  # 根部添加
        mesh_id = tree.add_text_item(geo_id, "Mesh")  # "Geometries"下再添加
        tree.add_text_item(mesh_id, "Triangles")  # "Mesh"下再添加
        tree.add_text_item(mesh_id, "Albedo texture")
        tree.add_text_item(mesh_id, "Normal map")
        points_id = tree.add_text_item(geo_id, "Points")
        tree.can_select_items_with_children = True
        tree.set_on_selection_changed(self._on_tree)  # 选中时触发回调函数. 这里只是打印信息.
        # does not call on_selection_changed: user did not change selection
        tree.selected_item = points_id  # 默认选中此
        collapse.add_child(tree)


    def _on_tree(self, new_item_id):
        print(new_item_id)
3.10 数字编辑器NumberEdit
![]()
        # 3.10 Add two number editors, one for integers and one for floating point
        # Number editor can clamp numbers to a range, although this is more
        # useful for integers than for floating point.
        intedit = gui.NumberEdit(gui.NumberEdit.INT)  # 整数编辑器
        intedit.int_value = 0
        intedit.set_limits(1, 19)  # value coerced to 1
        intedit.int_value = intedit.int_value + 2  # value should be 3
        doubleedit = gui.NumberEdit(gui.NumberEdit.DOUBLE)  # 双精度编辑器

        numlayout = gui.Horiz()
        numlayout.add_child(gui.Label("int"))
        numlayout.add_child(intedit)
        numlayout.add_fixed(em)  # manual spacing (could set it in Horiz() ctor)
        numlayout.add_child(gui.Label("double"))
        numlayout.add_child(doubleedit)
        collapse.add_child(numlayout)
3.11 进度条 ProgressBar
![]()
        # 3.11 Create a progress bar. It ranges from 0.0 to 1.0. 进度条
        self._progress = gui.ProgressBar()
        self._progress.value = 0.25  # 25% complete
        self._progress.value = self._progress.value + 0.08  # 0.25 + 0.08 = 33%
        prog_layout = gui.Horiz(em)
        prog_layout.add_child(gui.Label("Progress..."))
        prog_layout.add_child(self._progress)
        collapse.add_child(prog_layout)
3.12 滚动条Slider
![]()
        # 3.12 Create a slider. It acts very similar to NumberEdit except that the. 滚动条
        # user moves a slider and cannot type the number.
        slider = gui.Slider(gui.Slider.INT)
        slider.set_limits(5, 13)
        slider.set_on_value_changed(self._on_slider)  # 触发回调函数,这里是改变上面的进度条值.
        collapse.add_child(slider)


    def _on_slider(self, new_val):
        self._progress.value = new_val / 20.0
3.13 文本框
![]()
        # 3.13 Create a text editor. The placeholder text (if not empty) will be
        # displayed when there is no text, as concise help, or visible tooltip. 文本框
        tedit = gui.TextEdit()
        tedit.placeholder_text = "Edit me some text here"

        # on_text_changed fires whenever the user changes the text (but not if
        # the text_value property is assigned to).
        tedit.set_on_text_changed(self._on_text_changed)  # 文本框内内容改变时触发回调. 这里是打印文本内容.

        # on_value_changed fires whenever the user signals that they are finished
        # editing the text, either by pressing return or by clicking outside of
        # the text editor, thus losing text focus.
        tedit.set_on_value_changed(self._on_value_changed)
        collapse.add_child(tedit)


    def _on_text_changed(self, new_text):
        print("edit:", new_text)


    def _on_value_changed(self, new_text):
        print("value:", new_text)
3.14 显示3D数组VectorEdit
![]()
        # 3.14 Create a widget for showing/editing a 3D vector. 显示3D数组
        vedit = gui.VectorEdit()
        vedit.vector_value = [1, 2, 3]
        vedit.set_on_value_changed(self._on_vedit)  # 内容改变时触发回调. 这里是打印文本内容.
        collapse.add_child(vedit)


    def _on_vedit(self, new_val):
        print(new_val)
3.15 网格布局

        # 3.15 网格布局. Create a VGrid layout. This layout specifies the number of columns
        # (two, in this case), and will place the first child in the first
        # column, the second in the second, the third in the first, the fourth
        # in the second, etc.
        # So:
        #      2 cols             3 cols                  4 cols
        #   |  1  |  2  |   |  1  |  2  |  3  |   |  1  |  2  |  3  |  4  |
        #   |  3  |  4  |   |  4  |  5  |  6  |   |  5  |  6  |  7  |  8  |
        #   |  5  |  6  |   |  7  |  8  |  9  |   |  9  | 10  | 11  | 12  |
        #   |    ...    |   |       ...       |   |         ...           |
        vgrid = gui.VGrid(2)  # 两列
        vgrid.add_child(gui.Label("Trees"))  # 一行一行添加
        vgrid.add_child(gui.Label("12 items"))
        vgrid.add_child(gui.Label("People"))
        vgrid.add_child(gui.Label("2 (93% certainty)"))
        vgrid.add_child(gui.Label("Cars"))
        vgrid.add_child(gui.Label("5 (87% certainty)"))
        collapse.add_child(vgrid)
3.16 选项卡TabControl

        # 3.16 选项卡控件. Create a tab control. This is really a set of N layouts on top of each
        # other, but with only one selected.
        tabs = gui.TabControl()  # 下面会依次创建4个选项

        tab1 = gui.Vert()  # 第一个选项管理的是一个垂直布局.
        tab1.add_child(gui.Checkbox("Enable option 1"))  # 每一个都是Checkbox
        tab1.add_child(gui.Checkbox("Enable option 2"))
        tab1.add_child(gui.Checkbox("Enable option 3"))
        tabs.add_tab("Options", tab1)

        tab2 = gui.Vert()  # 一个垂直布局.
        tab2.add_child(gui.Label("No plugins detected"))
        tab2.add_stretch()
        tabs.add_tab("Plugins", tab2)

        tab3 = gui.RadioButton(gui.RadioButton.VERT)  # 创建单选按钮, 按钮按垂直排列VERT
        tab3.set_items(["Apple", "Orange"])
        def vt_changed(idx):
            print(f"current cargo: {tab3.selected_value}")
        tab3.set_on_selection_changed(vt_changed)  # 内容改变时触发回调. 这里是打印文本
        tabs.add_tab("Cargo", tab3)

        tab4 = gui.RadioButton(gui.RadioButton.HORIZ)  # 创建单选按钮, 按钮按水平排列HORIZ
        tab4.set_items(["Air plane", "Train", "Bus"])
        def hz_changed(idx):
            print(f"current traffic plan: {tab4.selected_value}")
        tab4.set_on_selection_changed(hz_changed)  # 内容改变时触发回调. 这里是打印文本
        tabs.add_tab("Traffic", tab4)
        collapse.add_child(tabs)
3.17 终止程序
![]()
gui.Application.instance.quit()
        # 3.17 Quit button. (Typically this is a menu item)  关闭应用按钮
        button_layout = gui.Horiz()
        ok_button = gui.Button("Ok")
        ok_button.set_on_clicked(self._on_ok)  # 触发回调,关闭
        button_layout.add_stretch()  # 添加一个拉伸空白空间
        button_layout.add_child(ok_button)  #

        layout.add_child(button_layout)

        # We're done, set the window's layout
        w.add_child(layout)


    def _on_ok(self):
        gui.Application.instance.quit()
4. 完整程序
import open3d.visualization.gui as gui
import os.path

basedir = os.path.dirname(os.path.realpath(__file__))


class ExampleWindow:
    MENU_CHECKABLE = 1
    MENU_DISABLED = 2
    MENU_QUIT = 3

    def __init__(self):
        self.window = gui.Application.instance.create_window("Test", 400, 768)
        # self.window = gui.Application.instance.create_window("Test", 400, 768,
        #                                                        x=50, y=100)
        w = self.window  # for more concise code

        # Rather than specifying sizes in pixels, which may vary in size based
        # on the monitor, especially on macOS which has 220 dpi monitors, use
        # the em-size. This way sizings will be proportional to the font size,
        # which will create a more visually consistent size across platforms.
        em = w.theme.font_size

        # Widgets are laid out in layouts: gui.Horiz, gui.Vert,
        # gui.CollapsableVert, and gui.VGrid. By nesting the layouts we can
        # achieve complex designs. Usually we use a vertical layout as the
        # topmost widget, since widgets tend to be organized from top to bottom.
        # Within that, we usually have a series of horizontal layouts for each
        # row.
        # 部件通常是垂直布局,然后部件内部是行布局.
        layout = gui.Vert(0, gui.Margins(0.5 * em, 0.5 * em, 0.5 * em,
                                         0.5 * em))  # 这里选垂直布局Vert. em=w.theme.font_size

        # 1, Create the menu. The menu is global (because the macOS menu is global),
        # so only create it once.
        if gui.Application.instance.menubar is None:
            menubar = gui.Menu()  # 菜单栏
            test_menu = gui.Menu()  # 添加第一个菜单
            test_menu.add_item("An option", ExampleWindow.MENU_CHECKABLE)  # 关联数字1 MENU_CHECKABLE
            test_menu.set_checked(ExampleWindow.MENU_CHECKABLE, True)  # 关联数字1 是否选中

            test_menu.add_item("Unavailable feature", ExampleWindow.MENU_DISABLED)  # 关联数字2 MENU_DISABLED
            test_menu.set_enabled(ExampleWindow.MENU_DISABLED, False)  # 关联数字2 是否开启该item.

            test_menu.add_separator()
            test_menu.add_item("Quit", ExampleWindow.MENU_QUIT)
            # On macOS the first menu item is the application menu item and will
            # always be the name of the application (probably "Python"),
            # regardless of what you pass in here. The application menu is
            # typically where About..., Preferences..., and Quit go.
            menubar.add_menu("Test", test_menu)
            gui.Application.instance.menubar = menubar

        # Each window needs to know what to do with the menu items, so we need
        # to tell the window how to handle menu items.
        # item关联回调函数
        w.set_on_menu_item_activated(ExampleWindow.MENU_CHECKABLE,  # menubar.set_checked
                                     self._on_menu_checkable)
        w.set_on_menu_item_activated(ExampleWindow.MENU_QUIT,  # 关停整个app
                                     self._on_menu_quit)

        # 2, Create a file-chooser widget. One part will be a text edit widget for
        # the filename and clicking on the button will let the user choose using
        # the file dialog.
        # 文件选择部件. 选中按钮将会展示目录
        self._fileedit = gui.TextEdit()    # 生成文本框
        filedlgbutton = gui.Button("...")  # 生成选择文件按钮
        filedlgbutton.horizontal_padding_em = 0.5  # em是相对度量单位. 以em为单位的水平填充
        filedlgbutton.vertical_padding_em = 0
        filedlgbutton.set_on_clicked(self._on_filedlg_button)  # 按钮关联回调函数

        # (Create the horizontal widget for the row. This will make sure the
        # text editor takes up as much space as it can.)
        fileedit_layout = gui.Horiz()  # 水平布局
        fileedit_layout.add_child(gui.Label("Model file"))  # 水平布局内先添加一个Label
        fileedit_layout.add_child(self._fileedit)  # 添加一个文本框
        fileedit_layout.add_fixed(0.25 * em)  # 在布局中添加固定数量的空白空间. em=w.theme.font_size
        fileedit_layout.add_child(filedlgbutton)  # 再添加按钮
        # add to the top-level (vertical) layout
        layout.add_child(fileedit_layout)

        # 3, Create a collapsible vertical widget, which takes up enough vertical
        # space for all its children when open, but only enough for text when
        # closed. This is useful for property pages, so the user can hide sets
        # of properties they rarely use. All layouts take a spacing parameter,
        # which is the spacinging between items in the widget, and a margins
        # parameter, which specifies the spacing of the left, top, right,
        # bottom margins. (This acts like the 'padding' property in CSS.)
        collapse = gui.CollapsableVert("Widgets", 0.33 * em,
                                       gui.Margins(em, 0, 0, 0))  # 生成一个可折叠的垂直部件.
        # 3.1 label
        self._label = gui.Label("this is a Label")  # 生成一个label
        self._label.text_color = gui.Color(1.0, 0.5, 0.0)  # 设置label颜色
        collapse.add_child(self._label)

        # 3.2 Create a checkbox. Checking or unchecking would usually be used to set
        # a binary property, but in this case it will show a simple message box,
        # which illustrates how to create simple dialogs.
        cb = gui.Checkbox("Enable some really cool effect")
        cb.set_on_checked(self._on_cb)  # set the callback function: 可实现一些回调功能
        collapse.add_child(cb)

        # 3.3 Create a color editor. We will change the color of the orange label
        # above when the color changes.  色板
        color = gui.ColorEdit()
        color.color_value = self._label.text_color  # 设置初值颜色
        color.set_on_value_changed(self._on_color)  # 选中后关联回调功能, 这里的回调功能是修改_label颜色
        collapse.add_child(color)

        # 3.4 This is a combobox, nothing fancy here, just set a simple function to
        # handle the user selecting an item. 下拉框
        combo = gui.Combobox()  # 下拉框
        combo.add_item("Show point labels")
        combo.add_item("Show point velocity")
        combo.add_item("Show bounding boxes")
        combo.set_on_selection_changed(self._on_combo)  # 选中后关联回调: 打印信息
        collapse.add_child(combo)

        # 3.5 This is a toggle switch, which is similar to a checkbox. To my way of
        # thinking the difference is subtle: a checkbox toggles properties
        # (for example, purely visual changes like enabling lighting) while a
        # toggle switch is better for changing the behavior of the app (for
        # example, turning on processing from the camera).
        switch = gui.ToggleSwitch("Continuously update from camera")  # 拨动开关
        switch.set_on_clicked(self._on_switch)  # 选中后关联回调: 打印信息
        collapse.add_child(switch)

        # 3.6 部件代理. 通过按钮控制部件代理显示不同的图片或者文字.
        self.logo_idx = 0
        proxy = gui.WidgetProxy()  # 部件代理

        def switch_proxy():
            self.logo_idx += 1  # 每次点击会递增
            if self.logo_idx % 3 == 0:
                proxy.set_widget(None)
            elif self.logo_idx % 3 == 1:
                # Add a simple image
                logo = gui.ImageWidget(basedir + "/icon-32.png")
                proxy.set_widget(logo)  # 显示不同的图片
            else:
                label = gui.Label(
                    'Open3D: A Modern Library for 3D Data Processing')
                proxy.set_widget(label)  # 显示不同的文字.
            w.set_needs_layout()

        logo_btn = gui.Button('Switch Logo By WidgetProxy')  # 按钮
        logo_btn.vertical_padding_em = 0
        logo_btn.background_color = gui.Color(r=0, b=0.5, g=0)
        logo_btn.set_on_clicked(switch_proxy)  # 每次点击会调用一次

        collapse.add_child(logo_btn)  # 先添加按钮
        collapse.add_child(proxy)  # 再在按钮下添加部件代理,该部件代理其实就是显示图片或者文字.

        # 3.7 Widget stack demo: push_widget(). 动态生成和减少多个部件
        self._widget_idx = 0
        hz = gui.Horiz(spacing=5)  # 水平部件
        push_widget_btn = gui.Button('Push widget')  # 添加部件
        push_widget_btn.vertical_padding_em = 0
        pop_widget_btn = gui.Button('Pop widget')    # 减少部件
        pop_widget_btn.vertical_padding_em = 0

        stack = gui.WidgetStack()  # 生成多个部件
        stack.set_on_top(lambda w: print(f'New widget is: {w.text}'))

        hz.add_child(gui.Label('WidgetStack '))  # 先添加label
        hz.add_child(push_widget_btn)  # 再添加bn
        hz.add_child(pop_widget_btn)   # 再添加bn
        hz.add_child(stack)            # 再添加stack集

        collapse.add_child(hz)

        def push_widget():  # 自定义的,也可以用stack.push_widget()
            self._widget_idx += 1
            stack.push_widget(gui.Label(f'Widget {self._widget_idx}'))  # 压入部件.

        push_widget_btn.set_on_clicked(push_widget)  # 关联生成部件函数,也可以用stack.push_widget()
        pop_widget_btn.set_on_clicked(stack.pop_widget)  # 关联减少部件函数

        # 3.8 Add a list of items. 列表
        lv = gui.ListView()
        lv.set_items(["Ground", "Trees", "Buildings", "Cars", "People", "Cats"])
        lv.selected_index = lv.selected_index + 2  # initially is -1, so now 1
        lv.set_max_visible_items(4)
        lv.set_on_selection_changed(self._on_list)  # 当改变选中时触发回调函数. 这里只是打印信息
        collapse.add_child(lv)

        # 3.9 Add a tree view. 树形视图
        tree = gui.TreeView()
        tree.add_text_item(tree.get_root_item(), "Camera")  # 根部添加
        geo_id = tree.add_text_item(tree.get_root_item(), "Geometries")  # 根部添加
        mesh_id = tree.add_text_item(geo_id, "Mesh")  # "Geometries"下再添加
        tree.add_text_item(mesh_id, "Triangles")  # "Mesh"下再添加
        tree.add_text_item(mesh_id, "Albedo texture")
        tree.add_text_item(mesh_id, "Normal map")
        points_id = tree.add_text_item(geo_id, "Points")
        tree.can_select_items_with_children = True
        tree.set_on_selection_changed(self._on_tree)  # 选中时触发回调函数. 这里只是打印信息.
        # does not call on_selection_changed: user did not change selection
        tree.selected_item = points_id  # 默认选中此
        collapse.add_child(tree)

        # 3.10 Add two number editors, one for integers and one for floating point
        # Number editor can clamp numbers to a range, although this is more
        # useful for integers than for floating point.
        intedit = gui.NumberEdit(gui.NumberEdit.INT)  # 整数编辑器
        intedit.int_value = 0
        intedit.set_limits(1, 19)  # value coerced to 1
        intedit.int_value = intedit.int_value + 2  # value should be 3
        doubleedit = gui.NumberEdit(gui.NumberEdit.DOUBLE)  # 双精度编辑器

        numlayout = gui.Horiz()
        numlayout.add_child(gui.Label("int"))
        numlayout.add_child(intedit)
        numlayout.add_fixed(em)  # manual spacing (could set it in Horiz() ctor)
        numlayout.add_child(gui.Label("double"))
        numlayout.add_child(doubleedit)
        collapse.add_child(numlayout)

        # 3.11 Create a progress bar. It ranges from 0.0 to 1.0. 进度条
        self._progress = gui.ProgressBar()
        self._progress.value = 0.25  # 25% complete
        self._progress.value = self._progress.value + 0.08  # 0.25 + 0.08 = 33%
        prog_layout = gui.Horiz(em)
        prog_layout.add_child(gui.Label("Progress..."))
        prog_layout.add_child(self._progress)
        collapse.add_child(prog_layout)

        # 3.12 Create a slider. It acts very similar to NumberEdit except that the. 滚动条
        # user moves a slider and cannot type the number.
        slider = gui.Slider(gui.Slider.INT)
        slider.set_limits(5, 13)
        slider.set_on_value_changed(self._on_slider)  # 触发回调函数,这里是改变上面的进度条值.
        collapse.add_child(slider)

        # 3.13 Create a text editor. The placeholder text (if not empty) will be
        # displayed when there is no text, as concise help, or visible tooltip. 文本框
        tedit = gui.TextEdit()
        tedit.placeholder_text = "Edit me some text here"

        # on_text_changed fires whenever the user changes the text (but not if
        # the text_value property is assigned to).
        tedit.set_on_text_changed(self._on_text_changed)  # 文本框内内容改变时触发回调. 这里是打印文本内容.

        # on_value_changed fires whenever the user signals that they are finished
        # editing the text, either by pressing return or by clicking outside of
        # the text editor, thus losing text focus.
        tedit.set_on_value_changed(self._on_value_changed)
        collapse.add_child(tedit)

        # 3.14 Create a widget for showing/editing a 3D vector. 显示3D数组
        vedit = gui.VectorEdit()
        vedit.vector_value = [1, 2, 3]
        vedit.set_on_value_changed(self._on_vedit)  # 内容改变时触发回调. 这里是打印文本内容.
        collapse.add_child(vedit)

        # 3.15 网格布局. Create a VGrid layout. This layout specifies the number of columns
        # (two, in this case), and will place the first child in the first
        # column, the second in the second, the third in the first, the fourth
        # in the second, etc.
        # So:
        #      2 cols             3 cols                  4 cols
        #   |  1  |  2  |   |  1  |  2  |  3  |   |  1  |  2  |  3  |  4  |
        #   |  3  |  4  |   |  4  |  5  |  6  |   |  5  |  6  |  7  |  8  |
        #   |  5  |  6  |   |  7  |  8  |  9  |   |  9  | 10  | 11  | 12  |
        #   |    ...    |   |       ...       |   |         ...           |
        vgrid = gui.VGrid(2)  # 两列
        vgrid.add_child(gui.Label("Trees"))  # 一行一行添加
        vgrid.add_child(gui.Label("12 items"))
        vgrid.add_child(gui.Label("People"))
        vgrid.add_child(gui.Label("2 (93% certainty)"))
        vgrid.add_child(gui.Label("Cars"))
        vgrid.add_child(gui.Label("5 (87% certainty)"))
        collapse.add_child(vgrid)

        # 3.16 选项卡控件. Create a tab control. This is really a set of N layouts on top of each
        # other, but with only one selected.
        tabs = gui.TabControl()  # 下面会依次创建4个选项

        tab1 = gui.Vert()  # 第一个选项管理的是一个垂直布局.
        tab1.add_child(gui.Checkbox("Enable option 1"))  # 每一个都是Checkbox
        tab1.add_child(gui.Checkbox("Enable option 2"))
        tab1.add_child(gui.Checkbox("Enable option 3"))
        tabs.add_tab("Options", tab1)

        tab2 = gui.Vert()  # 一个垂直布局.
        tab2.add_child(gui.Label("No plugins detected"))
        tab2.add_stretch()
        tabs.add_tab("Plugins", tab2)

        tab3 = gui.RadioButton(gui.RadioButton.VERT)  # 创建单选按钮, 按钮按垂直排列VERT
        tab3.set_items(["Apple", "Orange"])
        def vt_changed(idx):
            print(f"current cargo: {tab3.selected_value}")
        tab3.set_on_selection_changed(vt_changed)  # 内容改变时触发回调. 这里是打印文本
        tabs.add_tab("Cargo", tab3)

        tab4 = gui.RadioButton(gui.RadioButton.HORIZ)  # 创建单选按钮, 按钮按水平排列HORIZ
        tab4.set_items(["Air plane", "Train", "Bus"])
        def hz_changed(idx):
            print(f"current traffic plan: {tab4.selected_value}")
        tab4.set_on_selection_changed(hz_changed)  # 内容改变时触发回调. 这里是打印文本
        tabs.add_tab("Traffic", tab4)
        collapse.add_child(tabs)

        layout.add_child(collapse)

        # 3.17 Quit button. (Typically this is a menu item)  关闭应用按钮
        button_layout = gui.Horiz()
        ok_button = gui.Button("Ok")
        ok_button.set_on_clicked(self._on_ok)  # 触发回调,关闭
        button_layout.add_stretch()  # 添加一个拉伸空白空间
        button_layout.add_child(ok_button)  #

        layout.add_child(button_layout)

        # We're done, set the window's layout
        w.add_child(layout)

    def _on_filedlg_button(self):  # 选择文件按钮
        filedlg = gui.FileDialog(gui.FileDialog.OPEN, "Select file",
                                 self.window.theme)
        filedlg.add_filter(".obj .ply .stl", "Triangle mesh (.obj, .ply, .stl)")  # 过滤条件, 提示说明文本.
        filedlg.add_filter("", "All files")  # 过滤条件为空,即不过滤.
        filedlg.set_on_cancel(self._on_filedlg_cancel)
        filedlg.set_on_done(self._on_filedlg_done)
        self.window.show_dialog(filedlg)

    def _on_filedlg_cancel(self):
        self.window.close_dialog()

    def _on_filedlg_done(self, path):
        self._fileedit.text_value = path
        self.window.close_dialog()

    def _on_cb(self, is_checked):
        if is_checked:
            text = "Sorry, effects are unimplemented"
        else:
            text = "Good choice"

        self.show_message_dialog("There might be a problem...", text)

    def _on_switch(self, is_on):
        if is_on:
            print("Camera would now be running")
        else:
            print("Camera would now be off")

    # This function is essentially the same as window.show_message_box(),
    # so for something this simple just use that, but it illustrates making a
    # dialog.
    def show_message_dialog(self, title, message):
        # A Dialog is just a widget, so you make its child a layout just like
        # a Window.
        dlg = gui.Dialog(title)

        # Add the message text
        em = self.window.theme.font_size
        dlg_layout = gui.Vert(em, gui.Margins(em, em, em, em))
        dlg_layout.add_child(gui.Label(message))

        # Add the Ok button. We need to define a callback function to handle
        # the click.
        ok_button = gui.Button("Ok")
        ok_button.set_on_clicked(self._on_dialog_ok)

        # We want the Ok button to be an the right side, so we need to add
        # a stretch item to the layout, otherwise the button will be the size
        # of the entire row. A stretch item takes up as much space as it can,
        # which forces the button to be its minimum size.
        button_layout = gui.Horiz()
        button_layout.add_stretch()
        button_layout.add_child(ok_button)

        # Add the button layout,
        dlg_layout.add_child(button_layout)
        # ... then add the layout as the child of the Dialog
        dlg.add_child(dlg_layout)
        # ... and now we can show the dialog
        self.window.show_dialog(dlg)

    def _on_dialog_ok(self):
        self.window.close_dialog()

    def _on_color(self, new_color):
        self._label.text_color = new_color

    def _on_combo(self, new_val, new_idx):
        print(new_idx, new_val)

    def _on_list(self, new_val, is_dbl_click):
        print(new_val)

    def _on_tree(self, new_item_id):
        print(new_item_id)

    def _on_slider(self, new_val):
        self._progress.value = new_val / 20.0

    def _on_text_changed(self, new_text):
        print("edit:", new_text)

    def _on_value_changed(self, new_text):
        print("value:", new_text)

    def _on_vedit(self, new_val):
        print(new_val)

    def _on_ok(self):
        gui.Application.instance.quit()

    def _on_menu_checkable(self):
        gui.Application.instance.menubar.set_checked(
            ExampleWindow.MENU_CHECKABLE,
            not gui.Application.instance.menubar.is_checked(
                ExampleWindow.MENU_CHECKABLE))

    def _on_menu_quit(self):
        gui.Application.instance.quit()


# This class is essentially the same as window.show_message_box(),
# so for something this simple just use that, but it illustrates making a
# dialog.
class MessageBox:

    def __init__(self, title, message):
        self._window = None

        # A Dialog is just a widget, so you make its child a layout just like
        # a Window.
        dlg = gui.Dialog(title)

        # Add the message text
        em = self.window.theme.font_size
        dlg_layout = gui.Vert(em, gui.Margins(em, em, em, em))
        dlg_layout.add_child(gui.Label(message))

        # Add the Ok button. We need to define a callback function to handle
        # the click.
        ok_button = gui.Button("Ok")
        ok_button.set_on_clicked(self._on_ok)

        # We want the Ok button to be an the right side, so we need to add
        # a stretch item to the layout, otherwise the button will be the size
        # of the entire row. A stretch item takes up as much space as it can,
        # which forces the button to be its minimum size.
        button_layout = gui.Horiz()
        button_layout.add_stretch()
        button_layout.add_child(ok_button)

        # Add the button layout,
        dlg_layout.add_child(button_layout)
        # ... then add the layout as the child of the Dialog
        dlg.add_child(dlg_layout)

    def show(self, window):
        self._window = window

    def _on_ok(self):
        self._window.close_dialog()


def main():
    # We need to initialize the application, which finds the necessary shaders for
    # rendering and prepares the cross-platform window abstraction.
    gui.Application.instance.initialize()

    w = ExampleWindow()

    # Run the event loop. This will not return until the last window is closed.
    gui.Application.instance.run()


if __name__ == "__main__":
    main()


