本文参考MOOC哈工大操作系统课程与课件
主要基于Linux 0.11系统展开
”Author:Mayiming“
实践部分依赖虚拟环境展开,请访问网址
https://www.lanqiao.cn/courses/115
本文就试验一、二、三进行梳理
一、熟悉试验环境
试验环境使用了oslab、bochs、gcc等。
1. oslab
oslab是bochs和linux 0.11整合的一个包的名称
2. bochs
Bochs 是一个免费且开放源代码的 IA-32(x86)架构 PC 机模拟器(注意是模拟器,不是虚拟机)
3. gcc
gcc 是和 Linux 一起成长起来的编译器
4. Image
Image是操作系统内核编译的目标文件
5. hdc-0.11.img
hdc-0.11.img 是文件的格式是 Minix 文件系统的镜像
Linux 所有版本都支持这种格式的文件系统,所以可以直接在宿主 Linux 上通过 mount 命令访问此文件内的文件,达到宿主系统和 bochs 内运行的 Linux 0.11 之间交换文件的效果。
hdc-0.11.img 内包含有:
	Bash shell;
	一些基本的 Linux 命令、工具,比如 cp、rm、mv、tar;
	vi 编辑器;
	gcc 1.4 编译器,可用来编译标准 C 程序;
	as86 和 ld86;
	Linux 0.11 的源代码,可在 0.11 下编译,然后覆盖现有的二进制内核。
6. 编译Linux 0.11
在linux 0.11文件夹中执行make clean && make all
7. 本地和模拟器环境文件交换
首先通过sudo ./mount-hdc进行挂载。
然后在 Ubuntu 的~/oslab/hdc/ 下即为linux 0.11环境下的文件
sudo umount hdc可以卸载
二、操作系统的引导
linux 0.11文件中 boot/bootsect.s、boot/setup.s,即为前文【操作系统启动过程】中提到的bootsect和setup模块。
1. bootsect.s
1.1 打印字符串
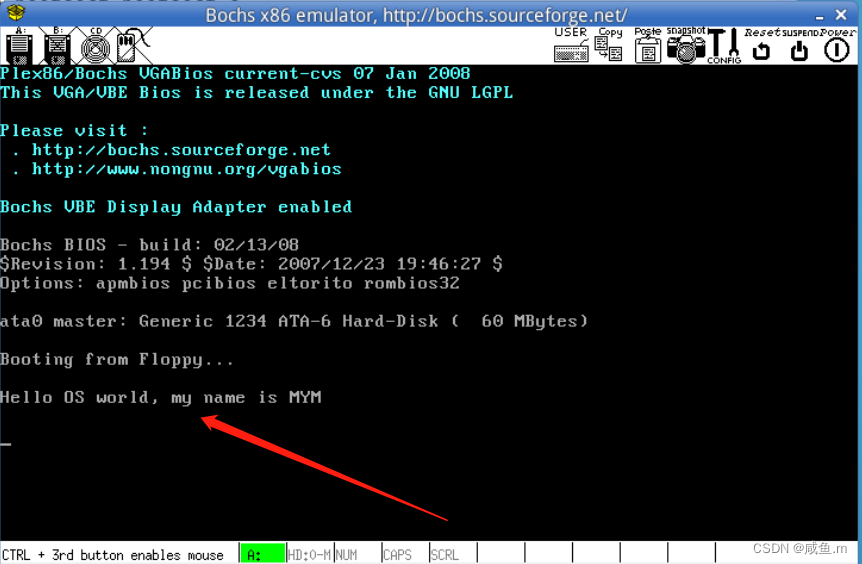
想要在操作系统启动时打印"Hello OS world, my name is MYM"需要如何修改bootsect.s
完整代码如下:
entry _start
_start:
    // 读取鼠标
    mov ah,#0x03
    xor bh,bh
    int 0x10
    // 显示字符  cx 字符长度 bx 显示属性 es:bp 字符串地址 ax 中断的一些设置...
    mov cx,#36
    mov bx,#0x0007
    mov bp,#msg1
    mov ax,#0x07c0
    mov es,ax
    mov ax,#0x1301
    int 0x10
    // 无线循环,为了让显示的字符串停留在显示器上
inf_loop:
    jmp inf_loop
// 字符串长度30, msg1后三个换行+回车一共6个字符,因此 cx = 36
msg1:
    .byte   13,10
    .ascii  "Hello OS world, my name is MYM"
    .byte   13,10,13,10
.org 510
// 设置引导扇区标记 0xAA55 必须有它,才能引导
boot_flag:
    .word   0xAA55
下面需要汇编上述代码:
$ as86 -0 -a -o bootsect.o bootsect.s
$ ld86 -0 -s -o bootsect bootsect.o
其中 -0(注意:这是数字 0,不是字母 O)表示生成 8086 的 16 位目标程序,-a 表示生成与 GNU as 和 ld 部分兼容的代码,-s 告诉链接器 ld86 去除最后生成的可执行文件中的符号信息
-rw--x--x    1  root  root  544  Jul  25  15:07   bootsect
-rw------    1  root  root  257  Jul  25  15:07   bootsect.o
-rw------    1  root  root  686  Jul  25  14:28   bootsect.s
从上述结果可以看到bootsect大小是544字节,而前文中我们说bootsect是占用一个扇区是512字节,造成多了 32 个字节的原因是ld86产生的是Minix可执行文件格式,这样的可执行文件除了文本段、数据段等部分以外,还包括一个Minix可执行文件头部。
下面去掉头部:
$ dd bs=1 if=bootsect of=Image skip=32
1.2 载入setup.s
继续编写bootsect.s,使其可以读入setup.s
SETUPLEN=2 // 原版是读入4个扇区,此处不需要那么多
SETUPSEG=0x07e0 // setup 内存起始位置
entry _start
_start:
    mov ah,#0x03
    xor bh,bh
    int 0x10
    mov cx,#36
    mov bx,#0x0007
    mov bp,#msg1
    mov ax,#0x07c0
    mov es,ax
    mov ax,#0x1301
    int 0x10
load_setup:
	// 设置驱动器和磁头(drive 0, head 0): 软盘 0 磁头
    mov dx,#0x0000
    // 设置扇区号和磁道(sector 2, track 0): 0 磁道、2 扇区
    mov cx,#0x0002
    // 设置读入的内存地址:BOOTSEG+address = 512,偏移512字节, ps:0x0200十进制是512
    mov bx,#0x0200
    // 设置读入的扇区个数(service 2, nr of sectors)
    mov ax,#0x0200+SETUPLEN
    // 应用 0x13 号 BIOS 中断读入 2 个 setup.s扇区
    int 0x13
    // 读入成功,跳转到 ok_load_setup: ok - continue
    jnc ok_load_setup
    // 软驱、软盘有问题才会执行到这里。我们的镜像文件比它们可靠多了
    mov dx,#0x0000
    //  否则复位软驱 reset the diskette
    mov ax,#0x0000
    int 0x13
    // 重新循环,再次尝试读取
    jmp load_setup
ok_load_setup:
	// 接下来要干什么?当然是跳到 setup 执行。
	// 要注意:我们没有将 bootsect 移到 0x9000,因此跳转后的段地址应该是 0x07e0
	// 因为BOOTSEG=0x07c0,物理地址为0x07c00,setup的物理地址相对bootsect偏移512字节,即0x07e00
    // 即我们要设置 SETUPSEG=0x07e0
    jmpi    0,SETUPSEG
msg1:
    .byte   13,10
    .ascii  "Hello OS world, my name is MYM"
    .byte   13,10,13,10
.org 510
boot_flag:
    .word   0xAA55
编译:
make BootImage
至于为什么这么编译,因为Makefile定义了BootImage需要做的事情
1.3 修改build.c
build.c 从命令行参数得到 bootsect、setup 和 system 内核的文件名,将三者做简单的整理后一起写入 Image。
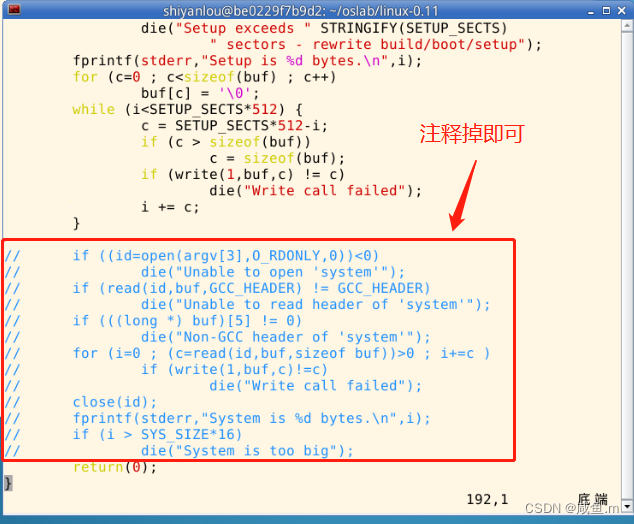
其中 system 是第三个参数(argv[3])。当“make all”或者“makeall”的时候,这个参数传过来的是正确的文件名,build.c 会打开它,将内容写入 Image。
而 “make BootImage” 时,传过来的是字符串 "none"。所以,改造build.c的思路就是当argv[3]是"none"的时候,只写bootsect和 setup,忽略所有与system有关的工作,或者在该写system的位置都写上 “0”。
修改工作主要集中在build.c的尾部,可以参考下面的方式,将圈起来的部分注释掉。
2. setup.s
2.1 获取硬件参数
通过setup.s获取硬件参数,setup.s 将获得硬件参数放在内存的 0x90000 处。原版setup.s中已经完成了光标位置、内存大小、显存大小、显卡参数、第一和第二硬盘参数的保存。
ah=#0x03 调用 0x10 中断可以读出光标的位置
ah=#0x88 调用 0x15 中断可以读出内存的大小
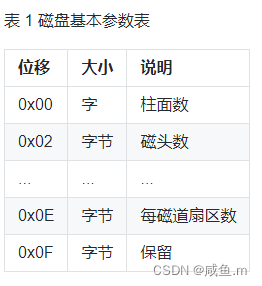
磁盘参数表的获取,在 PC 机中 BIOS 设定的中断向量表中 int 0x41 的中断向量位置(4*0x41 = 0x0000:0x0104)存放的并不是中断程序的地址,而是第一个硬盘的基本参数表。
第二个硬盘的基本参数表入口地址存于 int 0x46 中断向量位置处。每个硬盘参数表有 16 个字节大小。下表给出了硬盘基本参数表的内容:
mov    ax,#INITSEG  // INITSEG = 0x9000
// 设置 ds = 0x9000
mov    ds,ax
mov    ah,#0x03
 // 读入光标位置
xor    bh,bh
// 调用 0x10 中断
int    0x10
// 将光标位置写入 0x90000.
mov    [0],dx

// 读入内存大小位置
mov    ah,#0x88
int    0x15
mov    [2],ax

// 从 0x41 处拷贝 16 个字节(磁盘参数表)
mov    ax,#0x0000
mov    ds,ax // ds = 0x0000
lds    si,[4*0x41]
mov    ax,#INITSEG
mov    es,ax // es = 0x9000
mov    di,#0x0004 // es:di=0x90004 表示磁盘参数放的地址
mov    cx,#0x10
// 重复16次 将磁盘参数表 16 字节移动到 0x90004
rep
movsb
2.2 显示硬件参数
显示硬件参数主要使用INT 0x10 BIOS中断
INITSEG  = 0x9000
entry _start
_start:
// Print "NOW we are in SETUP"
    mov ah,#0x03
    xor bh,bh
    int 0x10 // 获取鼠标
    mov cx,#25
    mov bx,#0x0007
    mov bp,#msg2
    mov ax,cs
    mov es,ax
    mov ax,#0x1301
    int 0x10 // 显示字符

    mov ax,cs
    mov es,ax
// 初始化堆栈 init ss:sp : 0x9FF00
    mov ax,#INITSEG
    mov ss,ax
    mov sp,#0xFF00

// Get Params 放到内存0x90000位置
    // 获取鼠标位置
    mov ax,#INITSEG
    mov ds,ax
    mov ah,#0x03
    xor bh,bh
    int 0x10
    // 获取内存参数
    mov [0],dx
    mov ah,#0x88
    int 0x15
    // 获取磁盘表
    mov [2],ax
    mov ax,#0x0000
    mov ds,ax
    lds si,[4*0x41]
    mov ax,#INITSEG
    mov es,ax
    mov di,#0x0004
    mov cx,#0x10
    rep
    movsb

// Be Ready to Print 设置段寄存器
    mov ax,cs
    mov es,ax
    mov ax,#INITSEG
    mov ds,ax

 // Cursor Position
    mov ah,#0x03
    xor bh,bh
    int 0x10
    mov cx,#18
    mov bx,#0x0007
    mov bp,#msg_cursor
    mov ax,#0x1301
    int 0x10 // 显示msg_cursor
    mov dx,[0]
    call    print_hex // 输出dx:[0]鼠标位置

// Memory Size
    mov ah,#0x03
    xor bh,bh
    int 0x10
    mov cx,#14
    mov bx,#0x0007
    mov bp,#msg_memory
    mov ax,#0x1301
    int 0x10 // 显示 msg_memory
    mov dx,[2]
    call    print_hex // 显示dx:[2]处的数字
// Add KB
    mov ah,#0x03
    xor bh,bh
    int 0x10
    mov cx,#2
    mov bx,#0x0007
    mov bp,#msg_kb
    mov ax,#0x1301
    int 0x10 // 显示kb  单位
//  Cyles
    mov ah,#0x03
    xor bh,bh
    int 0x10
    mov cx,#7
    mov bx,#0x0007
    mov bp,#msg_cyles
    mov ax,#0x1301
    int 0x10 // cyles: 磁道
    mov dx,[4]
    call    print_hex // 显示cyles的参数 dx:[4]
// Heads
    mov ah,#0x03
    xor bh,bh
    int 0x10
    mov cx,#8
    mov bx,#0x0007
    mov bp,#msg_heads
    mov ax,#0x1301
    int 0x10
    mov dx,[6]
    call    print_hex // 显示磁头参数 dx:[6]
// Secotrs
    mov ah,#0x03
    xor bh,bh
    int 0x10
    mov cx,#10
    mov bx,#0x0007
    mov bp,#msg_sectors
    mov ax,#0x1301
    int 0x10
    mov dx,[12]
    call    print_hex // 显示扇区参数 dx:[12]

inf_loop: // 无限循环,界面停留在参数显示
    jmp inf_loop

print_hex: // 显示参数段
    mov    cx,#4
print_digit:
    rol    dx,#4
    mov    ax,#0xe0f  // AH = 0x0E 在Teletype模式下显示字符
    and    al,dl
    add    al,#0x30 // 0x30对应ASCII码的0
    cmp    al,#0x3a // 判断al是否大于10, a=#10
    jl     outp // al小于10跳转
    add    al,#0x07 // al大于等于10, 比如 al=0x0C=#12,al+0x30=0x3C,0x3C+0x07=0x43 对应ASCII码是“C”
outp:
    int    0x10
    loop   print_digit // 循环CX - 1
    ret
print_nl: // 打印换行  回车
    mov    ax,#0xe0d     ! CR
    int    0x10
    mov    al,#0xa     ! LF
    int    0x10
    ret

msg2:
    .byte 13,10
    .ascii "NOW we are in SETUP"
    .byte 13,10,13,10
msg_cursor:
    .byte 13,10
    .ascii "Cursor position:"
msg_memory:
    .byte 13,10
    .ascii "Memory Size:"
msg_cyles:
    .byte 13,10
    .ascii "Cyls:"
msg_heads:
    .byte 13,10
    .ascii "Heads:"
msg_sectors:
    .byte 13,10
    .ascii "Sectors:"
msg_kb:
    .ascii "KB"

.org 510
boot_flag:
    .word 0xAA55
3. 代码
下面是bootsect.s的原版代码:
!
! SYS_SIZE is the number of clicks (16 bytes) to be loaded.
! 0x3000 is 0x30000 bytes = 196kB, more than enough for current
! versions of linux
!
SYSSIZE = 0x3000
!
!	bootsect.s		(C) 1991 Linus Torvalds
!
! bootsect.s is loaded at 0x7c00 by the bios-startup routines, and moves
! iself out of the way to address 0x90000, and jumps there.
!
! It then loads 'setup' directly after itself (0x90200), and the system
! at 0x10000, using BIOS interrupts.
!
! NOTE! currently system is at most 8*65536 bytes long. This should be no
! problem, even in the future. I want to keep it simple. This 512 kB
! kernel size should be enough, especially as this doesn't contain the
! buffer cache as in minix
!
! The loader has been made as simple as possible, and continuos
! read errors will result in a unbreakable loop. Reboot by hand. It
! loads pretty fast by getting whole sectors at a time whenever possible.

.globl begtext, begdata, begbss, endtext, enddata, endbss
.text
begtext:
.data
begdata:
.bss
begbss:
.text

SETUPLEN = 4				! nr of setup-sectors
BOOTSEG  = 0x07c0			! original address of boot-sector
INITSEG  = 0x9000			! we move boot here - out of the way
SETUPSEG = 0x9020			! setup starts here
SYSSEG   = 0x1000			! system loaded at 0x10000 (65536).
ENDSEG   = SYSSEG + SYSSIZE		! where to stop loading

! ROOT_DEV:	0x000 - same type of floppy as boot.
!		0x301 - first partition on first drive etc
ROOT_DEV = 0x306

entry _start
_start:
	mov	ax,#BOOTSEG
	mov	ds,ax
	mov	ax,#INITSEG
	mov	es,ax
	mov	cx,#256
	sub	si,si
	sub	di,di
	rep
	movw
	jmpi	go,INITSEG
go:	mov	ax,cs
	mov	ds,ax
	mov	es,ax
! put stack at 0x9ff00.
	mov	ss,ax
	mov	sp,#0xFF00		! arbitrary value >>512

! load the setup-sectors directly after the bootblock.
! Note that 'es' is already set up.

load_setup:
	mov	dx,#0x0000		! drive 0, head 0
	mov	cx,#0x0002		! sector 2, track 0
	mov	bx,#0x0200		! address = 512, in INITSEG
	mov	ax,#0x0200+SETUPLEN	! service 2, nr of sectors
	int	0x13			! read it
	jnc	ok_load_setup		! ok - continue
	mov	dx,#0x0000
	mov	ax,#0x0000		! reset the diskette
	int	0x13
	j	load_setup

ok_load_setup:

! Get disk drive parameters, specifically nr of sectors/track

	mov	dl,#0x00
	mov	ax,#0x0800		! AH=8 is get drive parameters
	int	0x13
	mov	ch,#0x00
	seg cs
	mov	sectors,cx
	mov	ax,#INITSEG
	mov	es,ax

! Print some inane message

	mov	ah,#0x03		! read cursor pos
	xor	bh,bh
	int	0x10

	mov	cx,#24
	mov	bx,#0x0007		! page 0, attribute 7 (normal)
	mov	bp,#msg1
	mov	ax,#0x1301		! write string, move cursor
	int	0x10

! ok, we've written the message, now
! we want to load the system (at 0x10000)

	mov	ax,#SYSSEG
	mov	es,ax		! segment of 0x010000
	call	read_it
	call	kill_motor

! After that we check which root-device to use. If the device is
! defined (!= 0), nothing is done and the given device is used.
! Otherwise, either /dev/PS0 (2,28) or /dev/at0 (2,8), depending
! on the number of sectors that the BIOS reports currently.

	seg cs
	mov	ax,root_dev
	cmp	ax,#0
	jne	root_defined
	seg cs
	mov	bx,sectors
	mov	ax,#0x0208		! /dev/ps0 - 1.2Mb
	cmp	bx,#15
	je	root_defined
	mov	ax,#0x021c		! /dev/PS0 - 1.44Mb
	cmp	bx,#18
	je	root_defined
undef_root:
	jmp undef_root
root_defined:
	seg cs
	mov	root_dev,ax

! after that (everyting loaded), we jump to
! the setup-routine loaded directly after
! the bootblock:

	jmpi	0,SETUPSEG

! This routine loads the system at address 0x10000, making sure
! no 64kB boundaries are crossed. We try to load it as fast as
! possible, loading whole tracks whenever we can.
!
! in:	es - starting address segment (normally 0x1000)
!
sread:	.word 1+SETUPLEN	! sectors read of current track
head:	.word 0			! current head
track:	.word 0			! current track

read_it:
	mov ax,es
	test ax,#0x0fff
die:	jne die			! es must be at 64kB boundary
	xor bx,bx		! bx is starting address within segment
rp_read:
	mov ax,es
	cmp ax,#ENDSEG		! have we loaded all yet?
	jb ok1_read
	ret
ok1_read:
	seg cs
	mov ax,sectors
	sub ax,sread
	mov cx,ax
	shl cx,#9
	add cx,bx
	jnc ok2_read
	je ok2_read
	xor ax,ax
	sub ax,bx
	shr ax,#9
ok2_read:
	call read_track
	mov cx,ax
	add ax,sread
	seg cs
	cmp ax,sectors
	jne ok3_read
	mov ax,#1
	sub ax,head
	jne ok4_read
	inc track
ok4_read:
	mov head,ax
	xor ax,ax
ok3_read:
	mov sread,ax
	shl cx,#9
	add bx,cx
	jnc rp_read
	mov ax,es
	add ax,#0x1000
	mov es,ax
	xor bx,bx
	jmp rp_read

read_track:
	push ax
	push bx
	push cx
	push dx
	mov dx,track
	mov cx,sread
	inc cx
	mov ch,dl
	mov dx,head
	mov dh,dl
	mov dl,#0
	and dx,#0x0100
	mov ah,#2
	int 0x13
	jc bad_rt
	pop dx
	pop cx
	pop bx
	pop ax
	ret
bad_rt:	mov ax,#0
	mov dx,#0
	int 0x13
	pop dx
	pop cx
	pop bx
	pop ax
	jmp read_track

!/*
! * This procedure turns off the floppy drive motor, so
! * that we enter the kernel in a known state, and
! * don't have to worry about it later.
! */
kill_motor:
	push dx
	mov dx,#0x3f2
	mov al,#0
	outb
	pop dx
	ret

sectors:
	.word 0

msg1:
	.byte 13,10
	.ascii "Loading system ..."
	.byte 13,10,13,10

.org 508
root_dev:
	.word ROOT_DEV
boot_flag:
	.word 0xAA55

.text
endtext:
.data
enddata:
.bss
endbss:
setup.s 原版代码:
!
!	setup.s		(C) 1991 Linus Torvalds
!
! setup.s is responsible for getting the system data from the BIOS,
! and putting them into the appropriate places in system memory.
! both setup.s and system has been loaded by the bootblock.
!
! This code asks the bios for memory/disk/other parameters, and
! puts them in a "safe" place: 0x90000-0x901FF, ie where the
! boot-block used to be. It is then up to the protected mode
! system to read them from there before the area is overwritten
! for buffer-blocks.
!

! NOTE! These had better be the same as in bootsect.s!

INITSEG  = 0x9000	! we move boot here - out of the way
SYSSEG   = 0x1000	! system loaded at 0x10000 (65536).
SETUPSEG = 0x9020	! this is the current segment

.globl begtext, begdata, begbss, endtext, enddata, endbss
.text
begtext:
.data
begdata:
.bss
begbss:
.text

entry start
start:

! ok, the read went well so we get current cursor position and save it for
! posterity.

	mov	ax,#INITSEG	! this is done in bootsect already, but...
	mov	ds,ax
	mov	ah,#0x03	! read cursor pos
	xor	bh,bh
	int	0x10		! save it in known place, con_init fetches
	mov	[0],dx		! it from 0x90000.
! Get memory size (extended mem, kB)

	mov	ah,#0x88
	int	0x15
	mov	[2],ax

! Get video-card data:

	mov	ah,#0x0f
	int	0x10
	mov	[4],bx		! bh = display page
	mov	[6],ax		! al = video mode, ah = window width

! check for EGA/VGA and some config parameters

	mov	ah,#0x12
	mov	bl,#0x10
	int	0x10
	mov	[8],ax
	mov	[10],bx
	mov	[12],cx

! Get hd0 data

	mov	ax,#0x0000
	mov	ds,ax
	lds	si,[4*0x41]
	mov	ax,#INITSEG
	mov	es,ax
	mov	di,#0x0080
	mov	cx,#0x10
	rep
	movsb

! Get hd1 data

	mov	ax,#0x0000
	mov	ds,ax
	lds	si,[4*0x46]
	mov	ax,#INITSEG
	mov	es,ax
	mov	di,#0x0090
	mov	cx,#0x10
	rep
	movsb

! Check that there IS a hd1 :-)

	mov	ax,#0x01500
	mov	dl,#0x81
	int	0x13
	jc	no_disk1
	cmp	ah,#3
	je	is_disk1
no_disk1:
	mov	ax,#INITSEG
	mov	es,ax
	mov	di,#0x0090
	mov	cx,#0x10
	mov	ax,#0x00
	rep
	stosb
is_disk1:

! now we want to move to protected mode ...

	cli			! no interrupts allowed !

! first we move the system to it's rightful place

	mov	ax,#0x0000
	cld			! 'direction'=0, movs moves forward
do_move:
	mov	es,ax		! destination segment
	add	ax,#0x1000
	cmp	ax,#0x9000
	jz	end_move
	mov	ds,ax		! source segment
	sub	di,di
	sub	si,si
	mov 	cx,#0x8000
	rep
	movsw
	jmp	do_move

! then we load the segment descriptors

end_move:
	mov	ax,#SETUPSEG	! right, forgot this at first. didn't work :-)
	mov	ds,ax
	lidt	idt_48		! load idt with 0,0
	lgdt	gdt_48		! load gdt with whatever appropriate

! that was painless, now we enable A20

	call	empty_8042
	mov	al,#0xD1		! command write
	out	#0x64,al
	call	empty_8042
	mov	al,#0xDF		! A20 on
	out	#0x60,al
	call	empty_8042

! well, that went ok, I hope. Now we have to reprogram the interrupts :-(
! we put them right after the intel-reserved hardware interrupts, at
! int 0x20-0x2F. There they won't mess up anything. Sadly IBM really
! messed this up with the original PC, and they haven't been able to
! rectify it afterwards. Thus the bios puts interrupts at 0x08-0x0f,
! which is used for the internal hardware interrupts as well. We just
! have to reprogram the 8259's, and it isn't fun.

	mov	al,#0x11		! initialization sequence
	out	#0x20,al		! send it to 8259A-1
	.word	0x00eb,0x00eb		! jmp $+2, jmp $+2
	out	#0xA0,al		! and to 8259A-2
	.word	0x00eb,0x00eb
	mov	al,#0x20		! start of hardware int's (0x20)
	out	#0x21,al
	.word	0x00eb,0x00eb
	mov	al,#0x28		! start of hardware int's 2 (0x28)
	out	#0xA1,al
	.word	0x00eb,0x00eb
	mov	al,#0x04		! 8259-1 is master
	out	#0x21,al
	.word	0x00eb,0x00eb
	mov	al,#0x02		! 8259-2 is slave
	out	#0xA1,al
	.word	0x00eb,0x00eb
	mov	al,#0x01		! 8086 mode for both
	out	#0x21,al
	.word	0x00eb,0x00eb
	out	#0xA1,al
	.word	0x00eb,0x00eb
	mov	al,#0xFF		! mask off all interrupts for now
	out	#0x21,al
	.word	0x00eb,0x00eb
	out	#0xA1,al

! well, that certainly wasn't fun :-(. Hopefully it works, and we don't
! need no steenking BIOS anyway (except for the initial loading :-).
! The BIOS-routine wants lots of unnecessary data, and it's less
! "interesting" anyway. This is how REAL programmers do it.
!
! Well, now's the time to actually move into protected mode. To make
! things as simple as possible, we do no register set-up or anything,
! we let the gnu-compiled 32-bit programs do that. We just jump to
! absolute address 0x00000, in 32-bit protected mode.
	mov	ax,#0x0001	! protected mode (PE) bit
	lmsw	ax		! This is it!
	jmpi	0,8		! jmp offset 0 of segment 8 (cs)

! This routine checks that the keyboard command queue is empty
! No timeout is used - if this hangs there is something wrong with
! the machine, and we probably couldn't proceed anyway.
empty_8042:
	.word	0x00eb,0x00eb
	in	al,#0x64	! 8042 status port
	test	al,#2		! is input buffer full?
	jnz	empty_8042	! yes - loop
	ret

gdt:
	.word	0,0,0,0		! dummy

	.word	0x07FF		! 8Mb - limit=2047 (2048*4096=8Mb)
	.word	0x0000		! base address=0
	.word	0x9A00		! code read/exec
	.word	0x00C0		! granularity=4096, 386

	.word	0x07FF		! 8Mb - limit=2047 (2048*4096=8Mb)
	.word	0x0000		! base address=0
	.word	0x9200		! data read/write
	.word	0x00C0		! granularity=4096, 386

idt_48:
	.word	0			! idt limit=0
	.word	0,0			! idt base=0L

gdt_48:
	.word	0x800		! gdt limit=2048, 256 GDT entries
	.word	512+gdt,0x9	! gdt base = 0X9xxxx

.text
endtext:
.data
enddata:
.bss
endbss:
三、系统调用
本节需要在linux 0.11上自定义系统调用函数,实现内核态和用户态字符串的交换。
int iam(const char * name);
功能是将字符串参数 name 的内容拷贝到内核中保存下来。要求name的长度不能超过23个字符。返回值是拷贝的字符数。如果 name 的字符个数超过了 23,则返回 “-1”,并置errno为 EINVAL
int whoami(char* name, unsigned int size);
将内核中由 iam() 保存的名字拷贝到name指向的用户地址空间中,同时确保不会对name越界访存(name 的大小由 size 说明)。返回值是拷贝的字符数。如果size小于需要的空间,则返回“-1”,并置errno为 EINVAL
上述函数在 kernal/who.c 中实现
1. 系统调用流程
首先需要明确的是系统调用的流程,确定流程后才能确定要修改哪些东西。
- 应用程序调用库函数(API):
_syscall1(int, close, int, fd)即为close()函数的API - API 将系统调用号存入 EAX,然后通过中断调用使系统进入内核态:
__asm__ volatile ("int $0x80" : "=a" (__res) : "0" (__NR_close),"b" ((long)(fd)))使用内嵌汇编将__NR_close存入EAX然后触发中断INT 0x80 - 内核中的中断处理函数根据系统调用号,调用对应的内核函数(系统调用)
kernel/system_call.s中call sys_call_table(,%eax,4) - 系统调用完成相应功能,将返回值存入 EAX,返回到中断处理函数
- 中断处理函数返回到 API 中
- API 将 EAX 返回给应用程序
2. 具体实现步骤
具体需要做什么呢?
2.1 添加系统调用号
首先需要在/usr/include/unistd.h 头文件中添加__NR_iam 72 __NR_whoami 73
2.2 修改系统调用总数
修改kernel/system_call.s中系统调用总数 nr_system_calls = 74
2.3 添加系统调用函数
在 include/linux/sys.h中添加系统调用函数 ( 位置要和__NR_xxx 系统调用数对应 )
extern int sys_whoami();
extern int sys_iam();
2.4 实现系统调用函数
在头文件include/asm/segment.h中定义了内核态和用户态互相传字节的函数
extern inline unsigned char get_fs_byte(const char * addr) // 将用户态的字存入内核态
{
    unsigned register char _v;
    __asm__ ("movb %%fs:%1,%0":"=r" (_v):"m" (*addr));
    return _v;
}
extern inline void put_fs_byte(char val,char *addr) // 将内核态的字存入用户态
{
    __asm__ ("movb %0,%%fs:%1"::"r" (val),"m" (*addr));
}
上述函数可用于实现系统调用函数,下面在 kernal/who.c 中实现系统调用函数
#include<asm/segment.h> // 包含get_fs_byte、put_fs_byte 函数所在的头文件
#include<string.h> // 使用了string.h中定义的strlen()函数
#include<errno.h>
char username[24]=""; // 在内核态中分配一段内存,建立字符串数组
int sys_iam(const char *name)
{
    int n=0, i;
    char temp[32]; // 这里只要大于等于24就行 不必一定是32
    for(i=0;i<32;i++)
    {
        temp[i]=get_fs_byte(&name[i]); // 将函数调用传入的name 放入内核态
        if(temp[i]!='\0')
            n++;
        else
            break;
    }
    if(n<24)
        strcpy(username, temp);
    else
        n=-EINVAL;
        //仔细阅读文件unistd.h
        //格外注意系统调用函数是如何处理errno的值的
    return n;
}
int sys_whoami(char *name, unsigned int size)
{
    int n=strlen(username), i;
    if(n<size)
    {
        for(i=0;i<n;i++)
        {
            put_fs_byte(username[i], &name[i]);
        }
    }
    else
        n=-EINVAL;
    return n;
}
2.5 修改 Makefile
在OBJS中添加 who.o
OBJS  = sched.o system_call.o traps.o asm.o fork.o \
        panic.o printk.o vsprintf.o sys.o exit.o \
        signal.o mktime.o who.o
在依赖项中添加who文件和who依赖的头文件
### Dependencies:
who.s who.o: who.c  ..include/asm/segment.h ../include/string.h ../include/errno.h //因为who只用到这三个头文件
exit.s exit.o: exit.c ../include/errno.h ../include/signal.h \
  ../include/sys/types.h ../include/sys/wait.h ../include/linux/sched.h \
  ../include/linux/head.h ../include/linux/fs.h ../include/linux/mm.h \
  ../include/linux/kernel.h ../include/linux/tty.h ../include/termios.h \
  ../include/asm/segment.h
make之后who.c就会被编译到内核中
2.6 挂载linux 0.11
在oslab中执行 ./mount-hdc ,进入hdc中重新执行下步骤2.1-2.3
2.7 编写测试程序
在挂载的linux 0.11系统中编写我们的测试程序,因为测试程序是运行在用户态的
在linux 0.11系统的/root 目录下创建程序iam.c和whoami.c:
#include<stdio.h> // c标准库
#include<unistd.h>
#include<errno.h>
#define __LIBRARY__ // 系统调用号的定义

_syscall1(int,iam,const char*,name) // api

int main(int argc, char *argv[])
{
    int r;
    if(argc!=2) // 判断参数数目
    {
        puts("Argument Error!");
        r=-1;
    }
    else
    {
        r=iam(argv[1]); // 将字符串放入内核态内存地址,地址在系统调用函数中定义分配
        if(r!=-1)   r=0;
    }
    return r;
}
#include<unistd.h>
#include<errno.h>
#include<stdio.h>
#define __LIBRARY__

_syscall2(int,whoami,char*,name,unsigned int,size) // api

int main(void)
{
    char name[24]; // 分配用户态内存
    int r=whoami(name, 24); // 内核态取数据到name所在地址
    if(r!=-1)
        puts(name); // 输出字符
    return r;
}
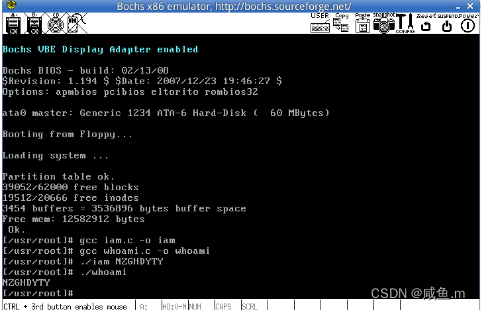
gcc iam.c -Wall -o iam
gcc whoami.c  -Wall -o whoami

./iam NZGHDYTY
./whoami
2.8 问题
(1) 从Linux 0.11现在的机制看,它的系统调用最多能传递几个参数?你能想出办法来扩大这个限制吗?
答:在32位的处理器上有这样几个寄存器:eax,ebx,ecx,edx。其中eax用于传递中断调用号和返回值,其它三个用于传递参数。因此它的系统调用最多能传递3个参数。扩大这个限制的方法是:采用栈传递参数,寄存器只需要获取栈的地址和参数的长度。
(2) 用文字简要描述向Linux 0.11添加一个系统调用foo()的步骤。
答:根据Linux 0.11的系统调用机制,先添加一个系统调用库函数foo(),同时增加其系统调用号,然后system_call.s中扩大系统调用函数的数量,随后将内核函数加入到内核函数表中,随后在内核中添加内核函数sys_foo()的定义(即具体实现),特别注意用户态的系统调用函数是如何处理变量errno以传递错误信息的。


