目录
- 效果图展示
- 启动页效果
- 轮播图效果
- MotionLayout详解
- 准备工作
- 正题
- 轮播图效果实现
- ConstraintSet
- Transition
- Carousel
- 浅述启动页的实现
- 插入gif图
源码在这里:
源码链接
本文是用java写的
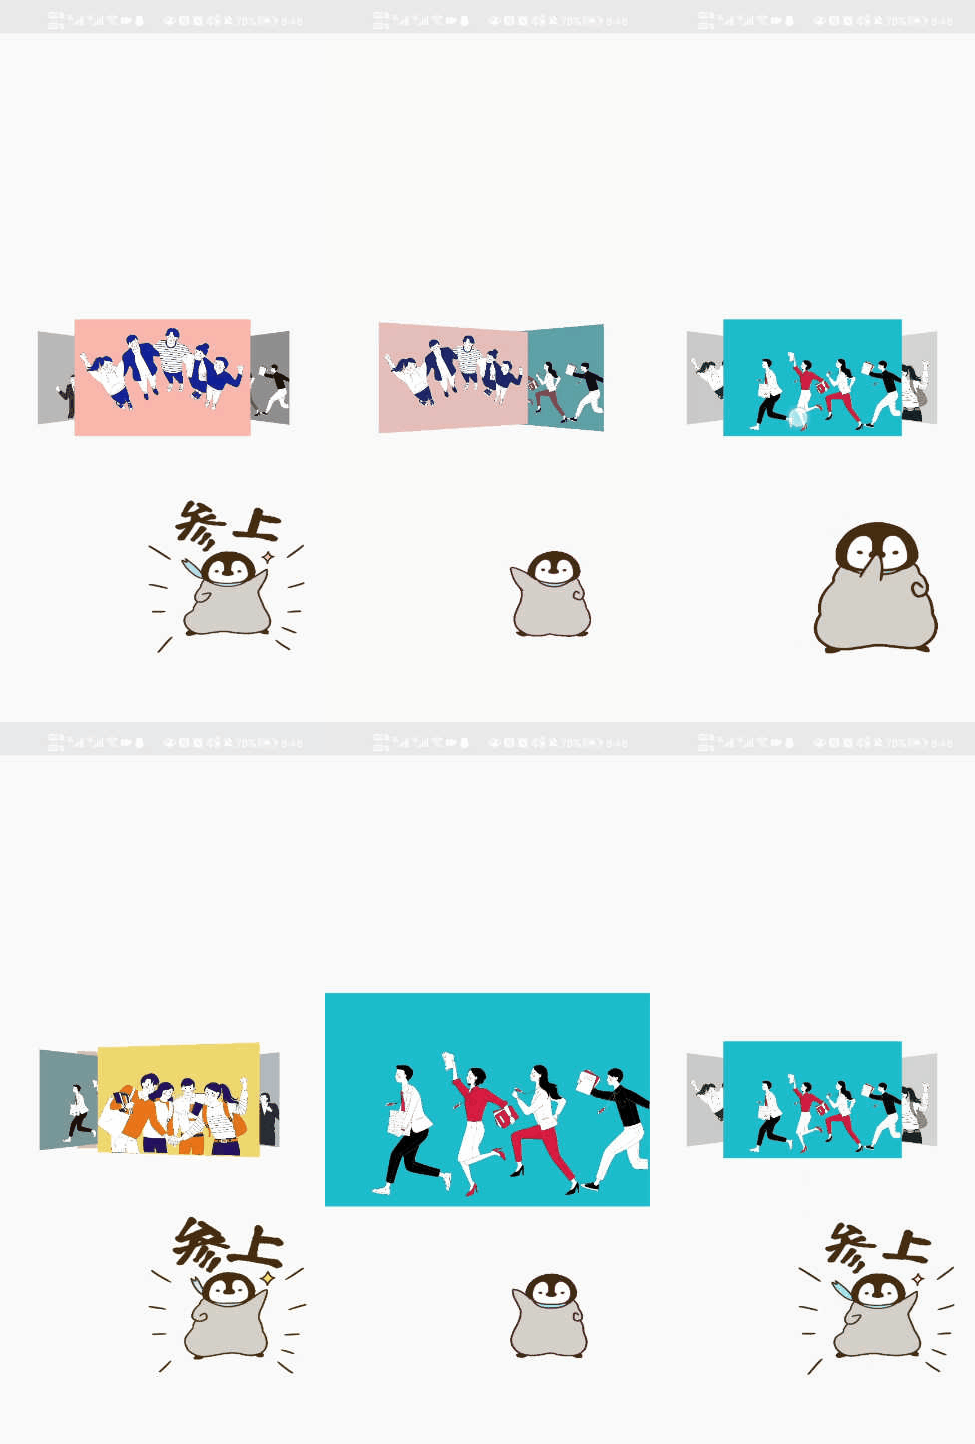
效果图展示
下面是本博客我使用真机所实现的功能展现,方便大家根据自身需求自取
启动页效果

轮播图效果
MotionLayout详解
准备工作
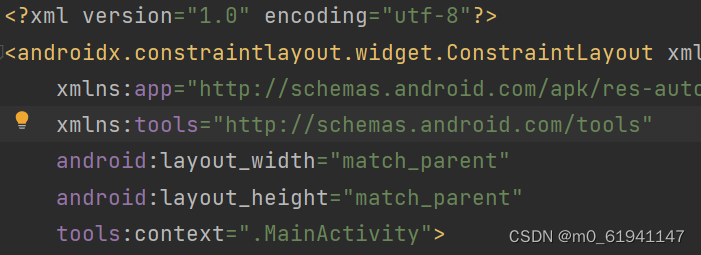
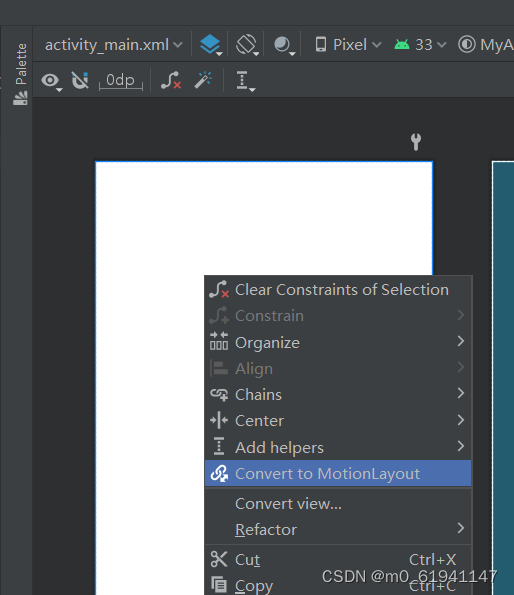
想要实现MotionLayout,第一步就是使用ConstraintLayout布局,然后将其一键转换,就可以得到MotionLaout布局和其对应的scene文件
点击下图的Convert to MotionLayout就可以得到一个MotionLayout布局,
这里注意了,原先的ConstrainLayout布局中的组件的顺序是有意义的,在后续scene的文件中是根据这里面的顺序进行排布的。
转换完成后,你就会得到一个这样的MotionLayout布局的activity_main.xml

以及一个大致长这样的activity_main_scene.xml
正题
首先将你所要放入的组件先放入到你的MotionLaout中,下面是我的主页面的MotionLayout中的内容
<?xml version="1.0" encoding="utf-8"?>
<androidx.constraintlayout.motion.widget.MotionLayout xmlns:android="http://schemas.android.com/apk/res/android"
    xmlns:app="http://schemas.android.com/apk/res-auto"
    xmlns:tools="http://schemas.android.com/tools"
    android:layout_width="match_parent"
    android:layout_height="match_parent"
    app:layoutDescription="@xml/activity_main_scene">

    <pl.droidsonroids.gif.GifImageView
        android:id="@+id/gifImv1"
        android:layout_width="200dp"
        android:layout_height="200dp"
        android:layout_weight="1"
        android:scaleType="fitXY"
        android:src="@drawable/d320c53c8d16cda0b7431627e897d2b2"
        app:layout_constraintBottom_toBottomOf="@id/g7"
        app:layout_constraintLeft_toLeftOf="@id/g3"
        app:layout_constraintRight_toRightOf="@id/g4"
        app:layout_constraintTop_toTopOf="@id/g7" />

    <androidx.constraintlayout.widget.Guideline
        android:id="@+id/g1"
        android:layout_width="wrap_content"
        android:layout_height="wrap_content"
        android:orientation="vertical"
        app:layout_constraintGuide_percent="0.2" />

    <androidx.constraintlayout.widget.Guideline
        android:id="@+id/g2"
        android:layout_width="wrap_content"
        android:layout_height="wrap_content"
        android:orientation="vertical"
        app:layout_constraintGuide_percent="0.4" />

    <androidx.constraintlayout.widget.Guideline
        android:id="@+id/g3"
        android:layout_width="wrap_content"
        android:layout_height="wrap_content"
        android:orientation="vertical"
        app:layout_constraintGuide_percent="0.6" />

    <androidx.constraintlayout.widget.Guideline
        android:id="@+id/g4"
        android:layout_width="wrap_content"
        android:layout_height="wrap_content"
        android:orientation="vertical"
        app:layout_constraintGuide_percent="0.8" />

    <androidx.constraintlayout.widget.Guideline
        android:id="@+id/g5"
        android:layout_width="wrap_content"
        android:layout_height="wrap_content"
        android:orientation="horizontal"
        app:layout_constraintGuide_percent="0.5" />


    <androidx.constraintlayout.widget.Guideline
        android:id="@+id/g6"
        android:layout_width="wrap_content"
        android:layout_height="wrap_content"
        android:orientation="vertical"
        app:layout_constraintGuide_percent="1" />
    <androidx.constraintlayout.widget.Guideline
        android:id="@+id/g7"
        android:layout_width="wrap_content"
        android:layout_height="wrap_content"
        android:orientation="horizontal"
        app:layout_constraintGuide_percent="0.8"/>
    <androidx.constraintlayout.utils.widget.ImageFilterView
        android:id="@+id/img1"
        android:layout_width="10dp"
        android:layout_height="10dp"
        android:src="@drawable/img1"
        android:visibility="invisible"
        app:layout_constraintBottom_toBottomOf="parent"
        app:layout_constraintLeft_toLeftOf="parent"
        app:layout_constraintRight_toRightOf="parent"
        app:layout_constraintTop_toTopOf="parent" />

    <androidx.constraintlayout.utils.widget.ImageFilterView
        android:id="@+id/img2"
        android:layout_width="10dp"
        android:layout_height="10dp"
        android:src="@drawable/img2"
        android:visibility="invisible"
        app:layout_constraintBottom_toBottomOf="parent"
        app:layout_constraintLeft_toLeftOf="parent"
        app:layout_constraintRight_toRightOf="parent"
        app:layout_constraintTop_toTopOf="parent" />

    <androidx.constraintlayout.utils.widget.ImageFilterView
        android:id="@+id/img3"
        android:layout_width="10dp"
        android:layout_height="10dp"
        android:src="@drawable/img3"
        android:visibility="invisible"
        app:layout_constraintBottom_toBottomOf="parent"
        app:layout_constraintLeft_toLeftOf="parent"
        app:layout_constraintRight_toRightOf="parent"
        app:layout_constraintTop_toTopOf="parent" />

    <androidx.constraintlayout.utils.widget.ImageFilterView
        android:id="@+id/img4"
        android:layout_width="10dp"
        android:layout_height="10dp"
        android:src="@drawable/img4"
        android:visibility="invisible"
        app:layout_constraintBottom_toBottomOf="parent"
        app:layout_constraintLeft_toLeftOf="parent"
        app:layout_constraintRight_toRightOf="parent"
        app:layout_constraintTop_toTopOf="parent" />

	<androidx.constraintlayout.helper.widget.Carousel
        android:id="@+id/carousel"
        android:layout_width="wrap_content"
        android:layout_height="wrap_content"
        app:carousel_backwardTransition="@+id/backward"
        app:carousel_firstView="@+id/img1"
        app:carousel_forwardTransition="@+id/forward"
        app:carousel_infinite="true"
        app:carousel_nextState="@+id/next"
        app:carousel_previousState="@+id/previous"
        app:constraint_referenced_ids="img1,img2,img3,img4" />

</androidx.constraintlayout.motion.widget.MotionLayout>
这边给大家解释一下下面用到的几个组件的含义
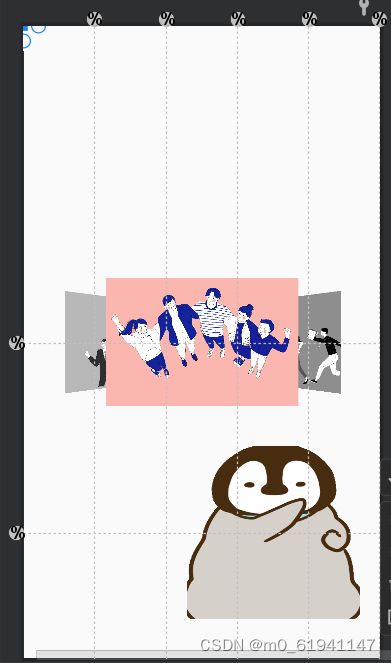
Guideline这个东西你可以理解为是一个用来确定组件位置的辅助线,你可以在编辑界面中看到这些辅助线,但是当你运行它时,却不会显示,方便咱定位组件位置,android:orientation="vertical"表明这是一条垂直的辅助线app:layout_constraintGuide_percent="0.2"表明它所处的位置大概是在20%的位置
下图中你所看到的虚线就是Guideline
ImageFilterView这个组件可以便于后续实现轮播图中在灰度级的控制(即将图片的变成黑白效果,这是普通的ImageView所做不到的,如果你不想实现这个灰度级的控制,就可以使用普通的ImageView)Carousel这个玩意是用来实现轮播图的,试想,正常情况下,你将轮播图向左拖动到下一个页面时,这个动画按理说已经结束了,没法继续切换图片了,那咋办呢,就是用的这个玩意,这里就先不细讲了哈
轮播图效果实现
废话结束,现在开始动画的制作
- 首先,请点开你的design页面,这和平常的布局的design页面还是有较大区别的(个人觉得),长这样(这是我已经实现后的样子)
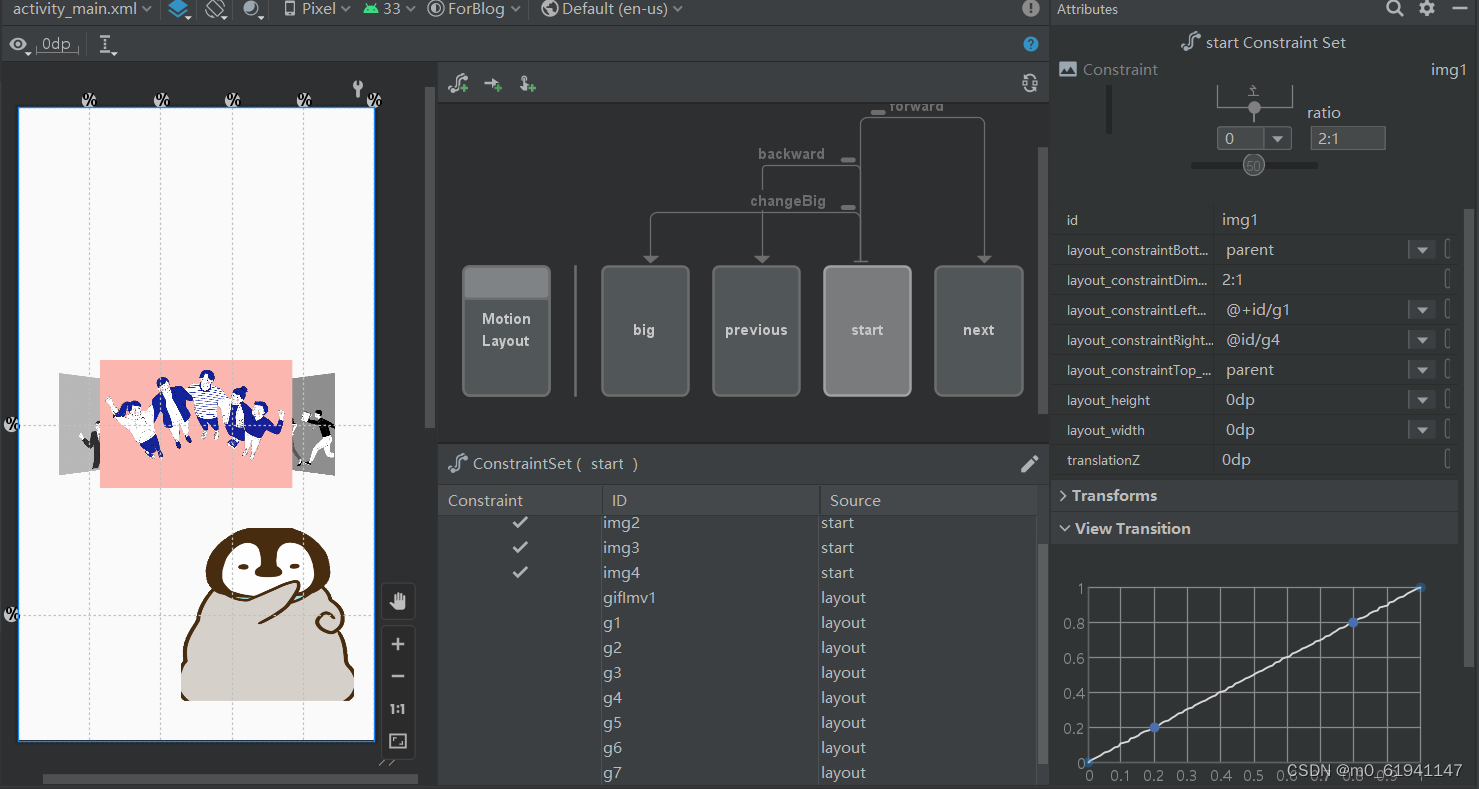
- 点击中间的框中间的start,然后再点击中间下面的组件,然后点那根笔,选择
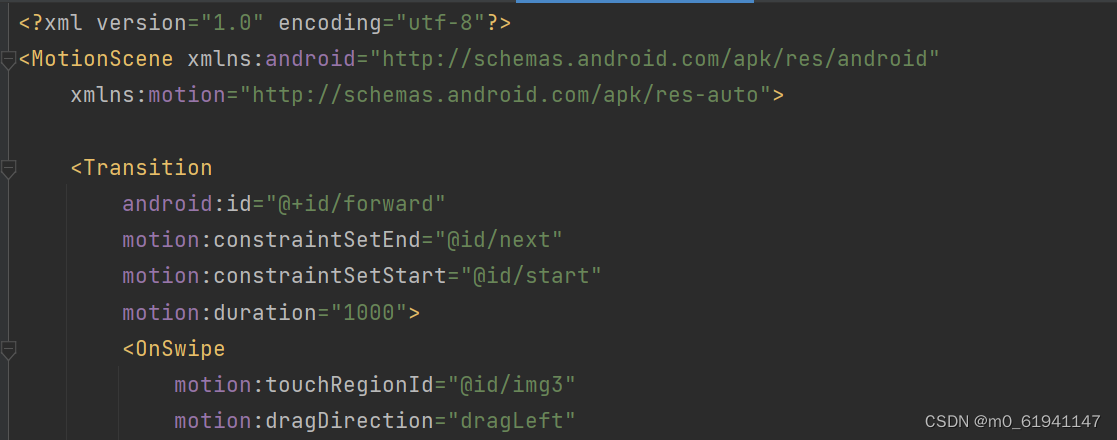
Create Constraint,你就可以开始做动画的效果啦,这里的start,指的是开始时的状态,一般你创建MotionLayout中,除了start,还会预先给你创建一个end,这个是结束时的状态,将这两个状态设置完毕后,它就会自动的给你生成动画效果,当然,你可以进行自定义 - 那么,现在先开始对
start状态进行实现,你可以用右边的Attributes来实现,就像上面那张图那样,也可以手动在scene里面写 - 那么,上代码:
	<?xml version="1.0" encoding="utf-8"?>
<MotionScene xmlns:android="http://schemas.android.com/apk/res/android"
    xmlns:motion="http://schemas.android.com/apk/res-auto">

    <Transition
        android:id="@+id/forward"
        motion:constraintSetEnd="@id/next"
        motion:constraintSetStart="@id/start"
        motion:duration="1000">
        <OnSwipe
            motion:touchRegionId="@id/img3"
            motion:dragDirection="dragLeft"
            motion:touchAnchorSide="left" />
    </Transition>

    <Transition
        android:id="@+id/backward"
        motion:constraintSetEnd="@id/previous"
        motion:constraintSetStart="@id/start"
        motion:duration="1000">
        <OnSwipe
            motion:dragDirection="dragRight"
            motion:touchAnchorSide="right" />
    </Transition>

    <Transition
        android:id="@+id/changeBig"
        motion:constraintSetEnd="@id/big"
        motion:constraintSetStart="@id/start"
        motion:duration="1000">
        <OnSwipe
            motion:dragDirection="dragUp"
            motion:touchAnchorSide="top"/>
    </Transition>
    <ConstraintSet android:id="@+id/big">
        <Constraint
            android:id="@id/img3"
            android:layout_width="match_parent"
            android:layout_height="match_parent"
            android:adjustViewBounds="true"
            android:translationZ="100dp"
            motion:layout_constraintBottom_toBottomOf="parent"
            motion:layout_constraintLeft_toLeftOf="parent"
            motion:layout_constraintRight_toRightOf="parent"
            motion:layout_constraintTop_toTopOf="parent" />
    </ConstraintSet>

    <ConstraintSet android:id="@+id/previous">
        <Constraint
            android:id="@id/img4"
            android:layout_width="0dp"
            android:layout_height="0dp"
            android:translationZ="0dp"
            motion:layout_constraintBottom_toBottomOf="parent"
            motion:layout_constraintDimensionRatio="2:1"
            motion:layout_constraintLeft_toLeftOf="@+id/g1"
            motion:layout_constraintRight_toRightOf="@id/g4"
            motion:layout_constraintTop_toTopOf="parent">
            <CustomAttribute
                motion:attributeName="Saturation"
                motion:customFloatValue="1.0"
                />
        </Constraint>

        <Constraint
            android:id="@id/img1"
            android:layout_width="0dp"
            android:layout_height="0dp"
            android:rotationY="30"
            android:scaleX="0.8"
            android:scaleY="0.8"
            android:translationZ="4dp"
            motion:layout_constraintBottom_toBottomOf="parent"
            motion:layout_constraintDimensionRatio="2:1"
            motion:layout_constraintLeft_toLeftOf="parent"
            motion:layout_constraintRight_toRightOf="@id/g3"
            motion:layout_constraintTop_toTopOf="parent">
            <CustomAttribute
                motion:attributeName="Saturation"
                motion:customFloatValue="0.0"
                />
        </Constraint>

        <Constraint
            android:id="@id/img2"
            android:layout_width="0dp"
            android:layout_height="0dp"
            android:scaleX="1.2"
            android:scaleY="1.2"
            android:translationZ="10dp"
            motion:layout_constraintBottom_toBottomOf="parent"
            motion:layout_constraintDimensionRatio="2:1"
            motion:layout_constraintLeft_toLeftOf="@+id/g1"
            motion:layout_constraintRight_toRightOf="@id/g4"
            motion:layout_constraintTop_toTopOf="parent">
            <CustomAttribute
                motion:attributeName="Saturation"
                motion:customFloatValue="1.0"
                />
        </Constraint>
        <Constraint
            android:id="@id/img3"
            android:layout_width="0dp"
            android:layout_height="0dp"
            android:rotationY="-30"
            android:scaleX="0.8"
            android:scaleY="0.8"
            android:translationZ="4dp"
            motion:layout_constraintBottom_toBottomOf="parent"
            motion:layout_constraintDimensionRatio="2:1"
            motion:layout_constraintLeft_toLeftOf="@id/g2"
            motion:layout_constraintRight_toRightOf="parent"
            motion:layout_constraintTop_toTopOf="parent">
            <CustomAttribute
                motion:attributeName="Saturation"
                motion:customFloatValue="0.0"
                />
        </Constraint>
    </ConstraintSet>

    <ConstraintSet android:id="@+id/start">
        <Constraint
            android:id="@id/img1"
            android:layout_width="0dp"
            android:layout_height="0dp"
            android:translationZ="0dp"
            motion:layout_constraintBottom_toBottomOf="parent"
            motion:layout_constraintDimensionRatio="2:1"
            motion:layout_constraintLeft_toLeftOf="@+id/g1"
            motion:layout_constraintRight_toRightOf="@id/g4"
            motion:layout_constraintTop_toTopOf="parent">
            <CustomAttribute
                motion:attributeName="Saturation"
                motion:customFloatValue="1.0"
                />
        </Constraint>

        <Constraint
            android:id="@id/img2"
            android:layout_width="0dp"
            android:layout_height="0dp"
            android:rotationY="30"
            android:scaleX="0.8"
            android:scaleY="0.8"
            android:translationZ="4dp"
            motion:layout_constraintBottom_toBottomOf="parent"
            motion:layout_constraintDimensionRatio="2:1"
            motion:layout_constraintLeft_toLeftOf="parent"
            motion:layout_constraintRight_toRightOf="@id/g3"
            motion:layout_constraintTop_toTopOf="parent">
            <CustomAttribute
                motion:attributeName="Saturation"
                motion:customFloatValue="0.0"
                />
        </Constraint>

        <Constraint
            android:id="@id/img3"
            android:layout_width="0dp"
            android:layout_height="0dp"
            android:scaleX="1.2"
            android:scaleY="1.2"
            android:translationZ="10dp"
            motion:layout_constraintBottom_toBottomOf="parent"
            motion:layout_constraintDimensionRatio="2:1"
            motion:layout_constraintLeft_toLeftOf="@+id/g1"
            motion:layout_constraintRight_toRightOf="@id/g4"
            motion:layout_constraintTop_toTopOf="parent">
            <CustomAttribute
                motion:attributeName="Saturation"
                motion:customFloatValue="1.0"
                />
        </Constraint>

        <Constraint
            android:id="@id/img4"
            android:layout_width="0dp"
            android:layout_height="0dp"
            android:rotationY="-30"
            android:scaleX="0.8"
            android:scaleY="0.8"
            android:translationZ="4dp"
            motion:layout_constraintBottom_toBottomOf="parent"
            motion:layout_constraintDimensionRatio="2:1"
            motion:layout_constraintLeft_toLeftOf="@id/g2"
            motion:layout_constraintRight_toRightOf="parent"
            motion:layout_constraintTop_toTopOf="parent">
            <CustomAttribute
                motion:attributeName="Saturation"
                motion:customFloatValue="0.0"
                />
        </Constraint>
    </ConstraintSet>
    <ConstraintSet android:id="@+id/next">
        <Constraint
            android:id="@id/img1"
            android:layout_width="0dp"
            android:layout_height="0dp"
            android:rotationY="-30"
            android:scaleX="0.8"
            android:scaleY="0.8"
            android:translationZ="6dp"
            motion:layout_constraintBottom_toBottomOf="parent"
            motion:layout_constraintDimensionRatio="2:1"
            motion:layout_constraintLeft_toLeftOf="@id/g2"
            motion:layout_constraintRight_toRightOf="parent"
            motion:layout_constraintTop_toTopOf="parent">
            <CustomAttribute
                motion:attributeName="Saturation"
                motion:customFloatValue="0.0"
                />
        </Constraint>
        <Constraint
            android:id="@id/img2"
            android:layout_width="0dp"
            android:layout_height="0dp"
            android:translationZ="0dp"
            motion:layout_constraintBottom_toBottomOf="parent"
            motion:layout_constraintDimensionRatio="2:1"
            motion:layout_constraintLeft_toLeftOf="@+id/g1"
            motion:layout_constraintRight_toRightOf="@id/g4"
            motion:layout_constraintTop_toTopOf="parent">
            <CustomAttribute
                motion:attributeName="Saturation"
                motion:customFloatValue="1.0"
                />
        </Constraint>

        <Constraint
            android:id="@id/img3"
            android:layout_width="0dp"
            android:layout_height="0dp"
            android:rotationY="30"
            android:scaleX="0.8"
            android:scaleY="0.8"
            android:translationZ="4dp"
            motion:layout_constraintBottom_toBottomOf="parent"
            motion:layout_constraintDimensionRatio="2:1"
            motion:layout_constraintLeft_toLeftOf="parent"
            motion:layout_constraintRight_toRightOf="@id/g3"
            motion:layout_constraintTop_toTopOf="parent">
            <CustomAttribute
                motion:attributeName="Saturation"
                motion:customFloatValue="0.0"
                />
        </Constraint>

        <Constraint
            android:id="@id/img4"
            android:layout_width="0dp"
            android:layout_height="0dp"
            android:scaleX="1.2"
            android:scaleY="1.2"
            android:translationZ="10dp"
            motion:layout_constraintBottom_toBottomOf="parent"
            motion:layout_constraintDimensionRatio="2:1"
            motion:layout_constraintLeft_toLeftOf="@+id/g1"
            motion:layout_constraintRight_toRightOf="@id/g4"
            motion:layout_constraintTop_toTopOf="parent">
            <CustomAttribute
                motion:attributeName="Saturation"
                motion:customFloatValue="1.0"
                />
        </Constraint>
    </ConstraintSet>
</MotionScene>
ConstraintSet
- 现在来分析一下上面的代码中
ConstraintSet部分:- 上面的
ConstraintSet就是几个状态,start就是开始阶段的状态,previous是切换到上一页时的状态,next是切换到下一页的状态,big是把图片放大时的状态
- 上面的
- 接着,来分析一下里面的代码,
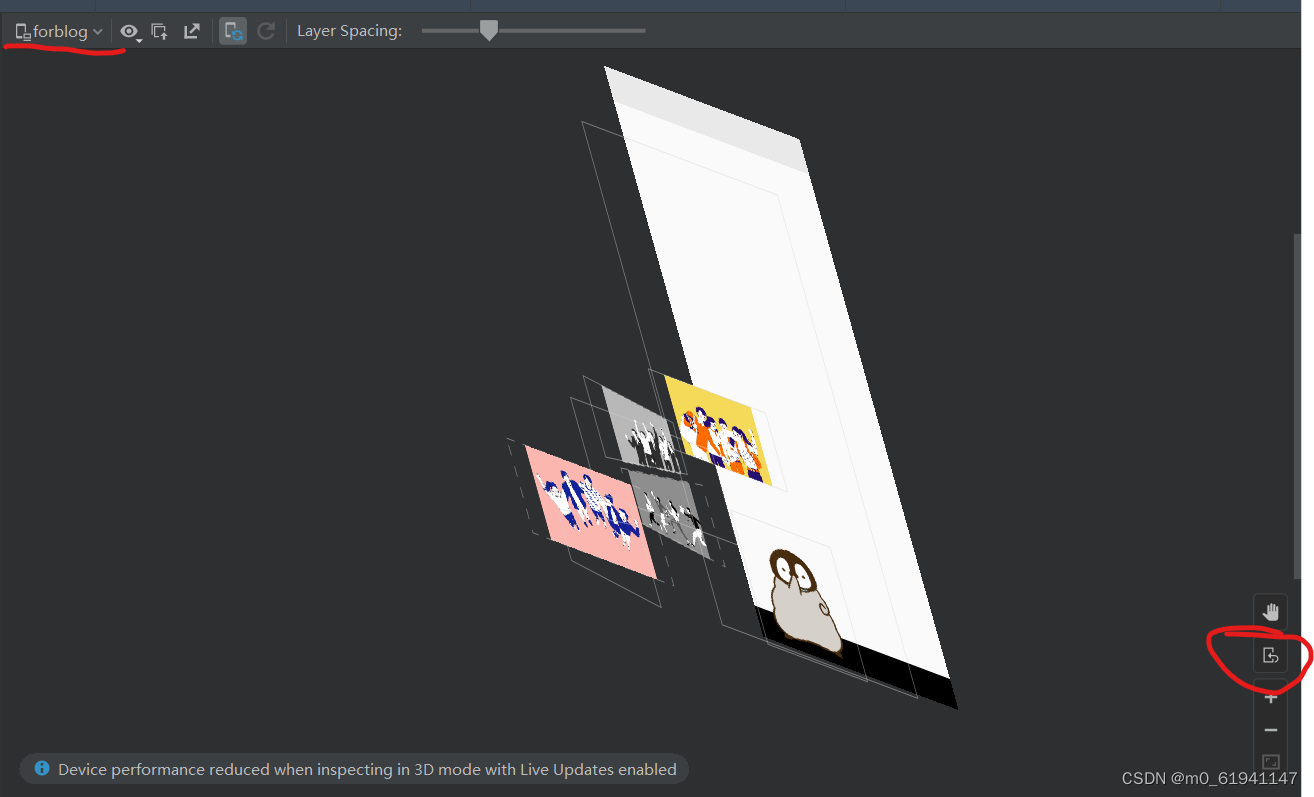
scaleX、scaleY是对应方向上面的缩放attributeName="Saturation"这玩意就是上面说到的灰度级的实现了,当值为0时,为黑白图rotationY是图片的绕Y轴旋转,如下图中左边和右边的两张图片
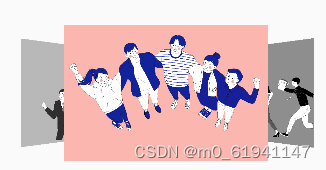
translationZ是图片的Z轴高度,看下面这张3D效果图就很好理解了(如果你也想看到这种效果的话,可以点击你的AS中的tools,选择Layout Inspector,然后点击右下角我用红笔圈中的部分,就可以切换3D效果)
Transition
- 这一部分在我看来就是实现几个状态的衔接,如:
<Transition android:id="@+id/forward" motion:constraintSetEnd="@id/next" motion:constraintSetStart="@id/start" motion:duration="1000"> <OnSwipe motion:touchRegionId="@id/img3" motion:dragDirection="dragLeft" motion:touchAnchorSide="left" /> </Transition> - 以上面的这一部分来进行解析
motion:constraintSetStart就是状态衔接中的起始状态motion:constraintSetEnd就是状态衔接中的结束状态duration就是这个衔接过程的时间,我是这么理解的,但是实际实现起来,有的时候却不会按照这个时间,但是总体影响不大- 然后
Onswipe就是滑动效果,上面这个代码中,touchRegionId就是你拖动的组件,dragDirection就是你滑动的方向,上面的代码片段即:当你左滑id=img3的组件时,会实现从start状态到next状态的转换
- 当你完成了上面的那些部分时,你就已经完成了一个简单的轮播图的效果,你可以从展示第一张图片转换到第二张图片,但是当你进入这个状态时,要再切换到第三张图片,你会发现是做不到的,因为到目前为止还尚未实现这种效果,这时候,想要完成一个完美的轮播图效果,就要用到一个新的东西:
Carousel
Carousel
终于到了这个部分,完成了这个部分后,就可以实现轮播图的切换了
首先,我们来看一看官方文档中的介绍:具体请看官方文档: https://developer.android.google.cn/develop/ui/views/animations/motionlayout/carousel
带运动布局的旋转木马
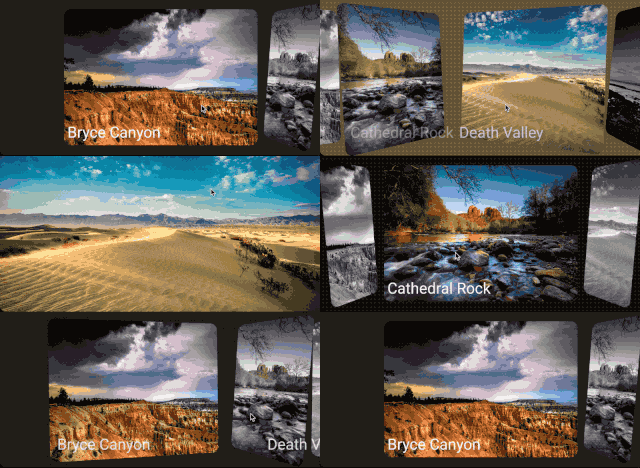
Carousel是一个运动辅助对象,可以轻松构建自定义的“carousel”视图,显示用户可以浏览的元素列表。与实现这种视图的其他解决方案相比,该助手允许您通过利用MotionLayout.
Carousel小部件支持带有开始和结束的列表以及循环环绕列表。
概念:如何旋转木马MotionLayout作品
假设我们想要构建一个简单的水平旋转视图,并放大居中的视图:
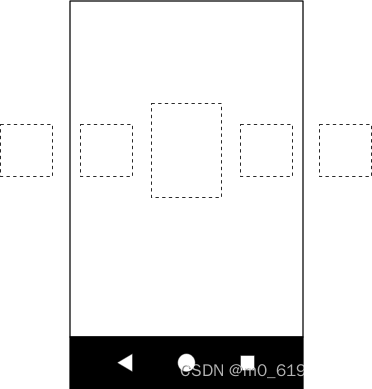
我们的基本布局包含几个视图,代表我们的轮播项目:

创建一个MotionLayout有三种状态(确保给他们id):
以前的
开始
然后
如果开始状态对应于基础布局,则以前的状态应该以这样一种方式完成,即轮播项目将移动一个。
例如,假设我们有5个视图:A、B、C、D、E处于开始状态,B、C、D可见,A和E在屏幕之外。我们想建立一个以前的陈述A、B、C、D的位置现在是B、C、D、E所在的位置,视图从左向右移动。在……里然后状态,需要发生相反的情况,B,C,D,E移动到A,B,C,D所在的位置,视图从右向左移动。
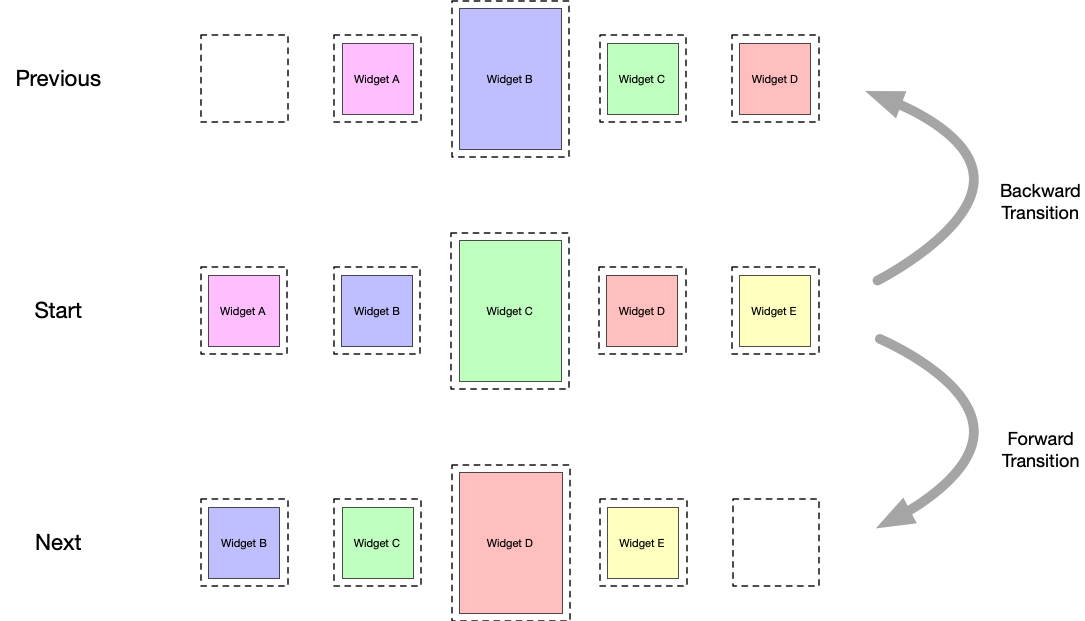
重要的是视图正好在原始视图开始的地方结束;旋转木马给人一种无限元素集合的错觉的方式是通过移动实际的视图恢复到原来的位置,但是用新的匹配内容重新初始化它们。下图显示了这种机制(注意“项目#”值):
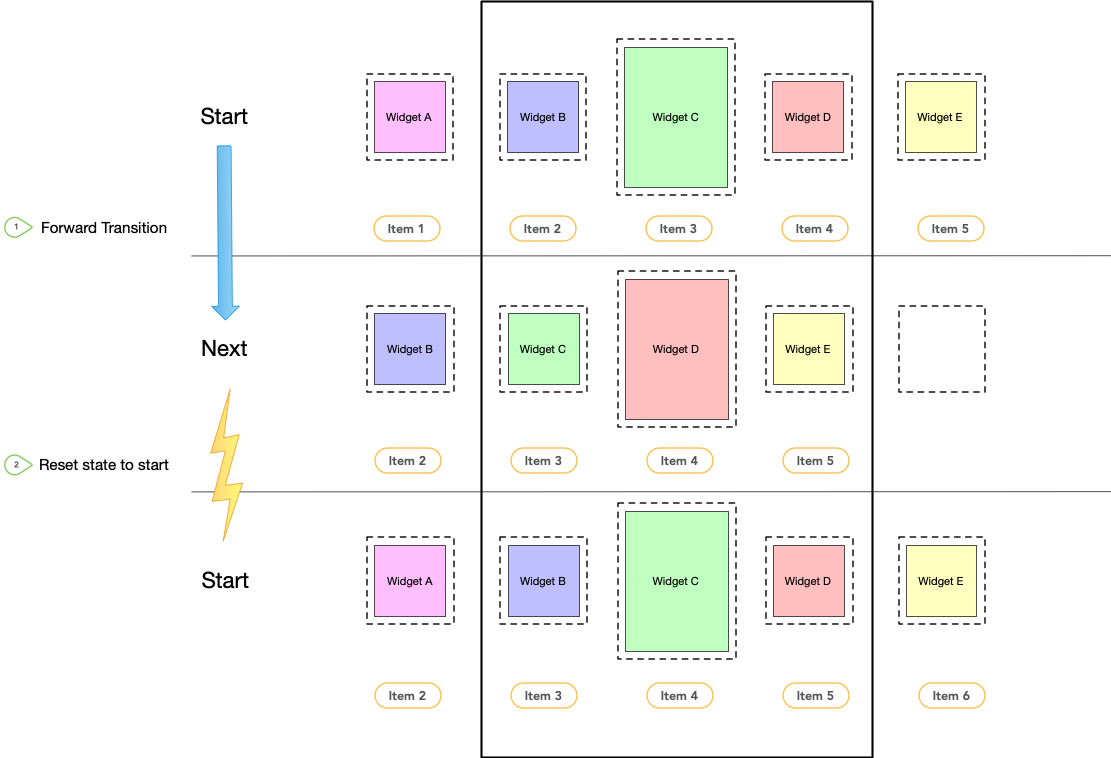
好了,上面的就是官方文档的内容,相信看了这部分之后你应该就对Carousel是干嘛的有了一个初步的想法,说了这么多,那么要如何通过java代码来实现呢,请继续看后续的部分:
- 首先,我们要再MotionLayout中插入
Carousel,以便后续在java代码中进行调用,还是老样子,先上代码:
<androidx.constraintlayout.helper.widget.Carousel
        android:id="@+id/carousel"
        android:layout_width="wrap_content"
        android:layout_height="wrap_content"
        app:carousel_backwardTransition="@+id/backward"
        app:carousel_firstView="@+id/img1"
        app:carousel_forwardTransition="@+id/forward"
        app:carousel_infinite="true"
        app:carousel_nextState="@+id/next"
        app:carousel_previousState="@+id/previous"
        app:constraint_referenced_ids="img1,img2,img3,img4" />
开始解析:
-
carousel_forwardTransition向前跳转的动画 -
carousel_backwardTransition向后跳转的动画 -
carousel_previousState向前跳转动画完成后对应的状态 -
carousel_nextState:向后跳转动画后对应的状态 -
carousel_infinite:开启无限循环 -
carousel_firstView:老实讲,没太懂,反正放第一个图的id就完事
package com.example.forblog;

import androidx.appcompat.app.AppCompatActivity;
import androidx.constraintlayout.helper.widget.Carousel;

import android.content.Context;
import android.os.Bundle;
import android.view.View;
import android.widget.ImageView;

import kotlin.jvm.JvmOverloads;

public class MainActivity extends AppCompatActivity {


    @Override
    protected void onCreate(Bundle savedInstanceState) {
        super.onCreate(savedInstanceState);
        setContentView(R.layout.activity_main);

        int images[] = {
                R.drawable.img1,
                R.drawable.img2,
                R.drawable.img3,
                R.drawable.img4
        };

        Carousel carousel = findViewById(R.id.carousel);
        carousel.setAdapter(new Carousel.Adapter() {
            @Override
            public int count() {
                // need to return the number of items we have in the carousel
                return 4;
            }

            @Override
            public void populate(View view, int index) {
                if (view instanceof ImageView){
                    ((ImageView) view).setImageResource(images[index]);
                }

                // need to implement this to populate the view at the given index
            }

            @Override
            public void onNewItem(int index) {
                // called when an item is set
            }
        });
    }
}
- 这部分的代码其实就是照套路来就成了,把官方文档中的实现代码贴过来,很容易看明白
count函数里面返回图片总数populate函数里面:需要实现这一点以填充给定索引处的视图(我只是简单的拿过来用,其实这个我没有太理解,但是能模仿着用就成)
当你做到这里,你就可以运行你的程序了,一个完整的轮播图效果就实现了!!!
浅述启动页的实现
当你看完了上面轮播图的实现后,其实想要完成一个启动页的模拟效果,已经很接近啦,只要做一个动画效果,然后让其自动播放,然后在几秒后自动跳转到MainActivity页面就行了
我这里其实就是使用投机的方式,在网上找了一个自动点击页面的代码(设置动画为点击页面后开始),然后在启动页放一个线程,睡眠一段时间后跳转页面就行
详细请见源码https://github.com/lrhzds/MotionLayout_Demo
    <Transition
        motion:constraintSetEnd="@+id/end"
        motion:constraintSetStart="@id/start"
        motion:duration="5000"
        motion:motionInterpolator="cubic(0.09,0.15,0.34,0.86)">
        <KeyFrameSet.../>
        </KeyFrameSet>
        <OnClick motion:clickAction="transitionToEnd" />
    </Transition>
上面的activity_start_scene.xml的部分代码中定义一个点击事件
java代码如下,实例化了一个单击事件AutoTouch(),当页面加载时,会启动一个线程,先睡眠6秒(这段时间其实就是启动页动画的时间),6秒后会自动跳转到主界面,这样就能完成一个伪启动页的效果
public class AutoTouch {

    public void autoClickPos(final double x1, final double y1, final double x2, final double y2) {
        new Thread(new Runnable() {
            @Override
            public void run() {
                try {
                    Thread.sleep(500);
                } catch (Exception e) {
                    e.printStackTrace();
                }
                System.out.println("=========");
                String[] order = {"input", "swipe", "" + x1, "" + y1, "" + x2, "" + y2,};
                try {
                    new ProcessBuilder(order).start();
                } catch (Exception e) {
                    e.printStackTrace();
                }
            }
        }).start();
    }
setContentView(R.layout.activity_start);
        AutoTouch autoTouch = new AutoTouch();
        autoTouch.autoClickPos(300,300,300,300);

        Thread t= new Thread(new Runnable() {

            @Override
            public void run() {
                //1:休眠6S
                try {
                    Thread.sleep(6000);
                } catch (InterruptedException e) {
                    e.printStackTrace();
                }

                //进入主页面
                Intent it=new Intent(StartActivity.this,
                        MainActivity.class);
                startActivity(it);
            }
        });
        //2:启动这个子线程
        t.start();
插入gif图

如果对上面的gif图的插入有兴趣的话可以继续看后续的内容,如果没有那本篇博客的内容就到此结束啦,感谢您的观看!!!
//GIF
    implementation 'pl.droidsonroids.gif:android-gif-drawable:1.2.15'
只要导入上面的库,然后在activity里面直接使用就行
<pl.droidsonroids.gif.GifImageView
        android:id="@+id/gifImv1"
        android:layout_width="200dp"
        android:layout_height="200dp"
        android:layout_weight="1"
        android:scaleType="fitXY"
        android:src="@drawable/d320c53c8d16cda0b7431627e897d2b2"
        app:layout_constraintBottom_toBottomOf="@id/g7"
        app:layout_constraintLeft_toLeftOf="@id/g3"
        app:layout_constraintRight_toRightOf="@id/g4"
        app:layout_constraintTop_toTopOf="@id/g7" />
官方文档
参考链接
作者:林睿航
原文链接



![[Android]Logcat调试](https://img-blog.csdnimg.cn/a98798faf3ca46eb8f6cbd786c1e2e22.png)

![[附源码]Python计算机毕业设计SSM开放性实验室网上预约管理(程序+LW)](https://img-blog.csdnimg.cn/7e29bbe36163462f9f8d66ccf66bc744.png)

