1.前言
在【如何用Nginx代理MySQL连接,并限制可访问IP】一文中,我们实现了通过Nginx代理MySQL连接,并限制了指定IP才能通过Nginx进行连接,以提高数据安全性。
该场景适用于根据具体的IP地址来进行访问限制,假如我们要上线一个新的功能,但是只想在某些地区进行小规模的测试,就无能为力了。

我们可以通过添加第三方模块ngx_http_geoip2_module来实现,其实Nginx也提供了ngx_http_geoip_module,至于我们为什么不使用它,我们后续揭晓。
2.限制指定IP
我们先来回顾一下,如何通过指定IP来进行访问限制。
Nginx提供了ngx_http_access_module和ngx_stream_access_module模块,前者针对http请求,后者针对stream连接,它们的指令非常简单,仅包含allow和deny指令,唯一区别就是作用域不同。
我们这里就以ngx_http_access_module模块为例。
1)allow
该指令设置指定的IP允许访问。可以和deny指令配合使用
作用域:http, server, location, limit_except
语法:allow address | CIDR | unix: | all;
示例:
# 允许192.168.110.1访问
allow 192.168.110.1;

# 允许192.168.110.1到192.168.255.254
allow 192.168.110.0/16;

# 允许192.168.110.1到192.168.110.254
allow 192.168.110.0/24;

# 允许所有的IP访问
allow all;
2)deny
该指令设置指定的IP禁止访问。可以和allow指令配合使用。
作用域:http, server, location, limit_except
语法:deny address | CIDR | unix: | all;
# 禁止192.168.110.1访问
deny 192.168.110.1;

# 禁止192.168.110.1到192.168.255.254
deny 192.168.110.0/16;

# 禁止192.168.110.1到192.168.110.254
deny 192.168.110.0/24;

# 禁止所有的IP访问
deny all;
3)配置示例
禁止所有的IP访问,192.168.110.100除外。
http {
	server {
		listen 80;
		server_name localhost;
		allow 192.168.110.100;
		deny all;
	}
}
🔔Tips:如果指定了allow,需要配合deny使用,否则就是允许所有的IP地址访问。
3.限制国家/城市
前面我们提到了Nginx也提供了ngx_http_geoip_module来实现根据国家/城市进行访问限制。
官当文档:https://nginx.org/en/docs/http/ngx_http_geoip_module.html

从上图可以得知该模块需要maxmind的数据库,并且格式为.dat,那好,我们来看看maxmind提供的数据,如下图:

其格式为.mmdb,与该模块的数据格式不匹配,因此我们使用第三方模块ngx_http_geoip2_module。
下载地址:https://github.com/leev/ngx_http_geoip2_module/archive/refs/heads/master.zip
3.1 安装maxminddb library
首先,我们需要安装用于读取.mmdb的文件的依赖。
apt install libmaxminddb0 libmaxminddb-dev mmdb-bin
3.2 构建模块
对于添加第三方模块,我们需要在configure时使用--add-module来实现。例如:
./configure --sbin-path=/usr/local/nginx/nginx --conf-path=/usr/local/nginx/nginx.conf --pid-path=/usr/local/nginx/nginx.pid --with-stream --add-module=/home/stone/nginx-1.22.1/module/ngx_http_geoip2_module
其余步骤,可参照【Nginx基本命令&不停机版本升级】一文进行,这里不再赘述。
3.3 GEOIP数据下载
下载地址(需注册账号):https://dev.maxmind.com/geoip/geolite2-free-geolocation-data
国家库:

城市库:

通过解压缩得到GeoLite2-Country.mmdb和GeoLite2-City.mmdb数据库文件。
3.4 配置
3.4.1 初体验
在进行配置之前,我们先通过第一步安装的依赖库来体验一下。
mmdblookup --file /usr/local/nginx/GeoLite2-City.mmdb --ip 183.195.99.161
可以看到,其识别出这是一个来自上海的IP地址。

3.4.2 配置示例
接下来,我们开始配置。
http {
	include       mime.types;
	default_type  application/octet-stream;

	# 自定义日志格式
	log_format geoip '$http_x_forwarded_for_temp - $remote_user [$time_local] - $request - $status - $geoip2_country_name_en - $geoip2_city_name_en';

	geoip2 /usr/local/nginx/GeoLite2-Country.mmdb {
		auto_reload 5m;
		$geoip2_metadata_country_build metadata build_epoch;
		$geoip2_country_code source=$http_x_forwarded_for_temp country iso_code;
		$geoip2_country_name_en source=$http_x_forwarded_for_temp country names en;
		$geoip2_country_name_zh source=$http_x_forwarded_for_temp country names zh-CN;
	}

	geoip2 /usr/local/nginx/GeoLite2-City.mmdb {
		auto_reload 5m;
		$geoip2_city_name_en source=$http_x_forwarded_for_temp city names en;
		$geoip2_city_name_zh source=$http_x_forwarded_for_temp city names zh-CN;
	}

	server {

		listen       80;
		server_name  localhost;

		access_log logs/geoip.log geoip;
		default_type text/html;
		# 正则匹配取反
		if ($geoip2_city_name_en !~ 'Shanghai'){
			return 403 "<h1>Forbidden!</h1><p>You don't have permission to access the URL on this server.</p>";
		}

		location / {
			return 200 '<p>Real IP:  $http_x_forwarded_for_temp</p><p>Country:  $geoip2_country_name_en</p><p>City:  	$geoip2_city_name_en</p>';
		}
	}
}
🔔Tips:由于我们这里没有外网环境,因此使用$http_x_forwarded_for_temp变量来模拟,只需在请求头中加入X-Forwarded-For-Temp字段即可。实际环境还是使用$http_x_forwarded_for变量用来获取请求的真实IP。
3.4.3 实战
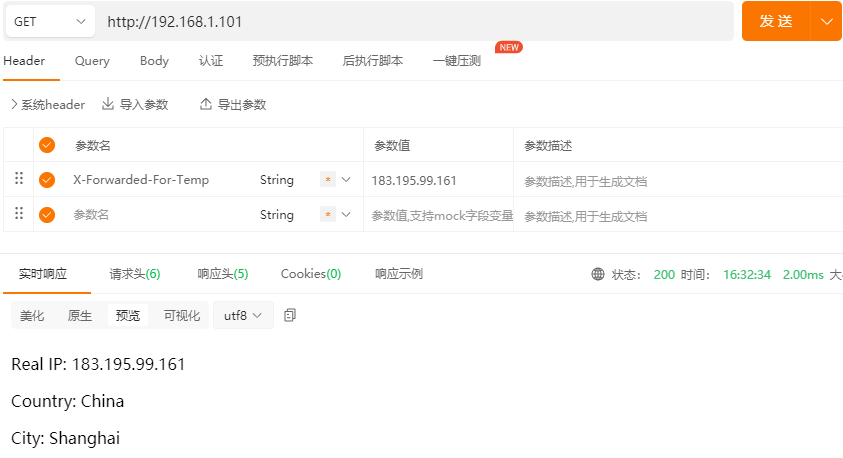
1)发起请求,X-Forwarded-For-Temp=183.195.99.161,上海IP,响应码200。
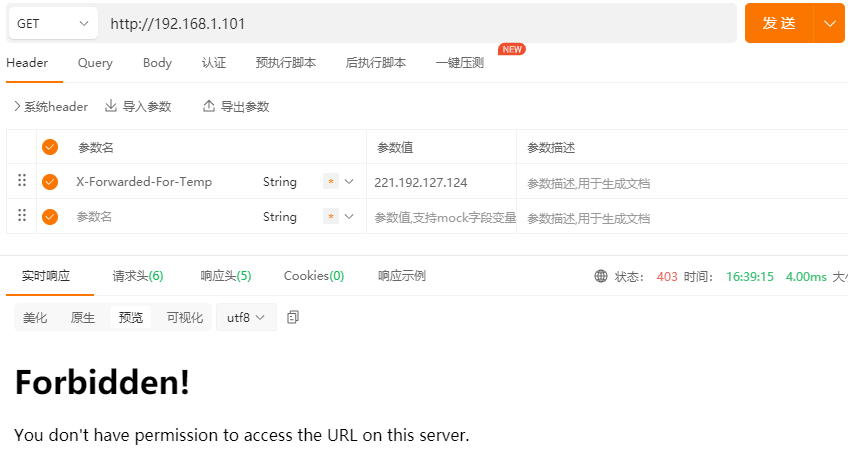
2)发起请求,X-Forwarded-For-Temp=221.192.127.124,唐山IP,响应码403。
3)日志记录:

以上就是Nginx限制可访问IP的全部内容,Nginx是多模块化的,还有很多高级功能,我们后面继续探索。


