文章目录
- Webpack4 应用
- 处理CSS文件
- 使用css-loader和style-loader内联CSS
- 安装
- 配置webpack.config.js
- 编写源代码
- 编译打包
- 使用css-loader和mini-css-extract-plugin外部链接CSS
- 安装
- 配置webpack.config.js
- 编译打包
- 处理图片
- 使用file-loader处理CSS图片
- 安装file-loader
- 配置webpack.config.js
- 编译打包
- 使用html-withimg-loader处理HTML图片
- 安装html-withimg-loader
- 配置webpack.config.js
- 编译打包
- 使用file-loader处理JS图片
- 配置webpack.config.js
- 编写index.js处理JS图片
- 编译打包
- 使用url-loader处理图片
- 安装url-loader
- 配置webpack.config.js
- 编译打包
- webpack-dev-server
- 安装webpack-dev-server
- 配置package.json
- 执行命令
Webpack4 应用
处理CSS文件
使用css-loader和style-loader内联CSS
-
css-loader将 CSS 文件转换成 JavaScript 模块,并解析其中的依赖关系。在模块构建完成后,webpack 会生成对应的 CSS 代码,并插入到 HTML 文件中。 -
style-loader将解析完成的 CSS 代码注入到 HTML 文件的<head>中,通过<style>标签内联样式,使页面可以渲染样式。
安装
// 安装webpack
npm install --save-dev webpack-cli@3.3.12 webpack@4.44.1
// 安装html插件
npm install --save-dev html-webpack-plugin@4.3.0
// 安装css-loader
npm install --save-dev css-loader@4.1.1
// 安装style-loader
npm install --save-dev style-loader@1.2.1
配置webpack.config.js
const path = require("path");
const HtmlWebpackPlugin = require("html-webpack-plugin");

module.exports = {
  mode: "development",
  entry: "./src/index.js",
  output: {
    path: path.resolve(__dirname, "dist"),
    filename: "[name].js",
  },
  module: {
    rules: [
      {
        test: /\.css$/,
        use: ["style-loader", "css-loader"],
      },
    ],
  },
  plugins: [
    new HtmlWebpackPlugin({
      template: "./index.html",
      filename: "index.html",
    }),
  ],
};
编写源代码
新建 index.html 文件,并写入:
<!DOCTYPE html>
<html lang="en">
  <head>
    <meta charset="UTF-8" />
    <meta http-equiv="X-UA-Compatible" content="IE=edge" />
    <meta name="viewport" content="width=device-width, initial-scale=1.0" />
    <title>Document</title>
  </head>
  <body>
    <p>index</p>
  </body>
</html>
新建 src/index.css 文件,并写入:
body {
    background-color: red;
}
新建 src/index.js 文件,并写入:
import "./index.css";
编译打包
npm run webpack
编译完成后如下:
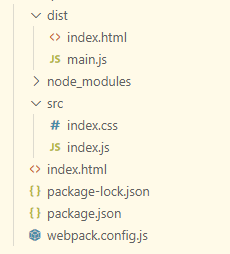
打开dist/index.html 可以看到CSS样式被内联到里面了。
使用css-loader和mini-css-extract-plugin外部链接CSS
mini-css-extract-plugin插件可以将CSS代码提取成单独的文件,然后通过<link>标签引入到HTML中。
安装
npm install --save-dev mini-css-extract-plugin@0.9.0
配置webpack.config.js
const path = require("path");
const HtmlWebpackPlugin = require("html-webpack-plugin");
const MiniCssExtractPlugin = require("mini-css-extract-plugin");

module.exports = {
  mode: "development",
  entry: "./src/index.js",
  output: {
    path: path.resolve(__dirname, "dist"),
    filename: "[name].js",
  },
  module: {
    rules: [
      {
        test: /\.css$/,
        use: [MiniCssExtractPlugin.loader, "css-loader"],
      },
    ],
  },
  plugins: [
    new HtmlWebpackPlugin({
      template: "./index.html",
      filename: "index.html",
    }),
    new MiniCssExtractPlugin({
      filename: "css/[name].css",
    }),
  ],
};
编译打包
执行命令:
npm run webpack
编译完后生成如下:
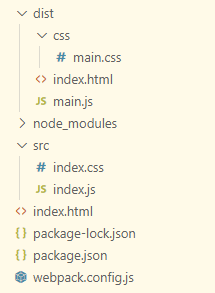
处理图片
使用file-loader处理CSS图片
安装file-loader
npm install --save-dev file-loader@6.0.0
配置webpack.config.js
const path = require("path");
const HtmlWebpackPlugin = require("html-webpack-plugin");
const MiniCssExtractPlugin = require("mini-css-extract-plugin");

module.exports = {
  mode: "development",
  entry: "./src/index.js",
  output: {
    path: path.resolve(__dirname, "dist"),
    filename: "[name].js",
  },
  module: {
    rules: [
      {
        test: /\.css$/,
        use: [
          {
            loader: MiniCssExtractPlugin.loader,
            options: {
              publicPath: "../",
            },
          },
          "css-loader",
        ],
      },
      {
        test: /\.(png|jpe?g|gif)$/,
        use: {
          loader: "file-loader",
          options: {
            name: "img/[name].[ext]",
          },
        },
      },
    ],
  },
  plugins: [
    new HtmlWebpackPlugin({
      template: "./index.html",
      filename: "index.html",
    }),
    new MiniCssExtractPlugin({
      filename: "css/[name].css",
    }),
  ],
};
编译打包
执行命令:
npm run webpack
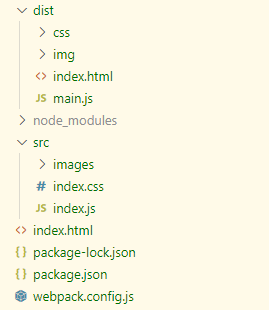
编译完后生成如下:
使用html-withimg-loader处理HTML图片
安装html-withimg-loader
npm install --save-dev html-withimg-loader@0.1.16
配置webpack.config.js
const path = require("path");
const HtmlWebpackPlugin = require("html-webpack-plugin");

module.exports = {
  mode: "development",
  entry: "./src/index.js",
  output: {
    path: path.resolve(__dirname, "dist"),
    filename: "[name].js",
  },
  module: {
    rules: [
      {
        test: /\.(png|jpe?g|gif)$/,
        use: {
          loader: "file-loader",
          options: {
            name: "img/[name].[ext]",
            esModule: false,
          },
        },
      },
      {
        test: /\.(htm|html)$/,
        loader: "html-withimg-loader",
      },
    ],
  },
  plugins: [
    new HtmlWebpackPlugin({
      template: "./index.html",
      filename: "index.html",
    }),
  ],
};
编译打包
执行命令:
npm run webpack
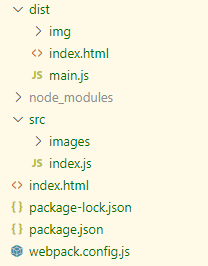
编译完后生成如下:
使用file-loader处理JS图片
配置webpack.config.js
const path = require("path");
const HtmlWebpackPlugin = require("html-webpack-plugin");
const MiniCssExtractPlugin = require("mini-css-extract-plugin");

module.exports = {
  mode: "development",
  entry: "./src/index.js",
  output: {
    path: path.resolve(__dirname, "dist"),
    filename: "[name].js",
  },
  module: {
    rules: [
      {
        test: /\.css$/,
        use: [
          {
            loader: MiniCssExtractPlugin.loader,
            options: {
              publicPath: "../",
            },
          },
          "css-loader",
        ],
      },
      {
        test: /\.(png|jpe?g|gif)$/,
        use: {
          loader: "file-loader",
          options: {
            name: "img/[name].[ext]",
          },
        },
      },
    ],
  },
  plugins: [
    new HtmlWebpackPlugin({
      template: "./index.html",
      filename: "index.html",
    }),
    new MiniCssExtractPlugin({
      filename: "css/[name].css",
    }),
  ],
};
编写index.js处理JS图片
import "./index.css";

import img from "./images/a.jpg";

console.log(img); // img/a.jpg

let imgEl = document.createElement("img");
imgEl.src = img;
document.body.appendChild(imgEl);
编译打包
执行命令:
npm run webpack
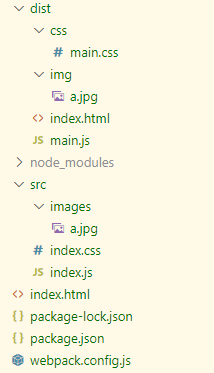
编译完后生成如下:
使用url-loader处理图片
url-loader可以讲图片文件转换为Base64字符串,并嵌入打包后的JS文件中,可以减少网页请求次数。
使用url-loader时,它会先比较文件大小,如果文件小于限制值则转Base64,如果大于限制值则使用file-loader处理。
安装url-loader
npm install --save-dev url-loader@4.1.0
配置webpack.config.js
const path = require("path");
const HtmlWebpackPlugin = require("html-webpack-plugin");

module.exports = {
  mode: "development",
  entry: "./src/index.js",
  output: {
    path: path.resolve(__dirname, "dist"),
    filename: "[name].js",
  },
  module: {
    rules: [
      {
        test: /\.(htm|html)$/,
        loader: "html-withimg-loader",
      },
      {
        test: /\.(png|jpe?g|gif)$/,
        use: {
          loader: "url-loader",
          options: {
            name: "img/[name].[ext]",
            esModule: false,
            limit: 10 * 1024, // 文件10KB以下转为base64
          },
        },
      },
    ],
  },
  plugins: [
    new HtmlWebpackPlugin({
      template: "./index.html",
      filename: "index.html",
    }),
  ],
};
编译打包
执行命令:
npm run webpack
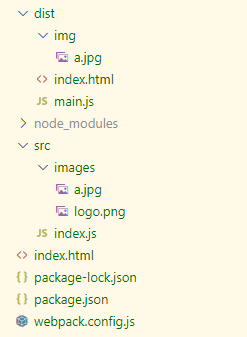
编译完后生成如下:
webpack-dev-server
webpack-dev-server是Webpack提供的一个开发服务器,它在本地启动一个服务器,并且实时监听项目文件的变化,在文件发生变化时自动重新编译,并重新刷新浏览器。开发者可以通过webpack-dev-server来在本地快速开发运行Webpack项目,它大大提升了前端开发效率。
安装webpack-dev-server
npm install --save-dev webpack-dev-server@3.11.0
配置package.json
{
  "name": "use_webpack-dev-server",
  "version": "1.0.0",
  "description": "",
  "main": "index.js",
  "scripts": {
    // 打包命令
    "webpack": "webpack",
    // 开发阶段
    "dev": "webpack-dev-server --open chrome"
  },
  "keywords": [],
  "author": "",
  "license": "ISC",
  "devDependencies": {
    "css-loader": "^4.1.1",
    "html-webpack-plugin": "^4.3.0",
    "mini-css-extract-plugin": "^0.9.0",
    "webpack": "^4.44.1",
    "webpack-cli": "^3.3.12",
    "webpack-dev-server": "^3.11.0"
  }
}
执行命令
npm run dev
执行命令后,就可以热更新修改代码,所生成的代码都在内存中不会保持在本地磁盘。





![[PyTorch][chapter 33][卷积神经网络]](https://img-blog.csdnimg.cn/980da0adf08d44c599ceb86255c190dd.png)
