什么是Cube Map
在开始立方体贴图之前,我们先简单了解下cube map。
cube map 包含了六个纹理,分别表示了立方体的六个面;
相较二维的纹理使用坐标uv来获取纹理信息,这里我们需要使用三维的方向向量来获取纹理信息(一些地方称为法线 normal,但我认为方向向量更合理)。
Cube Map可以用于:
- 正方体表面贴图
- 用于环境贴图(反射贴图),模拟镜面反射结果
- 天空盒
什么是立方体贴图
故名思意,将cube map的六个纹理分别贴到立方体的六个面上,就算立方体贴图。效果如下:
- 纹理图

- 立方体贴图
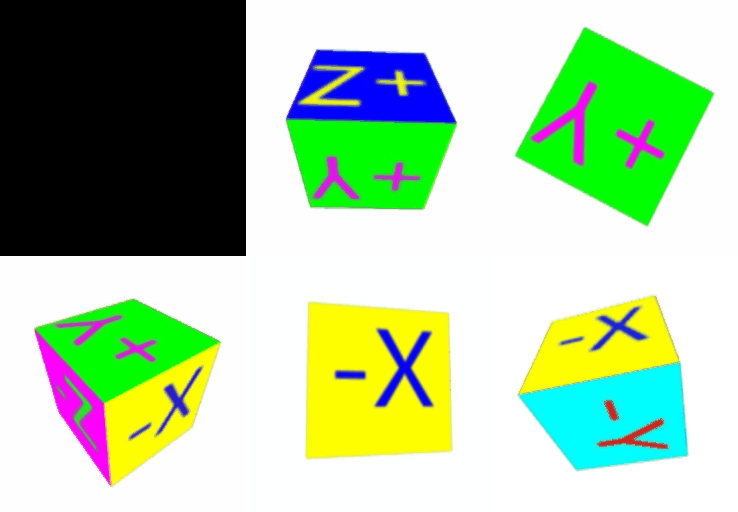
我们下面从两个部分来进行讲解
- 使用文本生成对应的纹理图
- 使用cubemap将对应的纹理分别贴到立方体的六个面上
生成立方体纹理
- 纹理图效果如下

- 关键代码(使用canvas生成对应的图片)
function generateFace(ctx, faceColor, textColor, text){
    const {width, height} = ctx.canvas;
    ctx.fillStyle = faceColor;
    ctx.fillRect(0, 0, width, height);
    ctx.font = `${width * 0.7}px sans-serif`;
    ctx.textAlign = 'center';
    ctx.textBaseline = "middle";
    ctx.fillStyle = textColor;
    ctx.fillText(text, width / 2, height / 2);
}
- 关键代码(组织数据,获得图片,并使用html显示)
const ctx = document.createElement("canvas").getContext("2d");

ctx.canvas.width = 128;
ctx.canvas.height = 128;

const faceInfos = [
    { faceColor: '#F00', textColor: '#0FF', text: '+X' },
    { faceColor: '#FF0', textColor: '#00F', text: '-X' },
    { faceColor: '#0F0', textColor: '#F0F', text: '+Y' },
    { faceColor: '#0FF', textColor: '#F00', text: '-Y' },
    { faceColor: '#00F', textColor: '#FF0', text: '+Z' },
    { faceColor: '#F0F', textColor: '#0F0', text: '-Z' },
];

faceInfos.forEach((faceInfo) => {
    const { faceColor, textColor, text } = faceInfo;
    generateFace(ctx, faceColor, textColor, text);

    ctx.canvas.toBlob((blob => {
        const img = new Image();
        img.src = URL.createObjectURL(blob);
        document.body.appendChild(img);
    }))
})
}
完整代码
<!DOCTYPE html>
<html lang="en">
<head>
    <meta charset="UTF-8">
    <title>CubeMap</title>
</head>
<body>
<script>

    function main(){
        const ctx = document.createElement("canvas").getContext("2d");

        ctx.canvas.width = 128;
        ctx.canvas.height = 128;

        const faceInfos = [
            { faceColor: '#F00', textColor: '#0FF', text: '+X' },
            { faceColor: '#FF0', textColor: '#00F', text: '-X' },
            { faceColor: '#0F0', textColor: '#F0F', text: '+Y' },
            { faceColor: '#0FF', textColor: '#F00', text: '-Y' },
            { faceColor: '#00F', textColor: '#FF0', text: '+Z' },
            { faceColor: '#F0F', textColor: '#0F0', text: '-Z' },
        ];

        faceInfos.forEach((faceInfo) => {
            const { faceColor, textColor, text } = faceInfo;
            generateFace(ctx, faceColor, textColor, text);

            ctx.canvas.toBlob((blob => {
                const img = new Image();
                img.src = URL.createObjectURL(blob);
                document.body.appendChild(img);
            }))
        })
    }

    function generateFace(ctx, faceColor, textColor, text){
        const {width, height} = ctx.canvas;
        ctx.fillStyle = faceColor;
        ctx.fillRect(0, 0, width, height);
        ctx.font = `${width * 0.7}px sans-serif`;
        ctx.textAlign = 'center';
        ctx.textBaseline = "middle";
        ctx.fillStyle = textColor;
        ctx.fillText(text, width / 2, height / 2);
    }

    main()

</script>
</body>
</html>
将纹理贴到立方体
关键代码说明
1. 创建gl
const canvas = document.querySelector("#canvas");
const gl = canvas.getContext("webgl");
2. 初始化片元着色器和顶点着色器
const V_SHADER_SOURCE = '' +
    'attribute vec4 a_position;' +
    'uniform mat4 u_matrix;' +
    'varying vec3 v_normal;' +
    'void main(){' +
    'gl_Position = u_matrix * a_position;' +
    'v_normal = normalize(a_position.xyz);' +
    '}'

const F_SHADER_SOURCE = '' +
    'precision mediump float;' +
    'varying vec3 v_normal;' +
    'uniform samplerCube u_texture;' +
    'void main(){' +
    'gl_FragColor = textureCube(u_texture, normalize(v_normal));' +
    '}'

if (!initShaders(gl, V_SHADER_SOURCE, F_SHADER_SOURCE)){
	console.log('Failed to initialize shaders.');
	return;
}
3. 配置attribute信息a_position
// 获取a_position
const positionLocation = gl.getAttribLocation(gl.program, "a_position");

// 创建数据buffer 并绑定pisitions数据
const positionBuffer = gl.createBuffer();
gl.bindBuffer(gl.ARRAY_BUFFER, positionBuffer);
gl.bufferData(gl.ARRAY_BUFFER, positions, gl.STATIC_DRAW);

// 开启顶点属性 并设置其对应的属性 从而从数据buffer中获取对应的数据
gl.enableVertexAttribArray(positionLocation);
const size = 3;
const type = gl.FLOAT;
const normalize = false;
const stride = 0;
const offset = 0;
gl.vertexAttribPointer(positionLocation, size, type, normalize, stride, offset);
4. 配置uniform信息u_texture
// 创建纹理对象 并绑定到 cube_map
const texture = gl.createTexture();
gl.bindTexture(gl.TEXTURE_CUBE_MAP, texture);

// 生成纹理图片 并调用 gl.texImage2D进行绑定
const ctx = document.createElement("canvas").getContext("2d");

ctx.canvas.width = 128;
ctx.canvas.height = 128;

const faceInfos = [
    { target: gl.TEXTURE_CUBE_MAP_POSITIVE_X, faceColor: '#F00', textColor: '#0FF', text: '+X' },
    { target: gl.TEXTURE_CUBE_MAP_NEGATIVE_X, faceColor: '#FF0', textColor: '#00F', text: '-X' },
    { target: gl.TEXTURE_CUBE_MAP_POSITIVE_Y, faceColor: '#0F0', textColor: '#F0F', text: '+Y' },
    { target: gl.TEXTURE_CUBE_MAP_NEGATIVE_Y, faceColor: '#0FF', textColor: '#F00', text: '-Y' },
    { target: gl.TEXTURE_CUBE_MAP_POSITIVE_Z, faceColor: '#00F', textColor: '#FF0', text: '+Z' },
    { target: gl.TEXTURE_CUBE_MAP_NEGATIVE_Z, faceColor: '#F0F', textColor: '#0F0', text: '-Z' },
];

faceInfos.forEach((faceInfo) => {
    const { target, faceColor, textColor, text } = faceInfo;
    generateFace(ctx, faceColor, textColor, text);

    // Upload the canvas to the cube map face.
    const level = 0;
    const internalFormat = gl.RGBA;
    const format = gl.RGBA;
    const type = gl.UNSIGNED_BYTE;
    gl.texImage2D(target, level, internalFormat, format, type, ctx.canvas);

})

// 生成cubemap纹理 并进行传递
gl.generateMipmap(gl.TEXTURE_CUBE_MAP);
gl.texParameteri(gl.TEXTURE_CUBE_MAP, gl.TEXTURE_MIN_FILTER, gl.LINEAR_MIPMAP_LINEAR);
const textureLocation = gl.getUniformLocation(gl.program, "u_texture");
gl.uniform1i(textureLocation, 0);
5. 动态更新uniform信息u_matrix
// 获取每一帧的时间差
time *= 0.001;
const deltaTime = time - then;
then = time;

// 计算沿x y 轴的旋转角度
modelXRotationRadians += -0.7 * deltaTime;
modelYRotationRadians += -0.4 * deltaTime;

// 计算投影矩阵
const aspect = gl.canvas.clientWidth / gl.canvas.clientHeight;
const projectionMatrix =
    m4.perspective(fieldOfViewRadians, aspect, 1, 2000);

// 计算相机矩阵
const cameraPosition = [0, 0, 2];
const up = [0, 1, 0];
const target = [0, 0, 0];
const cameraMatrix = m4.lookAt(cameraPosition, target, up);

// 获取view矩阵
const viewMatrix = m4.inverse(cameraMatrix);

// 计算得到vp矩阵
const viewProjectionMatrix = m4.multiply(projectionMatrix, viewMatrix);

// 返回有旋转角度的 vp矩阵
let matrix = m4.xRotate(viewProjectionMatrix, modelXRotationRadians);
return m4.yRotate(matrix, modelYRotationRadians);
6. 开始绘制
const matrixLocation = gl.getUniformLocation(gl.program, "u_matrix");

function drawScene(time){
    gl.viewport(0, 0, gl.canvas.width, gl.canvas.height);
    gl.enable(gl.CULL_FACE);
    gl.enable(gl.DEPTH_TEST);

    gl.clear(gl.COLOR_BUFFER_BIT | gl.DEPTH_BUFFER_BIT);

    gl.useProgram(gl.program);

    // 动态更新矩阵信息
    gl.uniformMatrix4fv(matrixLocation, false, updateMatrix(time));

    // Draw the geometry.
    gl.drawArrays(gl.TRIANGLES, 0, 6 * 6);

    requestAnimationFrame(drawScene);
}
效果

完整代码
<!DOCTYPE html>
<html lang="en">
<head>
    <meta charset="UTF-8">
    <title>CubeMap</title>
</head>
<body>
<script src="https://webglfundamentals.org/webgl/resources/m4.js"></script>
<canvas id="canvas" style="height: 256px; width: 246px"></canvas>
<script>
    const V_SHADER_SOURCE = '' +
        'attribute vec4 a_position;' +
        'uniform mat4 u_matrix;' +
        'varying vec3 v_normal;' +
        'void main(){' +
        'gl_Position = u_matrix * a_position;' +
        'v_normal = normalize(a_position.xyz);' +
        '}'

    const F_SHADER_SOURCE = '' +
        'precision mediump float;' +
        'varying vec3 v_normal;' +
        'uniform samplerCube u_texture;' +
        'void main(){' +
        'gl_FragColor = textureCube(u_texture, normalize(v_normal));' +
        '}'

    function main(){
        // Get A WebGL context
        /** @type {HTMLCanvasElement} */
        const canvas = document.querySelector("#canvas");
        const gl = canvas.getContext("webgl");
        if (!gl) {
            return;
        }

        if (!initShaders(gl, V_SHADER_SOURCE, F_SHADER_SOURCE)){
            console.log('Failed to initialize shaders.');
            return;
        }

        const matrixLocation = gl.getUniformLocation(gl.program, "u_matrix");

        setGeometry(gl, getGeometry());

        setTexture(gl)


        function radToDeg(r) {
            return r * 180 / Math.PI;
        }

        function degToRad(d) {
            return d * Math.PI / 180;
        }

        const fieldOfViewRadians = degToRad(60);
        let modelXRotationRadians = degToRad(0);
        let modelYRotationRadians = degToRad(0);

        // Get the starting time.
        let then = 0;

        requestAnimationFrame(drawScene);

        function drawScene(time){
            gl.viewport(0, 0, gl.canvas.width, gl.canvas.height);
            gl.enable(gl.CULL_FACE);
            gl.enable(gl.DEPTH_TEST);

            gl.clear(gl.COLOR_BUFFER_BIT | gl.DEPTH_BUFFER_BIT);

            gl.useProgram(gl.program);


            gl.uniformMatrix4fv(matrixLocation, false, updateMatrix(time));

            // Draw the geometry.
            gl.drawArrays(gl.TRIANGLES, 0, 6 * 6);

            requestAnimationFrame(drawScene);
        }

        function updateMatrix(time){
            time *= 0.001;
            const deltaTime = time - then;
            then = time;

            modelXRotationRadians += -0.7 * deltaTime;
            modelYRotationRadians += -0.4 * deltaTime;
            // Compute the projection matrix
            const aspect = gl.canvas.clientWidth / gl.canvas.clientHeight;
            const projectionMatrix =
                m4.perspective(fieldOfViewRadians, aspect, 1, 2000);

            const cameraPosition = [0, 0, 2];
            const up = [0, 1, 0];
            const target = [0, 0, 0];

            // Compute the camera's matrix using look at.
            const cameraMatrix = m4.lookAt(cameraPosition, target, up);

            // Make a view matrix from the camera matrix.
            const viewMatrix = m4.inverse(cameraMatrix);

            const viewProjectionMatrix = m4.multiply(projectionMatrix, viewMatrix);

            let matrix = m4.xRotate(viewProjectionMatrix, modelXRotationRadians);
            return m4.yRotate(matrix, modelYRotationRadians);
        }

    }

    function generateFace(ctx, faceColor, textColor, text){
        const {width, height} = ctx.canvas;
        ctx.fillStyle = faceColor;
        ctx.fillRect(0, 0, width, height);
        ctx.font = `${width * 0.7}px sans-serif`;
        ctx.textAlign = 'center';
        ctx.textBaseline = "middle";
        ctx.fillStyle = textColor;
        ctx.fillText(text, width / 2, height / 2);
    }

    /**
     * create a program object and make current
     * @param gl GL context
     * @param vShader  a vertex shader program (string)
     * @param fShader   a fragment shader program(string)
     */
    function initShaders(gl, vShader, fShader){
        const program = createProgram(gl, vShader, fShader);
        if (!program){
            console.log("Failed to create program");
            return false;
        }

        gl.useProgram(program);
        gl.program = program;

        return true;
    }

    /**
     * create a program object and make current
     * @param gl GL context
     * @param vShader  a vertex shader program (string)
     * @param fShader   a fragment shader program(string)
     */
    function createProgram(gl, vShader, fShader){
        const vertexShader = loadShader(gl, gl.VERTEX_SHADER, vShader);
        const fragmentShader = loadShader(gl, gl.FRAGMENT_SHADER, fShader);

        if (!vertexShader || !fragmentShader){
            return null;
        }

        const program = gl.createProgram();
        if (!program){
            return null;
        }

        gl.attachShader(program, vertexShader);
        gl.attachShader(program, fragmentShader);

        gl.linkProgram(program);

        const linked = gl.getProgramParameter(program, gl.LINK_STATUS);
        if (!linked){
            const error = gl.getProgramInfoLog(program);
            console.log('Failed to link program: ' + error);
            gl.deleteProgram(program);
            gl.deleteShader(vertexShader);
            gl.deleteShader(fragmentShader);
        }
        return program;
    }

    /**
     *
     * @param gl GL context
     * @param type  the type of the shader object to be created
     * @param source    shader program (string)
     */
    function loadShader(gl, type, source){
        const shader = gl.createShader(type);
        if (shader == null){
            console.log('unable to create shader');
            return null;
        }

        gl.shaderSource(shader, source);

        gl.compileShader(shader);

        const compiled = gl.getShaderParameter(shader, gl.COMPILE_STATUS);
        if (!compiled){
            const error = gl.getShaderInfoLog(shader);
            console.log('Failed to compile shader: ' + error);
            gl.deleteShader(shader);
            return null;
        }

        return shader;
    }


    function getGeometry(){
        return new Float32Array(
            [
                -0.5, -0.5, -0.5,
                -0.5, 0.5, -0.5,
                0.5, -0.5, -0.5,
                -0.5, 0.5, -0.5,
                0.5, 0.5, -0.5,
                0.5, -0.5, -0.5,

                -0.5, -0.5, 0.5,
                0.5, -0.5, 0.5,
                -0.5, 0.5, 0.5,
                -0.5, 0.5, 0.5,
                0.5, -0.5, 0.5,
                0.5, 0.5, 0.5,

                -0.5, 0.5, -0.5,
                -0.5, 0.5, 0.5,
                0.5, 0.5, -0.5,
                -0.5, 0.5, 0.5,
                0.5, 0.5, 0.5,
                0.5, 0.5, -0.5,

                -0.5, -0.5, -0.5,
                0.5, -0.5, -0.5,
                -0.5, -0.5, 0.5,
                -0.5, -0.5, 0.5,
                0.5, -0.5, -0.5,
                0.5, -0.5, 0.5,

                -0.5, -0.5, -0.5,
                -0.5, -0.5, 0.5,
                -0.5, 0.5, -0.5,
                -0.5, -0.5, 0.5,
                -0.5, 0.5, 0.5,
                -0.5, 0.5, -0.5,

                0.5, -0.5, -0.5,
                0.5, 0.5, -0.5,
                0.5, -0.5, 0.5,
                0.5, -0.5, 0.5,
                0.5, 0.5, -0.5,
                0.5, 0.5, 0.5,

            ]);

    }
    // Fill the buffer with the values that define a cube.
    function setGeometry(gl, positions) {
        const positionLocation = gl.getAttribLocation(gl.program, "a_position");

        const positionBuffer = gl.createBuffer();
        gl.bindBuffer(gl.ARRAY_BUFFER, positionBuffer);
        gl.bufferData(gl.ARRAY_BUFFER, positions, gl.STATIC_DRAW);

        gl.enableVertexAttribArray(positionLocation);
        const size = 3;
        const type = gl.FLOAT;
        const normalize = false;
        const stride = 0;
        const offset = 0;
        gl.vertexAttribPointer(positionLocation, size, type, normalize, stride, offset);

    }


    function setTexture(gl){

        // Create a texture.
        const texture = gl.createTexture();
        gl.bindTexture(gl.TEXTURE_CUBE_MAP, texture);

        const ctx = document.createElement("canvas").getContext("2d");

        ctx.canvas.width = 128;
        ctx.canvas.height = 128;

        const faceInfos = [
            { target: gl.TEXTURE_CUBE_MAP_POSITIVE_X, faceColor: '#F00', textColor: '#0FF', text: '+X' },
            { target: gl.TEXTURE_CUBE_MAP_NEGATIVE_X, faceColor: '#FF0', textColor: '#00F', text: '-X' },
            { target: gl.TEXTURE_CUBE_MAP_POSITIVE_Y, faceColor: '#0F0', textColor: '#F0F', text: '+Y' },
            { target: gl.TEXTURE_CUBE_MAP_NEGATIVE_Y, faceColor: '#0FF', textColor: '#F00', text: '-Y' },
            { target: gl.TEXTURE_CUBE_MAP_POSITIVE_Z, faceColor: '#00F', textColor: '#FF0', text: '+Z' },
            { target: gl.TEXTURE_CUBE_MAP_NEGATIVE_Z, faceColor: '#F0F', textColor: '#0F0', text: '-Z' },
        ];

        faceInfos.forEach((faceInfo) => {
            const { target, faceColor, textColor, text } = faceInfo;
            generateFace(ctx, faceColor, textColor, text);

            // Upload the canvas to the cube map face.
            const level = 0;
            const internalFormat = gl.RGBA;
            const format = gl.RGBA;
            const type = gl.UNSIGNED_BYTE;
            gl.texImage2D(target, level, internalFormat, format, type, ctx.canvas);

        })

        gl.generateMipmap(gl.TEXTURE_CUBE_MAP);
        gl.texParameteri(gl.TEXTURE_CUBE_MAP, gl.TEXTURE_MIN_FILTER, gl.LINEAR_MIPMAP_LINEAR);
        // Tell the shader to use texture unit 0 for u_texture
        const textureLocation = gl.getUniformLocation(gl.program, "u_texture");
        gl.uniform1i(textureLocation, 0);
    }

    main()

</script>
</body>
</html>
参考资料
WebGL Cubemaps
WebGL Environment Maps (reflections)
WebGL SkyBox
![[PyTorch][chapter 33][卷积神经网络]](https://img-blog.csdnimg.cn/980da0adf08d44c599ceb86255c190dd.png)
